
Use and Care Manual


Digital Video Recorder
49
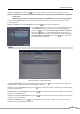
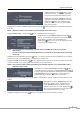
Schedule
Figure 34: Notification – Schedule setup screen.
You can add and edit notification schedules on this screen. Highlight the + and press the button to add a schedule.
Highlighting the boxes under the Column heading and pressing the
button allows you to edit the information in
those boxes.
The Day box allows you to select the days that the notification schedule will be active. The choices are: Sun, Mon,
Tue, Wed, Thu, Fri, Sat, M~F, Hol and All.
The Range box allows you to set the time that the notification schedule will be active in 15-minute increments from
00:00 to 24:00.
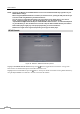
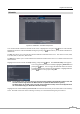
Highlight the desired box under the Notify heading, and press the
button. The Schedule Notify menu appears.
You can toggle the entire list On and Off by highlighting Notification and
pressing the
button. You can toggle the individual items On and Off
by highlighting that item and pressing the
button. Highlight OK and
press the
button to accept your changes.
NOTE: For the Notify action, the notify item you select should be enabled in the Notification setup screen and
the DVR should be registered in the REVO Remote Pro (Remote Administration System).
The Notify action for system events you made in the System Event setup screen on the System menu
will not be affected by your Notification Schedule settings.
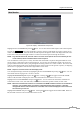
Highlight the box beside Summary Email Interval and select the interval that you want the DVR to send a summary
email. The DVR will send an email containing a summary of events detected during the preset interval.