
Use and Care Manual
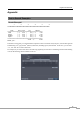


User’s Manual
78
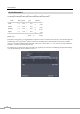
④ The DVR information window displays the time information of recorded data on the remote DVR and login
information of REVO Remote.
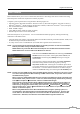
⑤ Click the to blur, sharpen, equalize and interpolate playback images. Click the to
zoom out or zoom in the recorded image. Click the
to adjust the brightness of the
recorded images.
NOTE: Image processing works only in the pause mode.
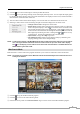
⑥ The playback function buttons include fast backward, pause, play, fast forward, go to the first
image, go to the previous image, go to the next image, and got to the last image.
⑦ Click the screen format to select the desired display mode.
⑧ Click the to enter the time-lapse search mode which allows you to search for recorded data
by time and then play back images found within the time parameters. The Timetable window
located at the bottom displays the time information for the image of the date selected on the
calendar. If more than one video stream in the same time range, you can select the video stream
you want to search. Clicking a specific time displays the image recorded at that time on the
screen. Selecting the
allows you to display an image from a specific time.
⑨ Click the to enter the event search mode which allows you to search for event log entries using specific
conditions and play back the images associated with those event entries.
⑩ Click the to save any video clip of recorded data as an executable file, or click the to save the current image
in a bitmap or JPEG file format. Click the
to print the current image on a printer connected to your computer.
NOTE: When saving as an executable file, selecting the Exclude Player option will reduce the file size and its
saving time. You can download the Player program to review the video clip by entering the following
information in the address field of Internet Explorer.
– When using the EZLink: “http://DVRNS server address/DVR Name/ClipPlayer.exe” (The DVRNS
server address and the DVR name registered on the DVRNS server)
– When not using the EZLink: “http://IP address:port number/ClipPlayer.exe” (The DVR IP address and
the REVO Remote port number (default: 12088) set in the Network setup screen (REVO Remote tab))
⑪ Click the to set up the image drawing mode and OSD display. You can adjust the display speed by changing
the image drawing mode, and select OSD information to be displayed on the screen.
⑫ Click the to reload the recording data.
⑬ The Timetable displays recorded data of the selected camera by time (in hour segments).
⑭ Selecting a camera on the screen and clicking the right mouse button displays the text menu screen.
Change Camera Title: Changes the camera name.
Enable Audio: Plays audio while playing back recorded video that has recorded
audio. (Single-Screen Layout Only)
Aspect Ratio: Changes the image aspect ratio.
Anti-Aliasing Screen: Enhances image display quality by eliminating stair
stepping (aliasing) effects in the enlarged image.
NOTE: A camera name change in the Web Search mode does not affect the camera name set up on the remote
site. Leaving the Camera Title blank causes the camera name set up on the remote site to display.