DNR Super High Resolution Day & Night Color Camera 3-AXIS INDOOR DOME CAMERA
WARNINGS AND CAUTIONS: TO REDUCE THE RISK OF FIRE OR ELECTRIC SHOCK, DO NOT EXPOSE THIS PRODUCT TO RAIN OR MOISTURE. DO NOT INSERT ANY METALLIC OBJECTS THROUGH THE VENTILATION GRILLS OR OTHER OPENINGS ON THE EQUIPMENT. CAUTION: CAUTION CAUTION: TO REDUCE THE RISK OF ELECTRIC SHOCK, DO NOT REMOVE COVER(OR BACK). NO USER-SERVICEABLE PARTS INSIDE. REFER SERVICING TO QUALIFIED SERVICE PERSONNEL.
FCC COMPLIANCE STATEMENT FCC INFORMATION : THIS EQUIPMENT HAS BEEN TESTED AND FOUND TO COMPLY WITH THE LIMITS FOR A CLASS A DIGITAL DEVICE, PURSUANT TO PART 15 OF THE FCC RULES. THESE LIMITS ARE DESIGNED TO PROVIDE REASONABLE PROTECTION AGAINST HARMFUL INTERFERENCE WHEN THE EQUIPMENT IS OPERATED IN A COMMERCIAL ENVIRONMENT.
IMPORTANT SAFEGUARDS 1. Read these instructions. 2. Keep these instructions. 3. Heed all warnings. 4. Follow all instructions. 5. Do not use this apparatus near water. 6. Clean only with dry cloth. 7. Do not block any ventilation openings. Install in accordance with the manufacturer's instructions. 8. Do not install near any heat sources such as radiators, heat registers, stoves, or other apparatus (including amplifiers) that product heat.. 9.
INTRODUCTION The camera provides high-quality images using SONY 1/3" CCD and digital signal processing LSIs. Features: 1/3" Super HADII CCD for an image of high sensitivity Digital Wide Dynamic Range(Xtended Dynamic Range) Excellent picture quality 560 lines of resolution 0.25 Lux(Color), 0.01 Lux(B/W)@ F1.
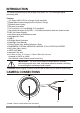
2. Color Lead Wire & Color Display Label COLOR DESCRIPTION RED AC24V/DC12V WHITE AC24V/DC12V YELLOW ALARM OUT GRAY DN EXT-IN BLACK&WHITE DN EXT-OUT BLACK GND REMINDER: Never aim the camera directly into the sun. COLOR DESCRIPTION GND AC24V/DC12V DN EXT-IN ALARM OUT AC24V/DC12V DN EXT-OUT RED GRAY WHITE BLACK YELLOW BLACK&WHITE 3. Power : power source from a DC 12V / AC24V +/- 10% Use Certified/Listed Class 2 power supply transformer only.
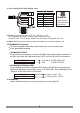
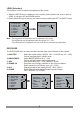
PACKAGE CONTENTS The package contains the following. Camera in Housing Instruction Manual (This Document) Accessory Kit for Installing Drilling guide label 1 1 1 1 INSTALLATION 1. Make mounting holes and cable hole in the place (ceiling or wall) to which this dome camera is installed using the Drilling guide label. Liner Dome body 2. To remove dome cover, turn the dome body counterclockwise until locators reach end of travel and pull off.
MOUNTING HOUSING TO AN ELECTRICAL BACK BOX The housing can also be mounted on a 4s electrical box. Electrical box Rubber Washers(4x) Torx screws UNC 8-32 x 0.75 3. Attach the housing to the ceiling using suitable fasteners, M6x35 tapping screws are supplied only use if they are suitable. Turn the housing to right direction about 16 degrees to lock in place. 4. The assembly of the dome body and liner is in reverse order of disassembly.
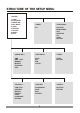
STRUCTURE OF THE SETUP MENU 1.LENS 2.EXPOSURE 3.WHITE BAL 4.DAY NIGHT 5.3DNR 6.SPECIAL 7.ADJUST 8.RESET 9.
LENS (Selection) This function is used to adjust the brightness of the screen. 1. When the SETUP menu is displayed on the screen, please position the arrow to point to 'LENS' by using the UP and DOWN buttons. 2. Please select the type of the lens you wish to use by pressing the LEFT or RIGHT button. ► 1. LENS 2. EXPOSURE 3. WHITE BAL 4. DAY NIGHT 5. 3DNR 6. SPECIAL 7. ADJUST 8. RESET 9.
WHITE BAL The screen color can be adjusted by using the WHITE BALANCE function. 1) AWB 2) AWC -> SET Wide range auto white balance mode. Please press the ENTER button while the camera is directed at a piece of while paper to obtain the optimum state under current illumination. if the environment including the light source is changed, you have to adjust the while balance again. Manual mode. User can change R and B Gain manually.
1. LENS 2. EXPOSURE 3. WHITE BAL 4. DAY NIGHT ► 5. 3DNR 6. SPECIAL 7. ADJUST 8. RESET 9. EXIT 3DNR DC ► LEVEL RETURN AWB AUTO ON IIIIIIIIIIIIIIIIII RET 50 SPECIAL 1) CAM TITLE A B C CAM TITLE 0123456789 ABCDEFGHIJK LMNOPQRSTUV WXYZ ►→←↑↓() ‾–_ ▌/ = & : ~ ‚ " ←→ CLR POS END 2) D-EFFECT FREEZE MIRROR ← : Move to left → : Move to right CLR : Erase all characters POS : Move the position of title END : Save and End Select the real or still mode. Reverse the screen in 3 modes selection.
4) PRIVACY AREA SELECT AREA DISPLAY LEFT/RIGHT WIDTH TOP/BOTTOM HEIGHT COLOR 1. LENS 2. EXPOSURE 3. WHITE BAL 4. DAY NIGHT 5. 3DNR ► 6. SPECIAL 7. ADJUST 8. RESET 9. EXIT DC AWB AUTO ON Select MASK area number. Select MASK ON/OFF Adjust the location of the MASK area with boundary LEFT and RIGHT Adjust width of MASK area Adjust the location of the MASK area with boundary TOP and BOTTOM. Adjust height of MASK area Select MASK color. (0~15) SPECIAL 1.CAM TITLE 2.D-EFFECT 3.MOTION ► 4.PRIVACY 5. SYNC 6.
LENS ADJUSTMENT (OPTIONAL VARIFOCAL LENS) T Field of view: Adjust setting from Telephoto (T) to wide (W) field of View. N W Focus: Adjust lens focus from near (N) to infinity ( ). Adjust Focus Adjust Angular Field View DC AUTO IRIS LENS Image Size Focal Length Aperture Ratio Angular Field of View 2.6~6mm 4-9mm 2.8~12mm (Aspherical ) 1/3" CCD 1/3" CCD 1/3" CCD 2.6-6.0mm 1 : 1.6 5% 5% DIAGONAL 2.6mm : 134.6o o 6mm : 59.2 4.0-9.0mm 1 : 1.6 5% 2.8-12mm 5% DIAGONAL 4mm : 92.4o o 9mm : 39.
SPECIFICATIONS MODEL Power NTSC D-WDR General Connector & etc. PAL Power source Power consumption 3.0 Watts 1/3" SONY Super HADII CCD Image sensor Total pixels 795(H) x 596(V) 811(H) x 508(V) Scanning system 2:1 interlace Scanning frequency 15.734KHz(H) x 59.94Hz(V) 15.625KHz(H) x 50Hz(V) Sync. system Internal / Line lock Resolution 560 TV lines Color(0.25 Lux), B/W(0.01 Lux) (SENS UP : OFF) Min. illumination 1.
EXTERNAL DIMENSION Dimensions 113 145.6 100 (Inner) 59 Unit: mm Window Size 0.1 in. (2.5mm thick), impact-resistant P.C (LEXAN) 3.93 in. (10cm) diameter Cable Entry One 1" opening holes Weight - Unit: Shipping: 0.99 lb. (0.45kg) 1.41 lb. (0.