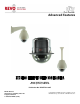
Advanced Features Model RESPTZ37-SERIES 24 VAC @ 60 Hz, 12W NTSC Publication No. RESPTZ37-10AF REVO America 700 Freeport Parkway Suite 100 Coppell, TX 75019 1-800-6250-REVO (7386) Copyright © 2013 REVO America Inc. All rights reserved. REVO and its logo are trademarks of REVO America Inc.
REVO America wants to ensure that your installation experience is a safe and pleasant one. Please read and adhere to these Safety Instructions. CAUTION Model RESPTZ37-1 is an indoor camera and not meant for outdoor use. Models RESPTZ37-1HSC and RESPTZ37-1HSW are provided with weather-proof enclosures and can be used outdoors. 1. Never perform any installation procedure or open the camera case with power on. 2. Pay attention to the Warnings and Cautions in the instructions.
FCC Compliance FCC INFORMATION: This equipment has been tested and found to comply with the limits for a Class A digital device, pursuant to Part 15 of the FCC rules. These limits are designed to provide reasonable protection against harmful interference when the equipment is operated in a commercial environment.
Contents Contents .......................................................................................................................................... 2 Advanced Features ......................................................................................................................... 3 The Advanced Features on the Dome Menu ............................................................................... 5 Titling ..................................................................................
Advanced Features This manual describes the advanced features of your RESPTZ37-Series dome camera. The User manual should be followed for installation and basic setup of the camera. This manual assumes that the camera has been installed and set up using that manual, RESPTZ37-10B. In this manual you will learn how to set up Auto Scans, Presets, Patterns, Tours, Alarms, Area Titles and Privacy Zones.
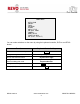
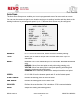
DOME MENU AUTO SCAN PRESET TOUR PATTERN ALARM AREA TITLE PRIVACY ZONE CAMERA DOME SETUP FUNCTION RUN EXIT(ESC TO EXIT) You can make selections on the menu by using the keyboard controller, DVR or non REVO device. Function Keyboard Controller Key Call the on-screen menu utility MENU Navigate through the menu items. Joystick up or down Go into the sub-menu items. Joystick left or right Change value. Enter the editing title mode.
The Advanced Features on the Dome Menu Auto Scan Enables you to set a programmed scan of an area such as a room. You can set the camera to start in one location and move to another location and then back to the starting location at a preconfigured speed. Up to 17 different Auto Scans may be configured. Preset Enables you to create presets, which are programmed video scenes, based on specific pan, tilt, zoom, and focus settings.
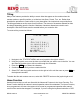
Titling Many of the features provide the ability to create titles that appear on the monitor when the camera reaches a specific position, or to label an Auto Scan, Preset, Tour, etc. Rather than describe the procedure to create a title in every description, the instructions are provided here. The titling procedures are the same for all functions. The amount of characters allowed for titles do change depending upon the function. Maximum characters allowed are noted in each description.
to manually zoom, pan or tilt the camera to view something of interest, setting the Home Function to one of the functions will program the camera to automatically begin one of the following: None/Tour/Pattern/Auto Scan/Preset, after a user defined waiting time. The Home Function is located on the DOME SETUP menu, which is described in the User manual. To access the Home function, navigate to the DOME SETUP menu and select the HOME FUNCTION SETUP menu.
Auto Scan The Auto Scan Setup menu enables you to set a programmed scan of an area such as a room. You can set the camera to start in one location and move to another location and then back to the starting location at a preconfigured speed. Up to 17 different Auto Scans may be configured. AUTO SCAN SETUP NUMBER : 01 TITLE : A01 MODE : NORMAL SPEED : 5 STEP START ANGLE : ----- ----END ANGLE : ----- ----SCAN DIR : CCW SWAP : OFF DWELL : 03 SEC SAVE AND EXIT(ESC TO CANCEL) NUMBER: 01-17.
DWELL: Sets the time that the camera stays on the start and end points before scanning. 01-99 seconds. To create an Auto Scan, proceed as follows: 1. Press the SCAN key on the keyboard controller to enter the Auto Scan menu directly. Or press the MENU key to display the main menu on the monitor. Scroll to Auto Scan and move the joystick to the right. 2. Select NUMBER and set the desired number by moving the joystick to the left or right. 3. Select TITLE and twist the joystick to enter the title edit mode.
Preset The Preset Setup menu enables you to create presets, which are programmed video scenes, based on specific pan, tilt, zoom, focus and auto exposure settings. For example, one preset may be a close up view of the back door, while another may be a window in the same room. Think of a preset as if you had a camera in your hand and were taking photos of various objects in a room. Up to 240 Presets may be programmed for this camera.
* : position has the Preset █ : current cursor position Follow the steps below to store the Preset positions: 1. Press the PRST key on the keyboard controller to enter the Preset menu directly. Or press the MENU key to display the main menu on the monitor. Scroll to Preset and move the joystick to the right. 2. Select a blank Preset position by moving the joystick to one of the rows that start with 00, 02, 04, etc. Any position that has an asterisk displayed already has a preset stored. 3.
MOTION SETUP SENSITIVITY : 12 POSITION : ALL DELAY : 00 SEC OUTPUT : OFF HOLD TIME : 03 SEC EXIT(ESC TO EXIT) SENSITIVITY: 01-15. the higher the number, the greater the sensitivity. POSITION: ALL/CENTER. Selects detection across the entire frame or just the center. DELAY: 0-5 sec. Sets the time the camera will wait before triggering an alarm. OUTPUT: OFF/OUT1. Alarm output on or off. HOLD TIME: 03-99 sec. Sets the time the alarm will be held. 7.
12. To delete a Preset, press the HOME key at programmed Preset position. 13. To store the Preset that you created as the default programmed action for the camera, navigate to the DOME SETUP menu and select HOME FUNCTION. Refer to the Home Function procedure. TIP You can use a keyboard controller shortcut to create Presets on the fly. Keyboard Controller Shortcut 1. Select a scene that you want to save as a Preset. 2. Press number 1 to 120 on the numeric keypad. 3. Press CTRL then press PRST.
Pattern A Pattern is a user defined set of camera movements. Think of it as a recorder that records the movements you make with the camera. You can move the camera by panning, tilting and zooming to create the sequence that you want to monitor and then save it. This menu enables you to create and save Patterns. Up to 8 patterns may be created. PATTERN SETUP (CTRL KEY) NO TITLE SEC PERCENT 01 : P01 000 00.0% 02 : P02 000 00.0% 03 : P03 000 00.0% 04 : P04 000 00.0% 05 : P05 000 00.0% 06 : P06 000 00.
4. 5. 6. 7. key, until 500 seconds are used for each Pattern or 100% of all movements are used by the 8 Patterns. Select SAVE AND EXIT and move the joystick to the right. Press the ESC key to exit the program without saving. To create a unique title, refer to the Titling procedure. To delete a Pattern, press the HOME key at any programmed Pattern position. To store the Pattern that you created as the default programmed action for the camera, navigate to the DOME SETUP menu and select HOME FUNCTION.
Tour This menu provides the options for creating Tours, which are a programmed sequence of events for the camera. A tour can include Presets, Auto Scans, Patterns and even other Tours and save them. Up to 8 Tours may be programmed. Each tour has 42 positions that may be programmed. By using second-level tours, a single tour can include over 300 functions.
1. Press the MENU key to display the main menu on the monitor. Scroll to Tour and move the joystick to the right to enter the Tour menu. Or, just press the TOUR key on the keyboard. 2. Select NUMBER and set the desired Tour number by pushing the joystick to the left or right. 3. Choose a blank position to be programmed by moving the joystick up, down, right, or left. 4. To add a stored Preset, twist the joystick then the stored Preset number displays. 5.
2. By pressing the PRST key, the camera will move to the stored Preset view and the cursor will move to the DWELL time field. 3. After changing the Dwell time, press the PRST key and the cursor will move to the Preset number. To assign functions other than Preset in the Tour when the function key is not available: 1. Use the joystick to move the cursor to a stored Preset position. 2. Press the CTRL key to change the Preset number to another function such as: Auto Scan, Pattern, Tour, Preset). 3.
IN: Input. Specifies the type of input that will trigger the alarm. NO: Normally open. NC: Normally closed. OFF: Ignore input. OUT: Output (OUT1 thru OUT4). Specifies the alarm output from the camera. ON: TTL output on. OFF: No output HLD: Hold. Alarm will be held for programmed time (03 to 99 seconds). LATCH: ON: Alarm message will remain on the screen even though alarm input is deactivated. OFF: Alarm message will disappear on the screen after programmed hold time when alarm input is deactivated.
NOTE If you disable Alarms by the DIP switch setting (S4-1), the following menu displays. ALARM SETUP ALARM DISABLED CHECK THE DIP SWITCH EXIT(ESC TO EXIT) Area Title The Area Title Setup menu enables you to label up to eight different areas for various camera angles that the camera will view. For example, as shown in the screen below, when the camera points to an angle between 124.3° (PAN), 30.7° (TILT) to 359.5° (PAN), 45.4° (TILT), ABC will be displayed on the screen.
To create area titles, proceed as follows: 1. Select NUMBER and set the desired number by moving the joystick to the left or right. 2. To edit the title, refer to the Titling procedure of the Auto Scan above to edit titles. 3. Select START ANGLE. Hold down the CTRL key while selecting the start position using the joystick. Current panning position will be displayed. Release the CTRL key to complete the selection of the start position. To fine adjust at the 0.
2. Hold down the CTRL key displays the privacy area menu while selecting the position using the joystick. Current position will be displayed. Release the CTRL key to complete the selection of the position. PRIVACY AREA MENU (CTRL KEY) CONTROL NUMBER 001 354.8 344.8 3. Place the cursor at the title field. Twist the joystick to enter the title edit mode. Refer to the Titling procedure. 4. To turn the stored zone On or Off, twist the joystick. 5. Set the method, BLOCK or V.OFF(video off).
Function Run The Function Run Setup menu allows you to quickly execute a function such as Preset, Pattern, Tour or Scan (Auto Scan) from the menu using either a keyboard or a DVR. Select the function from the menu to execute it. Please note that you must have set up the Preset, Pattern, Tour or Auto Scan using the respective menu first. FUNCTION RUN SETUP (CTRL KEY) PRESET PATTERN TOUR SCAN HOME AUTO PAN RELAY OUT EXIT(ESC TO EXIT) : : : : --------- : --- 1.
RELAY OUT SETUP OUT1 : ALARM OUT2 : 1 MIN OUT3 : ALARM OUT4 : 5 MIN EXIT(ESC TO EXIT) Factory Setup FACTORY SETUP TOUR DWELL TIME : 03 SEC ANSWER DELAY : 03 SEC SAVE AND EXIT(ESC TO CANCEL) Press 250 on the numeric keypad and then the PRST key to display this menu. TOUR DWELL TIME: Dwell time between Tours. ANSWER DELAY: Response time of the dome. REVO America www.revoamerica.
Appendix A Shortcut Keys If you are using the REVO America REJCPTZ-1 keyboard controller you can use a shortcut key to perform operations requiring the joystick and/or other keys. Short Cut Key Function PRST Access Preset setup menu. TOUR Access Tour setup menu. PTRN Access Pattern setup menu. SCAN Access Auto Scan setup menu. No.+ CTRL+ PRST Store the current view at the selected number.
13 + ON Dome OSD on 13 + OFF Dome OSD off 14 + ON Dome Area Title Display on 14 + OFF Dome Area Title Display off Short Cut Key Short Cut Key Function Function 15 + ON View Direction on 15 + OFF View Direction off 104 + ON WDR ON 104 + OFF WDR off 150 + ON Image Flip ON 150 + OFF Image Flip off 151 + ON Origin Check 152 + ON Place the camera in the 0° area horizontally.
REVO America www.revoamerica.
REVO America 700 Freeport Parkway Suite 100 Coppell, TX 75019 1-800-6250-REVO (7386) Copyright © 2013 REVO America Inc. All rights reserved. REVO and its logo are trademarks of REVO America Inc.