IMPORTANT SAFEGUARDS 1. Read all of these instructions. 2. Save these instructions for later use. 3. Unplug this monitor from the wall outlet before cleaning. Do not use liquid cleaners or aerosol cleaners. Use a damp cloth for cleaning. 4. Do not use attachments not recommended by the monitor manufacturer as they may cause hazards. 5. Do not use this monitor near water, e.g., near a bathtub, washbowl, kitchen sink, or laundry tub, in a wet basement, or near a swimming pool, etc. 6.
FEDERAL COMMUNICATIONS COMMISSION RADIO FREQUENCY INTERFERENCE STATEMENT NOTE : This equipment has been tested and found to comply with the limits for a Class B digital device, pursuant to Part 15 of the FCC Rules. These limits are designed to provide reasonable protection against harmful interference in a residential installation.
CONTENTS Introduction ............................................................................. 1 Product Features ................................................................. 2 Setup ......................................................................................... 3 Stand Assembling Procedures ............................................ 3 Stnad Disassembling Procedures ......................................... 3 Operation & Adjustment ......................................................
INTRODUCTION This manual explains how to correctly install, operate and get the best performance from your monitor. Please read this user’s guide carefully before installing your monitor, then keep it near your monitor for quick reference. First, please check that the contents of the box corresponds with the following checklist : • TFT LCD monitor • Power cord • 15 pin signal cable • User’s guide • Audio Cable If any item is missing or damaged, please contact your dealer.
PRODUCT FEATURES The monitor is designed for use in a small work area or for those who need more work space on the desk. The convenient and user-friendly on-screen display allows for easy and accurate adjustments of screen size, position and screen color. The monitor complies with the VESA Display Data Channel (DDC) specification for Plug and Play compatibility. Advanced microcircuitry makes setup and configuration fast and effortless.
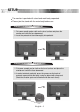
SETUP The monitor is packed with stand and main body separated. Please join the stand with the main body before use. Stand Assembling Procedures 1. Put some smooth pad or cloth on the level surface and place the monitor on it with the face downward. 2. Insert the protrude of stand thoroughly into pedestal. Stnad Disassembling Procedures 1. Put some smooth pad or cloth on the level surface and place the monitor on it with the face downward. 2.
CONNECTING THE 15 PIN SIGNAL CABLE AND POWER CORD ① Turn off the DVR and monitor. ② Connect the 15 pin signal cable to the output port of the DVR and monitor. ③ Connect the audio cable to the output port of the sound DVR. ④ Plug the power cord into the AC receptacle located on the back of the monitor.
OPERATION & ADJUSTMENT CONTROL PANEL 1 POWER Indicator 2 POWER Shows both normal operation and power management status with power indicator light. (*) Moves cursor to the right or low window in the OSD window and increases the value of any selected function. While the OSD screen is off - In case of the model where the speaker is had built-in, you can adjust the volume directly. 3 Switches the monitor on and off.
KEY PROCESS COLOR BRIGHTNESS PICTURE CONTRAST FUNCTION COLOR TEMP. OSD MENU LANGUAGE SOUND Sound icon will be displayed only for Built in speaker model. BRIGHTNESS CONTRAST COLOR TEMP.
HOT KEY When there is no OSD, if you press this AUTO button, you can use the best display performance fit for a current mode. In case of the model where the speaker is had built-in, you can adjust the volume directly before use the OSD menu.
ADJUSTMENT PROCEDURE Perform the Auto tracking No Is the H.SIZE proper? Adjust the CLOCK control. Yes Perform the AUTO POSITION. Is the noise displayed on the screen? Yes Adjust the CLOCK FINE until the screen is cleared.
OSD FUNCTIONS WITH USING PC COLOR BRIGHTNESS Adjust the brightness of image. Adjust the contrast of image, the difference between light and dark areas on the screen. Choose different preset color temperatures or set your COLOR TEMP. own customized color parameters. CONTRAST SHARPNESS Adjust the display image quality. (if the screen proceed to scaling up) PICTURE H. POSITION & Adjust the position of the display horizontally (left or right) and vertically (up or down). V.
OSD MENU OSD H & V POSITION Adjust the OSD position horizontally (left or right) and vertically (up or down). OSD TIME Adjust the display OSD Menu. TRANSLUCENT Adjust the OSD. Transparency ASPECT RATIO Select the aspect ratio. (WIDE/AUTO/4:3) WIDE Regardless of input signal, wide screen output is automatically made. AUTO Screen output is made according to input signal. It's not a defect if black strips are shown on both sides of the screen when 4:3 input signal comes in.
SELF DIAGNOSIS If there is no image, the Self Diagnosis screen will be displayed. Self Diagnosis function checks if the status of the monitor screen is No Signal, Out of range or None support. No Signal screen is displayed when the DSub signal connector is connected but the status of the monitor is on DPMS mode. Out of Range screen is displayed when the applied frequency is under or over normal range.
SPECIFICATIONS <19 inch wide LCD> Panel Synchronization Video Bandwidth Max Resolution Optimal Resolution Colors Display Area PC Input Signal Speaker Plug and Play Power Source Power Consumption Dimension-W x H x D Size Pixel Pitch Viewing Angle Contrast Ratio Brightness Response Time Color Filter Horizontal Vertical Sync Video Max. Output Weight-net/gross Power Saving Tilt Range Operating Temperature 19-inch(48 cm) diagonal 0.2835(H)mm x 0.
FACTORY PRESET TIMINGS VESA MODES Resolution (dots X lines) H.Freq(KHz) V.Freq(Hz) Remark 640 X 480@60Hz 31.5 60 Non-interlaced 640 X 480@72Hz 37.9 72 Non-interlaced 640 X 480@75Hz 37.5 75 Non-interlaced 800 X 600@56Hz 35.2 56 Non-interlaced 800 X 600@60Hz 37.9 60 Non-interlaced 800 X 600@72Hz 48.1 72 Non-interlaced 800 X 600@75Hz 46.9 75 Non-interlaced 1024 X 768@60Hz 48.4 60 Non-interlaced 1024 X 768@70Hz 56.5 70 Non-interlaced 1024 X 768@75Hz 60.
CHANGING THE STAND Removing Original Stand Turn off the monitor and pull out the power cable. Place a cushion or a soft cloth on the floor and put the product on it with the front of the monitor facing the floor. 1. Detach the rear cover of the stand with a screwdriver. 2. Remove the four screws connecting the stand and the body and the stand is disassembled.
ATTACHING THE MONITOR WITH THE ARM-STAND(OPTION) Support stand Surface for stand installation Tighten up screws at the locations indicated by arrows. This monitor’s installation surface is compatible with various kinds of VESA standard stands.
TROUBLESHOOTING Symptom Check Picture is jitterd. Adjust Clock to set the screen position and adjust Clock fine until a noise isn’t displayed. No picture. Check if power switch and DVR power on. Check if the signal cable is correctly connected to the DVR. Check if the pins of D-sub connector are not bent.. POWER LED is not lit. Check if power switch is in the on position. Check if the power cord is correctly connected.. Image is not centered, too small or too large.
MEMO
9978641707