
User Manual


Page 10
STEP 3 Continued: Pairing Microphones to
Fusion Base Station if Necessary
Place the microphone unit into pairing mode by holding the MUTE button down
for seven seconds. The LED will turn solid RED. Release the MUTE button. The
microphone is now in pairing mode.
Within one minute, push and hold the button for the desired channel on the
Base Station (refer to page 5) for seven seconds to enter into pairing mode then
release. The LED for that channel will be solid red until pairing starts, as
indicated by a quick GREEN flash, then switching to flashing RED on both the
microphone and the Base Station (muted audio). Pairing is now complete.
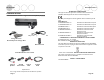
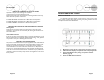
The Fusion Base Station has four or eight indicator LED lights (one for each
microphone) and pairing push buttons on the front panel. When the LED is
flashing GREEN or RED, that channel is active and connected to a wireless
microphone (GREEN is for live audio, RED is for muted). When the LED is OFF,
the channel is inactive (the microphone is out of range or turned off).
Set-Up Guide
Hearing Assistance
Setting the Hearing Assistance Option
All Microphones Hear Audio From the Far End (default)
If an earpiece is plugged into any of the microphones, the user will hear the far
end of the audio only. DIP switch #8 is OFF (page 18).
Hear Audio From Both Far End and Within The Room
If the user needs to hear the audio from both the far end and the other
microphones within the room, he/she must use the microphone paired to
Channel 8 (refer to pairing mode page 9) and the DIP switch #8 must be set to
ON (page 18). Please note that the Room Out RCA plug will no longer
function in this mode; Aux Out will serve as Room Out.
NOTE: The Fusion system must be powered off and back on for any
DIP Switch changes to take effect.
Page 23
Revolabs Fusion™