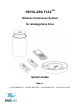
REVOLABS FLX2TM Wireless Conference System for analog phone lines System Guide Models: 10-FLX2-200-POTS 10-FLX2-020-POTS 10-FLX2-002-POTS 10-FLX2-101-POTS
© 2011 REVOLABS, INC. All rights reserved. No part of this document may be reproduced in any form or by any means without express written permission from Revolabs, Inc. Product specifications are subject to change without notice. Revolabs FLX2 System Guide – Analog 10-FLX2SYSGUIDE-EN October 2011 (Rev 1.2.
Introduction Congratulations on your purchase of the Revolabs FLX2TM Wireless Conference Phone. This system utilizes state of the art technology providing high band-width audio and enabling clear, reliable, un-tethered communications with your telephone, PC, mobile device, and video conferencing system. The Revolabs FLX2 Conferencing Phone allows enhanced freedom for telephone and video conferences by allowing independent locations of the microphones and the speaker used during the call.
Contents Introduction ............................................................................................................................................ 3 Safety Warnings ..................................................................................................................................... 3 Contents .................................................................................................................................................... 4 General Information ...............
System Information ...................................................................................................................................... 38 Bluetooth .......................................................................................................................................................... 38 Home .................................................................................................................................................................. 39 Call............
General Information The Revolabs FLX2 Conference Phone includes several components which, in the sum, make up the conferencing phone. The components are the Charger Base, Speaker, Microphones and Dialer (handset).
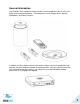
Quick setup for Telephone Conference Calls While all components delivered with the Revolabs FLX2 Conference Phone are partially charged, we recommend charging the Speaker, the Microphones, and the Dialer for at least 8 hours or overnight before starting to use the system. Please note that the Revolabs FLX2 Conference Phone comes with two different power supplies. Please ensure that you are using the correct power supply when connecting the Base Station and the Charger Base.
Making a call To make a conference call, take at least one of the Microphones out of the Charger Base, and take the Dialer out of the Charger Base. You can remove all Microphones and the Speaker if you wish, but this is not required. Use the Dialer to enter the number you want to call, including any leading digits your telephone connection might require. The Speaker and any Microphone that is not in the Charger Base will be active during the call.
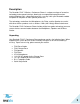
Description The Revolabs FLX2™ Wireless Conference Phone is a unique marriage of innovative technology and ergonomic design, allowing for an unparalleled experience when making telephone calls, video conference calls, or using it with your Bluetooth enabled cell phone or computer to make speaker phone calls. The technology used allows the Microphones, the Dialer, and the Speaker to co-exist with other wireless products such as wireless LANs (802.11b&g) without interference.
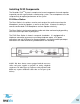
Installing FLX2 Components The Revolabs FLX2TM System is comprised of several components that work together to provide you with a great wireless conferencing system. These components must be setup correctly for optimal performance of the system. FLX2 Base Station The Base Station is the wireless receiver and sender of the audio stream from the Microphones and to the Speaker, as well as to the Dialer. It features the ability to connect two Revolabs FLX Microphones and one Speaker wirelessly.
FLX2 Charger Base The FLX2 Charger Base, shown below, provides charging capabilities for all battery operated system components, including the Dialer, the Speaker, and the Microphones, by allowing them to charge in one simple and organized location. The FLX2 Charger Base is not required while in a conference call, however it can maintain the charge of the FLX Speaker and FLX Dialer while a call is in progress.
FLX Dialer The FLX Dialer equips the user with an intuitive and interactive tool for configuring and operating the FLX System. The Dialer is not only used to make and answer conference calls, but it is also used for configuring the system settings, having a call using the handset, and monitoring the system components. The FLX Dialer, shown below, is composed of several parts such as a color LCD screen, a compilation of buttons, and a microphone and handset speaker.
FLX Speaker The FLX Speaker, shown below, is a wireless active omnidirectional speaker that has been designed and optimized specifically for use with the FLX Conferencing System. The Speaker is equipped with a pairing button on the bottom and 4 LED indicators on the top to display the activity of the Speaker and the mute status of the system. The Speaker can operate in or out of the Charger Base during conference calls.
FLX Microphones The FLX Microphones provide a sleek and unobtrusive form factor allowing for closer proximity to the participants and creating the best audio available to the far end. They are equipped with a button for pairing and muting, an LED indicator to display mute status and battery charge level, and an internal buzzer to warn if the Microphones have lost connection to the Base Station.
Initial Setup After unpacking the FLX2 Conferencing System, there are a few initial setup tasks that must be performed before a call can take place or any system configuration can be changed. Connecting System Cables The FLX2 Base Station and Charger Base each have a power supply that needs to be connected, as shown below. In addition, the Base Station needs to be connected to the telephone network using the provided RJ11 telephone cable before a conference call can be made.
call, as well as the Speaker and Microphones, are controlled by the FLX Dialer. The user can switch between „speaker mode‟ and „handset mode‟ while in a call. Handset Mode Handset mode allows a telephone call to take place through the handset speaker and microphone located in the FLX Dialer. This allows a single user to make and receive a private call. It also provides the ability for the FLX2 System to act as a personal desk phone. The Microphones and Speaker are not used during a handset call.
NOTE: When using the FLX connected through the AUX IN and AUX OUT to another device, only the FLX speaker can be used. All other speakers must be switched off. Any Echo Cancellation provided on the Video Conferencing unit must be switched off. NOTE: For security reasons, Microphones will not send any audio signal to the AUX OUT connector when in the charger. To receive audio signal on the AUX OUT, microphones have to be taken out of the Charger Base.
Answering an Incoming Telephone Call 1. When the FLX2 System identifies an incoming call, it will play the ring tone through the FLX Speaker. If the Dialer is not in the Charger Base it will play a ring tone, too. 2. If your phone line supports caller ID, and the caller has not suppressed their caller ID information, the FLX Dialer will display the caller ID information for the incoming call. 3. A call can be answered in one of three fashions. a.
Ending a Telephone call 1. A call can be ended in two fashions. a. Press the Red „End Call‟ button on the FLX Dialer during a call. b. Place the Dialer in the charger. („Handset mode‟ only) 2. When a call is ended the FLX Dialer will display the phone number and the call duration for 2 seconds. 3. After 2 seconds, the home screen is shown, and system is ready for calls. 4.
Muting a Call 1. In handset mode, the „Mute‟ and „UnMute‟ key will mute/unmute the FLX Dialer microphone, not the wireless Microphones. 2. In speaker mode, the „Mute‟ and „UnMute‟ key will mute/unmute all wireless Microphones. NOTE: If the setting ‘All Mic Mute’ is OFF, the Microphone mute buttons will be locked while the Master Mute is active. The Master Mute can only be deactivated via the FLX Dialer. Once deactivated, the Microphones will return to their previous mute state.
Conference Call 1. Press the „Enter‟ key to access the Active Call Menu and select „Conference‟. 2. Create the second call by selecting Dialer, Contacts, or Recent. 3. Initiate the second call. 4. After the second call has been established, merge the two calls by pressing the green „Call‟ button again. Call Waiting 1. While a call is active and the FLX2 System receives a second call, the Speaker or Dialer will play the call waiting indication tone. 2.
When the Dialer is removed from the Charger Base no change to call activity will take place. If there is no active call, the Dialer will revert to the home screen. Speaker When the Speaker is placed into the charger during a call the Speaker will reboot and enter its charging mode. During the reboot the incoming audio from the conference call will mute until the reboot is complete (approximately 6 seconds). Once the reboot is complete the audio will resume on the speaker.
Bluetooth The FLX2 System is equipped with a Bluetooth interface allowing a call to be placed through a cell phone, computer, or 3rd party Bluetooth device. The FLX Microphones and Speaker then act as the Microphone and Speaker for that call. The FLX2 System only supports the Hands Free Profile for Bluetooth 2.0 or newer. Should the application on the computer, cell phone, or other 3 rd party device require other profiles to be supported, FLX cannot act as the Speaker and Microphone for that application.
Adding a Device 1. Go to the Menu Bluetooth. Select „Discovery Mode‟ to activate Bluetooth and accept Bluetooth Request from other devices. 2. The FLX Dialer displays “This device is visible to other devices in range for 3 minutes” 3. The discovery mode screen will read “System in discoverable Mode, Start Scan From BT Device. System Name: ” 4. Scan for devices from the Bluetooth device you want to connect to the FLX2 System. 5.
Viewing Device Details 1. Go to the Menu Bluetooth. Select „Device List‟. 2. Select desired device and press the „Enter‟ key or the „Select‟ key to view device details 3. Device Information screen is shown with device name, address, BT version, and date/time the device was first connected. Removing a Device 1. Go to the Menu Bluetooth. Select „Device List‟. 2. Select desired device and press the „Enter‟ key or the „Select‟ key. 3. Press the „Option‟ key 4.
Setting Device Trust Level 1. Go to the Menu Bluetooth. Select „Device List‟. 2. Select the desired device and press the „Enter‟ key or the „Select‟ key to view the device details. 3. Press the „Option‟ key and then select „Options…‟. 4. Choose either „Auto-Connect‟ or „Ask‟ depending on the trust level you want to set for the Bluetooth Device. Making a call via Bluetooth 1. With the Bluetooth connection enabled, dial a number from the Bluetooth device.
Video Conference Collaboration The FLX2 System is equipped with balanced analog audio input and output to be connected to 3rd party video or PC conferencing system. This allows the FLX Microphones and Speaker to be used as Microphones and Speaker for the video call. It also provides Acoustic Echo Cancelation and Noise Control to the video call. Connecting a Video Conference System In the advanced audio setting (see page 40), change the Aux Audio setting for Aux Out to MIC.
Mixing the audio signals As discussed earlier, Audio and Video, or Bluetooth and Video calls can be made simultaneously from a FLX system, requiring FLX to mix the audio of the different inputs to go to the different outputs. In the Audio Controls menu, available from the main menu and the Active Call Menu, the Audio Mixer menu is offered. This menu offers three different audio mixer settings, based on the output medium.
FLX2 System Configuration There are many features to the FLX2 System that can be modified and configured using the FLX Dialer. The following is a list of those features and their options.
Recent Calls The Recent Calls call log stores the contact information from calls placed or received, allowing the user to review recent calls, redial a recent call, or store a recent call in the system directory. Recent Call Log 1. Access recent call log by browsing: Menu Recent Calls 2. The recent call list is sorted chronologically with the most recent call at the top 3.
View Recent Call Information 1. Access the recent call log by browsing: Menu Recent Calls or pressing the green „Call‟ button while no call is in progress. 2. You can view a recent call one of two ways: a. In the recent call list, select the entry you want to view, and press the „View‟ key. This displays more information for the recent call you selected. b. In the recent call list, press enter to bring up the Options menu.
Delete Call History 1. Access the recent call log by browsing: Menu Recent Calls or pressing the green „Call‟ button while no call is in progress. 2. In the Recent Call menu, press „Enter‟ to open the Options Menu. 3. In the Options Menu select „Delete Redundant‟ to delete redundant call history information, or select „Delete All Calls‟ to delete all call history information. 4. Press „Yes‟ to delete the information when prompted for confirmation.
Edit a Contact 1. Browse to the Contacts menu: Menu Contacts, scroll to the desired contact, and selects „View‟ to access the contact. 2. The contact screen shows the current name and number. Pressing the „Edit‟ key will open the Edit Contact menu. 3. In the Edit Contact menu, select „Edit Info‟ to edit the selected contact. 4. Edit the name in alphanumeric mode. Pressing „Clear‟ will delete a character to the left of the cursor.
Search for Contact 1. Browse to the Contacts menu: Menu Contacts. 2. Use the keys (0-9) to apply a filter a. Once a key is pressed the title line will read ‟Contact()‟ and display the characters being typed. b. The search string can be up to 5 characters long. c. In this mode the ‟Clear‟ key will delete the last character in the filter field. 3. Only contact items that satisfy the filter will be shown in the contact screen. For example, if „C‟ is entered, any contact name starting with „C‟ will be shown.
Set Speed Dial 1. Browse to the Contacts menu: Menu Contacts, scroll to the desired contact, and selects the „View‟ key to access the contact. 2. The contact view screen shows the current name and number. Pressing the ‟Edit‟ key will open the Edit Contact menu. 3. In the Edit Contact menu select „Set Speed Dial‟. 4. Scroll to the desired speed dial number and press the ‟Set‟ key. 5.
Ringer 1. Browse to the Ringer menu: Menu Audio Controls Ringer. 2. Choose „Ringer Volume‟ in the Ringer Settings menu to adjust the Ringer Volume. 3. Press the up and down buttons to increase and decrease the volume. 4. Choose „Ring Tone‟ in the Ringer Settings menu to select a ring tone. 5. Use the up and down buttons to select a ring tone, and press enter to set the selected ring tone. Equalizer (EQ) 1. Browse to the Equalizer Settings menu: Menu Audio Controls EQ. 2.
Device Status 1. Browse to Device Status: Menu Device Status. 2. The Device Status screen shows status for the Microphones and the Speaker. System Information The following is a list of FLX Dialer menus that allow the user to retrieve system information. System Info 1. Browse to System Info: Menu System Info. 2. About System shows the firmware (FW) bundle version, the System Name, and phone type information. 3. Device Versions shows firmware version for the Speaker (SPK) and Microphones (MIC1, MIC2).
Home When selecting the „Home‟ menu item, the Dialer will go back to displaying the home screen. The same effect can be achieved by pressing the „Return‟ key, or the red „End Call‟ button. Call When selecting „Call‟ in the menu, the Dialer will open the Dialer menu, allowing dialing a number. Setup Setup is divided into a generic area of features that are not password protected and Advanced Setup, which requires a password. Display 1. Browse to the Display menu: Menu Setup Display. 2.
attempt to derive the date and time from the telephone network. Bluetooth, Audio, System Info The menu entries for Bluetooth, Audio, and System Info in the setup menu will open the top level menus of the same name described earlier in this documentation. Advanced Setup The following is a list of advanced configuration settings that are protected by a 4 digit password for administrator access only. The default password is 7386 (revo). This password should be changed by the system administrator.
Mic Audio The „Mic Audio‟ allows controlling the Microphones. 1. If „All Mic Mute‟ is ON, all active Microphones are affected when a mute button is pressed. If one or more active Microphones are outside the Charger Base, pressing the mute button will change the mute status on all Microphones outside of the Charger Base. Microphones in the Charger Base will not be affected and will stay muted at all times.
Aux Audio „Aux Audio‟ is to control the AUX In and AUX Out connections on the base. 1. Aux In ON/OFF and Aux Out ON/OFF allow enabling / disabling the Aux connectors of the FLX phone. 2. Aux In Level allows changing the level of the Aux In signal. 3. Aux Out Level allows changing the level of the Aux Out signal. 4. Aux Out – MIC / LINE allows setting the level of the Aux Out connectors to either Mic level or Line level.
Setting System Name 1. Go to Menu Setup Advanced Setup Admin Settings Set System Name. 2. Change the current System Name to the new name, and press Enter. Reset Defaults 1. Go to Menu Setup Advanced Setup Admin Settings Reset Defaults. 2. Resetting defaults will revert back to factory defaults. Pairing of devices, recent calls, the contacts, and the system name are not affected by this. Set Password 1.
Pairing All FLX2 wireless components are paired before the system is shipped, providing much of the system setup already completed. While pairing should not be required for the system to work, sometimes components can require pairing if a part is shipped separately. The following are instructions on how to pair the wireless components of the system to the FLX2 Conference Phone. All components are paired to the Base, which is the central unit that communicates with all other components.
7. After a short time an overlay will appear on the FLX Dialer saying „Pairing Successful‟, after which the screen should read „SPK 1 Linked‟. 8. If pairing was unsuccessful, the Speaker will show an alternating red -green slow blinking sequence indicating that the pairing failed. The Dialer will display a „Pairing Timeout‟ message. In that case the pairing procedure should be repeated. Microphone 1.
Phone Settings 1. Browse to the Phone Settings menu: Menu Setup Advanced Setup Phone Settings. a. You can change the dialing method by selecting the entry, and then pressing the „Select‟ key. The factory preset is TONE. b. You can set the telephone number of the FLX2 System using the Phone Number setting. Select this entry, type in the number, and press „Enter‟ to capture the telephone number. c. Selecting Hook Flash Time you can change the time for a hook flash to be sent to your network.
1. Hold down the button on the bottom of the Speaker until the LED indicators on the top of the Speaker turn green. Once the LED indicators turn green, release the button and the Speaker will power on and connect to the system. OR 2. Simply return the Speaker to an active Charger Base and it will power on automatically. Microphones On/Off To power off a FLX Microphone, hold down the button located on the Microphone until the LED indicator turns solid red.
connector to 3.5mm unbalanced male connector (some PCs require unbalanced to stereo) All Lifesize Video Codecs All Sony Video Codecs excluding the PCS-HG90 model 07-35MUTODRCA-01 Cable 3.5mm unbalanced male Polycom HDX 7000 & connector to dual RCA connector 8000, QDX 6000, VSX 5000 & 7000(e/s) Video Codecs 07-35MUTORCA-01 Cable 3.
Dialer Link Lost If the FLX Dialer loses connection to the FLX2 Base Station it will display a „connection lost‟ notification on the screen and starts emitting a warning sound. The Dialer should be moved back into range of the Base Station at which point it will reconnect automatically. Base Power Lost If the FLX2 Base Station loses power, it will disconnect all telephone calls, analog audio inputs/outputs and will disconnect from the FLX Dialer, Speaker, and Microphones.
Telephone Interface problems “Line in Use” even though there is no call If you see messages that the telephone line is in use, even though no call is currently in progress, please change the Disconnect setting from OFF to ON (see the section on Phone Settings on page 46). This should resolve this issue. Cannot dial numbers When using FLX on a DSL analog telephone line, the DSL filter needs to be installed. If this is not the case, calls might not go through.
LED Indicators Device LED Indicator Status Microphone in Charger Base Steady Red Charging Steady Green Fully charged Active phone call, both microphones in Charger Base, microphones muted via Master Mute or All Mic Mute is ON Single red flash Double red flash Green flash Off o Active phone call, microphone(s) in Charger Base, microphone is muted.
Device LED Indicator Steady Red Green flash every second Red flash every second Flashing Yellow* – Red – Yellow* – Green Alternating slow Red - Green flash Status Base unmuted o Connected, battery charging, phone call in progress, Master Mute or “All Mic Mute” is ON, all Microphones are muted. o Connected, battery charging, no phone call in progress, Microphone(s) outside of Charger Base, “All Mic Mute” is ON, all Microphones are muted.
Device LED Indicator Flashing Yellow* – Red – Yellow* – Green Alternating slow Red - Green flash Steady Red Groups of five rapid Red flashes Device LED Indicator Long solid on, then a long solid off Double flashes every second Skip every fifth double flash Continuous Fast Flashing Off Status Mute or “All Mic Mute” is ON, all Microphones muted Searching for a connection to the base The speaker will try to re-establish the link for about 5 minutes, then power off.
Technical Specifications Models The Revolabs FLX2 System is available with a variety of configurations to provide the best audio capture in the industry. The following is a list of the available models. All of these models work with analog telephone lines.
Microphones Dimensions Microphones Weight Bandwidth Battery life (talk time) Charge time 94.2 x 24.6mm x 18.5mm (omnidirectional Microphone) 28.6g (omnidirectional Microphone) 80-11,000 Hz from Microphone to Analog OUT. This is reduced for telephone calls based on the bandwidth supported by the phone transport.
Regulatory Information FCC Notice to Users Users are not permitted to make changes or modify the equipment in any way. Changes or modifications not expressly approved by Revolabs, Inc. could void the user‟s authority to operate the equipment. This device complies with Part 15 of the FCC Rules.
Restricted use with certain medical devices Hearing Aids Some devices may interfere with some hearing aids. In the event of such interference, you may want to consult with your hearing aid manufacturer to discuss alternatives. Other Medical Devices If you use any other personal medical device, consult the manufacturer of your device to determine if it is adequately shielded from RF energy. Your physician may be able to assist you in obtaining this information.
E C Declaration of Conformity Manufacturer‟s Name: Manufacturer‟s Address: Revolabs 144 North Road, Suite 3250 Sudbury, MA 01776 U.S.A.
ACTA Part 68 information This equipment complies with Part 68 of the FCC rules and the requirements adopted by the ACTA. On the base of this equipment is a label that contains, among other information, a product identifier in the format US:AAAEQ##TXXXX. If requested, this number must be provided to the telephone company.
Limited Warranty and Limitation of Liability Limited Warranty Revolabs warrants to the end user (“Customer”) that this product will be free from significant defects in workmanship and materials, under normal use and service, for one year from the date of purchase from Revolabs or its authorized reseller provided the customer provides proof of purchase that demonstrates that the product is still within the warranty period and contacts Revolabs customer service, regarding warranty claims, within the warranty
Limitation of Liability TO THE FULL EXTENT ALLOWED BY LAW, REVOLABS EXCLUDES FOR ITSELF AND ITS SUPPLIERS ANY LIABILITY, WHETHER BASED IN CONTRACT OR TORT (INCLUDING NEGLIGENCE), FOR INCIDENTAL, CONSEQUENTIAL, INDIRECT, SPECIAL, OR PUNITIVE DAMAGES OF ANY KIND, OR FOR LOSS OF REVENUE OR PROFITS, LOSS OF BUSINESS, LOSS OF INFORMATION OR DATA, OR OTHER FINANCIAL LOSS ARISING OUT OF OR IN CONNECTION WITH THE SALE, INSTALLATION, MAINTENANCE, USE, PERFORMANCE, FAILURE, OR INTERRUPTION OF ITS PRODUCTS, EVEN IF RE
GPL LICENSED SOFTWARE The following GPL licensed software is used in this product and is subject to the GNU General Public License version 2 (GPLv2) License Agreements included as part of this documentation: uClinux 2.6.26 BusyBox 1.2.2 Source code for this software can be obtained by contacting Revolabs at support@revolabs.com. GNU GENERAL PUBLIC LICENSE Version 2, June 1991 Copyright (C) 1989, 1991 Free Software Foundation, Inc.
Finally, any free program is threatened constantly by software patents. We wish to avoid the danger that redistributors of a free program will individually obtain patent licenses, in effect making the program proprietary. To prevent this, we have made it clear that any patent must be licensed for everyone's free use or not licensed at all. The precise terms and conditions for copying, distribution and modification follow. TERMS AND CONDITIONS FOR COPYING, DISTRIBUTION AND MODIFICATION 0.
itself is interactive but does not normally print such an announcement, your work based on the Program is not required to print an announcement.) These requirements apply to the modified work as a whole. If identifiable sections of that work are not derived from the Program, and can be reasonably considered independent and separate works in themselves, then this License, and its terms, do not apply to those sections when you distribute them as separate works.
If distribution of executable or object code is made by offering access to copy from a designated place, then offering equivalent access to copy the source code from the same place counts as distribution of the source code, even though third parties are not compelled to copy the source along with the object code. 4. You may not copy, modify, sublicense, or distribute the Program except as expressly provided under this License.
consistent application of that system; it is up to the author/donor to decide if he or she is willing to distribute software through any other system and a licensee cannot impose that choice. This section is intended to make thoroughly clear what is believed to be a consequence of the rest of this License. 8.
LIABLE TO YOU FOR DAMAGES, INCLUDING ANY GENERAL, SPECIAL, INCIDENTAL OR CONSEQUENTIAL DAMAGES ARISING OUT OF THE USE OR INABILITY TO USE THE PROGRAM (INCLUDING BUT NOT LIMITED TO LOSS OF DATA OR DATA BEING RENDERED INACCURATE OR LOSSES SUSTAINED BY YOU OR THIRD PARTIES OR A FAILURE OF THE PROGRAM TO OPERATE WITH ANY OTHER PROGRAMS), EVEN IF SUCH HOLDER OR OTHER PARTY HAS BEEN ADVISED OF THE POSSIBILITY OF SUCH DAMAGES.