
Product specifications


8
88
8
Installation
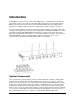
The Executive Base Station is easily installed into a standard 19” AV rack system using the
supplied rack ears and standard rack screws. The equipment requires 110-220V AC, 50-60 Hz,
power. Plug the power cord into an appropriate outlet and turn the circuit breaker-protected power
switch on the back panel to Reset. The GREEN power LED on the front panel will illuminate.
Attach the four diversity antennas (two on each side) and the system mute antenna (SMA male
connector) in the center.
Connections
There are eight mini-phoenix input and output ports on the back panel of the unit providing
access to each channel’s audio signal. The provided mini-phoenix connectors are designed for
easy wiring. The three terminals (from left to right) correspond to positive +, negative −
−−
−, and
ground
. Use the screws on top of the connector to first loosen the terminal to insert an
appropriate 3 conductor cable (3 separate conductors, or 2 conductors and shield), and then
tighten the screw to secure. Push the connector onto the pins centered under the desired input or
output port until firmly secured.
There are eight output channels representing a separate channel for each microphone. Likewise,
there are eight input channels to the unit. The microphone output connectors need to be attached
to the line-level input connectors of an audio mixer. The Base Station input connectors should
then be attached to mixer channel outputs. Because the system is full-duplex, the input
connections provide the ability to hear program audio using the provided earpiece attached to the
microphone. Depending on the application, it is possible to feed a single mixed channel back to
all earpieces or, alternatively, each user can receive a separate and unique channel. This would
allow for translation or other services to be incorporated into an application.
Set-up
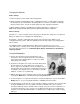
The Base Station has eight indicator LEDs (one for each channel) and pairing push buttons on
the front panel. When the LED is flashing GREEN or RED, that channel is active and connected
to a wireless microphone (GREEN is for live audio, RED is for muted). When the LED is off, the
channel is inactive (the microphone is out of range or turned off).
The front panel also has two sets of diversity antennae for best reception, and a fifth antenna for
system mute reception. These antennae are removable for relocation by installation
professionals, based on the installation environment and coverage optimization requirements.
Pairing Wireless Microphones to Base Station
“Pairing” creates a link between the wireless microphone and the Base Station with a unique
electronic serial number. When the microphone and Base Station have been previously paired,
the microphone will automatically try to connect to the Base Station whenever it is lifted from the
Charger Base.
Remember, microphones are always muted (flashing RED LED) when they are removed
from the Charger Base and the MUTE button needs to be pressed to make it “live” (flashing
GREEN LED).
Microphones in new systems come paired to the Base Station with each microphone assigned to
a unique channel on the base unit. However, if a replacement microphone is ever required, it will
need to be manually “paired.”