Instruction Manual Manuel d’utilisation
EN NOTICE All instructions, warranties and other collateral documents are subject to change at the sole discretion of Horizon Hobby, LLC. For up-to-date product literature, visit horizonhobby.com and click on the support tab for this product.
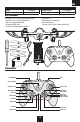
EN Specifications Length Height Propeller Length Flying Weight 3.1 in (80mm) 1.6 in (40mm) 2.75 in (68mm) 1.8 oz (53 g) Box Contents • Revolution® Vizo™ FPV Camera Drone (RVOH1200) • 380mAh 1S 3.7V 25C Li-Po (RVOH1202) • USB Li-Po Charger (RVOH1203) • Transmitter (RVOH1205) • A (2) and B (2) Replacement Propellers • Screwdriver (1) • 3 AA batteries (for transmitter) • Smart device mount (fits sizes: 2.
EN First Flight Preparation Flying Checklist • Remove and inspect the contents • Charge the flight battery • Install the batteries in the transmitter • Familiarize yourself with the controls • Install the flight battery in the drone (once it is fully charged) • Connect the transmitter • Find a suitable flight area for flying ❏❏Power on the transmitter ❏❏ Plug the flight battery into the drone ❏❏Fly the drone ❏❏Land the drone ❏❏ Unplug the flight battery from the drone ❏❏Power off the transmitter
EN Installing the Transmitter Batteries To install batteries in the included transmitter: 1. Remove the screw from the battery cover on the back of the transmitter. 2. Install 3 AA batteries, noting correct polarity. 3. Replace the battery cover. 4. Replace the screw on the battery cover. The transmitter will beep intermittently to indicate low battery power. Installing the Flight Battery 1. Slide the battery into the back of the drone, as shown, until it is fully seated. 2.
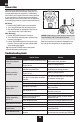
EN Understanding the Primary Flight Controls If you are not familiar with the controls of your drone, take a few minutes to familiarize yourself with them before attempting your first flight.
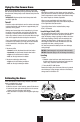
EN Flying the Vizo Camera Drone Flying Power on the transmitter and drone, place it on the floor with the nose pointed away from you and step back away from the drone. Always keep a safe distance away from the propellers. Maintaining a stable low-level hover, practice using the yaw, pitch and roll controls to familiarize yourself with the drone’s responses to control inputs. Remember to keep the control inputs as minimal as possible.
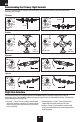
EN 360° Flip Mode The Vizo™ drone can flip 360° during flight. To perform a flip, press the FLIP button and use the right control stick to give a directional flip command. For optimal results, ensure the drone is at least 5–10 feet (1.5–3 m) off the ground. Press the FLIP button. Push the CONTROL stick LEFT then back to center. Press the FLIP button. Push the CONTROL stick RIGHT then back to center. Left Side View Press the FLIP button. Push the CONTROL stick UP then back to center.
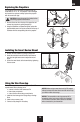
EN Replacing the Propellers The propellers on the Vizo drone are marked near the center with an “A” or “B.” If a propeller is ever damaged and needs to be replaced, always replace the propeller with the same letter type. CAUTION: Always disconnect the battery before performing propeller maintenance. 1. Remove the screw from the top of the propeller and remove the propeller by pulling straight up. 2. Using the illustration as a placement guide, replace the propeller.
EN Camera Use The Vizo drone is equiped with an FPV camera to shoot photos and video via the Vizo View app in real time*. You can save photos/videos to an optional 1–16GB capacity micro memory card (located in the micro memory card slot) or your smart device. Consult local laws and ordinances before using the camera on this device. You are responsible for operating this product in a legal and responsible manner. Still Photos 1. Press the PHOTO/VIDEO button on the transmitter. 2.
EN Post-Flight Inspection and Maintenance Checklist √ Cleaning Fasteners Propellers Make sure the battery is not installed before cleaning. Remove dust and debris with a soft brush or a dry, lint-free cloth. Make sure there are no loose screws, other fasteners or connectors. Do not over-tighten metal screws in plastic parts. Tighten screws so the parts are mated together, then turn the screw only 1/8th of a turn more. Do not use threadlock on or near plastic parts.
EN Limited Warranty What this Warranty Covers Horizon Hobby, LLC, (Horizon) warrants to the original purchaser that the product purchased (the “Product”) will be free from defects in materials and workmanship at the date of purchase.
EN Warranty and Service Contact Information Country of Purchase United States of America Horizon Hobby Contact Information Address Horizon Service Center (Repairs and Repair Requests) servicecenter.horizonhobby.com/RequestForm/ productsupport@horizonhobby.com Horizon Product Support 4105 Fieldstone Rd (Product Technical Assistance) 877-504-0233 Champaign, Illinois, 61822 USA websales@horizonhobby.
©2017 Horizon Hobby, LLC. Revolution, the Revolution logo, Vizo, and the Horizon Hobby logo are trademarks or registered trademarks of Horizon Hobby, LLC. All other trademarks, service marks or logos are property of their respective owners. Patents pending. Updated 8/17 55190.