
User Manual


5
EN
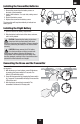
1. Open the hatch to the battery compartment.
2. Slide the battery into the back of the drone, as shown,
until it is fully seated.
CAUTION: Connecting the battery to the drone
power lead with reversed polarity will cause
damage to the drone and the battery. Damage caused by
incorrectly connecting the battery is not covered under
warranty.
CAUTION: Always remove the Li-Po battery
from the drone when not fl ying to avoid over-
discharging the battery. Batteries discharged to a
voltage lower than the lowest approved voltage may
become damaged, resulting in loss of performance and
potential fi re when batteries are charged.
Installing the Flight Battery
Installing the Transmitter Batteries
To connect the drone and transmitter, follow this start
up sequence:
1. With the drone on a level surface, power ON the drone
by pressing the Power switch for 3 seconds. The
drone’s LEDs will blink rapidly.
2. Power ON the transmitter by pressing the Power switch
for 3 seconds. The transmitter will beep 3 times and the
LEDs will be solid.
3. After the beeps, connection is successful. The
transmitter’s and drone’s LEDs stay solid.
Connecting the Drone and the Transmitter
To install batteries in the included transmitter:
1. Remove the screws from the battery covers on
the back of the transmitter.
2. Install 4 AAA batteries, 2 on each side, noting correct
polarity.
3. Replace the battery covers.
4. Replace the screws on the battery covers.
The transmitter will beep intermittently to indicate low
battery power.