
User Manual


7
EN
Power on the transmitter and drone, place it on the fl oor
with the nose pointed away from you and step back away
from the drone.
IMPORTANT: Beginner pilots should always start with
the EASY fl ight rate.
Takeoff
Press the AUTO TAKE OFF button. –OR–
Push the left and
right control sticks
to the lower outside
corners to arm the
throttle then slowly
increase the throttle
until the drone is
approximately 2 ft. (600mm) off the ground. The throttle
will not respond until its armed.
Making small corrections on the transmitter, try to hover
the drone in one spot. After moving the right stick and
returning it to center the drone should level itself. The
drone may continue to move due to inertia. Move the right
stick in the opposite direction to stop the movement.
Some minor drifting while hovering is normal due to the
movement of air, however, you may use the trim buttons
on the transmitter to limit severe drift in any given
direction.
If the drone drifts:
• forward, use the backward elevator trim button.
• backward, use the forward elevator trim button.
• right, use the left aileron trim button.
• left, use the right aileron trim button.
If the drone rotates (top down view):
• right, use the left rudder/yaw button.
• left, use the right rudder/yaw button.
Flying
Maintaining a stable low-level hover, practice using the
yaw, pitch and roll controls to familiarize yourself with the
drone’s responses to control inputs. Remember to keep
the control inputs as minimal as possible.
When you are comfortable with basic fl ight, you can
explore the different fl ight rates and functions explained
in the Flight Rate Selection section.
Typical fl ight times for the included battery range
from 5–6 minutes.
Low Voltage Cutoff (LVC)
LVC decreases the power to the motors when the battery
voltage gets low. The LEDs on the drone will indicate
when the battery charge is getting low. When the drone
LEDs begin fl ashing, land the drone immediately and
recharge the fl ight battery. Continuing to fl y after the
LEDs begin to fl ash will cause the motors to slow and
eventually shut down, causing a crash.
LVC does not prevent the battery from over-discharge
during storage.
NOTICE: Crash damage is not covered under warranty.
NOTICE: Repeated fl ying to LVC will damage the battery.
Landing
To land:
1. Establish a low level hover and slowly decrease the
throttle until the drone touches down. Fully decrease
the throttle stick to stop the motors. –OR–
2. Press the AUTO LAND button.
Remove the battery from the drone after use to prevent
over discharge. During storage, make sure the battery
charge does not fall below 3V.
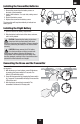
Flying the Vizo XL Camera Drone
Calibrating the Drone
If the drone drifts or is offset in any direction, use these
steps to recalibrate the drone:
1. Power ON the transmitter.
2. With the drone on a level surface, power ON the drone.
3. Push the left and right control sticks to the inside
corners (as shown) until the navigation light fl ashes.
4. After calibration is complete, the navigation light stays
solid.