user manual Fridge-Freezer FI 2212 VA+
electrolux Electrolux. Thinking of you. Share more of our thinking at www.electrolux.
electrolux 3 damage to the cord may cause a shortcircuit, fire and/or electric shock. Warning! Any electrical component (power cord, plug, compressor) must be replaced by a certified service agent or qualified service personnel. • • • • 1. Power cord must not be lengthened. 2. Make sure that the power plug is not squashed or damaged by the back of the appliance. A squashed or damaged power plug may overheat and cause a fire. 3. Make sure that you can come to the mains plug of the appliance. 4.
electrolux in either its refrigerant circuit or insulation materials. The appliance shall not be discarded together with the urban refuse and rubbish. The insulation foam contains flammable gases: the appliance shall be disposed according to the applicable regulations to obtain from your local authorities. Avoid damaging the cooling unit, especially at the rear near the heat exchanger. The materials used on this appliance marked by the symbol are recyclable.
electrolux 5 After this, a countdown of the temperature from -3 -2 -1 will be shown. When the appliance is switched off, Display also goes off. Temperature Indication Each time the Fridge-Freezer temperature indication button is pressed, the display indicates in sequence: 1. – The Fridge compartment indicator is on. – The display indicates the fridge temperature. 2. – The Freezer compartment indicator is on.5) – The display indicates the freezer temperature.
electrolux • flashing temperature • freezer compartment flashing (Freezer compartment indicator ) • red illumination of display • sounding of buzzer • alarm symbol. When normal conditions are restored: • the acoustic signal shuts off • the temperature value continues to flash • the display illumination remains red. When you press Function button / Alarm reset switch to deactivate the alarm, the high- est temperature reached in the compartment appears on indicator for some seconds.
electrolux 7 partment or at room temperature, depending on the time available for this operation. Small pieces may even be cooked still frozen, directly from the freezer: in this case, cooking will take longer. Cold accumulators The freezer contains at least one cold accumulator which increases storage time in the event of a power cut or breakdown. Ice-cube production This appliance is equipped with one or more trays for the production of ice-cubes.
electrolux HELPFUL HINTS AND TIPS Hints for energy saving • Do not open the door frequently or leave it open longer than absolutely necessary. • If the ambient temperature is high and the Temperature Regulator is set to low temperature and the appliance is fully loaded, the compressor may run continuously, causing frost or ice on the evaporator. If this happens, set the Temperature Regulator toward warmer settings to allow automatic defrosting and so a saving in electricity consumption.
electrolux 9 charging must therefore only be carried out by authorized technicians. Periodic cleaning The equipment has to be cleaned regularly: • clean the inside and accessories with lukewarm water and some neutral soap. • regularly check the door seals and wipe clean to ensure they are clean and free from debris. • rinse and dry thoroughly. Important! Do not pull, move or damage any pipes and/or cables inside the cabinet.
electrolux Do not use a mechanical device or any artificial means to speed up the thawing process other than those recommended by the manufacturer. A temperature rise of the frozen food packs, during defrosting, may shorten their safe storage life. 4. When defrosting is completed, dry the interior thoroughly and keep the scraper for future use. 5. Switch on the appliance. 6. After two or three hours, reload the previously removed food into the compartment.
electrolux 11 Problem Possible cause Solution The door has been opened too frequently. Do not keep the door open longer than necessary. The product temperature is too high. Let the product temperature decrease to room temperature before storage. The room temperature is too high. Decrease the room temperature. Water flows on the rear plate of the refrigerator. During the automatic defrosting process, frost defrosts on the rear plate. This is correct. Water flows into the refrigerator.
electrolux Closing the door 1. Clean the door gaskets. 2. If necessary, adjust the door. Refer to "Installation". 3. If necessary, replace the defective door gaskets. Contact the Service Center. TECHNICAL DATA Dimension of the recess Height 1780 mm Width 560 mm Depth 550 mm Rising Time 24 h The technical information are situated in the rating plate on the internal left side of the appliance and in the energy label.
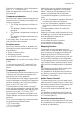
electrolux 13 3. Remove the hinge cover (A). Unscrew the pins (B) and spacers (C). Fit the hinge cover (A). 4. Remove the lower door. 5. Loosen the lower pin. Ventilation requirements The airflow behind the appliance must be sufficient. 50 - min. 200 cm2 C B min. 200 cm2 A Installing the appliance Caution! Make sure that the mains cable can move freely. On the opposite side: 1. Install the lower pin. 2. Install the lower door. 3.
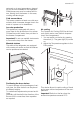
electrolux 2 I 1 4. Push the sealing strip between the appliance and the adjacent cabinet. 2. Adjust the appliance in the niche. The lower hinge cover (in the accessories bag) makes sure that the distance between the appliance and the kitchen furniture is correct. Open the door. Put the lower hinge cover in position. 4mm 44mm 5. Remove the correct part from the hinge cover (E). Make sure to remove the part DX, in the case of right hinge, SX in opposite case. 3.
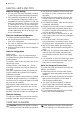
electrolux 15 Attach the hinge covers (E) to the hinge. Ha D Hb C E Hc Hd E B 7. If the appliance must connect laterally to the kitchen furniture door: a) Slacken the screws in fixing brackets (H). b) Move the brackets (H). c) Retighten the screws. 9. Install the part Ha on the inner side of the kitchen furniture. ca. 50 mm 90° 21 mm 90° ca. 50 mm 21 mm 10. Push the part Hc on the part Ha. Ha 8. Disconnect the parts Ha, Hb, Hc and Hd Hc 11.
electrolux Put together the appliance door and the furniture door and mark the holes. Align the kitchen furniture door and the appliance door by adjusting the part Hb. 8 mm Ha Hb Hb 12. Remove the brackets and mark a distance of 8 mm from the outer edge of the door where the nail must be fitted (K). 14. Press the part Hd on the part Hb. 8 mm Hb K Ha 13. Place the small square on the guide again and fix it with the screws supplied.
electrolux 17
electrolux
electrolux 19
www.electrolux.