BX-200 H EIMTRAINER BEDIENUNGSANLEITUNG REX_Trainer_BX200_12.indd D-1 02.05.
Inhaltsverzeichnis Inhaltsverzeichnis Vorwort ..................................................................................................................................................... Kennzeichnung wichtiger Hinweise ............................................................................................................. Wichtige Sicherheitshinweise ..................................................................................................................... Explosionszeichnung .....
Vorwort wir gratulieren Ihnen zum Kauf unseres FitnessGerätes. Sie haben ein wirklich gutes Produkt erworben und werden bestimmt viel Freude damit haben. Lesen Sie sich vor dem erstmaligen Gebrauch unbedingt die Bedienungsanleitung aufmerksam durch, um Schäden am Gerät oder Verletzungen zu vermeiden. Bewahren Sie die Bedienungsanleitung gut auf. DEUTSCH Vorwort · Kennzeichnung wichtiger Hinweise Mit freundlichen Grüßen Prophete GmbH u. Co.
Wichtige Sicherheitshinweise Wichtige Sicherheitshinweise Heben Sie die Bedienungsanleitung gut auf. Geben Sie sie im Fall eines Verkaufs oder bei Weitergabe des Fitness-Gerätes ebenfalls mit. GEFAHR ACHTUNG Es ist wichtig, dass Sie sich die komplette Anleitung durchlesen, bevor Sie das Gerät zusammenbauen und benutzen. Halten Sie das Gerät von Kindern und Haustieren fern. Es ist ausschließlich für Erwachsene geeignet.
Explosionszeichnung DEUTSCH Explosionszeichnung D-5 REX_Trainer_BX200_12.indd D-5 02.05.
Stückliste Stückliste Nr Name Größe 1 2 3 4 5 6 7 8 9 10 11 12 13 14 15 16 17 18 19 20 21 22 23 24 25 26 27 28 29 30 31 32 33 34 35 36 37 38 39 Kappe Lenker Computer-Konsole Computerkabel oben Halterung Zugseil oben Lenker-Stützrohr Zugseil unten Computerkabel unten Schraube Handgriffe Handpulsset (L&R) Computerkabel oben Handpulsset Führung Flügelschraube Sattel Sattelschiebeführung Sattel-Stützrohr Unterlegscheibe Feststellschraube Feststellschraube Kunststoffführung Sensorhalter Scheibe Rahmen C-Rin
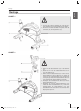
Montage DEUTSCH Montage SCHRITT 1 ACHTUNG 1. Legen Sie den vorderen Standfuß (41) sowie den hinteren Standfuß (58) wie abgebildet auf den Boden. 2. Montieren Sie beide Standfüße mit jeweils zwei M8 Schrauben (56) am Hauptrahmen (26). SCHRITT 2 ACHTUNG 1. Führen Sie das Sattel-Stützrohr (19) in den Rahmen ein. 2. Richten Sie ein Loch des Sattel-Stützrohres auf ein Loch des Rahmens aus. 3. Drehen Sie die Feststellschraube (22) in das Loch des Sattel-Stützrohres und des Rahmens ein.
Montage Montage SCHRITT 3 ACHTUNG 1. Verbinden Sie das obere mit dem unteren Computerkabel (40 + 9), sowie die beiden Zugseile (6 + 8). 2. Schieben Sie anschließend das Lenker-Stützrohr (7) samt Abdeckung (68) auf den Hauptrahmen (26). Achten Sie darauf, dass das Computerkabel nicht eingeklemmt wird. 3. Befestigen Sie nun das Lenker-Stützrohr (7) mit vier M8 Schrauben (10) und vier M8 Unterlegscheiben. 4. Klemmen Sie anschließend den Lenker in die Lenkerverschlussklammer. 5.
Montage DEUTSCH Montage SCHRITT 5 ACHTUNG 1. Montieren Sie das linke (65L) und das rechte (65R) Pedal am Pedalarm (61L/R). Achten Sie bei der Montage darauf, dass beide Pedale auf der jeweils richtigen Seite eingebaut werden, da diese sonst später ausbrechen können. Das rechte Pedal wird im Uhrzeigersinn und das linke gegen den Uhrzeigersinn eingeschraubt. Zur besseren Identifikation sind Sie mit einem „L“ für links bzw. einem „R“ für rechts gekennzeichnet. Ziehen Sie beide Pedale fest an.
Trainingsanleitung Trainingsanleitung Die Nutzung Ihres Fitness-Gerätes wird Ihnen zahlreiche Vorteile bieten. Es wird Ihre körperliche Fitness verbessern, Ihre Muskeln betonen und Ihnen in Verbindung mit einer kalorienreduzierten Diät auch beim Abnehmen helfen. TRAININGSGESTALTUNG/-HINWEISE Um ein optimales Training zu erzielen, sollten Sie vor Beginn des Trainings einige wichtige Dinge bezüglich der Art und Weise (wie man trainiert) und der Gestaltung des Trainings beachten.
2. Trainingsphase Ändern Sie in diesem Fall Ihren Trainingsplan wie folgt ab: Achten Sie beim Training darauf, dass Sie Ihr Tempo gleichmäßig und durchgehend halten. Für ein optimales Training sollte die Belastung so gewählt sein, dass Ihr Puls einen Wert von ca. 70–85 % des Maximalpulses erreicht (Zielzone) Anhand der Grafik können Sie die für Sie passende Zielzone ablesen: Sie sollten während der Warmlaufphase und der Abkühlphase wie gewohnt trainieren.
Bedienung Bedienung VOREINSTELLUNGEN TASTENFUNKTIONEN Das Fitness-Gerät bzw. die Anzeige aktiviert sich, sobald Sie die Schwungmasse z. B. mittels der Handgriffe bewegen oder eine beliebige Taste des Hometrainers drücken. Das Gerät schaltet bei Nichtbenutzung automatisch nach 4 Minuten in den Schlaf-Modus und zeigt Ihnen Zeit, Datum und Temperatur an. SET: Mit der SET-Taste können Sie die Werte und Trainingsparameter schrittweise erhöhen.
ANZEIGE-INFORMATIONEN TRAININGS-PROGRAMME Die Anzeige-Informationen im großen Display wechseln während des Trainings automatisch. Folgende Anzeige-Informationen können abgerufen werden: Unabhängig vom gewählten Trainings-Programm können Sie die Belastungsstufe mittels des Drehknopfes am Rahmenrohr individuell einstellen. 8 Belastungsstufen stehen Ihnen zur Auswahl. 1. TIME (Zeit) Der Computer zeigt Ihnen die aktuelle Trainingszeit an (max. 99:00).
Bedienung C Körperfett-Analyse (MEASURE) Beachten Sie, dass die Körperfettanalyse nicht für jedermann geeignet ist. Sie eignet sich nicht für Kinder unter 7 Jahren, Personen die unter Herzerkrankungen leiden, Schwangere oder Personen die in Behandlung kardiovaskulärer Medizin stehen. Bei folgenden Personenkreisen, ist es möglich, dass der Computer falsche Werte anzeigt.
Bedienung DEUTSCH Körperfettanteil Dieser Wert gibt an, wie viel Ihres Gesamtkörpergewichts aus Fettgewebe besteht (Körperfettanteil in %).
Pflege/Wartung · Technische Daten · Entsorgung Pflege/Wartung Wir empfehlen, etwa alle 2 bis 4 Wochen bzw. je nach Benutzungshäufigkeit, alle Geräteteile, bei denen Gefahr des Lösens besteht (Schrauben, Mutter u. ä.) regelmäßig zu kontrollieren. Benutzen Sie zum säubern bzw. pflegen ein weiches, evtl. leicht angefeuchtetes Tuch. Verwenden Sie keinesfalls aggressive Reinigungsmittel.
DEUTSCH Konformitätserklärung D-17 REX_Trainer_BX200_12.indd D-17 02.05.
Gewährleistung Gewährleistung 1. Gewährleistungsansprüche können Sie nur innerhalb eines Zeitraumes von max. 2 Jahren, gerechnet ab Kaufdatum, erheben. Unsere Gewährleistung ist auf die Behebung von Material- und Fabrikationsfehlern bzw. Austausch des Gerätes beschränkt. Die Erfüllung erfolgt nach unserer Wahl durch Instandsetzung des Gerätes. Unsere Gewährleistung ist für Sie kostenlos. • Bauteile die dem Verschleiß, Abnutzung oder Verbrauch unterliegen (ausgenommen eindeutiger Material bzw.
DEUTSCH Notizen D-19 REX_Trainer_BX200_12.indd D-19 02.05.
nb brück Postfach 21 24 • 33349 Rheda-Wiedenbrück eMail: si-service왁prophete.nett REX_Trainer_BX200_12.indd D-20 Technische Änderungen vorbehalten·Nachdruck vorbehalten· Nachdruck verboten verboten· ·Stand Stand 04/2012·88735 · © Prophete GmbH u. Co. KG Prophete GmbH u. Co. KG 02.05.
Technische Änderungen vorbehalten Nachdruck verboten Stand 04/2012 88735 Prophete GmbH u. Co. KG BX-200 E XERCISE B IKE OPERATING INSTRUCTIONS REX_Trainer_BX200_12.indd D-21 02.05.
Table of contents Table of contents Preface ................................................................................................................................................... Identification of important notes .............................................................................................................. Important safety instructions .................................................................................................................... Exploded view ..............
Preface · Identification of important notes Preface To avoid injuring yourself or damaging the machine, please read the operating instructions carefully before using the machine for the first time. Keep the operating instructions in a safe place. Kind regards, Prophete GmbH u. Co. KG ENGLISH Congratulations on your purchase of our fitness machine. You have purchased a really excellent product and will certainly enjoy using it.
Important safety instructions Important safety instructions Keep the operating instructions in a safe place. Make sure they are included in case you sell or pass the fitness machine on to someone else. DANGER WARNING It is important for you to read through the instructions completely before assembling and using the machine. Keep the machine away from children and house pets. It is only suitable for adults.
Exploded view ENGLISH Exploded view GB-25 REX_Trainer_BX200_12.indd GB-25 02.05.
Parts list Parts list No Name Size 1 2 3 4 5 6 7 8 9 10 11 12 13 14 15 16 17 18 19 20 21 22 23 24 25 26 27 28 29 30 31 32 33 34 35 36 37 38 39 40 Cap Handlebars Computer console Computer cable, top Holder Traction cable top Handlebar support tube Traction cable bottom Computer cable, bottom Screw Handgrips Hand pulse set (L&R) Computer cable, top Hand pulse set Guide Wing screw Saddle Saddle sliding guide Saddle post Washer Locking screw Locking screw Plastic guide Sensor holder Disc Frame C ring Nut S
Assembly Assembly WARNING 1. Place the front foot (41) and the rear foot (58) on the floor as illustrated. 2. Assemble both feet using respectively two M8 screws (56) to the main frame (26). ENGLISH STEP 1 STEP 2 WARNING 1. Insert the saddle post (19) into the frame. 2. Align one hole of the saddle post with one hole of the frame. 3. Screw the locking screw (22) into the hole of the saddle post and of the frame. Make sure that the locking screw engages firmly and is tightened firmly.
Assembly Assembly STEP 3 WARNING 1. Connect the upper computer cable to the lower computer cable (40 + 9) as well as both traction cables (6 + 8). 2. Then push the handlebar support tube (7) with cover (68) onto the main frame (26). Make sure not to pinch the computer cable. 3. Now fasten the handlebar support tube (7) with four M8 screws (10) and four M8 washers. 4. Then clamp the handlebar in the handlebar locking clamp. 5.
Assembly Assembly WARNING 1. Now assemble the left (65L) and the right (65R) pedal. During the assembly, make sure that both pedals are installed on the respectively correct side, otherwise they could break out. The right pedal is screwed in clockwise and the left pedal is screwed in anti-clockwise. For better identification, the pedals have been marked with an „L“ for left and an „R“ for right. Tighten both pedals firmly! ENGLISH STEP 5 STEP 6 WARNING 1.
Workout instructions Workout instructions Using your fitness machine will provide you with numerous advantages. It will improve your physical fitness, emphasize your muscles, and help you lose weight in conjunction with a calorie-reduced diet. DESIGNING YOUR WORKOUT/NOTES To achieve an optimal workout, you should consider several important things regarding the manner (of working out) and organization of your workout before you begin.
2. Workout phase In this case, modify your workout plan as follows: When working out, make sure you keep an even and consistent speed. Optimal training means choosing a workout that keeps your pulse at a value of approx. 70%-85% of your maximum pulse (target zone). Use the graphic to read the matching target zone for you. You should work out during the warm up and cool down phase as usual. But at the end of the exercise phase, increase the intensity so that your legs receive a more intense workout.
Operation Operation DEFAULT SETTINGS BUTTON FUNCTIONS The fitness machine, or the display, is activated as soon as the flywheel mass is moved by the handgrips or by pressing any button on the home exercise machine. The device switches to sleep-mode automatically after 4 minutes of nonuse and displays the time, date and temperature. SET: The SET button lets you increase the values and workout parameters in increments.
DISPLAY INFORMATION WORKOUT PROGRAMMES The display information in the large display changes automatically during the workout. The following display information can be called up: Regardless of the chosen workout programme, you can individually adjust the intensity level with the rotary knob on the frame tube. There are 8 intensity levels to choose from. 1. TIME The computer shows you the current workout time (max. 99:00).
Operation C Body fat analysis (MEASURE) Please note that the body fat analysis is not suitable for everyone. It is not suitable for children below the age of 7, people suffering from heart diseases, pregnant women, or people taking cardiovascular medication. The computer may display the incorrect values for the following group of people: If you would like to have your pulse rate displayed during the workout, then you do not need to observe the listed points and notes.
Operation Body fat percentage This value indicates how much of your overall body weight consists of fatty tissue (body fat in percentage).
Care/Maintenance · Technical Data · Disposal Care/Maintenance We recommend checking all machine parts that could loosen (screws, nuts, etc.) regularly every 2 to 4 weeks, depending on the frequency of use. Use a soft, perhaps slightly moistened cloth to clean. Do not use aggressive cleaning agents. Keep liquids of any type away from the computer and the machine interior, as the liquids could cause considerable functional impairments.
ENGLISH Declaration of conformity GB-37 REX_Trainer_BX200_12.indd GB-37 02.05.
Warranty Warranty • Components subject to wear or use (except clear material or manufacturer defects), such as: - Bearings Lamps - Stickers - Belts - Batteries, etc. 1. You may only assert warranty claims within a period of max. 2 years as of the purchase date. Our warranty is limited to the elimination of material and fabrication defects, or the replacement of the machine. Realisation occurs according to our choice through repair to the machine. Our warranty is free of charge.
ENGLISH Notes GB-39 REX_Trainer_BX200_12.indd GB-39 02.05.
nb brück Postfach 21 24 • 33349 Rheda-Wiedenbrück eMail: si-service왁prophete.nett REX_Trainer_BX200_12.indd GB-40 Technische Änderungen vorbehalten·Nachdruck vorbehalten· Nachdruck verboten verboten· ·Stand Stand 04/2012·88735 · © Prophete GmbH u. Co. KG Prophete GmbH u. Co. KG 02.05.
Technische Änderungen vorbehalten Nachdruck verboten Stand 04/2012 88735 Prophete GmbH u. Co. KG BX-200 VÉLO D’ EXERCICE MANUEL DE L‘UTILISATEUR REX_Trainer_BX200_12.indd GB-41 02.05.
Sommaire Sommaire Avant-propos ............................................................................................................................................. Identification des remarques importantes ................................................................................................... Consignes de sécurité importantes .............................................................................................................. Vue éclatée .........................................
Avant-propos · Identification des remarques importantes Avant-propos Avant la première utilisation, veuillez lire impérativement le manuel de l‘utilisateur avec attention afin d‘éviter tout dommage sur l‘appareil ou toute blessure. Conservez soigneusement le manuel de l‘utilisateur. Cordialement Prophete GmbH u. Co. KG FRANÇAISE Nous vous félicitons d’avoir acheté notre appareil de remise en forme.
Consignes de sécurité importantes Consignes de sécurité importantes Conservez soigneusement le manuel de l‘utilisateur. Donnez-le également à l‘acheteur en cas de vente ou de cession de l‘appareil de remise en forme. DANGER Il est important que vous lisiez entièrement le manuel de l‘utilisateur avant d‘assembler l‘appareil et de l‘utiliser. Une utilisation sûre et performante ne peut être obtenue que si l‘appareil est assemblé, entretenu et utilisé de manière conforme.
Vue éclatée FRANÇAISE Vue éclatée F-45 REX_Trainer_BX200_12.indd F-45 02.05.
Nomenclature des pièces Nomenclature des pièces No 1 2 3 4 5 6 7 8 9 10 11 12 13 14 15 16 17 18 19 20 21 22 23 24 25 26 27 28 29 30 31 32 33 34 35 36 37 38 39 Nom Taille Capuchon Guidon Console d'entraînement Câble supérieur de console d'entraînement Fixation Câble de traction supérieur Tube du guidon Câble de traction inférieur Câble inférieur de console d'entraînement Vis Poignées Capteur de pouls (G&D) Câble supérieur de console d'entraînement Capteur de pouls Guide Vis papillon Selle Guide-support d
Montage Montage ÉTAPE 1 1. Posez le stabilisateur avant (41), ainsi que le stabilisateur arrière (58) sur le sol, comme indiqué. 2. Montez les deux stabilisateurs au moyen de deux vis M8 chacun (56) sur le châssis (26). FRANÇAISE ATTENTION ÉTAPE 2 ATTENTION 1. Introduisez le tube de selle (19) dans le châssis. 2. Alignez le trou du tube de selle sur un trou du châssis. 3. Vissez la vis de serrage (22) dans le trou ménagé dans le tube de selle et dans le châssis.
Montage Montage ÉTAPE 3 ATTENTION 1. Reliez le câble supérieur de console d‘entraînement au câble inférieur (40 + 9) et rattachez les deux câbles de traction (6 + 8). 2. Enfilez ensuite le tube de guidon (7) et son habillage (68) sur le châssis (26). Veillez à ce que le câble de console d‘entraînement ne soit pas coincé. 3. Fixez maintenant le tube du guidon (7) avec quatre vis M8 (10) et quatre rondelles d‘appui M8. 4. Enclenchez ensuite le guidon dans la pince de fixation de guidon. 5.
Montage Montage ÉTAPE 5 1. Montez maintenant les pédales gauche (65L) et droite (65R). Lors du montage, veillez à ce que les deux pédales soient montées sur le bon côté car sinon, elles pourraient se rompre. La pédale droite est vissée dans le sens des aiguilles d‘une montre et la pédale gauche, dans le sens inverse. Pour mieux identifier les deux pédales, celles-ci sont marquées avec un « L » pour gauche et un « R » pour droite. Serrez bien les deux pédales ! FRANÇAISE ATTENTION ÉTAPE 6 ATTENTION 1.
Guide d‘entraînement Guide d‘entraînement L‘utilisation de votre appareil de remise en forme vous apportera de nombreux avantages. Elle améliorera votre forme physique, affinera votre musculature et, en association avec un régime hypocalorique, vous aidera également dans votre perte de poids.
Guide d‘entraînement 2. Phase d‘entraînement Lors de l‘entraînement, veillez à maintenir un rythme régulier et constant. Pour un entraînement optimal, le niveau d‘effort doit être choisi de manière à ce que votre pouls atteigne env. 70 à 85 % du pouls maximum (zone cible).
Utilisation Utilisation PRÉRÉGLAGES FONCTIONS DES TOUCHES L‘appareil de remise en forme ou son affichage s‘active dès que la roue d‘inertie est mise en mouvement, p. ex. par l‘intermédiaire des poignées de guidon mobile ou par l‘actionnement d‘une touche quelconque du vélo elliptique. En cas de non-utilisation, l‘appareil passe automatiquement en mode de veille au bout de 4 minutes et affiche l‘heure, la date et la température.
Utilisation AFFICHAGE DES INFORMATIONS PROGRAMMES D‘ENTRAÎNEMENT Les informations seront affichées automatiquement en alternance sur l‘écran de grande taille, pendant l‘entraînement. Les informations suivantes peuvent être affichées : Indépendamment du programme d‘entraînement sélectionné, vous pouvez régler le niveau d‘effort de manière individuelle au moyen du bouton rotatif monté sur le tube de cadre. Vous disposez de 8 niveaux d‘effort au choix.
Utilisation C Analyse du taux de graisses corp orelles (MEASURE) Veuillez noter que l‘analyse du taux de graisses corporelles n‘est pas indiquée pour tout le monde. Elle ne convient pas aux enfants de moins de 7 ans, aux personnes souffrants de maladies cardiaques, aux femmes enceintes ni aux personnes sous traitement médical pour affections cardiovasculaires.
Utilisation Taux de graisses corporelles Cette valeur indique la proportion de tissus graisseux dans votre poids total (taux de graisses corporelles en %).
Entretien/Maintenance · Caractéristiques techniques · Élimination Entretien/Maintenance Nous recommandons de contrôler régulièrement, soit toutes les 2 à 4 semaines environ ou bien en fonction de la fréquence d‘utilisation, tous les éléments de l‘appareil qui présentent un risque de desserrage (vis, écrous et simil.). Pour le nettoyage et l‘entretien, utilisez un chiffon doux, éventuellement légèrement humide. N‘utilisez en aucun cas de pro- duits nettoyants agressifs.
FRANÇAISE Déclaration de conformité F-57 REX_Trainer_BX200_12.indd F-57 02.05.
Garantie Garantie • Les pièces soumises à l‘usure, l‘abrasion ou à la consommation (sauf les vices de matériau ou de fabrication indiscutables), p. ex. : – Palier – Moyen d‘éclairage – Autocollant – Courroie – Piles, etc. 1. Vous ne pouvez présenter vos droits à prestations de garantie que pendant un délai de 2 ans maximum, à compter de la date de l’achat. Nos prestations de garantie se limitent à l’élimination des vices de matériau et de fabrication ou au remplacement de l‘appareil.
FRANÇAISE Notes F-59 REX_Trainer_BX200_12.indd F-59 02.05.
nb brück Postfach 21 24 • 33349 Rheda-Wiedenbrück eMail: si-service왁prophete.nett REX_Trainer_BX200_12.indd F-60 Technische Änderungen vorbehalten·Nachdruck vorbehalten· Nachdruck verboten verboten· ·Stand Stand 04/2012·88735 · © Prophete GmbH u. Co. KG Prophete GmbH u. Co. KG 02.05.
Technische Änderungen vorbehalten Nachdruck verboten Stand 04/2012 88735 Prophete GmbH u. Co. KG BX-200 C YCLETTE ISTRUZIONI PER L‘USO REX_Trainer_BX200_12.indd F-61 02.05.
Indice Indice Premessa .................................................................................................................................................. Identificazione di indicazioni importanti ..................................................................................................... Indicazioni di sicurezza importanti ............................................................................................................. Disegno esploso ....................................
Premessa · Identificazione di indicazioni importanti Premessa Ci congratuliamo con Lei per l‘acquisto del nostro apparecchio per il fitness. Ora possiede un prodotto di alta qualità che certamente Le darà grandi soddisfazioni. Prima di utilizzarlo per la prima volta, legga con attenzione il manuale d‘uso onde evitare possibili lesioni fisiche o danni all‘apparecchio. Conservi con cura il manuale di istruzioni. Cordiali saluti Prophete GmbH u. Co.
Indicazioni di sicurezza importanti Indicazioni di sicurezza importanti Conservare con cura il manuale di istruzioni. In caso di vendita o cessione dell'apparecchio per il fitness, consegnare anche il manuale al nuovo proprietario. PERICOLO È importante leggere attentamente l'intero contenuto delle istruzioni prima di assemblare ed utilizzare l'apparecchio.
Disegno esploso ITALIANO Disegno esploso I-65 REX_Trainer_BX200_12.indd I-65 02.05.
Lista dei componenti Lista dei componenti N.
Montaggio Montaggio FASE 1 AVVERTENZA ITALIANO 1. Appoggiare sul pavimento la base d‘appoggio anteriore (41) e quella posteriore (58) come indicato in figura. 2. Montare le due basi d‘appoggio sul telaio principale (26) utilizzando rispettivamente due viti M8 (56). FASE 2 AVVERTENZA 1. Inserire il tubo di supporto della sella (19) nel telaio. 2. Allineare un foro del tubo di supporto della sella ad un foro del telaio. 3.
Montage Montage FASE 3 AVVERTENZA 1. Collegare il cavo superiore del computer a quello inferiore (40 + 9) e i due cavi di trazione (6+8). 2. Quindi spingere sul telaio principale il tubo di supporto del manubrio (7) completo della copertura (68). Fare attenzione a non schiacciare il cavo del computer. 3. Fissare ora il tubo di supporto del manubrio (7) con quattro viti M8 (10) e quattro rondelle M8. 4. Quindi bloccare il manubrio nell’apposito morsetto di chiusura 5.
Montage Montage FASE 5 AVVERTENZA ITALIANO 1. Montare il pedale sinistro (65L) e destro (65R). Durante il montaggio, accertarsi che entrambi i pedali siano montati sul lato giusto, poiché in caso contrario potrebbero rompersi. Il pedale destro viene avvitato in senso orario e il sinistro in senso antiorario. Per una migliore identificazione, i pedali sono contrassegnati con una “L” per sinistra e “R” per destra. Stringere bene entrambi i pedali! FASE 6 AVVERTENZA 1.
Istruzioni per l‘allenamento Istruzioni per l‘allenamento L‘utilizzo di un apparecchio per il fitness offre numerosi vantaggi. Permette di migliorare la forma fisica, di tonificare i muscoli ed anche di perdere peso se abbinato a una dieta ipocalorica. ORGANIZZAZIONE DELL‘ALLENAMENTO/ AVVERTENZE Per ottenere un allenamento ottimale, prima di iniziare dovreste considerare alcuni aspetti importanti relativi alle sue modalità (come allenarsi) e all‘organizzazione dell‘allenamento.
Istruzioni per l‘allenamento 2. Fase di allenamento Durante l‘allenamento, abbiate l‘accortezza di mantenere una velocità costante e senza interruzioni. Per un allenamento ottimale, il carico dovrebbe essere scelto in modo tale che il battito cardiaco raggiunga un valore pari al 7085% circa della soglia massima (zona target).
Utilizzo Uso IMPOSTAZIONI INIZIALI FUNZIONI DEI TASTI L‘apparecchio per il fitness/il display si attiva non appena si muove la massa oscillante, ad esempio tramite le impugnature, o si preme un tasto qualsiasi dell‘home trainer. L‘apparecchio, quando non viene utilizzato, passa automaticamente in modalità „sleep“ dopo 4 minuti e visualizza l‘ora, la data e la temperatura. SET: Con il tasto SET è possibile aumentare gradualmente i valori e i parametri di allenamento.
Uso INFORMAZIONI VISUALIZZATE PROGRAMMI DI ALLENAMENTO Le informazioni visualizzate nell‘ampio display cambiano automaticamente durante l‘allenamento. Le seguenti informazioni possono essere richiamate per la visualizzazione: Indipendentemente dal programma di allenamento prescelto, è possibile regolare individualmente il livello di carico tramite la manopola presente sul tubo del telaio. Si può scegliere tra 8 diversi livelli di carico. 1.
Uso C Analisi del grasso corporeo (MEASURE) Attenzione: l‘analisi del grasso corporeo non è adatta a tutti. Non è indicata per i bambini di età inferiore a 7 anni, per le persone affette da patologie cardiache, per le donne incinte o per le persone sottoposte a trattamento di medicina cardiovascolare. Per le seguenti categorie di persone, è possibile che il computer visualizzi valori errati.
Uso Percentuale di grasso corporeo Questo valore indica la percentuale di massa grassa rispetto al peso corporeo totale (quota di grasso corporeo in %).
Cura/manutenzione · Dati tecnici · Smaltimento Cura/manutenzione Raccomandiamo di controllare regolarmente, all'incirca ogni 2-4 settimane a seconda della frequenza d'uso, tutte le parti dell'apparecchio che potrebbero allentarsi (viti, dadi e simili). Per la cura e la pulizia utilizzare un panno morbido, eventualmente leggermente inumidito. Non utilizzare mai detergenti aggressivi.
ITALIANO Dichiarazione di conformità I-77 REX_Trainer_BX200_12.indd I-77 02.05.
Garanzia Garanzia 1. I diritti di garanzia possono essere esercitati solo in un periodo di massimo 2 anni, calcolati dalla data di acquisto. La nostra garanzia è limitata all’eliminazione dei difetti di materiali e fabbricazione o alla sostituzione dell‘apparecchio. L’adempimento avviene a nostra scelta mediante riparazione dell‘apparecchio. La nostra prestazione di garanzia è gratuita per il cliente.
ITALIANO Note I-79 REX_Trainer_BX200_12.indd I-79 02.05.
nb brück Postfach 21 24 • 33349 Rheda-Wiedenbrück eMail: si-service왁prophete.nett REX_Trainer_BX200_12.indd I-80 Technische Änderungen vorbehalten·Nachdruck vorbehalten· Nachdruck verboten verboten· ·Stand Stand 04/2012·88735 · © Prophete GmbH u. Co. KG Prophete GmbH u. Co. KG 02.05.
Technische Änderungen vorbehalten Nachdruck verboten Stand 04/2012 88735 Prophete GmbH u. Co. KG BX-200 H OMETRAINER BEDIENINGSHANDLEIDING REX_Trainer_BX200_12.indd I-81 02.05.
Inhoudsopgave Inhoudsopgave Voorwoord ................................................................................................................................................ Aanduiding van de belangrijke aanwijzingen ............................................................................................... Belangrijke veiligheidsinstructies .............................................................................................................. Explosietekening ..........................
Voorwoord · Aanduiding van de belangrijke aanwijzingen Voorwoord Wij feliciteren u met de aankoop van ons fitnessapparaat. U hebt een uitstekend product gekozen en zult er ongetwijfeld veel plezier mee hebben. Lees voor het eerste gebruik de bedieningshandleiding zorgvuldig door om schade aan het apparaat of lichamelijk letsel te voorkomen. Bewaar de bedieningshandleiding goed. Met vriendelijke groet, Prophete GmbH u. Co.
Belangrijke veiligheidsinstructies Belangrijke veiligheidsinstructies Bewaar de bedieningshandleiding goed. Geef de handleiding mee bij verkoop of doorgave van het fitnessapparaat. WAARSCHUWING ATTENTIE Het is belangrijk dat u de complete handleiding doorleest voordat u het apparaat in elkaar zet en gebruikt. Houd het apparaat uit de buurt van kinderen en huisdieren. Het is uitsluitend geschikt voor volwassenen.
Explosietekening NEDERLANDS Explosietekening NL-85 REX_Trainer_BX200_12.indd NL-85 02.05.
Onderdelenlijst Onderdelenlijst Nr.
Montage Montage STAP 1 ATTENTIE NEDERLANDS 1. Plaats de voorste voet (41) en de achterste voet (58) op de vloer, zoals afgebeeld. 2. Monteer beide voeten met twee M8 schroeven (56) aan het hoofdframe (26). STAP 2 ATTENTIE 1. Breng de zadelsteunbuis (19) aan op het frame. 2. Breng een gat van de zadelsteunbuis in lijn met een gat van het frame. 3. Draai de stelbout (22) in het gat van de zadelsteunbuis en het frame. Verzeker u ervan dat de stelbout goed vastklikt en stevig aangedraaid is.
Montage Montage STAP 3 ATTENTIE 1. Verbind de bovenste met de onderste computerkabel (40 + 9) evenals beide trekkabels (6 + 8). 2. Schuif daarna de stuursteunbuis (7) samen met de afdekking (68) op het hoofdframe (26). Let er daarbij op dat de computerkabel niet wordt vastgeklemd. 3. Bevestig nu de stuursteunbuis (7) met vier M8 schroeven (10) en vier M8 onderlegringen. 4. Klem daarna het stuur in de stuursluitklem. 5.
Montage Montage STAP 5 ATTENTIE NEDERLANDS 1. Monteer nu het linker (65L) en rechter (65R) pedaal. Let er bij de montage op dat beide pedalen aan de juiste zijde worden gemonteerd, omdat zij anders kunnen afbreken. Het rechter pedaal wordt met de wijzers van de klok mee en het linker tegen de wijzers van de klok in vastgeschroefd. Voor een betere identificatie zijn de pedalen met een “L“ voor links of een “R“ voor rechts gemarkeerd. Draai de beide pedalen stevig vast! STAP 6 ATTENTIE 1.
Trainingshandleiding Trainingshandleiding Het gebruik van uw fitnessapparaat zal u tal van voordelen bieden. Het zal uw lichamelijke conditie verbeteren, uw spieren accentueren en in combinatie met een caloriearm dieet u ook helpen af te vallen. TRAININGSINRICHTING/-AANWIJZINGEN Om een optimale training te bereiken, moet u voor aanvang van de training een paar belangrijke zaken met betrekking tot de manier (waarop men traint) en de inrichting van de training in acht nemen.
Trainingshandleiding 2. Trainingsfase Let er bij de training op dat uw tempo gelijkmatig en aanhoudend is. Voor een optimale training moet de belasting zo zijn gekozen, dat uw polsslag een waarde van ca. 70– 85% van de maximale polsslag bereikt (doelzone) Aan de hand van de grafiek kunt u de voor u geschikte doelzone aflezen: Wijzig in dat geval uw trainingsschema als volgt: U moet tijdens de opwarmfase en de afkoelfase trainen zoals u gewend bent.
Bediening Bediening VOORINSTELLINGEN FUNCTIE VAN DE KNOPPEN Het fitnessapparaat of de weergave worden geactiveerd, zodra u het vliegwiel bijv. door middel van de handgrepen beweegt of een willekeurige knop van de hometrainer indrukt. Het apparaat schakelt automatisch na 4 minuten niet te zijn gebruikt in standby en toont u tijd, datum en temperatuur. SET: Met de SET-knop kunt u de waarde en trainingsparameters stapsgewijs verhogen.
Bediening WEERGEGEVEN INFORMATIE TRAININGSPROGRAMMA De informatie weergegeven in de grote display wisselt tijdens de training automatisch. Volgende weergegeven informatie kan worden opgeroepen: Los van het gekozen trainingsprogramma kunt u het belastingsniveau met de draaiknop op de framebuis individueel instellen. U kunt kiezen uit 8 belastingsniveaus. 1. TIME (tijd) De computer laat u de huidige trainingstijd zien (max. 99:00).
Bediening C Lichaamsvetanalyse (MEASURE) Let erop dat de lichaamsvetanalyse niet voor iedereen geschikt is. De analyse is niet geschikt voor kinderen jonger dan 7 jaar, mensen met een hartaandoening, zwangere vrouwen of mensen die onder behandeling zijn van een cardioloog. Bij de volgende personen kan de computer verkeerde waarden aangeven. OPMERKING Als u uw polsfrequentie tijdens de training wilt weergeven, hoeft u niet op de punten en aanwijzingen in de lijst te letten.
Bediening Aandeel lichaamsvet Deze waarde geeft aan in hoeverre uw totale lichaamsgewicht uit vetweefsel bestaat (aandeel lichaamsvet in %).
Verzorging/onderhoud · Technische gegevens · Afvalverwijdering Verzorging/onderhoud Wij adviseren ca alle 2 tot 4 weken of afhankelijk van het gebruik, alle onderdelen, waarbij gevaar op losraken bestaat (schroeven, moeren en dergelijke) regelmatig te controleren. Gebruik voor schoonmaken of verzorgen een zachte, evt. iets vochtige doek. Gebruik in geen geval agressieve reinigingsmiddelen.
NEDERLANDS Conformiteitsverklaring NL-97 REX_Trainer_BX200_12.indd NL-97 02.05.
Garantie Garantie 1. Garantieclaims kunt u alleen binnen een periode van max. 2 jaar, te rekenen vanaf de aankoopdatum, indienen. Onze garantie is beperkt tot het verhelpen van materiële en fabricagefouten resp. vervanging van het apparaat. Het nakomen gebeurt, als wij daarvoor kiezen, door reparatie van het apparaat. De garantie is voor u gratis.
NEDERLANDS Notities NL-99 REX_Trainer_BX200_12.indd NL-99 02.05.
Postfach 21 24 • 33349 Rheda-Wiedenbrück eMail: si-service왁prophete.net REX_Trainer_BX200_12.indd NL-100 Technische Änderungen vorbehalten· Nachdruck verboten· Stand 04/2012·88735 · © Prophete GmbH u. Co. KG Prophete GmbH u. Co. KG 02.05.