REFRIGERATEURCONGELATEUR FRIDGE-FREEZER REFRIGERADORCONGELADOR FRIGORÍFICOCONGELADOR RF 320 MODE D’EMPLOI INSTRUCTION BOOKLET LIBRO DE INSTRUCCIONES MANUAL DE INSTRUÇÕES 2222 154-63
WARNINGS GB It is most important that this instruction book should be retained with the appliance for future reference. Should the appliance be sold or transferred to another owner, or should you move house and leave the appliance, always ensure that the book is supplied with the appliance in order that the new owner can be acquainted with the functioning of the appliance and the relevant warnings. These warnings are provided in the interest of safety.
GB CONTENTS Installation 12 ■ Positioning 12 ■ Cleaning the interior 12 ■ Instructions for totally built-in appliances 13 ■ Electrical connection 15 Technical specification ■ Operation ■ Temperature regulation Freezing fresh food ■ Storage of frozen food ■ Thawing ■ Fresh food refrigeration ■ Defrosting Maintenance ■ Periodic cleaning ■ Periods of non use 16 ■ Replacing the interior light bulb 16 16 Defective operation 15 Use ■ INSTALLATION If this appliance featurin
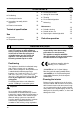
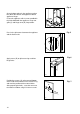
I nstructions for totally built-in appliances Door reversibility (Fig. 1) P P A P1 P1 D114 Right opening Left opening Remove the pins (P) and (P1) Remove (P) from both sides and the door. Remove the middle hinge (A) and refit it on the opposite side. Refit the door and (P) on the left side. Remove (P1) from the right side. 50 mm Dimensions of the recess Height 1780 mm Depth 550 mm Width 560 mm The appliance’s door has been locked in position for transport by means of pins on both sides.
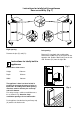
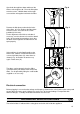
Fig. 4 Open the door and push the appliance against the side of the kitchen unit opposite to that of appliance hinges. Fasten the appliance with 4 screws provided in the kit included with the appliance. Snap vent grille (C) and hinge cover (D) into position. D C D723 Press in the joint covers between the appliance and the kitchen unit. Fig. 5 D724 Fig. 6 Apply covers (B) on joint cover lugs and into hinge holes.
Open both the appliance door and that of the kitchen unit to approx. 90°. Place the little plates over the runners. Hold the doors of the appliance and the unit together and mark the holes. Fig. 8 8mm PR34 Remove the little plates and make the holes with a diam. of 2 mm. Replace the little platee over the runners and screw in the screws provided (3.5x16 mm). For the alignment of the kitchen unit door, if necessary, use the clearance size of the slotted holes.
USE Operation Insert the plug into the wall socket. Open the refrigerator door and turn the thermostat knob, clockwise, beyond the «O» (STOP) position. The appliance will start to operate. Temperature regulation The temperature is automatically regulated and can be increased to achieve a higher temperature (warmer) by rotating the thermostat knob toward lower settings or reduced (colder) rotating the knob towards higher settings.
It is also advisable not to exceed the storage period indicated by the producer of the food. Finally, do not open the door frequently or leave it open longer than is absolutely necessary. If there is a power failure when food is in the freezer, do not open the door of the freezing compartment.
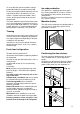
Defrosting Frost is automatically eliminated from the evaporator of the refrigerator compartment every time the motor compressor stops, during normal use. The defrost water drains out through a trough into a special container at the back of the appliance, over the motor compressor, where it evaporates. The freezer compartment, however, will become progressively covered with frost. This should be removed with the special plastic scraper provided, whenever the thickness of the frost exceeds 4 mm.
MAINTENANCE Unplug the appliance before carrying out any maintenance operation. GB Interior light The light bulb inside the refrigerator compartment can be reached as follows: Internal clearing ■ Never use metal objects for clearing your appliance as it may get damaged. When performing a complete defrosting, wash the internal surfaces of the freezer with lukewarm water and bicarbonate; rinse and then accurately dry. External clearing Wash the outer body with lukewarm water and soap.