
Installation - Filter Cabinet User guide


Form I-CAUA-FC, Page 10
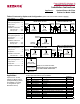
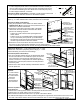
STEPS 1 and 2 Parts
Required:
1 Filter Cabinet Door
Channel
1 Filter Cabinet
Bottom/Top Panel
1 Filter Support
1 Filter Support
Channel
7 Screws from the Pkg
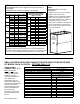
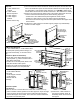
Instructions (Refer to Illustration):
1) One end of the lter cabinet will have an attached side panel, and the other will
have a removable door panel. On the end that is selected for the door panel, use
the "preparation" holes (located using dimension "F" in FIGURE 7) drilled in the
heater cabinet and screws from the kit to attach the lter cabinet door channel.
2) Remove the screws along the bottom edge of the heater cabinet and use those
screws to attach the lter cabinet pieces in the following sequence.
- Position the lter cabinet bottom panel against the heater cabinet.
- Position a lter support on top of the bottom panel (as illustrated).
- Re-insert the screws securing both the bottom panel and the lter support to the
heater cabinet.
3) Position the lter channel on the lter support (channel "up" as illustrated).
Attach to the lter support.
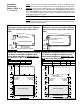
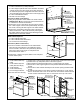
STEP 3 Parts Required:
1 Filter Cabinet Side; 1 Filter Cabinet Rear
Inlet Panel (with opening and duct ange); 1
Filter Channel Assembly; 13 Screws from the
Pkg
Instructions (Refer to Illustration):
1) On the side of the cabinet without the door
channel (STEP 1), position and attach the
lter cabinet side panel.
2) Position the rear inlet panel; attach to the
side panel and the bottom panel.
3) Position the lter channel assembly as
illustrated. Attach to the rear panel inlet.
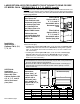
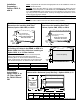
STEP 4 Parts Required:
1 Filter Cabinet Bottom/
Top Panel
1 Filter Support Channel
1 Filter Support
11 Screws from the
Package
Instructions (Refer
to Illustration):
1) Remove the row of screws above the cutout area. Position the top
panel on the lter cabinet; position the lter support on top of the edge
of the top panel; and re-insert the screws to attach both the top panel
and the lter support to the heater. Use screws from the kit to attach the
top panel to the rear inlet panel.
2) Position the lter channel on
the support (channel "down" as
illustrated). Attach the channel to
the support.