
Quick Start Guide


4. Configuring the Reader
To configure the Reader for operation, complete the following steps:
6.
Start the pcProx Configuration Utility software.
7.
Plug the reader into the workstation’s USB port.
a.
If the reader has a USB connector, verify the workstation detected the connection automatically using
Windows Device Manager.
8.
If your reader requires a custom configuration, refer to the pcProx Plus/pcProx Enroll Manual for detailed
information on the configuring the reader. The manual is available at www.rfIDEAS.com > Support >
Product Manuals.
9.
After the configuration settings are correctly configured and written/saved to the device, unplug the reader.
The reader is now ready for use.
Troubleshooting
If the device is not working or the following error message is displayed:
10.
Check to be sure the device is connected to the USB port. When the
workstation is on and no card is being read, the LED is red. A valid
proximity card causes the LED to turn green, provided the
configuration is not set to only read certain bit lengths.
11.
Verify the correct model and the software configuration screen agrees with the device attached.
12.
Verify the port agrees with the workstation connector.
13.
If the device still does not work, disconnect it, remove ‘General USB Device’ using Windows ‘Control Panel’ a
‘Add/Remove’ Hardware. Then reboot the workstation. When the workstation boots up, re-attach the device
USB and the OS should re-install the Windows driver automatically.
If the device does not read the card, contact the card manufacturer/vendor to verify that the card type is compatible
with the device model.
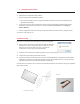
Reader
Radio Waves
Contactless Badge