
Instructions / Assembly


49
INSTALLATION INSTRUCTIONS
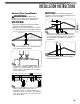
Plumbing
Open the shut-off valve in the COLD water Inlet
line to check the water flow through the water
heater.
Close the shut-off valve and remove, clean, and
replace the water filter.
NOTICES:
• Be sure to connect the COLD water inlet and the
HOT water outlet as shown on the water heater.
If reversed, the water heater will not function.
• The flow rate of HOT water may vary when more
than two faucets (appliances, fixtures, etc.) are
being used simultaneously.
• The pipes MUST be completely drainable. If the
HOT water faucets are located at a point higher
than the water heater, place a drain valve at the
lowest point.
It is recommended to use unions and flexible
copper connections at the COLD and HOT
water lines. They allow the water heater to be
disconnected easily for servicing.
Use the following guidelines when connecting
the HOT WATER OUTLET:
• Connections between the water heater and
point(s) of use should be as short as possible.
• Local codes shall govern the piping used for
water connections.
• To conserve energy and to prevent freezing,
insulate both COLD and HOT water supply lines.
Do not insulate drain line or pressure-relief valve.
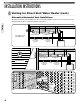
5
4
Pressure
Relief Valve
Pressure
Relief Valve
Cold Water
Service Valve
Cold Water
Service Valve
Water
Inlet
Water
Inlet
Water
Outlet
Water
Outlet
Hot Water
Service Valve
Hot Water
Service Valve
Drain
Drain
Water Piping Arrangement With Service Valve Kit
Service valve kits are available on all tankless
water heater systems. All kits include two full-port
isolation valves to be used in the COLD and HOT
water lines. When installed, these valves allow
one person full diagnostic testing and ease of
flushing the system. Contact your distributor or
place of purchase for availability and installation
information.
Water Supply Installation (cont.)