Owners Guide and Installation Instructions Electric Domestic Water Heater This water heater must be installed and serviced by an authorised person. Please leave this guide with the householder.
Notice to Victorian Customers from the Victorian Plumbing Industry Commission. This water heater must be installed by a licensed person as required by the Victorian Building Act 1993. Only a licensed person will give you a Compliance Certificate, showing that the work complies with all the relevant standards. Only a licensed person will have insurance protecting their workmanship for 6 years. Make sure you use a licensed person to install this water heater and ask for your Compliance Certificate.
CONTENTS HOUSEHOLDER - We recommend you read pages 4 to 14. The other pages are intended for the installer but may be of interest About Your Water Heater............................................................4 How Your Water Heater Works...................................................8 Regular Care ..............................................................................10 Save A Service Call ...................................................................12 Installation....................
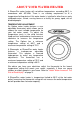
ABOUT YOUR WATER HEATER MODEL TYPE Congratulations for choosing a Rheem® water heater. The model you have chosen will be either a Rheemglas®, Optima™ or RheemPlus™ model. The Optima model has a temperature adjusting knob on the lower front of the water heater.
ABOUT YOUR WATER HEATER A RheemPlus water heater will not deliver temperatures exceeding 50°C, in accordance with AS 3498. There is no statutory requirement to fit a temperature limiting device if this water heater is installed in other than an early childhood centre, school, nursing home or a facility for young, aged, sick or disabled people.
ABOUT YOUR WATER HEATER WARNING This water heater is only intended to be operated by persons who have the experience or the knowledge and the capabilities to do so. This water heater is not intended to be operated by persons with reduced physical, sensory or mental capabilities i.e. the infirm, or by children. Children should be supervised to ensure they do not interfere with the water heater. This water heater uses 240 V AC power for the electrically operated components.
ABOUT YOUR WATER HEATER TO TURN ON THE WATER HEATER • Open the cold water isolation valve fully on the cold water line to the water heater. • Plug in the power supply cord at the power outlet (power supply cord model only). • Switch on the electrical supply at the isolating switch to the water heater. HOW DO I KNOW IF THE WATER HEATER IS INSTALLED CORRECTLY? Installation requirements are shown on pages 15 to 21.
HOW YOUR WATER HEATER WORKS Water is stored in a vitreous enamel lined steel cylinder and heated by the electric immersion heating unit. The thermostat controls the temperature. Automatic safety controls are fitted to the water heater to provide safe and efficient operation. MAINS PRESSURE The water heater is designed to operate at mains pressure by connecting directly to the mains water supply.
HOW YOUR WATER HEATER WORKS TWIN ELEMENT MODEL This type of water heater has two heating units, each with its own thermostat. One heating unit is at the base of the water heater and the other near the top. • Bottom heating unit During normal operation this heating unit supplies all the hot water. • Top heating unit (Booster) This heating unit only operates during periods of high demand to provide an additional supply of heated water.
REGULAR CARE TEMPERATURE PRESSURE RELIEF VALVE This valve is near the top of the water heater and is essential for its safe operation. It is possible for the valve to release a little water through the drain line during each heating period. This occurs as the water is heated and expands by approximately 1/50 of its volume. Continuous leakage of water from the valve and its drain line may indicate a problem with the water heater (refer to “Temperature Pressure Relief Valve Running” on page 13).
REGULAR CARE TEMPERATURE LIMITING VALVE A RheemPlus water heater is fitted with a temperature limiting valve at the hot water outlet. The valve is set to deliver water not exceeding 50°C. The valve should be checked for performance every twelve months. This can be performed by measuring the water temperature from a hot tap with a thermometer. If the water is being delivered at a temperature exceeding 50°C, phone your nearest Rheem Service Department or Accredited Service Agent to arrange for an inspection.
SAVE A SERVICE CALL Check the items below before making a service call. You will be charged for attending to any condition or fault that is not related to the manufacture or failure of a part. NOT ENOUGH HOT WATER (OR NO HOT WATER) • Is the electricity switched on? Inspect the isolating switch marked “HOT WATER” or “WATER HEATER” at the switchboard and the isolating switch (if one is installed) near the water heater and ensure they are turned on.
SAVE A SERVICE CALL • Water heater size Do you have the correct size water heater for your requirements? The sizing guide in the Rheem sales literature and on the Rheem website (www.rheem.com.au) suggests average sizes that may be needed. WATER TEMPERATURE TOO HIGH A RheemPlus water heater is fitted with a temperature limiting valve set to deliver water not exceeding 50°C.
SAVE A SERVICE CALL EXPANSION CONTROL VALVE RUNNING If an expansion control valve is fitted in the cold water line to the water heater (refer to page 23) it may discharge a small quantity of water instead of the temperature pressure relief valve on the water heater. The benefit is that energy is conserved as the discharged water is cooler.
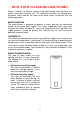
INSTALLATION THIS WATER HEATER IS NOT SUITABLE FOR POOL HEATING WATER HEATER LOCATION This water heater is suitable for either outdoor or indoor installation (a model with a supply cord and plug is suitable for indoor installation only). Whether located outdoor or indoor, the water heater should be installed close to the most frequently used outlet and its position chosen with safety and service in mind. Clearance must be allowed for servicing of the water heater.
INSTALLATION SAFE TRAY It is a requirement of AS/NZS 3500.4 that for a new installation, a water heater be installed in a safe tray where in the event of a leak, property may otherwise be damaged. Construction, installation and draining of a safe tray must comply with the abovementioned Standard.
INSTALLATION HOT WATER DELIVERY This water heater can deliver water at temperatures which can cause scalding. It is necessary and we recommend that a temperature limiting device be fitted between a Rheemglas or Optima water heater and the hot water outlets in any ablution area such as a bathroom or ensuite, to reduce the risk of scalding. The installing plumber may have a legal obligation to ensure the installation of this water heater meets the delivery water temperature requirements of AS/NZS 3500.
INSTALLATION A RheemPlus water heater will not deliver temperatures exceeding 50°C, in accordance with AS 3498. There is no statutory requirement to fit a temperature limiting device if this water heater is installed in other than an early childhood centre, school, nursing home or a facility for young, aged, sick or disabled people. CIRCULATED HOT WATER FLOW AND RETURN SYSTEM A RheemPlus water heater cannot be installed as part of a circulated hot water flow and return system in a building.
INSTALLATION Circulated Hot Water Flow and Return – Continuous Electric Water Heater Off-Peak or Time Controlled Electricity Supply A single or twin element electric water heater connected to an Off-Peak electricity supply should not be installed as part of a circulated hot water flow and return system in a building. The benefits of the Off-Peak electricity supply will be significantly reduced.
INSTALLATION REDUCING HEAT LOSSES The cold water line to and the hot water line from the water heater must be insulated in accordance with the requirements of AS/NZS 3500.4. The insulation must be weatherproof and UV resistant if exposed. ANODE TYPES The correct anode type for the water supply being used must be fitted in the water heater (refer to “Water Supplies” on page 33). The black anode is fitted as standard.
INSTALLATION TYPICAL INSTALLATION – OUTDOOR LOCATION TYPICAL INSTALLATION – INDOOR LOCATION 21
INSTALLATION DIMENSIONS AND TECHNICAL DATA Rheemglas and Optima Rheemglas Single Element Rheemglas Twin Element Optima Single Element Optima Twin Element RheemPlus Single Element RheemPlus 111 025 191 050 111 080 111 125 111 160 111 250 111 315 162 160 162 250 162 315 411 250 411 315 462 250 462 315 121 125 121 160 121250 121 315 111 400 162 400 411 400 462 400 - Hot Water Delivery Litres 18 50 80 125 160 250 315 Boost Capacity Litres - - - - 45 50 50 90 A mm 390 695 940 1340 1
CONNECTIONS – PLUMBING CONNECTION SIZES • Hot water connection: Rheemglas, Optima RP ¾/20 RheemPlus G¾B • Cold water connection: RP ¾/20 G¾B • Relief valve connection: RP ½/15 RP ½/15 All plumbing work must be carried out by a qualified person and in accordance with the Plumbing Standard AS/NZS 3500.4 and local authority requirements. WATER INLET AND OUTLET All pipe work must be cleared of foreign matter before connection and purged before attempting to operate the water heater.
CONNECTIONS – PLUMBING LEFT AND RIGHT HAND SIDE WATER CONNECTIONS The cold water supply, hot water supply and temperature pressure relief valve can be connected to either side of a water heater with both left and right hand side water connections. A kit is supplied with the water heater to plug off the unused cold, hot and temperature pressure relief valve fittings.
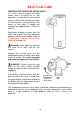
CONNECTIONS – PLUMBING USE TEFLON TAPE FIT SUPPLIED INSULATION TO VALVE AS SHOWN Screw the valve into the correct opening (refer to the installation diagram on page 21) leaving the valve outlet pointing downwards. Do not use a wrench on the valve body - use the spanner flats provided. RELIEF VALVE DRAIN A copper drain line must be fitted to the relief valve to carry the discharge clear of the water heater. Connect the drain line to the relief valve using a disconnection union.
CONNECTIONS – PLUMBING EXPANSION CONTROL VALVE Local regulations may make it mandatory to install an expansion control valve (ECV) in the cold water line to the water heater. In other areas, an ECV is not required unless the saturation index is greater than +0.4 (refer to “Water Supplies” on page 33). However, an ECV may be needed in a corrosive water area where there are sufficient quantities of silica dissolved in the water.
CONNECTIONS – ELECTRICAL The power supply to the water heater must not be switched on until the water heater is filled with water and a satisfactory megger reading is obtained. All electrical work and permanent wiring must be carried out by a qualified person and in accordance with the Standards Australia Wiring Rules AS/NZS 3000 and local authority requirements.
CONNECTIONS – ELECTRICAL ASSEMBLY OF ADJUSTER MECHANISM ON OPTIMA MODEL When the front cover has been removed, reassemble as follows: • Remove the knob from the front cover by depressing the locking tabs on the inside of the front cover. • Turn the thermostat to the lowest temperature (refer to “Temperature Adjustment” on page 5). • Fit the front cover. • Insert the connector shaft through the hole into the thermostat adaptor slots.
CONNECTIONS – ELECTRICAL Electrical Circuit for Twin Element Models – Robertshaw “ST” Thermostats The active from the continuous supply must be connected to the top heating unit circuit and the active from the Off-Peak or time controlled supply must be connected to the bottom heating unit circuit.
COMMISSIONING TO FILL AND TURN ON THE WATER HEATER The power supply to the water heater must not be switched on until the water heater is filled with water and a satisfactory megger reading is obtained. • Open all of the hot water taps in the house (don’t forget the shower). • Open the cold water isolation valve fully on the cold water line to the water heater. Air will be forced out of the taps. • Close each tap as water flows freely from it. • Check the pipe work for leaks.
DRAINING THE WATER HEATER To drain the water heater: • Turn off the water heater (refer to “To Turn Off The Water Heater” on page 30). • Close all hot water taps. • Operate the relief valve release lever - do not let the lever snap back or you will damage the valve seat. Operating the lever will release the pressure in the water heater. • Undo the union at the cold water inlet to the water heater and attach a hose to the water heater side of the union. Let the other end of the hose go to a drain.
This page is intentionally blank.
WATER SUPPLIES Your water heater is manufactured to suit the water conditions of most metropolitan supplies. However, there are some known water supplies which can have detrimental effects on the water heater and its operation and/or life expectancy. If you are unsure of your water quality, you can obtain information from your local water supply authority. The water heater should only be connected to a potable water supply.
WATER SUPPLIES SATURATION INDEX The saturation index is used as a measure of the water’s corrosive or scaling properties. In a corrosive water supply, the water can attack copper parts and cause them to fail. Where the saturation index is less than –1.0, the water is corrosive and a corrosion resistant heating unit should be used. In a scaling water supply calcium carbonate is deposited out of the water onto any hot metallic surface. Where the saturation index exceeds +0.
RHEEM MAINS PRESSURE WATER HEATER WARRANTY (EXCLUDING SOLAR) - AUSTRALIA ONLY WARRANTY CONDITIONS 1. This warranty is applicable only to water heaters and the installed site shall be the owner’s responsibility. manufactured from 1st September 2006. 5. Where the water heater is installed in a position that does not allow safe, ready access, the cost of 2.
RHEEM MAINS PRESSURE WATER HEATER WARRANTY (EXCLUDING SOLAR) - AUSTRALIA ONLY WARRANTY Rheem will: a) Repair or, if necessary replace any Rheem water heater; or b) Replace any component (or, if necessary, arrange the installation of a new water heater), which falls within the Warranty Periods specified below, subject to the warranty conditions and exclusions.