
Instructions / Assembly


AP18733 REV. 3.2.17
60
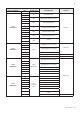
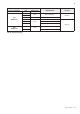
Parameter Detail Description
A:Li or GA
Flow Unit
Current Flow Unit
(Li: Liters/min, GA: Gallons/min)
b:Fr
Fan Speed (RPM) Current Fan Speed RPM Value
C:Lc
Lock Mode
Lock Mode is In Use (ON) or Unused (OFF)
Allows user to lock out any temperature change.
d:Op
Operating Temperature Current Heat Exchanger Operating Temperature
E:dH
DHW Outlet Temperature Current DHW Outlet Temperature
F:Eh
Exhaust Temperature Current Exhaust Temperature
H:In
Inlet Water Temperature Current Inlet Water Temperature
I:rt
PH
Power On Time Power On Time: 1,000 hour increments
rH
Burner Operating Time Burner Operating Time: 1,000 hour increments
bnCY
Burner Cycles Burner Cycles: 1,000 times unit displayed
PPHr
Pump Running Time 1,000 hour increments
J:AG
AGM Adjusts AGM Position: + / - 50
K:TA
Time Adjustment Current Clock Setting
Table 25 – Status Mode Display Screen Descriptions – NOTE: Shaded Parameters Not Used on This Software Version
Turn the dial counterclockwise and clockwise to scroll through the displayed parameters. To view parameter details, press the button at
the appropriate screen. Press the or buttons to leave the parameter.
Press the button again to return to Operation Mode.
To turn on Lock Mode, press the button at the C: Lc parameter. Turn the dial counterclockwise and clockwise to scroll On or Off.
Press the button to save the selection and return to the parameters.
Press the button again to return to Operation Mode.
NOTE: The Control System will not allow the changes if Lock Mode is activated. Lock Mode will have to be turned off before making further
changes
▪ F. CHANGING THE TIME
Press and hold the button for ve seconds when the display panel is powered ON to enter Status Display Mode. Turn the dial
counterclockwise and clockwise to scroll through the displayed parameters to parameter K:TA Press the button to enter and change the time.
The time can be adjusted as follows: Year / Month / Date / Hour / Minute / Day of Week.
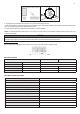
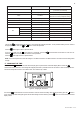
Figure 37 – Changing the Time Screen
Turn the dial counterclockwise to lower and clockwise to raise the current time setting. After changing the setting, press the button to
save it. The next adjustable setting will appear. After the time settings have been entered, press the button to save and return to the Status
Display screens.