
Instructions / Assembly

73
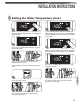
Start/Adjust
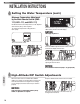
INSTALLATION INSTRUCTIONS
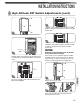
High-Altitude DIP Switch Adjustments (cont.)
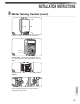
Remove the front cover panel on the water heater.
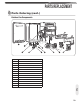
Find DIP Switch 2 located in the top-right portion of the
control board. The switch labeled “DIP 2” is the bottom
switch.
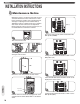
The factory settings for this switch should all be in the
OFF position (DOWN).
If altitude is above 2000 ft. (610 m) and below 5,400 ft.
(1650 m), change the third switch on “DIP 2” to the ON
position (UP).
If altitude is above 5,400 ft. (1650 m) and below 8,500
ft. (2590 m), change the fourth switch to the ON
position (UP).
NOTICE:
DO NOT alter any other DIP switch settings. The manifold
pressure will be reduced accordingly.
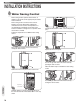
Some models are not available at higher than 5400
ft (1650m). Please contact technical service listed on
page 26 of this use and care manual if you have any
questions of high altitude DIP switch adjustments.
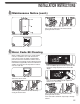
Replace the front cover panel.
Turn on the gas and water to the water heater by
opening the shut-off valves.
Control
Board
Dip Switches
3
5
2
7
4
As set
from factory
MIN MAX ADJ
8
6