Use & Care Manual With Installation Instructions for the Installer Direct Vent Gas Tankless Water Heater ! The purpose of this manual is twofold: one, to provide the installer with the basic directions and recommendations for the proper installation and adjustment of the water heater;; and two, to the owner–operator, to explain the features, operation, safety precautions, maintenance and troubleshooting of the water heat
Safety Information FOR YOUR RECORDS Safety Precautions . . . . . . . 3–6 Write the model and serial numbers here: LP Gas Models . . . . . . . . . . . 5 # Installation Instructions # Location . . . . . . . . . . . . . . . . . .7 You can find them on a label on the appliance. Inspect Shipment . . . . . . . . . . .8 Staple sales slip or cancelled check here. Venting . . . . . . . . . . . . . . .
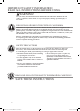
IMPORTANT SAFETY INFORMATION. READ ALL INSTRUCTIONS BEFORE USING. Be sure to read and understand the entire Use and Care Manual before attempting to install or operate this water heater. It may save you time and money. Pay particular attention to the Safety Instructions. Failure to follow these warnings could result in serious bodily injury or death.
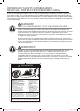
IMPORTANT SAFETY INFORMATION READ ALL INSTRUCTIONS BEFORE USING. ! DANGER! WATER TEMPERATURE SETTING Safety and energy conservation are factors to be considered when selecting the water temperature setting of a water heater’s remote control. Water temperatures above 125°F (52°C) can cause severe burns or death from scalding. Be sure to read and follow the warnings outlined on the label pictured below.
DANGER! NATURAL GAS AND LIQUEFIED PETROLEUM MODELS Both LP and natural gas have an odorant added to aid in detecting a gas leak. Some people may not physically be able to smell or recognize this odorant. If you are unsure or unfamiliar with the smell of LP or natural gas, ask the gas supplier. Other conditions, such as “odorant fade”, which causes the odorant to diminish in intensity, can also hide or camouflage a gas leak.
IMPORTANT SAFETY INFORMATION READ ALL INSTRUCTIONS BEFORE USING. ! WARNING! For your safety, the information in this manual must be followed to minimize the risk of fire or explosion, electric shock, or to prevent property damage, personal injury or loss of life.
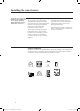
Installing the water heater : This water heater must be installed in accordance with these instructions, local codes, utility company requirements and/or in the absence of local codes, use the latest edition of the American National Standard/ National Fuel Gas Code. A copy can be purchased from either the American Gas Association, 400 North Capitol Street Northwest, Washington, DC 20001 as ANSI standard Z223.
Installing the water heater: NOTICE: The water heater should not be installed near an air supply containing halogenated hydrocarbons and/or other corrosives. Corrosive Atmospheres The air in beauty shops, dry cleaning establishments, photo processing labs, and storage areas for liquid and powdered bleaches or swimming pool chemicals often contains such halogenated hydrocarbons and/or corrosives.
The water heater must be installed with a 3”/5” diameter UL approved Category III Concentric Stainless Steel appliance concentric vent pipe or Rheem approved concentric vent pipe.
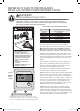
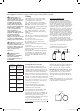
Installing the water heater: Venting Through Closed Spaces 1/4" per foot downward slope Wall Plates 94° Elbow Fire Stop Vent Pipe 12” (min) (30 cm) Follow local codes and vent manufacturer’s installation instructions. For maintenance and inspection purposes two (2) inspection access panels large enough to allow access for venting inspection may be required.
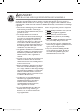
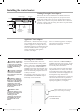
G v H A D E V B B B OPE C V L LE RAB OPE F B v A M I X K X v B v v ED FIX ED S CLO v ED FIX ED S CLO v E RABL J B V VENT TERMINAL AREA WHERE TERMINAL IS NOT PERMITTED X AIR SUPPLY INLET Horizontal Vent Terminal Location The following information should be used for determining the proper location of the vent terminal for direct vent tankless water heaters.
Installing the water heater: Additional Considerations Indoor Water Heater Do NOT install vent terminal under any patio or deck. To help prevent moisture from freezing on walls and under eaves, do not locate vent terminal on the side of a build ing with prevailing winter winds. Caulk Rising moisture will collect under eaves. If soffit vent is too close, block off and install new vent at another location.
Installing the water heater: Horizontal Vent Installation continued. Interior Wall Exterior Wall Wall Plate 94° Elbow Determine the heater location and wall construction for correct screw and anchor selection. If mounting on drywall/wallboard it is recommended to locate the wall studs and secure a 1/2 or 3/4" plywood backing plate to the wall studs. Use 4 hollow wall anchors, at least Condensate Drain Line Connection 1/8 inch (0.
Installing the water heater: Vertical Vent Termination Location The location of the vent terminal depends on the following minimum clearances and considerations (see diagram at left): Only Rheem approved termination and parts should be used during installation. Minimum twelve (12) inches (30 cm) above roof.2 Minimum twelve (12) inches (30 cm) above anticipated snow level.
Mounting the Water Heater CAUTION: Reinforcement of the wall is required in case the wall is not strong enough to hold the appliance. Upper Bracket Washer 1/8" (.32 cm) Clearance Wood Screw Wood Screw lower bracket to the wall (Left and Right). Repeat to affix the top bracket. Wall studs should be utilized when mounting the water heater to the wall.
Installing the water heater: Water Supply Connections, continued CAUTION: This water heater must only be used with the following water supply system conditions: ● With clean, potable water free of corrosive chemicals, sand, dirt or other contaminates. ● With inlet water temperatures above 32°F (0°C), but not exceeding 120°F (49°C). ● With recommended water quality (see chart bellow).
Relief Valve A new pressure relief valve, complying with the Standard for Relief Valves and Automatic Gas Shut-Off Devices for Hot Water Supply Systems, ANSI Z21.22/ CSA 4.4, must be installed at the hot water outlet connection of the water heater at the time of installation. Local codes shall govern the installation of relief valves. Drain Valve shown on right without tubing.
Installing the Main Remote Control: WARNING: Do not attempt to convert this water heater for use with a different type of gas other than the type shown on the rating plate. Such conversion could result in hazardous operating conditions.
WARNING: Field wiring connections and electrical grounding must comply with local codes, or in the absence of local codes, with the latest edition of the National Electrical Code, ANSI/NFPA 70, or in Canada, Canadian Electrical Code, CSA C22.1 Part 1. NOTICE: The provided remote control will allow a maximum temperature setting of 120°F (49°C).
Installing the Main Remote Control: WARNING: Field wiring connections and electrical grounding must comply with local codes, or in the absence of local codes, with the latest edition of the National Electrical Code, ANSI/NFPA 70, or in Canada, Canadian Electrical Code, CSA C22.1 Part 1. Remote Control Installation Connecting the MAIN (UMC-117 ) remote NOTICE: Remote control control to the water heater: cable is included in the carton.
WARNING: Field wiring connections and electrical grounding must comply with local codes, or in the absence of local codes, with the latest edition of the National Electrical Code, ANSI/NFPA 70, or in Canada, Canadian Electrical Code, CSA C22.1 Part 1. Electrical Connection POWER CORD: WARNING: Shock hazard line voltage is present.
Installing the water heater: Typical Installation of Water Heater (Venting Required) 1/4” Per Foot Downward Pitch Wall Plate 94° Elbow Vent Termination With Protective Screen Vent Adapter Condensate Drain Line (to Suitable Drain) Outside Wall Drain Valve Water Filter Relief Va lve To Hot Water Faucet(s) Manual Gas Appliance Shut-off Union Check Va lve Cold Water Supply Shut-of Va lve Drain Hose 6” (15 cm) Air Gap Manual Gas Supply Line Shut-off Va lve (supplied) Union Sediment
Insulation Blankets WARNING: If local codes require external application of insulation blanket kits the manufacturer’s instructions included with the kit must be carefully followed. Insulation blankets, available to the general public for external use on gas water heaters, are not necessary. The purpose of an insulation blanket is to reduce the standby heat loss encountered with storage tank heaters.
Installing the water heater: Installation Check List A. Indoor Water Heater Location ❑ ❑ ❑ ❑ Close to area of vent termination. ❑ Approved pipe joint compound used. ❑ Soap and water solution used to check all connections Indoors and protected from freezing temperatures. Proper clearance from combustible surfaces observed. Sufficient fresh air supply for proper operation of water heater.
Lighting the water heater: Before operating this water heater, be sure to read and follow the instructions on the label pictured below and all other labels on the water heater, as well as the warnings printed in this manual. Failure to do so can result in unsafe operation of the water heater, resulting in property damage, personal injury or death.
Operating the water heater: Safety Precautions Do turn off manual gas shut-off valve if water heater has been subjected to overheating, fire, flood, physical damage or if the gas supply fails to shut off. Do Not turn on water heater unless water and gas supplies are fully opened. Do Not turn on water heater if cold water supply shut-off valve is closed.
Water Temperature Setting… Maximum water temperature occurs while the burner is on. To determine the water temperature, turn on a hot water faucet and place a thermometer in the water stream. Water temperature at the faucet may vary depending on season and length of pipe from the water heater. adjustment. Only factory authorized remote control(s) should be used.
Care and cleaning of the water heater: DANGER: Before manually operating the relief valve, make certain no one will be exposed to the danger of the hot water released by the valve. The water may be hot enough to create a scald hazard. The water should be released into a suitable drain to prevent injury or property damage. ! DANGER: Hotter water increases the potential for Hot Water Scalds.
Housekeeping, continued CLEANING THE WATER HEATER AND REMOTE CONTROL(S): ● Make sure the unit is OFF and the electrical power supply has been disconnected. ● DO NOT scrub the appliance with a brush. ● Use only mild soapy water;; other cleaners may damage the surface of the water heater. ● DO NOT remove any label including the rating plate while cleaning or servicing.
Care and cleaning of the water heater: Draining the Water Heater Below are instructions for draining water out of the water heater. suitable drain where it will cause no damage. Leave water heater as is until next use. Turn off the switch on the remote control. To put the water heater back into operation after draining, follow the steps below. Close the gas shut-off valve(s).
Before You Call For Service… Troubleshooting Tips Save time and money! Review the charts on the following pages first and you may not need to call for service. Problem Possible Cause What To Do Not enough or no hot water. Water Shutoff valve is not fully opened. ● Check shutoff valve and open fully. Hot water faucet is not fully opened. ● Open hot water faucet completely.
Error Code Guide: When an error code is displayed: ● Close the hot water faucet, turn off the switch on the remote control. ● Wait for about 5 minutes before turning the switch on again. ● Open the hot water faucet. If the error code remains in the display: ● Close the hot water faucet and turn off the switch on the remote control. ● Take the proper action shown below and attempt operation of the appliance again.
Replacement Parts: Direct Vent Water Heater Instructions For Placing a Parts Order WARNING: For your safety, DO NOT attempt to disassemble this unit for any reason. Address parts orders to the distributor or store where the water heater was purchased. All parts orders should include: The model and serial number of the water heater from the rating plate. Specify type of gas (natural or LP) as marked on the rating plate.
The content on this page is intended for use by qualified installation/service personnel ONLY. WARNING: Improper adjustment, alteration, service or maintenance can cause property damage, personal injury, or death. Maximum Temperature Adjustment by the Main Remote Control (UMC-117) Required adjustment for up to 140°F (60°C) water temperature settings for Residential product or 185° (85° C).
The content on this page is intended for use by qualified installation/service personnel ONLY. WARNING: Improper adjustment, altera- tion, service or maintenance can cause prop- erty damage, personal injury, or death.
IF YOU NEED SERVICE 1. Should you have any questions about your new water heater, or if it requires adjustment, repair, or routine maintenance, it is suggested that you first contact your installer, plumbing contractor or previously agreed upon service agency. In the event the firm has moved, or is unavailable, refer to the telephone directory, commercial listings or local utility for qualified service assistance. 2.