
Instructions / Assembly


10
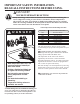
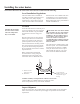
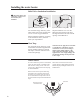
Installing the water heater.
For increased energy efficiency, some
water heaters have been supplied with
a 2-3/8” section of pipe insulation.
Please install the insulation, according
to the illustrations above, that best
meets your requirements.
Slip the insulation cover over the
T&P Valve through the center hole
and align the hole in the side with the
opening of the T&P Valve.
Typical top connection arrangement
Typical side connection arrangement
Relief Valve Insulation Installation
!
CAUTION: Ensure the
T&P Valve opening is not
obstructed by the
insulation.
Heat Trap
For increased energy efficiency, some
water heaters have been supplied with
factory installed internal or external
heat traps in the hot outlet and cold
water inlet openings.
NOTICE: Do not apply heat to the HOT
or COLD water connections. If sweat
connections are used, sweat tubing to
adapter before fitting adapter to the
water connections on heater. Any heat
applied to the water supply fittings will
permanently damage the dip tube and/
or heat traps.
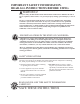
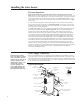
Water Sensor
In order to detect the presence of unwanted
water, this water heater is supplied with a
built-in water sensing circuit. The water
sensor rope is shipped in the warranty bag
for eld installation.
Remove water sensor rope from the bag
and attach to the connector located near
the lower access panel. Place the rope in
the recommended catch pan and secure to
the pan bottom with provided self adhesive
clips.
When water is detected, the electronic
control will turn off the heating elements,
ash the display backlight and turn on an
audible alarm.
Water Sensor Rope
Attachment Point
Clips
Catch Pan