TELECOM LASER MFP SP 1000SF Operating Instructions Read this manual carefully before you use this machine and keep it handy for future reference. For safe and correct use, be sure to read the Safety Information in this manual before using the machine.
Contents Security Security directives Laser safety For Europe/Asia For North America Declaration of conformity Notice to Users in EEA Countries Notice to Users Accessing Analog PSTN in EEA Countries Symbols for the main power switch Positions of Warning and Caution labels on the machine FCC Compliance Note to users in the United States of America Notice about the Telephone Consumer Protection Act (Valid in USA only) Note to users in Canada Remarque concernant les utilisateurs au Canada FCC Requirements Noti
Local prefix Transmission report Document feed type Economy period Reception Mode Reception without paper Number of copies Fax or PC reception Received faxes reduction mode Technical Parameters Printing the functions guide Printing the logs Print the list of setups Lock the machine Lock the keyboard Lock the numbers Read the counters Sent pages counter Received pages counter Scanned pages counter Printed pages counter Display the consumables status Calibrate your scanner Directory Creating Speed dial Creat
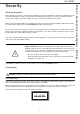
Security Security directives Before turning on your device, check that the outlet that you are going to plug it into conforms to the indications shown on the information plate (voltage, current, power network frequency) located on your device. This device shall be connected to a single phase power network. The device shall not be installed on bare ground.
For North America CDRH Regulations. This equipment complies with requirements of 21 CFR subchapter J for class 1 laser products. This equipment contains 1 class 3B laser diode, 10.72 milliwatt, 760-780 nanometer wavelength for each emitter. This equipment does not emit hazardous light, since the beam is totally enclosed during all customer modes of operation and maintenance.
1 - Security - Certification - Environment - Licence SP 1000SF FCC Compliance Note to users in the United States of America This equipment has been tested and found to comply with the limits for a Class B digital device, pursuant to Part 15 of the FCC Rules. These limits are designed to provide reasonable protection against harmful interference in a residential installation.
CAUTION : Changes or modifications not expressly approved by the party responsible for compliance could void the user's authority to operate the equipment.
Notice to users (New Zealand) • • • • • • • • • The grant of a Telepermit for any item of terminal equipment indicates only that Telecom has accepted that the item complies with minimum conditions for connection to its network. It indicates no endorsement of the product by Telecom, nor does it provide any sort of warranty.
Environment The preservation of the environment is of importance to the manufacturer. The manufacturer wishes to service the installations with respect to the environment and has chosen to integrate the environmental performance in the whole lifecycle of its products, throughout manufacturing, release, use and disposal. Batteries and rechargeable batteries If your product contains batteries or rechargeable batteries, these shall be disposed of at the designated collecting centers.
Software use license CAREFULLY READ ALL THE TERMS AND CONDITIONS OF THE PRESENT LICENSE BEFORE OPENING THE SEALED ENVELOPE CONTAINING THE SOFTWARE. OPENING THIS ENVELOPE INDICATES THAT YOU ACCEPT THESE TERMS AND CONDITIONS. In case you should not accept the terms of this license, the CD-ROM packaging should be returned to the retailer unopened, along with the other components of the product. Definition The Software designates programs and associated documentation.
Registered trademarks Companion Suite Pro is a registered trademark of Sagem Communication. Adobe® and the Adobe® products referred to here are registered trademarks of Adobe Systems Incorporated. PaperPort9SE is a registered trademark of ScanSoft.
Installation Location conditions By choosing an appropriate location, you preserve the longevity of the machine. Check that the selected location has the following characteristics: - Choose a well ventilated location. - Make sure not to obstruct the ventilation grids located on the left and right sides of the device. During the installation, make sure to place the machine thirty centimeters away from the surrounding objects so all the lids can be easily opened.
- If liquid or metallic item gets accidentally inside the machine, turn it off immediately, unplug the power cord and contact your retailer. Otherwise, you would face a fire hazard or an electric shock hazard. - In case of heat, smoke, unusual smell or abnormal noise emissions, turn the machine off, unplug the power cord immediately and contact your retailer. Otherwise, you would face a fire hazard or an electric shock hazard.
- For environmental reasons, do not dispose of the product or expended supply wastes at household waste collection point. Disposal can take place at our authorized dealer or at appropriate collection sites. - Our products are engineered to meet the high standards of quality and functionality, and we recommend that you only use the expendable supplies available at an authorized dealer. Power Supply The socket-outlet shall be installed near the product and shall be easily accessible.
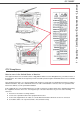
SP 1000SF 2 - Installation Terminal description Front side Document feeder Command panel Paper output Smart card insertion point Fold-down stopper for paper delivery Master USB connection (USB key) Front cover Manual input tray Manual paper feed setup guides Paper tray Back side Paper jam cover Master USB connection (USB key) * Slave USB connection (for PC) Power supply cord connection EXT.
SP 1000SF 2 - Installation Command panel Presentation 1 21 22 23 24 25 26 2 3 27 20 19 18 17 16 15 14 13 12 11 10 9 8 7 6 4 5 2. Alphanumerical keypad. 14. Button C: back to the previous menu and input correction. 3. One-Touch keypad (buttons 1 to 20). 15. Button 4. Button : document analysis to the PC or a media (USB key). 16. Button 5. Button 18. Button : colour analysis mode selection. 19. Button : analysis resolution setup. 20. Button : contrast setup. 1. Screen.
The following table gives all available characters. Key Assigned numbers, letters, or characters Key Assigned numbers, letters, or characters 1 P, Q, R, S, p, q, r, s, 7 A, B, C, a, b, c, 2 T, U, V, t, u, v, 8 D, E, F, d, e, f, 3 W, X, Y, Z, w, x, y, z, 9 G, H, I, g, h, I, 4 Space 0 @ .
Packaging contents Device installation The packaging contains the items listed below: 1 Unpack the device. 2 Install the device respecting the security notices stated at the beginning of this booklet. 3 Remove all stickers from the machine. 4 Remove the plastic protection film from the screen. Multifunction device Installing the document feeder 1 Secure the document feeder by fitting the two clips (B) in the notches (A) provided for this purpose.
(3) Paper with waved ends, paper which is creased, paper with crumples, and any other non-normal paper must not be used. 2 - Installation SP 1000SF C Handling the unit Operator shocks During printing, shocks must not be applied to the paper feed cassette, tray, cover, and other parts of the machine. A Moving the unit 5½ 7¼ 8 When moving the unit on a desk, it must be lifted, and not dragged. Handling the Toner Cartridge (1) Must not be stood on the side, or held upside down.
Starting your device 4 Hold it by its handle. Device connection Before plugging the power cord, it is WARNING imperative to refer to the Security directives, page 1. 5 Insert the cartridge in its slot by pushing it until it clicks (last move down) as shown on the picture below. 1 Plug the end of the telephone line into the terminal socket and the other end into the wall telephone socket. 6 Close the cover.
Paper insertion in the manual input tray The manual input tray allows you to use various paper formats with greater weightings than the one used in the paper feed cassette. Only one sheet or envelope can be fed at a time. Important See chapter Specifications for the various formats and types of paper. 1 Spread the manual feed guides to the maximum. 2 Insert a sheet or an envelope in the manual input tray. 3 Adjust the paper guides against the right and left edges of the sheet or the envelope.
Copy 2 Press the button. 3 Enter the number of copies that you want and confirm with the OK button. 4 Choose the paper tray AUTOMATIC or MANUAL with the buttons or , then confirm with the OK button. 5 Choose with the buttons or the printing option (see examples below) depending on the copy mode that you want: Combined mode (document feeder): 1 Page onto 1, 2 Pages onto 1, or 4 Pages onto 1. - Poster mode (flat-bed scanner): 1 Page to 1, 1 Page to 4 or 1 page to 9. Confirm with the OK button.
Resolution setup Contrast setup The RESOLUTION parameter allows you to setup the photocopy resolution. The CONTRAST parameter allows to choose the photocopy contrast. 841 - ADVANCED FCT/COPY/RESOLUTION 845 - ADVANCED FCT/COPY/CONTRAST 1 Choose the resolution with the buttons according to the following table: Parameter or 1 Setup the desired level of contrast with the buttons and , confirm by pressing the OK button.
3 Quit this menu by pressing the button. 857 - ADVANCED FCT/SCAN. & PRINT/ PAPER FORMAT Sheet-feed analysis margins setup If you want to, you can offset the lateral margins of the document to the left or right during the analysis with your sheet-feed scanner. 853 - ADVANCED FCT/SCAN. & PRINT/ S.F. MARGINS 1 Setup the left / right margins offsets (by 0.5 mm steps) with the buttons and . 2 Confirm by pressing the OK button. 3 Quit this menu by pressing the button.
Fax Transmission with auto redial This chapter describes all the fax processing and configuration functions. Fax transmission Immediate transmission 1 Place the document to be copied in the automatic document feeder, face printed on the top. or Place the document to be copied face down on the glass, respecting the indications around the glass. 2 Enter the fax number then press This function allows you to monitor the dialling operation during a fax transmission.
Manual tray paper format A5 A5 Main tray paper format Action A4,Letter and Legal An error message is displayed on the screen. The paper on manual tray is incompatible. A5 An error message is displayed on the screen. The paper on manual tray is incompatible. Saving an access code 383 - FAX / FAX ANSW. / ANSWER CODE 1 Enter the code (4 digits) and confirm with OK. Activating / Deactivating the answering device 382 - FAX / FAX ANSW.
Transmission waiting queue Printing rerouted documents 393 - FAX / REROUTING / COPY 1 Using the buttons and within the navigator, select the COPY option (local printout of the information relayed to your device) either WITH or WITHOUT. 2 Confirm with OK. 3 Quit this menu by pressing the button. Rerouting fax messages to a USB memory key This function allows you to reroute received fax messages to a USB memory key connected to your terminal. The USB memory key then becomes the terminal reception memory.
Printing a document in waiting or in deposit Placing a document in deposit 64 - COMMANDS / PRINT 1 Insert the document to deposit in the feeder. 2 Select 34 - FAX / POLLING TX and confirm with OK. 3 Choose the deposit type, according to the table below: 1 In the waiting queue select the desired document and confirm your choice with OK. Printing the waiting queue 65 - COMMANDS / PRINT LIST Menu A document called ** COMMAND LIST ** is printed.
Parameters/ Setup Type of network You may connect your fax to either a PSTN or private network such as private automatic branch exchange (PABX). You must select the network which is the most convenient. To select the type of network: You can setup your machine as you like depending on the use. You will find in this chapter description of the functions. 251 - SETUP / TEL. NETWORK / NETWORK TYPE You can print the functions guide and the available setup of your multifunction machine.
Language Transmission report This setting enables you to choose the menu language of your choice. By default, the multifunction machine is set to English. To select the language: You may print a transmission report for all communications over the telephone network (STN).
Economy period This function allows you to defer a fax transmission to "offpeak hours" and thus reduce the cost of your communications. The economy period, via the telephone network (at offpeak hours), is preset by default from 7.00 pm to 7.30 am. Nevertheless you may change this time slot.
1 Select Automatic and confirm with OK. 2 To exit this menu, press Parameter . Manual mode : The machine proposes a 70 to 100 % reduction. Outside these values, the machine beeps for error. This fixed reduction will be used when printing received documents, regardless of the used paper format. To set the manual mode : 246 - SETUP / RECEPTION / REDUCTION 1 Select FIXED and confirm with OK. 2 Enter the reduction value (between 70 and 100) and confirm with OK.
Parameter 79 - Toner Management This parameter helps you manage the consumable. When set to WITH [0-10%], you can only replace the toner cartridge when the toner has reached the threshold. If ever you need to replace the toner cartridge before the toner near end, set the parameter to WITH [0-100%] and proceed with the toner cartridge replacement (see chapter Maintenance, page 50).
Lock the keyboard Scanned pages counter Everytime you use your machine, you will have to enter your code. To view the number of pages scanned on your machine: 823 - ADVANCED FCT / COUNTERS / SCANNED PAGE 812 - ADVANCED FCT / LOCK / LOCK KEYBD. 1 Press on , enter 823 with the keyboard. 2 The number of scanned pages appears on the screen. 3 Quit this menu by pressing the button. 1 Press on , enter 812 with the keyboard. 2 Enter the lock code and confirm with OK.
Directory Creating Group dial To create group dial: 12 - DIRECTORY / NEW GROUP Your multifunction machine lets you create a directory by memorising subscriber records and subscriber lists. Your machine can store up to 250 speed dials, which includes 32 Group dials and 20 one-touch dials. 1 Press on , enter 12 with the alphanumerical keypad. 2 Enter the GROUP NAME with the alphanumerical keypad (20 characters maximum), confirm with OK.
Printing the directory Important The printing is not possible on A5 paper format. To print the directory: 15 - DIRECTORY / PRINT 1 Press on keypad. , enter 15 with the alphanumerical The printing of the directory starts, alphabetically ordering directory entries in the following three categories: • Directory (speed and groups dial list), • Group dial list, • One-Touch dial list.
USB memory key - You can connect a USB memory Key on the front side of your machine. The files stored in TXT, TIFF and JPEG formats will be analysed and you will be able to use the following actions: - print the stored files contained in your USB memory key1, - delete the files contained in your USB memory key, - run an analysis on the contents of the inserted USB memory key, - digitalise a document on your USB memory key, - fax archiving (see section Rerouting fax messages to a USB memory key, page 24).
1 Place the document to be copied face down on the glass. 2 Insert the USB memory key in the USB connector of your multifunction device. The USB memory key analysis is started. When the analysis is finished, the MEDIA menu is displayed. 3 Select SCAN TO with the or buttons then confirm with the OK button. 5 You have three possibilities to delete your files: - ALL, to delete all the files located in the USB memory key. Select ALL with the or buttons and confirm with OK. You come back to the previous menu.
To activate this option, proceed as follows : 0621 - MEDIA / DELETE / AUTOMATIC/ SCAN MODE 1 Select WITH with the with the OK button. or buttons then confirm To deactivate this option, proceed as follows : 0621 - MEDIA / DELETE / AUTOMATIC/ SCAN MODE 1 Select WITHOUT with the or confirm with the OK button.
PC Features This screen allows you to install and uninstall the software, access the product's user guides or browse the CD-ROM contents. 4 Place your cursor on INSTALL PRODUCTS and confirm with left-click of the mouse. 5 The INSTALL PRODUCTS screen appears. Place your cursor on ALL PRODUCTS and confirm by left-click with the mouse. Introduction The Companion Suite Pro software allows the connection of a personal computer with a compatible multifunction machine.
6 After restart, the InstallShield Wizard screen shows the progress of the assistant preparation. You can stop the procedure at any time by clicking on the CANCEL button. 12 The final installation is ready to be executed. 13 Click on the INSTALL button. 14 A screen informs you of the installation progress. 7 When the assistant finishes, the welcome screen appears. 15 The Companion Suite Pro software is installed on your PC.
5 Select the location where the system has to look for the driver. Only the CD-ROM DRIVES checkbox has to be selected if Windows asks you where to look for the drivers. Click on the NEXT button. The search takes a few moments. 6 A window informs you that the driver has been located. Click on the NEXT button. 7 A screen informs you that the software has been installed. Click on the FINISH button. 8 If the ADD HARDWARE assistant window appears on more time, go back step 3 and follow the instructions.
MF Director 4 A preparation screen appears. You can cancel the removal by clicking on CANCEL. This graphical Interface allows you to run the utilities and the software to manage your multifunction machine. Graphical presentation Run the application by clicking on the MF Director icon located on your desktop or from the menu START > PROGRAMS > COMPANION SUITE > COMPANION SUITE PRO LL > MF DIRECTOR. 5 You need to restart your system at the end of the procedure.
MF Monitor Note Graphical presentation Run the application by clicking on the MF Monitor icon located on your desktop or from the menu START > PROGRAMS > COMPANION SUITE > COMPANION SUITE PRO LL > MF MONITOR. The function SCAN TO can only be used if the application is running. If this is not the case, activate it. 1 Select the Scan To tab. 2 Select one of the possible choices: - colour, - grayscale, - black and white. 3 Select the scanner resolution (72 dpi to 4800 dpi).
1 Left-click with the mouse on the SCAN TO graphical Printing image or click the button from your machine. 2 You can follow the ongoing digitisation on a screen. You can print your documents via the USB connection . During the installation of the software, the LASER PRO LL printer driver will be installed automatically onto your pc. This will allow you to print your documents on the machine via the USB connection.
SP 1000SF 8 - PC Features 2 Select the terminal address book. 3 Click on NEW and select CONTACT in the displayed menu. The input window for the contact data is displayed.. Select a contact or a group in the zone ADDRESS BOOK, click on (to add a contact to the group you can also double click on it). 4 Enter the contact name as well as the fax number, the fax transmission rate with this person and the associated quick dial button. Click on OK. The new contact is added to the list.
Presentation of the Fax window When a contact is deleted from the directory, it is automatically deleted Important from any group in which it may be included. 2 1 3 4 5 6 7 Print the address book 1 Click on PRINT. 9 The list of the address book is printed on the terminal (if no contact is selected). Import or export a directory Import a directory Importing a directory makes it possible to exchange address book entries between two devices without having to enter contacts one by one manually.
1 From your desktop software, select FILE > PRINT. 2 Click NEW then click FAX. 2 Select the printer COMPANION SUITE PRO LL FAX and click OK. The fax oubox window is displayed. 3 Select SCANNER if your document is in paper format or MEMORY if the document is a computer file located on your hard disk (this file must be in TIFF or FAX format).
Follow-up of fax communications The outbox log Follow-up of fax communications is by means of: The outbox log is used to keep a history of all fax communications (successful or rejected) that your Terminal processes. The log is printed automatically as soon as an A4 page is filled. - an outbox, - an inbox, - a sent item memory, - an outbox log, - an inbox log. The button DELETE deletes the entire Important log, and not simply the selected message(s).
Field Automatic printing of a received document Field Description The fax is automatically printed when received. Printing of a inbox report A report is printed out for each fax received. Printing of inbox log The log is automatically printed when it fills an A4 page. Automatic printing of a sent document The fax is automatically printed when it is sent.
Field Description Name of the cover sheet Either the name of the page selected by default or the page you have selected to use. Sender You can enter information concerning the sender. You can enter information concerning the recipient. Destination: Name, Company, Department If you want these fields to be automatically filled in for recipients already listed in the directory (as favorites, group or distribution list), type "Auto" in the desired fields.
Add any recipient to the recipient list, click on the tab ADVANCED OPTIONS, select resolution NORMAL as shown below: Add any recipient to the recipient list, click on the tab ADVANCED OPTIONS, select resolution NORMAL as shown below: Finally click on the button SAVE AS DRAFT in the lower right corner (this is the button with the floppy disk icon). The background image is created in the directory C:\Program Files\Companion Suite Pro LL\Documents\FAX\Temporary and has the file extension .fax.
Maintenance Your machine comes with a current consumable management system. It tells you if your toner cartridge is close to its end of cycle. The following message will appear on your machine screen. Service TONER NEAR END General information To quit this screen, press OK. To replace the toner cartridge, proceed as shown below. CAUTION For your safety, it is imperative to refer to the safety information presented in chapter Security, page 1.
3 Close the scanner cover. 4 Make a copy to check that the symptoms have disappeared. 9 A wait message appears. PLEASE WAIT Printer cleaning The smart card is read. NEW TONER REMOVE CARD Remove the smart card from the reader, your machine is ready to print again. CAUTION To continue the printing of your documents when the message TONER NEAR END is displayed, set the TONER MANAGEMENT setting to WITHOUT.
SP 1000SF 9 - Maintenance Paper jam When printing, a sheet of paper may get stuck in the printer or the paper tray and cause a paper jam. In case of a paper jam in the machine, the following message appears: PAPER JAM EXTERNAL TRAY 1 Open the paper jam cover located at the back of the machine. 2 Remove the jammed sheet of paper and close the cover. 5 Replace the paper tray in the machine.
1 Remove the document or press button . 2 Check the thickness of the document (50 sheets of paper of 80 g/m2). 3 Iron out the sheets if needed. 4 Help the sheets along. The terminal does not receive any faxes. 1 Check that the telephone line cable is correctly plugged in. 2 Check that there is a tone signal on the telephone line by means of the button . You receive a blank page. 1 Make a photocopy of a document; if it is correct then your fax is functioning normally.
Code 19 - Subscriber has stopped The communication has been stopped by your subscriber. (Example: a fax wanted to poll your fax but there is no document deposited). Code 1A - Disconnected The transmission has not started. The telephone line is busy. Code 1B - Transmission failed During transmission: start again. During reception: ask your subscriber to resend the document.
Specifications Physical specifications Dimensions: Weight: 412 x 447 x 386 mm 13 kg Electrical specifications Power supply: Electric consumption: Single phase 220-240 V - 50/60 Hz - 4.
B299-8651