Paper type: OK Prince Eco G100(55kg), Paper Thickness=80 µm // Pages in book=180 // Print scale=81% Gap (when printed at 81% scale) = Pages in book × Paper thickness / 2 = 7.
Paper type: OK Prince Eco G100(55kg), Paper Thickness=80 µm // Pages in book=180 // Print scale=81% Gap (when printed at 81% scale) = Pages in book × Paper thickness / 2 = 7.200000 mm Introduction This manual describes detailed instructions on the operation and notes about the use of this machine. To get maximum versatility from this machine all operators are requested to read this manual carefully and follow the instructions. Please keep this manual in a handy place near the machine.
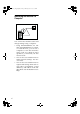
RussianC3_AEgsg-F_FM.book Page i Monday, June 16, 2003 6:35 PM Manuals for This Machine The following manuals describe the operational procedures of this machine. For particular functions, see the relevant parts of the manual. Note ❒ Manuals provided are specific to machine type. ❒ Adobe Acrobat Reader is necessary to view the manuals as a PDF file.
RussianC3_AEgsg-F_FM.book Page ii Monday, June 16, 2003 6:35 PM ❖ Manuals for DeskTopBinder V2 Lite DeskTopBinder V2 Lite is a utility included on the CD-ROM labeled "Scanner Driver & Document Management Utilities". • DeskTopBinder V2 Lite Setup Guide (PDF file - CD-ROM2) Describes installation of, and the operating environment for DeskTopBinder V2 Lite in detail. This guide can be displayed from the [Setup] display when DeskTopBinder V2 Lite is installed.
RussianC3_AEgsg-F_FM.book Page iii Monday, June 16, 2003 6:35 PM What You Can Do with This Machine The following introduces the functions of this machine, and the relevant manuals containing detailed information about them. Products marked with * are optional. For details about optional products, see p.154 “Options”, or contact your local dealer.
RussianC3_AEgsg-F_FM.book Page iv Monday, June 16, 2003 6:35 PM Paperless Fax Transmission and Reception Fax Transmission and Reception Through the Internet Reception GCKONN9J GCKONN3J • You can store received fax messages on the machine's hard disk, instead of printing them onto paper. You can use DeskTopBinder V2 P r o f e s si o n a l * / L i t e o r a W e b browser to check, print, delete, retrieve, or download documents using your computer (Storing received documents).
RussianC3_AEgsg-F_FM.book Page v Monday, June 16, 2003 6:35 PM Using the Scanner in a Network Environment Administrating the Machine/Protecting Documents (Security Functions) GCKONN5J • You can send scanned documents to other network computers using e-mail (Sending stored scan file by e-mail). See Scanner Reference. • With ScanRouter V2 Professional*/Lite, you can save scanned documents in specified destinations on network computers (File storage). See Scanner Reference.
RussianC3_AEgsg-F_FM.book Page vi Monday, June 16, 2003 6:35 PM Monitoring the Machine Via Computer GCKONN7J You can monitor machine status and change settings using a computer. • Using SmartNetMonitor for Admin, SmartNetMonitor for Client, or a Web browser, you can use a computer to view the machine's status, such as to check on paper quantities, or misfeeds, etc. See Network Guide. • You can also use a Web browser to make network settings. See Network Guide.
RussianC3_AEgsg-F_FM.book Page vii Monday, June 16, 2003 6:35 PM TABLE OF CONTENTS Manuals for This Machine ...................................................................................... i What You Can Do with This Machine.................................................................. iii Copier, Facsimile, Printer, and Scanner Functions ................................................... iii Utilizing Stored Documents .............................................................................
RussianC3_AEgsg-F_FM.book Page viii Monday, June 16, 2003 6:35 PM 3. Document Server Relationship between Document Server and Other Functions ....................... 31 Document Server Display ........................................................................................ 32 Using the Document Server................................................................................ 33 Storing Data .......................................................................................................
RussianC3_AEgsg-F_FM.book Page ix Monday, June 16, 2003 6:35 PM Registering Destinations to a Group ................................................................. 93 Registering a New Group ......................................................................................... 93 Registering Destinations to a Group ........................................................................ 94 Removing a Destination from a Group .....................................................................
RussianC3_AEgsg-F_FM.book Page x Monday, June 16, 2003 6:35 PM Maintaining Your Machine ................................................................................ 134 Cleaning the Exposure Glass.................................................................................134 Cleaning the Exposure Glass Cover ...................................................................... 134 Cleaning the Auto Document Feeder.....................................................................
RussianC3_AEgsg-F_FM.book Page 1 Monday, June 16, 2003 6:35 PM Copyrights and Trademarks Trademarks Microsoft®, Windows® and Windows NT® are registered trademarks of Microsoft Corporation in the United States and/or other countries. Acrobat® is a registered trademark of Adobe Systems Incorporated. Bluetooth™ is a trademark of the Bluetooth SIG, Inc. (Special Interest Group) and is used by RICOH Company Limited under license. Copyright ©2001 Bluetooth SIG, Inc.
RussianC3_AEgsg-F_FM.book Page 2 Monday, June 16, 2003 6:35 PM Information about Installed Software Expat • The software including controller, etc. (hereinafter "software") installed on this product uses the expat Version 1.95.2 (hereinafter "expat") under the conditions mentioned below.
RussianC3_AEgsg-F_FM.book Page 3 Monday, June 16, 2003 6:35 PM Redistribution and use in source and binary forms, with or without modification, are permitted provided that the following conditions are met: A Redistributions of source code must retain the above copyright notice, this list of conditions and the following disclaimer.
RussianC3_AEgsg-F_FM.book Page 4 Monday, June 16, 2003 6:35 PM d) The source code of the modified code of the Sablotron 0.82 is available at: http://support-download.com/services/device/sablot/notice082.html e) The source code of the Sablotron software is available at: http://www.gingerall.com f) MPL 1.1 is available at: http://www.mozilla.org/MPL/MPL-1.1.html Authors Name List All product names mentioned herein are trademarks of their respective owners.
RussianC3_AEgsg-F_FM.book Page 5 Monday, June 16, 2003 6:35 PM • This product includes software developed for the NetBSD Project by Jason R. Thorpe. • The software was developed by the University of California, Berkeley. • This product includes software developed by Chris Provenzano, the University of California, Berkeley, and contributors. JPEG LIBRARY • The software installed on this product is based in part on the work of the Independent JPEG Group.
RussianC3_AEgsg-F_FM.book Page 6 Monday, June 16, 2003 6:35 PM MD4 Copyright © 1990-2, RSA Data Security, Inc. All rights reserved. License to copy and use this software is granted provided that it is identified as the "RSA Data Security, Inc. MD4 Message-Digest Algorithm" in all material mentioning or referencing this software or this function. License is also granted to make and use derivative works provided that such works are identified as "derived from the RSA Data Security, Inc.
RussianC3_AEgsg-F_FM.book Page 7 Monday, June 16, 2003 6:35 PM How to Read This Manual Symbols This manual uses the following symbols: R WARNING: This symbol indicates a potentially hazardous situation that might result in death or serious injury if you misuse the machine by not following these instructions under this symbol. Be sure to read these instructions, all of which are included in the Safety Information section in the General Settings Guide.
RussianC3_AEgsg-F_FM.book Page 8 Monday, June 16, 2003 6:35 PM Safety Information When using this machine, the following safety precautions should always be followed. Safety During Operation In this manual, the following important symbols are used: R WARNING: Indicates a potentially hazardous situation which, if instructions are not followed, could result in death or serious injury.
RussianC3_AEgsg-F_FM.book Page 9 Monday, June 16, 2003 6:35 PM R CAUTION: • Protect the machine from dampness or wet weather, such as rain and snow. • Unplug the power cord from the wall outlet before you move the machine. While moving the machine, you should take care that the power cord will not be damaged under the machine. • When you disconnect the power plug from the wall outlet, always pull the plug (not the cable).
RussianC3_AEgsg-F_FM.book Page 10 Monday, June 16, 2003 6:35 PM Positions of Labels and Hallmarks forR RWARNING and RCAUTION This machine has labels for RWARNING and RCAUTION at the positions shown below. For safety, please follow the instructions and handle the machine as indicated.
RussianC3_AEgsg-F_FM.book Page 11 Monday, June 16, 2003 6:35 PM ENERGY STAR Program As an ENERGY STAR Partner, we have determined that this machine model meets the ENERGY STAR Guidelines for energy efficiency. The ENERGY STAR Guidelines intend to establish an international energy-saving system for developing and introducing energy-efficient office equipment to deal with environmental issues, such as global warming.
RussianC3_AEgsg-F_FM.book Page 12 Monday, June 16, 2003 6:35 PM ❖ Duplex Priority The ENERGY STAR Program recommends the duplex function. By conserving paper resources this function is less of a burden to the environment. For applicable machines, duplex function (one-sided originals→ two-sided copies) can be selected preferentially when the operation switch or the main power switch is turned on, the {Energy Saver} } key is pressed, or the machine resets automatically.
RussianC3_AEgsg-F_FM.book Page 13 Monday, June 16, 2003 6:35 PM Machine Types This machine comes in three models which vary in copy speed. To ascertain which model you have, see the inside front cover.
RussianC3_AEgsg-F_FM.
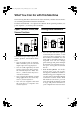
RussianC3_AEgsg-F_FM.book Page 15 Monday, June 16, 2003 6:35 PM 1. Getting Started Guide to Components 1. Exposure glass cover (optional) or Auto Document Feeder (ADF) (optional) Lower the exposure glass cover over originals placed on the exposure glass. If you have the ADF, load a stack of originals here. They will be fed automatically, one by one. (The illustration shows the ADF.) 2. Exposure glass Place originals face down. 3. Internal tray Copied, printed paper or fax messages are delivered here.
RussianC3_AEgsg-F_FM.book Page 16 Monday, June 16, 2003 6:35 PM Getting Started 1 9. Control panel 12. Front cover See p.19 “Control Panel”. Open to access the inside of the machine. 10. Remove Paper Indicator 13. Paper tray The indicator lights when paper is delivered to the internal tray 2 (1 bin tray). When paper is removed from the internal tray 2, the indicator goes off. Load paper. See p.108 “B Loading Paper”. Note ❒ Internal tray 2 (1 bin tray) is optional. 11.
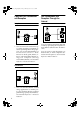
RussianC3_AEgsg-F_FM.book Page 17 Monday, June 16, 2003 6:35 PM Guide to Components External Options 1 1. 500-sheet finisher *1 8. Paper tray unit Sorts, stacks and staples copies. Consists of two paper trays. 2. Bridge unit 9. Large Capacity Tray (LCT) Relays copies to the finisher. Holds up to 2000 sheets of paper. 3. Exposure glass cover 10. Bypass tray Lower this cover over originals. Load a stack of originals. They will feed in automatically.
RussianC3_AEgsg-F_FM.book Page 18 Monday, June 16, 2003 6:35 PM Getting Started Internal Options A 1 B C D E F G H I HDD Allows you to use the Document Server function. Fax unit Allows you to use the facsimile function. Printer/Scanner unit *2 Allows you to use the printer and scanner functions. IEEE 1394 interface board *3 Connects to an IEEE 1394 cable. Bluetooth *3 Allows you to expand the interface.
RussianC3_AEgsg-F_FM.book Page 19 Monday, June 16, 2003 6:35 PM Control Panel Control Panel This illustration shows the control panel of a machine that has all options fully installed. 1 ZLFS390A 1. Screen contrast knob 3. {User Tools/Counter}} key Adjusts display panel brightness. • User Tools Press to change defaults and conditions to meet your requirements. See p.48 “Accessing User Tools (System Settings)”. • Counter Press to check or print the counter value. See p.139 “Counter”.
RussianC3_AEgsg-F_FM.book Page 20 Monday, June 16, 2003 6:35 PM Getting Started 8. {Energy Saver}} key 16. Number keys Press to switch to and from Energy Saver mode. See p.24 “Energy Saver Mode”. Use to enter the numbers for copies, fax numbers and data for the selected function. 9. { Interrupt}} key (copier/scanner mode) 1 Press to make interrupt copies during copying or scanning. See “Interrupt Copy”, Copy Reference. 10.
RussianC3_AEgsg-F_FM.book Page 21 Monday, June 16, 2003 6:35 PM Control Panel Display Panel The display panel shows machine status, error messages, and function menus. 1 Important ❒ A force or impact of more than 30 N (about 3 kgf) will damage the display panel. The copying screen is displayed as default after power on. The following display shows a machine with options fully installed. The function items displayed serve as selector keys. You can select or specify an item by lightly pressing them.
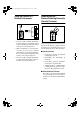
RussianC3_AEgsg-F_FM.book Page 22 Monday, June 16, 2003 6:35 PM Getting Started Turning On the Power This machine has two power switches. 1 ❖ Operation switch (right side of the control panel) Press to activate the machine. When the machine has finished warming up, you can make copies. ❖ Main power switch (left side of the machine) Turning off this switch makes the main power indicator on the right side of the control panel go off. When this is done, machine power is completely off.
RussianC3_AEgsg-F_FM.book Page 23 Monday, June 16, 2003 6:35 PM Turning On the Power Turning Off the Power A Make sure the On indicator is not A Make sure the exposure glass cov- B Open the switch cover, and then er or the ADF is in the right position. B Press the operation switch. lit. 1 turn off the main power switch. The main power indicator goes out. The On indicator goes out.
RussianC3_AEgsg-F_FM.book Page 24 Monday, June 16, 2003 6:35 PM Getting Started Saving Energy 1 - Energy Saver Mode If you do not use the machine for a certain period after an operation, or when you press the { Energy Saver} } key, the display disappears and the machine goes into Energy Saver mode. When you press the {Energy Saver} } key again, the machine returns to the ready condition. The machine uses less electricity in Energy Saver mode.
RussianC3_AEgsg-F_FM.book Page 25 Monday, June 16, 2003 6:35 PM 2.
RussianC3_AEgsg-F_FM.book Page 26 Monday, June 16, 2003 6:35 PM Combined Function Operations ❒ The copying screen is displayed as default after power on. You can change this default setting. See p.49 “Function Priority”. 2 ZLFS350A - System Reset The machine returns automatically to its initial condition when the job is finished, after a certain period of time has elapsed. This function is called "System Reset". Note ❒ You can change the System Reset time. See p.56 “System Auto Reset Timer”.
RussianC3_AEgsg-F_FM.book Page 27 Monday, June 16, 2003 6:35 PM Multi-Access Multi-Access You can carry out another job using a different function while the current job is being performed. Performing multiple functions simultaneously like this is called "Multi-accessing". This allows you to handle jobs efficiently, regardless of how the machine is being used. For example: • While making copies, you can scan documents to store in the Document Server.
RussianC3_AEgsg-F_FM.
RussianC3_AEgsg-F_FM.
RussianC3_AEgsg-F_FM.book Page 30 Monday, June 16, 2003 6:35 PM Combined Function Operations Note ❒ A machine with the 500–sheet finisher installed cannot accept other jobs while printing with the stapling operation. ❒ A machine with the 1000–sheet finisher installed, that is printing with the stapling operation on paper larger than A4 size, starts the subsequent job (for which Shift Sort Tray is specified as the output tray) only after the current print job finishes.
RussianC3_AEgsg-F_FM.book Page 31 Monday, June 16, 2003 6:35 PM 3. Document Server Relationship between Document Server and Other Functions The following table describes the relationship between the Document Server and other functions.
RussianC3_AEgsg-F_FM.book Page 32 Monday, June 16, 2003 6:35 PM Document Server Document Server Display ❖ Document Server Main Display 3 ZLFS070E 1. Operating status and messages. 2. The title of the currently selected 4. The operation keys. 5. The functions under which the screen. documents were stored. 3. The numbers of originals, copies, and printed pages. The icons below show the functions active when the documents were stored in the Document Server.
RussianC3_AEgsg-F_FM.book Page 33 Monday, June 16, 2003 6:35 PM Using the Document Server Using the Document Server Storing Data ❖ File name Stored documents are automatically named "COPY0001", "COPY0002". You can change assigned file names. ❖ User name You can register a user name to identify the user or user group that stored the documents. To assign it, you can register the user name using the name assigned to the user code, or by entering the name directly.
RussianC3_AEgsg-F_FM.book Page 34 Monday, June 16, 2003 6:35 PM Document Server C Enter a user name, file name, or password if necessary. Note ❒ If you do not enter a file name, one is automatically assigned. Reference p.34 “To register or change a user name” p.35 “To change a file name” p.35 “To set or change a password” 3 ❒ If you placed originals on the exposure glass, press [Scanning Finished] after all the originals have been scanned. The Select Files to Print display appears.
RussianC3_AEgsg-F_FM.book Page 35 Monday, June 16, 2003 6:35 PM Using the Document Server When using an unregistered user name in the Address Book A To enter an unregistered user name, press [Non-programmed Name]. B Enter a new user name, and then press [OK]. Reference p.141 “Entering Text” When no user name has been registered in the Address Book A Enter a new user name, and then press [OK]. D Enter a new file name, and then press [OK]. Note ❒ Up to 20 characters can be entered as a file name.
RussianC3_AEgsg-F_FM.book Page 36 Monday, June 16, 2003 6:35 PM Document Server Changing a Stored Document's File Name, User Name, or Password A Press the {Document Server}} key. B Select the document with the user Selecting a Document A Press the {Document Server}} key. B Select a document you want to print. name, file name, or password you want to change. 3 Note ❒ If a password is already set for the document, enter that password, and then press [OK]. C Press [File Management].
RussianC3_AEgsg-F_FM.book Page 37 Monday, June 16, 2003 6:35 PM Using the Document Server C To print multiple documents, repeat step B in the order you want to print. Note ❒ You can select up to 30 documents. ❒ If the sizes or resolution of selected documents are not the same, it may not be possible to print them. ❒ If you want to change the printing order, cancel the selection, and select documents again, this time in the order you want.
RussianC3_AEgsg-F_FM.book Page 38 Monday, June 16, 2003 6:35 PM Document Server C Enter the file name using the letter keys, and then press [OK]. Only files beginning with the name entered appear in the Select Files to Print display. Reference p.141 “Entering Text”. Note ❒ To display all files stored in the Document Server, press [File List]. 3 To search by user name A Press the {Document Server}} key. B Press [Search by User Name]. E Press [OK].
RussianC3_AEgsg-F_FM.book Page 39 Monday, June 16, 2003 6:35 PM Using the Document Server Note ❒ Print settings made for printing in copier or printer function remain after printing and applied to the next job. Print settings made in facsimile mode, however, do not remain. ❒ If you select multiple documents, print settings remain applied to the first document, but not to other documents. ❒ Print setting items are listed below. For details about print results of each setting, see Copy Reference.
RussianC3_AEgsg-F_FM.book Page 40 Monday, June 16, 2003 6:35 PM Document Server Changing the number of copies during printing Limitation ❒ The number of copies can only be changed when the Sort function is selected in the print settings. A Press the {Clear/Stop}} key. B Press [Change Quantity]. C Enter a new number of copies us- 3 ing the number key. D Press the {#}} key. E Press [Continue]. ❒ You can sort document names in the list by user name, file name, or date.
RussianC3_AEgsg-F_FM.book Page 41 Monday, June 16, 2003 6:35 PM Using the Document Server B Press [Print 1st Page]. C Press the {Start}} key. Deleting Stored Documents Important ❒ You can store up to 3,000 documents in the Document Server. No more documents can be stored when the total is 3,000. You should delete unnecessary documents to increase available memory. Note ❒ You can delete all stored documents at once with User Tools. See p.64 “Delete All Files”.
RussianC3_AEgsg-F_FM.book Page 42 Monday, June 16, 2003 6:35 PM Document Server Viewing Stored Documents Using a Web Browser Reference The Web browser's Help A Start a Web browser. B Enter “http:// (IP address of this machine) /” in the [Address] box. The top page appears on the Web browser. 3 C Click [Document Server]. The [Document Server File List] appears. Note ❒ To switch the display format, click [Details], [Thumbnails] or [Icons] from the [Display method] list.
RussianC3_AEgsg-F_FM.book Page 43 Monday, June 16, 2003 6:35 PM Settings for the Document Server Settings for the Document Server ❖ Copier/Document Server Features (See "General Features 4/4", Copy Reference.
RussianC3_AEgsg-F_FM.
RussianC3_AEgsg-F_FM.book Page 45 Monday, June 16, 2003 6:35 PM 4. User Tools (System Settings) User Tools Menu (System Settings) Reference For details about Interface Settings and File Transfer, see “User Tools Menu (System Settings)”, Network Guide. For details about parallel interface, see “System Settings (Parallel Connection)”, Printer Reference 2. ❖ General Features (See p.49 “General Features”.
RussianC3_AEgsg-F_FM.book Page 46 Monday, June 16, 2003 6:35 PM User Tools (System Settings) ❖ Tray Paper Settings (See p.53 “Tray Paper Settings”.
RussianC3_AEgsg-F_FM.book Page 47 Monday, June 16, 2003 6:35 PM User Tools Menu (System Settings) ❖ Key Operator Tools (See p.57 “Key Operator Tools”.
RussianC3_AEgsg-F_FM.book Page 48 Monday, June 16, 2003 6:35 PM User Tools (System Settings) Accessing User Tools (System Settings) This section is for key operators in charge of this machine. User Tools allow you to change or set defaults. Note ❒ Operations for system settings differ from normal operations. Always quit User Tools when you have finished. See p.48 “Exiting User Tools”.
RussianC3_AEgsg-F_FM.book Page 49 Monday, June 16, 2003 6:35 PM Settings You Can Change with User Tools Settings You Can Change with User Tools Reference To access User Tools, see p.48 “Accessing User Tools (System Settings)”. General Features ❖ Panel Tone The beeper (key tone) sounds when a key is pressed. Note ❒ Default: ON 4 ❖ Warm Up Notice (copier/Document Server) You can have the beeper sound when the machine becomes ready to copy after leaving Energy Saver mode, or when the power is turned on.
RussianC3_AEgsg-F_FM.book Page 50 Monday, June 16, 2003 6:35 PM User Tools (System Settings) ❖ Print Priority Print Priority is given to the mode selected. Reference p.27 “Multi-Access” Note ❒ Default: Display mode ❒ When [Interleave] is selected, the current print job will be interrupted after a maximum of five sheets.
RussianC3_AEgsg-F_FM.book Page 51 Monday, June 16, 2003 6:35 PM Settings You Can Change with User Tools ❖ Output: Copier (copier) You can specify a tray to which documents are delivered. 1 2 4 1 3 4 4 ZLFH150E 1. Internal Tray 1 2. Internal Tray 2 3. Finisher Upper Tray 4. Finisher Shift Tray Note ❒ Default: Internal Tray 1 ❖ Output: Document Server (Document Server) You can specify a tray to which documents are delivered. Note ❒ Default: Internal Tray 1 ❒ For details about output trays, see p.
RussianC3_AEgsg-F_FM.book Page 52 Monday, June 16, 2003 6:35 PM User Tools (System Settings) ❖ Size Setting Currently three types of F size are available; 81/2"×13"L, 81/4"×13"L and 8"×13"L. The ADF or exposure glass cover sensor cannot distinguish these three types of originals. This function sets the F size from the ADF or exposure glass cover sensor. Auto Paper Select or Auto Reduce/Enlarge can be used for F size originals based on this setting.
RussianC3_AEgsg-F_FM.book Page 53 Monday, June 16, 2003 6:35 PM Settings You Can Change with User Tools Tray Paper Settings ❖ Paper Tray Priority: Copier (copier/Document Server) You can specify the tray to supply paper for output. Note ❒ Default: Tray 1 ❖ Paper Tray Priority: Facsimile (facsimile) You can specify the tray to supply paper for output. Note ❒ Default: Tray 1 4 ❖ Paper Tray Priority: Printer (printer) You can specify the tray to supply paper for output.
RussianC3_AEgsg-F_FM.book Page 54 Monday, June 16, 2003 6:35 PM User Tools (System Settings) Note ❒ The paper guide for the optional LCT is fixed for A4K, 81/2"×11"K size paper. Contact your service representative if you need to change the paper size. ❒ If the paper size set for the selector in paper tray is different to the paper size for this setting, the paper size of the dial has priority. ❒ If you load paper of a size not indicated on the paper size selector in the paper tray, set the dial to " ".
RussianC3_AEgsg-F_FM.book Page 55 Monday, June 16, 2003 6:35 PM Settings You Can Change with User Tools ❒ When paper of the same type and size is loaded in two different paper trays and you want to specify tray for 2 Sided Copy and tray for 1 Sided Copy, specify the upper tray for 2 Sided Copy. If one of the trays is specified as the default in Paper Tray Priority, assign 2 Sided Copy to that tray. ❒ A appears next to the paper tray if [No] is selected in Auto Paper Select.
RussianC3_AEgsg-F_FM.book Page 56 Monday, June 16, 2003 6:35 PM User Tools (System Settings) Timer Settings ❖ Auto Off Timer After a specified period has passed, following job completion, the machine automatically turns off, in order to conserve energy. This function is called "Auto Off". The machine status after the Auto Off operation is referred to as "Off mode", or "Sleep mode". For the Auto Off Timer, specify the time to elapse before Auto Off.
RussianC3_AEgsg-F_FM.book Page 57 Monday, June 16, 2003 6:35 PM Settings You Can Change with User Tools ❖ Facsimile Auto Reset Timer (facsimile) Specifies the time to elapse before the facsimile mode resets. Note ❒ Default: 30 seconds ❒ The time can be set from 30 to 999 seconds, using the number keys. ❖ Scanner Auto Reset Timer (scanner) Specifies the time to elapse before the scanner function resets. Note ❒ If [OFF] is selected, the machine does not automatically switch to the user code entry screen.
RussianC3_AEgsg-F_FM.book Page 58 Monday, June 16, 2003 6:35 PM User Tools (System Settings) ❖ Key Counter Management Use the key counter to specify whether users are restricted or not. Note ❒ Default: Copier/OFF, Document Server/OFF, Facsimile/OFF, Scanner/OFF, Printer/OFF ❖ External Charge Unit Management Use the external charge unit to manage usage charges.
RussianC3_AEgsg-F_FM.book Page 59 Monday, June 16, 2003 6:35 PM Settings You Can Change with User Tools ❖ Display/Print Counter Allows you to view and print the number of prints. • Display/Print Counter Displays the number of prints for each function (Total, Copier, Facsimile, Printer, A3/DLT, Duplex, and Staple). • Print Counter List Prints out a list of the number of prints made under each function. • To print the counter list: A Press the {User Tools/Counter} } key. B Press [System Settings].
RussianC3_AEgsg-F_FM.book Page 60 Monday, June 16, 2003 6:35 PM User Tools (System Settings) ❖ Print Address Book: Destination List You can print the destination list registered in the Address Book. • Print in Title 1 Order Prints the Address Book in Title 1 order. • Print in Title 2 Order Prints the Address Book in Title 2 order. • Print in Title 3 Order Prints the Address Book in Title 3 order. • Print Group Dial List Prints the group Address Book. A Select the print format.
RussianC3_AEgsg-F_FM.book Page 61 Monday, June 16, 2003 6:35 PM Settings You Can Change with User Tools ❖ Address Book: Program/Change/Delete Group You can register multiple users in a group. This allows you to easily control registered users in each group. For details about operations, see p.93 “Registering Destinations to a Group”. • [Program/Change] This registers new groups, or changes the group name, key display, title selection, registration number or protection code.
RussianC3_AEgsg-F_FM.book Page 62 Monday, June 16, 2003 6:35 PM User Tools (System Settings) ❖ Address Book: Change Order Changes the order of registered users (destinations). Note ❒ You can rearrange the order of items on the same page, but you cannot move items to another page. For example, you cannot move an item from “PLANNING” ([OPQ]) to “DAILY” ([CD]). A Press the {User Tools/Counter} } key. B Press [System Settings]. C Press [Key Operator Tools], and then press [T TNext].
RussianC3_AEgsg-F_FM.book Page 63 Monday, June 16, 2003 6:35 PM Settings You Can Change with User Tools ❖ Address Book: Edit Title You can edit the title to easily find a user. A Press the {User Tools/Counter} } key. B Press [System Settings]. C Press [Key Operator Tools], and then press [T TNext]. D Press [Address Book: Edit Title]. E Press the title key you want to change. F Enter the new name, and then press [OK]. Press [OK]. Press [Exit].
RussianC3_AEgsg-F_FM.book Page 64 Monday, June 16, 2003 6:35 PM User Tools (System Settings) ❖ Delete All Files Deletes all documents stored in the Document Server. Note ❒ Even if a password is already set, all documents are deleted. ❒ A confirmation message appears. To delete all documents, select [Yes]. ❖ Password Management for Stored Files • Unlocking a locked document When a document is locked due to a wrong password being entered, this function unlocks the document, allowing access.
RussianC3_AEgsg-F_FM.book Page 65 Monday, June 16, 2003 6:35 PM Address Book Address Book Registering user information, such as fax number and e-mail address, in the Address Book allows you to manage them together. Important ❒ Address Book data is stored on the hard disk. It can be lost if there is some kind of hard disk failure. The manufacturer shall not be responsible for any damage resulting from data loss.
RussianC3_AEgsg-F_FM.book Page 66 Monday, June 16, 2003 6:35 PM User Tools (System Settings) 6. E-mail Reference p.66 “When using the fax function” p.67 “When using the scanner function” p.67 “Registering Sender Information” Registering Destination Information ❖ Registering the destination name and key display • User Name Register the destination name and key display name. This is the basic information required for managing destinations. Reference p.68 “User Codes” 4 7. Folder Reference p.
RussianC3_AEgsg-F_FM.book Page 67 Monday, June 16, 2003 6:35 PM Address Book ❖ When using the scanner function • E-mail Register e-mail addresses in the Address Book. To send a scan file by e-mail, select the destination key as it appears on the initial scanner function display, so you can specify the e-mail address. Reference p.80 “E-mail Destination” • Folder Register the path name, user name, and password.
RussianC3_AEgsg-F_FM.book Page 68 Monday, June 16, 2003 6:35 PM User Tools (System Settings) User Codes Register user codes to limit users to the following functions and check their use of each function: • Copier • Document Server • Facsimile • Scanner • Printer Note ❒ The number of copies made of documents stored in the Documents Server using the facsimile function is counted for each user code. This allows you to check each user's usage.
RussianC3_AEgsg-F_FM.book Page 69 Monday, June 16, 2003 6:35 PM User Codes To register the user name and key display A Press [Change] on the right of the user name or key display. The user name or key display entry display appears. B Enter the user name or key display, and then press [OK]. Note ❒ You can use the same user name as that assigned to the documents using the Document Server function. For this, the user code is not neces s ary . p . 31 “ D o c u m e n t Server” Reference p.
RussianC3_AEgsg-F_FM.book Page 70 Monday, June 16, 2003 6:35 PM User Tools (System Settings) Changing a User Code Changing the user code Note ❒ Even if you change a user code, the counter value will not be cleared. A Press [User Code]. B Press [Change], and then enter the new user code using the number keys. A Press the {User Tools/Counter}} key. B Press [System Settings]. C Press [Key Operator Tools], and then press [T TNext]. D Press [Address Book Management].
RussianC3_AEgsg-F_FM.book Page 71 Monday, June 16, 2003 6:35 PM User Codes Deleting a User Code To delete a user (destination) Important ❒ This operation also deletes user codes registered to multiple functions. User control via the deleted user code is disabled. A Press [Delete]. B Select the user (destination) you want to delete. Press the user (destination) key, or enter the registered code using the number keys. A Press the {User Tools/Counter}} key. B Press [System Settings].
RussianC3_AEgsg-F_FM.book Page 72 Monday, June 16, 2003 6:35 PM User Tools (System Settings) Printing the Counter for Each User Code You can print out the number of prints made under each user code using [Print Counter], [Transmission Counter] or [Scanner Counter]. To print the number of prints made under each user code A Press the {User Tools/Counter}} key. B Press [System Settings]. C Press [Key Operator Tools]. D Press [Display/Clear/Print Counter per 4 User Code].
RussianC3_AEgsg-F_FM.book Page 73 Monday, June 16, 2003 6:35 PM User Codes Clearing the Number of Prints A Press the {User Tools/Counter}} key. B Press [System Settings]. C Press [Key Operator Tools]. D Press [Display/Clear/Print Counter per To clear the number of prints for all user codes A Press [Clear] under All User Codes. User Code]. E Select the user code to clear. To clear the number of prints made under a user code A Select the user code from the left side of the display.
RussianC3_AEgsg-F_FM.book Page 74 Monday, June 16, 2003 6:35 PM User Tools (System Settings) Fax Destination Register a fax destination so you do not need to enter fax numbers each t i m e , an d c a n s e n d d o c u m e n t s scanned in using the facsimile function. • It is easy to select the fax destination if you register a “User (Destination) Name” and “Key Display” for the fax destination. • You can register fax destinations as a group.
RussianC3_AEgsg-F_FM.book Page 75 Monday, June 16, 2003 6:35 PM Fax Destination Registering a Fax Destination A Press the {User Tools/Counter}} key. B Press [System Settings]. C Press [Key Operator Tools], and then press [T TNext]. D Press [Address Book Management]. E Press [New Program]. Note ❒ To register a fax destination to a registered user, press the user (destination) key, or enter the registered number using the number keys. F Set the user's information.
RussianC3_AEgsg-F_FM.book Page 76 Monday, June 16, 2003 6:35 PM User Tools (System Settings) G Press [Fax Dest.]. H Enter the fax number using the number keys, and then press [OK]. To select the line A Press [Select Line]. 4 To program the SEP Code A Press [Adv. Features], and then select [SEP Code]. B Press [Change] under RX SEP Code. C Enter a SEP Code using the number keys, and then press [OK]. D To enter a password, press [Change ] u nd er P as sw or d (PWD).
RussianC3_AEgsg-F_FM.book Page 77 Monday, June 16, 2003 6:35 PM Fax Destination To set label insertion When Label Insertion is set to ON, the receiver's name and standard messages are printed on the fax message when it is received at the other end. A Press [Change] under Label Insertion. B Select [ON]. C Press [Change] under Line 2. D Select a standard message to print on the second line. To stamp a customized message, press [Custom Message]. E Enter a message, and then press [OK]. Reference p.
RussianC3_AEgsg-F_FM.book Page 78 Monday, June 16, 2003 6:35 PM User Tools (System Settings) To change the line To change the fax header A Press [Select Line]. A Press [Change] under Fax Header. B Select the fax header, and then press [OK]. To change the label insertion B Select the line type. C Press [OK]. To change the SUB Code 4 A Press [Adv. Features]. B Press [SUB Code]. C Press [Change] under TX SUB Code. D Enter the new SUB Code, and then press [OK].
RussianC3_AEgsg-F_FM.book Page 79 Monday, June 16, 2003 6:35 PM Fax Destination Deleting a Registered Fax Destination Note ❒ If you delete a destination that is a specified delivery destination, messages to its registered Personal Box, for example, cannot be delivered. Be sure to check the settings in the fax function before deleting any destinations. A Press the {User Tools/Counter}} key. B Press [System Settings]. C Press [Key Operator Tools], and then press [T TNext].
RussianC3_AEgsg-F_FM.book Page 80 Monday, June 16, 2003 6:35 PM User Tools (System Settings) E-mail Destination Register e-mail destinations so you do not need to enter an e-mail address every time, and can send scan files from scanner or fax function by email. • It is easy to select the e-mail destination if you register “User (Destination) Name” and “Key Display” as the e-mail destination. • You can register e-mail destinations as a group.
RussianC3_AEgsg-F_FM.book Page 81 Monday, June 16, 2003 6:35 PM E-mail Destination To register the user (destination) name and key display A Press [Change] under User (Destination) Name or Key Display. The user (destination) name or key display entry display appears. B Enter the user (destination) name or key display, and then press [OK]. Note ❒ You can use the user name when selecting an address to send an e-mail to. ❒ You can register the user code after the user name. For details, see p.
RussianC3_AEgsg-F_FM.book Page 82 Monday, June 16, 2003 6:35 PM User Tools (System Settings) Changing a Registered E-mail Destination A Press the {User Tools/Counter}} key. B Press [System Settings]. C Press [Key Operator Tools], and then press [T TNext]. D Press [Address Book Management]. E Select the registered e-mail address user you want to change. Press the user (destination) key, or enter the registered number using the number keys.
RussianC3_AEgsg-F_FM.book Page 83 Monday, June 16, 2003 6:35 PM Registering Folders Registering Folders By registering a shared folder, you can send scan files to it directly. There are two types of protocol you can use: • SMB For sending files to shared Windows folders • FTP Use when sending files to an FTP server. Note ❒ For details about protocols, server names, and folder levels, ask your network administrator. ❒ You can stop unauthorized users accessing folders from the machine. See p.
RussianC3_AEgsg-F_FM.book Page 84 Monday, June 16, 2003 6:35 PM User Tools (System Settings) F Set the user's information. Note ❒ To register a folder to a registered user, proceed to step G. To select the title A To associate a user with a title, press the title key under Select Title. To register the user (destination) name and key display A Press [Change] under User (Destination) Name or Key Display. The user (destination) name or key display entry display appears.
RussianC3_AEgsg-F_FM.book Page 85 Monday, June 16, 2003 6:35 PM Registering Folders To locate the folder manually A Press [Change] under Path. B Enter the path where the folder is located. Note ❒ Enter the path using this format: “\\ServerName\ShareName\PathName”. ❒ You can also enter an IP address. ❒ You can enter a path using up to 128 characters. C Press [OK]. Note ❒ If the format of the entered path is not correct, a message appears. Press [Exit], and then enter the path again.
RussianC3_AEgsg-F_FM.book Page 86 Monday, June 16, 2003 6:35 PM User Tools (System Settings) E Enter the user's password, and then press [OK]. The Browse Network display reappears. Note ❒ If the entered user name or password is not correct, a message appears. Press [Exit], and then enter the user name and password again. G Select the items you want to change. To change the protocol A Press [FTP]. F Press [OK]. 4 I Press [Connection Test] to check the B A confirmation message appears. Press [Yes].
RussianC3_AEgsg-F_FM.book Page 87 Monday, June 16, 2003 6:35 PM Registering Folders H Press [Connection Test] to check the path is set correctly. I Press [Exit]. Note ❒ If the connection test fails, check the settings, and then try again. J Press [OK]. Note ❒ To change the user (destination) name, see p.70 “Changing a User Code”. Deleting a registered SMB folder A Press the {User Tools/Counter}} key. B Press [System Settings]. C Press [Key Operator Tools], and then press [T TNext].
RussianC3_AEgsg-F_FM.book Page 88 Monday, June 16, 2003 6:35 PM User Tools (System Settings) E Press [New Program]. Note ❒ To register a folder to a registered user, press the user (destination) key, or enter the registered number using the number keys. To select the title A To associate a user with a title, press the title key under Select Title. F Set the user's information. Note ❒ To register a folder to a registered user, proceed to step G.
RussianC3_AEgsg-F_FM.book Page 89 Monday, June 16, 2003 6:35 PM Registering Folders Note ❒ You can enter an absolute path, using this format: “/user/home/username”; or a relative path, using this format: “directory/sub-directory”. ❒ If you leave the path blank, the login directory is assumed to be the current working directory. ❒ You can also enter an IP address. ❒ You can enter a path using up to 128 characters. M Press [OK]. Note ❒ To change the port number, press [Change] under Port No..
RussianC3_AEgsg-F_FM.book Page 90 Monday, June 16, 2003 6:35 PM User Tools (System Settings) 4 Changing items under FTP Deleting a registered FTP folder A Press [Change] under Server Name. B Enter the new server name, and then press [OK]. C Press [Change] under Path. D Enter the new path, and then press [OK]. E Press [Change] under User Name. F Enter the new user name, and then press [OK]. This is a user name which is authorized to access the folder. G Press [Change] under Password.
RussianC3_AEgsg-F_FM.book Page 91 Monday, June 16, 2003 6:35 PM Registering a Protection Code Registering a Protection Code You can stop sender's names or folders being accessed by setting a protection code. You can use this function to protect the following: • Folders You can prevent unauthorized access to folders. • Sender's names (when sending emails) You can prevent misuse of sender's names. Note ❒ This function is not available when using Internet Fax to send e-mails.
RussianC3_AEgsg-F_FM.book Page 92 Monday, June 16, 2003 6:35 PM User Tools (System Settings) Registering a Protection Code To a Group User A Press the {User Tools/Counter}} key. B Press [System Settings]. C Press [Key Operator Tools], and then press [T TNext]. D Press [Address Book: Program/ Change/ Delete Group]. E Press the group key you want to 4 register a protection code to. F Press [Protect Dest.]. G Press [Protect] under Folder. H Press [Change] under Protection Code.
RussianC3_AEgsg-F_FM.book Page 93 Monday, June 16, 2003 6:35 PM Registering Destinations to a Group Registering Destinations to a Group Register destinations to a group to easily control registered fax, e-mail and folders for each group. To group destinations, the groups must be registered beforehand. Note ❒ You can register up to 500 groups. ❒ When using Scan to Folder function, you cannot send scan files to a group with over 50 folders registered.
RussianC3_AEgsg-F_FM.book Page 94 Monday, June 16, 2003 6:35 PM User Tools (System Settings) 4 Registering Destinations to a Group Removing a Destination from a Group You can register destinations to a group. When registering new destinations, you can also register groups at the same time. A Press the {User Tools/Counter}} key. B Press [System Settings]. C Press [Key Operator Tools], and then A Press the {User Tools/Counter}} key. B Press [System Settings].
RussianC3_AEgsg-F_FM.book Page 95 Monday, June 16, 2003 6:35 PM Registering Destinations to a Group Displaying Destinations Registered in Groups Changing a Group Name You can check the user (destination) of each group. A Press the {User Tools/Counter}} key. B Press [System Settings]. C Press [Key Operator Tools], and then press [T TNext]. D Press [Address Book: gram/Change/Delete Group]. Pro- E Select the group where the data you want to check is registered. F Press [Programed Users].
RussianC3_AEgsg-F_FM.book Page 96 Monday, June 16, 2003 6:35 PM User Tools (System Settings) Deleting a Group A Press the {User Tools/Counter}} key. B Press [System Settings]. C Press [Key Operator Tools], and then press [T TNext]. D Press [Address Book: Program/Change / Delete Group]. E Press [Delete]. F Press a group key you want to de- 4 lete. G Press [Yes].
RussianC3_AEgsg-F_FM.book Page 97 Monday, June 16, 2003 6:35 PM Registering the Transfer Request Registering the Transfer Request This section describes how to register the Transfer Station and Receiving Station used in the fax function's Transfer Request. Note ❒ Before you can use Transfer Request, you must program the Polling ID and set the Transfer Report. S e e “P ro g ra m m i n g a P o l lin g ID”and “Transfer Report”, Facsimile Reference .
RussianC3_AEgsg-F_FM.book Page 98 Monday, June 16, 2003 6:35 PM User Tools (System Settings) To register the Transfer Request name and key display A Press [Change] under Transfer Request Name or Key Display. The user (destination) name or key display entry display appears. B Enter the Transfer Request name or key display, and then press [OK]. Reference p.141 “Entering Text” 4 To select the title A To associate a Transfer Request name with a title, press the title key under Select Title.
RussianC3_AEgsg-F_FM.book Page 99 Monday, June 16, 2003 6:35 PM Registering the Transfer Request Group Dial A Press [q qppGroup Dial]. B Enter the Group number using the number keys. For example, to select the destinations stored in Group 04 of th e Transfe r Stat ion, e nt er {0} }{4} }. C To specify an additional Receiving Station, press [Add]. To change the Transfer Request name and key display A Press [Change] under Transfer Request Name or Key Display.
RussianC3_AEgsg-F_FM.book Page 100 Monday, June 16, 2003 6:35 PM User Tools (System Settings) Deleting a Registered Transfer Station/Receiving Station A Press the {User Tools/Counter}} key. B Press [System Settings]. C Press [Key Operator Tools], and then press [T TNext]. D Press [Address Book: Program/ Change/ Delete Transfer Request]. E Press [Delete]. F Select a Transfer 4 Request you want to delete. Press the Transfer Request key, or enter the registered number using the number keys.
RussianC3_AEgsg-F_FM.book Page 101 Monday, June 16, 2003 6:35 PM Programming/Changing LDAP Server Programming/Changing LDAP Server Programming an LDAP server allows you to look up e-mail destinations from the LDAP server Address Book directly. This function is available when you send scan files by e-mail using scanner function. D Press [Program/Change LDAP Server]. E Enter the items. Note ❒ Select [ON] in the Use LDAP Server setting to use this function. See p.64 “Use LDAP Server”.
RussianC3_AEgsg-F_FM.book Page 102 Monday, June 16, 2003 6:35 PM User Tools (System Settings) To enter a port number A Press [Change] under Port No.. B Enter the port number using the number keys, and then press [#]. To set authentication A Press [Next]. B Press [ON] or [High Security] under Authentication. 4 Note ❒ [High Security] is not available with LDAP Version 2. ❒ When [ON] or [High Security] is selected, the administrator account name and password is required to acc ess the LDAP server.
RussianC3_AEgsg-F_FM.book Page 103 Monday, June 16, 2003 6:35 PM Programming/Changing LDAP Server To set search options Changing an LDAP Server Note ❒ You can search the LDAP server data using keywords below: Name, E-mail Address, Fax Destination, Company Name, Department Name. You can specify an additional keyword. This must be predefined in your LDAP database. A Press [Next] twice. B Press [Change] under Attribute.
RussianC3_AEgsg-F_FM.book Page 104 Monday, June 16, 2003 6:35 PM User Tools (System Settings) To change a port number A Press [Change] under Port No.. B Enter the new port number using the number keys, and then press [#]. To change authentication A Press [Next]. B Select [ON] or [High Security] if you want to activate authentication. Select [OFF] to cancel it. 4 Note ❒ [High Security] is not available when the LDAP Version is 2.
RussianC3_AEgsg-F_FM.book Page 105 Monday, June 16, 2003 6:35 PM 5. Troubleshooting If Your Machine Does Not Operate As You Want The following chart gives explanations of common problems and messages. If other messages appear, follow the instructions displayed. Note ❒ If you cannot make copies as you want because of the paper type, paper size or paper capacity problems, use recommended paper. See p.161 “Copy Paper”. General Problem Causes “Please wait. ” appears Wait for the machine to get ready.
RussianC3_AEgsg-F_FM.book Page 106 Monday, June 16, 2003 6:35 PM Troubleshooting Problem Causes The main power indicator continues blinking and does not turn off when pressed. This occurs in the fol- Close the exposure glass cover or ADF, and lowing cases: check if the machine communicating with a computer. • The exposure Solutions glass cover or the ADF is open. • The machine is communicating with external equipment. • The hard disk is active.
RussianC3_AEgsg-F_FM.book Page 107 Monday, June 16, 2003 6:35 PM If Your Machine Does Not Operate As You Want Document Server Problem Solutions "Scanned pages exceeded max. number. Do you want to store the scanned pages as a file?" appears. The number of scanned pages exceeds the capacity per file of the Document Server. You forgot your password. You can temporarily access password-protected files. To store scanned pages as a file, press [Store File].
RussianC3_AEgsg-F_FM.book Page 108 Monday, June 16, 2003 6:35 PM Troubleshooting B Loading Paper Reference For paper types and sizes, see p.161 “Copy Paper”. Loading Paper into Paper Trays Setting special paper in the paper tray 2 A Load the special paper below the limit mark of the tray. Note ❒ You can change the paper size, see p.120 “Changing the Paper Size”. A Pull out the paper tray until it stops. 5 B Square the paper and load it in the tray with the copying face up.
RussianC3_AEgsg-F_FM.book Page 109 Monday, June 16, 2003 6:35 PM B Loading Paper Loading Paper into Large Capacity Tray (optional) Note ❒ Load copy paper of the same size and orientation in both left and right side trays. Note ❒ Fan the paper before loading. ❒ Straighten curled or warped paper before loading. C Push the paper tray in until it stops. A Pull out the LCT. 5 B Square the paper, and then load it in the tray with the copying face up.
RussianC3_AEgsg-F_FM.book Page 110 Monday, June 16, 2003 6:35 PM Troubleshooting Orientation-Fixed Paper or Two-Sided Paper Orientation-fixed (top to bottom) or two-sided paper (for example, letterhead paper, punched paper, or copied paper) might not print correctly, depending on how the originals and paper are placed. Select [Yes] in Letterhead Setting under Copier/Document Server Features, and then place the original and paper as shown below (see Copy Reference).
RussianC3_AEgsg-F_FM.book Page 111 Monday, June 16, 2003 6:35 PM D Adding Toner D Adding Toner When D appears, it is time to add toner. R WARNING: • Do not incinerate used toner or toner containers. Toner dust might ignite when exposed to an open flame. Dispose of used toner containers in accordance with local regulations. R CAUTION: • Keep toner (used or unused) and toner containers out of reach of children. Important ❒ Fault may occur if you use toner other than the recommended type.
RussianC3_AEgsg-F_FM.book Page 112 Monday, June 16, 2003 6:35 PM Troubleshooting Removing Toner • 1: Open the front cover of the machine. • 2: Lift the green lever. • 3: Push the green lever, and then gently pull out the holder. 5 SL OW • 4: Push the toner bottle back to raise its top, and then gently pull out the bottle.
RussianC3_AEgsg-F_FM.book Page 113 Monday, June 16, 2003 6:35 PM Inserting Toner Inserting Toner • 1: Hold the new bottle horizontally and shake it from side to side five or six times. Note ❒ Do not remove the black cap before shaking. • 2: Remove the black cap. Note ❒ Do not remove the inner cap. • 3: Put the toner bottle on the holder, and then pull its top forward. 5 • 4: Push in the green lever until it clicks. OW SL • 5: Press down the green lever. • 6: Close the machine's front cover.
RussianC3_AEgsg-F_FM.book Page 114 Monday, June 16, 2003 6:35 PM Troubleshooting x Clearing Misfeeds R CAUTION: • The fusing section of this machine might be very hot. Caution should be taken when removing misfed paper. Important ❒ When clearing misfeeds, do not turn off the operation switch. If you do, your copy settings will be lost. ❒ To prevent misfeeds, do not leave any torn scraps of paper inside the machine. ❒ If paper misfeeds occur frequently, contact your service representative.
RussianC3_AEgsg-F_FM.
RussianC3_AEgsg-F_FM.
RussianC3_AEgsg-F_FM.
RussianC3_AEgsg-F_FM.
RussianC3_AEgsg-F_FM.
RussianC3_AEgsg-F_FM.book Page 120 Monday, June 16, 2003 6:35 PM Troubleshooting Changing the Paper Size Preparation Be sure to select the paper size with User Tools and the paper size selector. If you do not, misfeeds might occur. See p.53 “Tray Paper Size: Tray 1–4”. D Release the side lever. Important ❒ If you want to change the paper size set in the LCT, contact your service representative. Reference For details about paper sizes and types, see p.161 “Copy Paper”.
RussianC3_AEgsg-F_FM.book Page 121 Monday, June 16, 2003 6:35 PM Changing the Paper Size Note ❒ Fan the paper before loading. ❒ Straighten curled or warped paper before loading. I While pressing the release lever, adjust the back guide to the new paper size. G While pressing the release lever, adjust the side guides to the new paper size. J Adjust the paper size selector to the new paper size.
RussianC3_AEgsg-F_FM.book Page 122 Monday, June 16, 2003 6:35 PM Troubleshooting G Press [Exit] or the {User Tools/ Counter} } key to exit User Tools. Reference p.53 “Tray Paper Size: Tray 1–4” K Gently push the paper tray in until it stops. L Check the paper size shown on the display panel.
RussianC3_AEgsg-F_FM.book Page 123 Monday, June 16, 2003 6:35 PM d Adding Staples d Adding Staples Important ❒ Stapling failures or jams may occur if you use a staple cartridge other than that recommended. Reference For details about the type of finisher, see p.17 “External Options”. 500-Sheet Finisher • 1: Open the side cover. 5 • 2: Remove the cartridge. • 3: Take out the empty refill in the direction of the arrow. • 4: Push in the new refill until it clicks. • 5: Pull out the ribbon.
RussianC3_AEgsg-F_FM.book Page 124 Monday, June 16, 2003 6:35 PM Troubleshooting • 6: Reinstall the cartridge. • 7: Close the side cover. 1000-Sheet Finisher • 1: Open the front cover of the finisher, and then pull out the staple unit. 5 ZGJS801E • 2: Hold the green lever, and then gently pull out the cartridge. ZGJS802E • 3: Hold both sides of the cartridge. • 4: Pull up the upper unit of the cartridge. ZGJS803E • 5: Take out the empty refill in the arrow direction.
RussianC3_AEgsg-F_FM.book Page 125 Monday, June 16, 2003 6:35 PM d Adding Staples • 6: Align the arrows on the new refill with those on the cartridge, and then push in the refill until it clicks. ZGJS805E • 7: Gently push down the upper unit into the cartridge. ZGJS806E • 8: Pull out the ribbon. 5 ZGJS807E • 9: Hold the green lever while pushing in the cartridge until it clicks. • 10: Push back the staple unit, and then close the front cover of the finisher.
RussianC3_AEgsg-F_FM.book Page 126 Monday, June 16, 2003 6:35 PM Troubleshooting Removing Jammed Staples Note ❒ Curled paper may cause staples to jam. To avoid this, turn copy paper over in the tray. If there is no improvement, change to a stiffer copy paper. ❒ When the 500-sheet finisher is installed, after removing jammed staples, staples will not be ejected the first few times you try to use the stapler. Reference For types of finisher, see p.17 “External Options”.
RussianC3_AEgsg-F_FM.book Page 127 Monday, June 16, 2003 6:35 PM Removing Jammed Staples 1000-Sheet Finisher • 1: Open the front cover of the finisher, and then pull out the staple unit. ZGJS801E • 2: Hold the green lever while gently pulling out the cartridge. 5 ZGJS802E • 3: Open the cartridge's face plate. ZGJS813E • 4: Remove any jammed staples. ZGJS814E • 5: Pull down the cartridge's face plate until it clicks.
RussianC3_AEgsg-F_FM.
RussianC3_AEgsg-F_FM.book Page 129 Monday, June 16, 2003 6:35 PM 6. Remarks Dos and Don'ts R CAUTION: • Unplug the power cord from the wall outlet before you move the machine. While moving the machine, you should take care that the power cord will not be damaged under the machine. Important ❒ Do not turn the power off while the On indicator is lit or blinking. Doing so may damage the hard disk.
RussianC3_AEgsg-F_FM.book Page 130 Monday, June 16, 2003 6:35 PM Remarks Toner Handling Toner R WARNING: • Do not incinerate used toner or toner containers. Toner dust might ignite when exposed to an open flame. Dispose of used toner containers in accordance with local regulations. R CAUTION: • Keep toner (used or unused) and toner containers out of reach of children. Important ❒ Fault may occur if you use toner other than the recommended type. Reference To add toner, see p.111 “D Adding Toner”.
RussianC3_AEgsg-F_FM.book Page 131 Monday, June 16, 2003 6:35 PM Where to Put Your Machine Where to Put Your Machine Machine Environment Environments to avoid Choose your machine's location carefully. Environmental conditions greatly affect its performance. • Locations exposed to direct sunlight or other sources of strong light (more than 1,500 lux). • Locations directly exposed to cool air from an air conditioner or heated air from a heater.
RussianC3_AEgsg-F_FM.book Page 132 Monday, June 16, 2003 6:35 PM Remarks 6 132 Moving Power Connection R CAUTION: • Unplug the power cord from the wall outlet before you move the machine. While moving the machine, you should take care that the power cord will not be damaged under the machine. R WARNING: • Connect the machine only to the power source described on the inside front cover of this manual. Connect the power cord directly into a wall outlet and do not use an extension cord.
RussianC3_AEgsg-F_FM.book Page 133 Monday, June 16, 2003 6:35 PM Where to Put Your Machine Access to the Machine Place the machine near the power source, providing the clearance areas shown. 1 2 4 3 1. Rear: more than 1 cm (4") 2. Right: more than 1 cm (4") 3. Front: more than 75 cm (29.6") 4. Left: more than 1 cm (4") 6 Note ❒ For the required space when options are installed, contact your service representative.
RussianC3_AEgsg-F_FM.book Page 134 Monday, June 16, 2003 6:35 PM Remarks Maintaining Your Machine If the exposure glass, exposure glass cover, or ADF belt is dirty, copy clarity may be reduced. Clean these parts if they are dirty. Cleaning the Exposure Glass Cover ❖ Cleaning the machine Wipe the machine with a soft, damp cloth, and then wipe it with a dry cloth to remove the water. Important ❒ Do not use chemical cleaners or organic solvents, such as thinner or benzene.
RussianC3_AEgsg-F_FM.book Page 135 Monday, June 16, 2003 6:35 PM Replacing the Photo Conductor Unit (PCU) Replacing the Photo Conductor Unit (PCU) When the “Replace photoconductor unit” message appears on the display panel, it is time to replace the PCU panel. A If the duplex unit is installed, open it by pushing up the catch. R WARNING: • Do not incinerate the photoconductor unit. Toner dust might ignite when exposed to an open flame.
RussianC3_AEgsg-F_FM.book Page 136 Monday, June 16, 2003 6:35 PM Remarks D While pressing the button, slide out the PCU, until it stops. G Put the old PCU (removed in step E) into the plastic bag from step F, keeping it at the same angle as it was when installed. Then, zip up the plastic bag. Note ❒ Do not tilt the used PCU after taking it out of the machine. If you do, toner might leak out. H Remove the two red sheets from the PCU in the order shown.
RussianC3_AEgsg-F_FM.book Page 137 Monday, June 16, 2003 6:35 PM Replacing the Photo Conductor Unit (PCU) J Push the unit into the machine until it clicks into place. K Remove the red sheet from the PCU, and then remove the two strips of tape. M Close the front cover. N If the duplex unit is installed, close it by pushing up the catch. 6 L Close the machine's right cover. Note ❒ Check the "Replace PCU" message does not appear on the display panel.
RussianC3_AEgsg-F_FM.book Page 138 Monday, June 16, 2003 6:35 PM Remarks Other Functions Inquiry The inquiry function lets you check the telephone numbers to contact for repairs or ordering toner. Be sure to contact your service engineer to verify the following: ❖ Consumables • Telephone No. to order • Toner • Staple • TX Stamp Name ❖ Machine Maintenance/Repair • Telephone No. • Serial No. of Machine 6 ❖ Sales Representative • Telephone No. A Press the {User Tools/Counter}} key. B Press [Inquiry].
RussianC3_AEgsg-F_FM.book Page 139 Monday, June 16, 2003 6:35 PM Counter Counter Displaying the Total Counter You can display the total counter value used for all functions. A Press the {User Tools/Counter}} key. B Press [Counter]. 6 C To print a counter list, press [Print Counter List]. D Press the {Start}} key. A counter list prints out.
RussianC3_AEgsg-F_FM.
RussianC3_AEgsg-F_FM.book Page 141 Monday, June 16, 2003 6:35 PM 7. Entering Text Entering Text This section describes how to enter characters. When you enter a character, it appears at the position of the cursor. If there is a character already at the cursor position, the entered character appears before that.
RussianC3_AEgsg-F_FM.book Page 142 Monday, June 16, 2003 6:35 PM Entering Text How to Enter Text Entering letters A Press [Shift] to switch between uppercase and lowercase. B Press the letters you want to enter. Deleting characters A Press [Backspace] or [Delete All] to delete characters.
RussianC3_AEgsg-F_FM.book Page 143 Monday, June 16, 2003 6:35 PM 8. Security Security Confidential information is always at risk of being copied without permission or subject to unauthorized access through the network. To protect documents from such intrusion, not only can passwords be set, but also the Extended Security function can be used to strengthen security. For those who require increased document protection, we recommend using the Extended Security function.
RussianC3_AEgsg-F_FM.book Page 144 Monday, June 16, 2003 6:35 PM Security ❖ Documents stored in the Document Server by the following functions • Document Server • Copier function • Fax transmission • Scanner function • Printer driver ❖ Documents stored from the printer driver using the Locked Print function Reference For information about Document Server, see p.31 “Document Server”. For information about Locked Print, see “Locked Print”, Printer Reference, or the printer driver Help.
RussianC3_AEgsg-F_FM.book Page 145 Monday, June 16, 2003 6:35 PM Security Unlocking a locked document Unlock a document that was locked because a wrong password was entered multiple times, making it available for authorized users to access again. A Press the {User Tools/Counter}} key. B On the display panel, press [System Settings], [Key Operator Tools], [TTNext] and then press [Password Management for Stored Files]. C Press [OK] under Unlock Files. The document is unlocked.
RussianC3_AEgsg-F_FM.book Page 146 Monday, June 16, 2003 6:35 PM Security Operating Environment and Notes Security for this machine is assured on the premises that the machine is used under the following conditions: Operating Environment • The condition of the machine is normal. (For example, it is not damaged, modified, or lacking components.) • When the machine is connected to a network, the machine is protected from illegitimate access including unauthorized packet sniffing.
RussianC3_AEgsg-F_FM.book Page 147 Monday, June 16, 2003 6:35 PM Operating Environment and Notes For User • Be careful not to let anyone know your password, especially when entering a password or recording it. Keep any record of your password in a safe place. • Avoid using a single number or consecutive numbers for a password such as “0000” or “1234”, since the numbers like this are easy to guess, so using them will not provide a worthwhile level of security.
RussianC3_AEgsg-F_FM.
RussianC3_AEgsg-F_FM.book Page 149 Monday, June 16, 2003 6:35 PM 9.
RussianC3_AEgsg-F_FM.book Page 150 Monday, June 16, 2003 6:35 PM Specifications ❖ Copy paper size: • Tray 1: A3L – A5L, 11" × 17"L – 51/2" × 81/2"L • Tray 2: A3L – A6L, 11" × 17"L – 51/2" × 81/2"L • Bypass: A3L – A6L, 11" × 17"L – 51/2" × 81/2"L • Tray 2 (custom size): Vertical: 100 – 297 mm, 4.0" – 11.7" Horizontal: 148 – 432 mm, 5.9" – 17.0" • Bypass (custom size): Vertical: 90 – 305 mm, 3.6" – 12.0" Horizontal: 148 – 600 mm, 5.9" – 23.
RussianC3_AEgsg-F_FM.
RussianC3_AEgsg-F_FM.book Page 152 Monday, June 16, 2003 6:35 PM Specifications ❖ Power consumption: • Main unit only Warm-up Type 1/Type 2 Type 3 less than 1.5 kW less than 1.5 kW Stand-by about 150 W *2 about 150 W *2 During printing about 650 W *2 about 770 W *2 less than 1.5 kW less than 1.5 kW Type 1/Type 2 Type 3 Maximum • Complete system *1 Warm-up less than 1.5 kW less than 1.
RussianC3_AEgsg-F_FM.book Page 153 Monday, June 16, 2003 6:35 PM Main Unit • Complete system *3 Type 1/Type 2 Type 3 Stand-by Less than 38 dB (A) Less than 38 dB (A) Copying Less than 61 dB (A) Less than 64 dB (A) *1 *2 *3 The above measurements, made in accordance with ISO 7779, are actual values. Measured at the position of the bystander. The Complete System consists of the main unit, ADF, 1000-sheet finisher, duplex unit, internal tray 2 and paper tray unit. ❖ Weight: Type 1, 2, 3: Approx.
RussianC3_AEgsg-F_FM.book Page 154 Monday, June 16, 2003 6:35 PM Specifications Options Exposure Glass Cover Lower this over originals for copying. Auto Document Feeder ❖ Mode: ADF mode, Batch mode, SADF mode, Mixed Size mode, Custom Size originals mode ❖ Original size: • A3L – A5KL • 11" × 17"L – 51/2" × 81/2"KL ❖ Original weight: • One-sided originals: 40 – 128 g/m2 (11 – 34 lb.) • Two-sided originals: 52 – 105 g/m2 (14 – 28 lb.) (Duplex) ❖ Maximum number of originals: 50 sheets (80 g/m2, 20 lb.
RussianC3_AEgsg-F_FM.book Page 155 Monday, June 16, 2003 6:35 PM Options 500-Sheet Finisher ❖ Paper size: A3L, B4 JISL, A4KL, B5 JISK, 11" × 17"L, 11" × 14"L, 81/2" × 14"L, 81/2" × 11"KL, 81/2" × 13"L, 8" × 101/2"K ❖ Paper weight: 60 – 128 g/m2, 16 – 34 lb. ❖ Stack capacity: • 500 sheets (A4K, 81/2" × 11"K or smaller) (80 g/m2, 20 lb.) • 250 sheets (B4 JISL, 81/2" × 14"L or larger) (80 g/m2, 20 lb.) ❖ Staple capacity: • 30 sheets (A4K, 81/2" × 11"K or smaller) (80 g/m2, 20 lb.
RussianC3_AEgsg-F_FM.book Page 156 Monday, June 16, 2003 6:35 PM Specifications 1000-Sheet Finisher Finisher Upper Tray: ❖ Paper size: A3L, B4 JISL, A4KL, B5 JISKL, A5KL, B6 JISL, A6L, PostcardL, 11" × 17"L, 11" × 15"L, 11" × 14"L, 10" × 14"L, 10" × 15"L, 81/2" × 14"L, 81/2" × 11"KL, 101/2" × 71/4"KL, 8" × 13"L, 81/2" × 13"L, 81/4" × 13"L, 8" × 101/2"KL, 8" × 10"KL, 81/4" × 14"L, 51/2" × 81/2"KL ❖ Paper weight: 60 – 157 g/m2, 16 – 42 lb.
RussianC3_AEgsg-F_FM.book Page 157 Monday, June 16, 2003 6:35 PM Options ❖ Power consumption: Less than 50 W (power is supplied from the main unit) ❖ Dimensions (W × D × H): 527 × 520 × 790 mm, 20.8" × 20.5" × 31.1" ❖ Weight: Approx. 25 kg, 55.2 lb. Shift Sort Tray ❖ Paper capacity: 250 sheets (A4K, 81/2" × 11"K or smaller) (80 g/m2, 20 lb.) 125 sheets (B4 JISL, 81/2" × 14" or larger) (80 g/m2, 20 lb.) ❖ Power consumption: 3.
RussianC3_AEgsg-F_FM.book Page 158 Monday, June 16, 2003 6:35 PM Specifications Bypass Tray ❖ Paper size: • Standard size: A3L – A6L, 11" × 17"L – 51/2" × 81/2"L • Custom size: Vertical (100 – 297 mm, 4.0" – 11.7"), Horizontal (148 – 432 mm, 5.9" – 17.0") ❖ Paper weight: 52 – 157 g/m2, 14 – 42 lb. ❖ Dimensions (W × D × H): 296 × 495 × 163 mm, 11.7" × 19.5" × 6.5" ❖ Paper capacity: 52 – 90 g/m2, 16 – 20 lb: 100 sheets ❖ Weight: Approx. 2.5 kg, 5.6 lb. Bridge Unit ❖ Dimensions: 413 × 435 × 126 mm, 16.
RussianC3_AEgsg-F_FM.book Page 159 Monday, June 16, 2003 6:35 PM Options ❖ Maximum power consumption: Less than 15 W (power is supplied from the main unit) ❖ Dimensions (W × D × H): 530 × 410 × 120 mm, 20.9" × 16.2" × 4.7" ❖ Weight: Approx. 1.1 kg, 2.5 lb. Note ❒ Specifications are subject to change without notice. Large Capacity Tray ❖ Paper size: A4K, 81/2" × 11"K ❖ Paper weight: 60 – 90 g/m2, 16 – 24 lb. ❖ Paper capacity: 2,000 sheets (80 g/m2, 20 lb.) ❖ Power consumption Maximum.
RussianC3_AEgsg-F_FM.book Page 160 Monday, June 16, 2003 6:35 PM Specifications ❖ Paper capacity: 500 sheets (80 g/m2, 20 lb.) × 2 trays ❖ Dimensions (W × D × H): 550 × 520 × 271 mm, 21.7" × 20.5" × 10.7" ❖ Weight: Approx. 25 kg, 55.2 lb. Note ❒ Specifications are subject to change without notice.
RussianC3_AEgsg-F_FM.book Page 161 Monday, June 16, 2003 6:35 PM Copy Paper Copy Paper Recommended Paper Sizes and Types The following limitations apply to each tray: Tray Type Paper Type and Weight Metric Version Tray 1 60-90 g/m2 (16-24 lb.
RussianC3_AEgsg-F_FM.book Page 162 Monday, June 16, 2003 6:35 PM Specifications Tray Type Paper Type and Weight Bypass 52-90 g/m2 Tray *10 (14-24 lb.) (optional) Thin paper 52-60 g/m2 (14-16 lb.
RussianC3_AEgsg-F_FM.book Page 163 Monday, June 16, 2003 6:35 PM Copy Paper *4 *5 *6 *7 *8 *9 *10 *11 *12 Place the paper in the bypass tray, and specify the paper size. See “When copying onto custom size paper”, Copy Reference When paper larger than 433 mm is used, it is likely to jam, crease or not feed in properly. Make sure the paper is placed correctly so that feeds in straight. Placing one sheet at a time is recommended. The paper tray guide is fixed.
RussianC3_AEgsg-F_FM.book Page 164 Monday, June 16, 2003 6:35 PM Specifications Envelopes Note ❒ Postcards and envelopes should be fed from paper tray 2 or the bypass tray. ❒ Some kinds of envelopes might cause misfeeds or wrinkle. If this happens, push down the green lever of the fusing unit. See p.164 “When copying onto envelopes”. ❒ Envelopes with large flaps should be fed from paper tray 2 to prevent misfeeds. See the illustration below.
RussianC3_AEgsg-F_FM.book Page 165 Monday, June 16, 2003 6:35 PM Copy Paper B Open the right cover by lifting the catch. C Push down the green fusing unit's lever, as shown. ZEWH320E Important ❒ Be sure to return the lever to its original position after you have finished copying onto envelopes. ❒ If you copy onto plain paper without returning the lever to its original position, the copy quality might be reduced. 9 D Close the right cover.
RussianC3_AEgsg-F_FM.book Page 166 Monday, June 16, 2003 6:35 PM Specifications E If the duplex unit is installed, close it. F Press the {#}} key. G Select the paper size, and then select [Thick Paper] for the paper type. H Press [OK]. I Place your originals, and then press the {Start}} key. Note ❒ When copying onto OHP transparencies, remove copies one by one. ❒ When setting OHP transparencies, thin paper or label paper (adhesive labels), Staple, Shift or Sort function may not be used.
RussianC3_AEgsg-F_FM.book Page 167 Monday, June 16, 2003 6:35 PM Copy Paper Unusable Paper R CAUTION: • Do not use aluminum foil, carbon paper, or similar conductive paper to avoid a fire or machine failure.
RussianC3_AEgsg-F_FM.
RussianC3_AEgsg-F_FM.
RussianC3_AEgsg-F_FM.
Paper type: OK Prince Eco G100(55kg), Paper Thickness=80 µm // Pages in book=180 // Print scale=81% Gap (when printed at 81% scale) = Pages in book × Paper thickness / 2 = 7.200000 mm Introduction This manual describes detailed instructions on the operation and notes about the use of this machine. To get maximum versatility from this machine all operators are requested to read this manual carefully and follow the instructions. Please keep this manual in a handy place near the machine.
Paper type: OK Prince Eco G100(55kg), Paper Thickness=80 µm // Pages in book=180 // Print scale=81% Gap (when printed at 81% scale) = Pages in book × Paper thickness / 2 = 7.
Paper type: Wood Free 80g/m2, Paper Thickness=100 µm // Pages in book=128 // Print scale=81% Gap (when printed at 81% scale) = Pages in book × Paper thickness / 2 = 6.400000 mm RICOH COMPANY, LTD. 15-5, Minami Aoyama 1-chome, Minato-ku, Tokyo 107-8544, Japan Phone: +81-3-3479-3111 United Kingdom RICOH UK LTD.
Paper type: Wood Free 80g/m2, Paper Thickness=100 µm // Pages in book=128 // Print scale=81% Gap (when printed at 81% scale) = Pages in book × Paper thickness / 2 = 6.400000 mm Introduction This manual describes detailed instructions on the operation and notes about the use of this machine. To get maximum versatility from this machine all operators are requested to read this manual carefully and follow the instructions. Please keep this manual in a handy place near the machine.
RuC3_GBcopy-F_FM.book Page i Wednesday, June 25, 2003 9:39 AM Manuals for This Machine The following manuals describe the operational procedures of this machine. For particular functions, see the relevant parts of the manual. Note ❒ Manuals provided are specific to machine type. ❒ Adobe Acrobat Reader is necessary to view the manuals as a PDF file.
RuC3_GBcopy-F_FM.book Page ii Wednesday, June 25, 2003 9:39 AM ❖ Manuals for DeskTopBinder V2 Lite DeskTopBinder V2 Lite is a utility included on the CD-ROM labeled "Scanner Driver & Document Management Utilities". • DeskTopBinder V2 Lite Setup Guide (PDF file - CD-ROM2) Describes installation of, and the operating environment for DeskTopBinder V2 Lite in detail. This guide can be displayed from the [Setup] display when DeskTopBinder V2 Lite is installed.
RuC3_GBcopy-F_FM.book Page iii Wednesday, June 25, 2003 9:39 AM What You Can Do with This Machine Types of Duplex Copies 1-sided 2 Pages 2-sided 1 Page (see p.43 " 1 Sided 2 Sided") 2-sided 1 Page 2-sided 1 Page (see p.43 " 2 Sided 2 Sided") 1-sided 4 Pages 2-sided 1 Page (see p.46 " 1 Sided 4 Pages Combine 2 Side") 2-sided 2 Pages 2-sided 1 Page (see p.47 " 2 Sided 4 Pages Combine 2 Side") 1-sided 8 Pages 2-sided 1 Page (see p.
RuC3_GBcopy-F_FM.book Page iv Wednesday, June 25, 2003 9:39 AM Copying Book Originals 1-sided 4 Pages Booklet (see p.50 " 1 Sided Booklet") Open to Left 1 2 3 2 3 3 1 4 4 1 Open to Right 1 2 3 3 3 2 4 1 1 4 2-sided 2 Pages Booklet (see p.50 " 2 Sided Booklet") Open to Left 3 1 Open to Right 3 1 1-sided Magazine (see p.50 " 1 Sided Magazine") Open to Left 1 2 5 2 7 8 7 1 4 8 1 3 5 3 6 Open to Right 1 2 5 7 7 2-sided 8 2 8 1 5 3 1 4 6 Magazine (see p.
RuC3_GBcopy-F_FM.book Page v Wednesday, June 25, 2003 9:39 AM Combining Multiple Pages onto a Single Page (see p.45 " One-Sided Combine") 1-sided 2 Pages 1-sided 1 Page 2-sided 1 Page 1-sided 4 Pages 1-sided 1 Page 2-sided 2 Pages 1-sided 1 Page 1-sided 8 Pages 1-sided 1 Page 2-sided 4 Pages 1-sided 1 Page Copying Originals Such as Books (see p.48 "Series Copies") Bound Originals 1-sided Pages Bound Originals 2-sided Pages 1-sided 1 Page Copying 2-Sided Pages onto 1-Sided Pages (see p.
RuC3_GBcopy-F_FM.book Page vi Wednesday, June 25, 2003 9:39 AM TABLE OF CONTENTS Manuals for This Machine ...................................................................................... i What You Can Do with This Machine.................................................................. iii How to Read This Manual .....................................................................................1 Machine Types .......................................................................................
RuC3_GBcopy-F_FM.book Page vii Wednesday, June 25, 2003 9:39 AM Double Copies.......................................................................................................... 53 Centring.................................................................................................................... 53 Positive/Negative ..................................................................................................... 54 Erase....................................................................
RuC3_GBcopy-F_FM.book Page viii Wednesday, June 25, 2003 9:39 AM 5. Specifications Combination Chart............................................................................................. 105 Supplementary Specifications.......................................................................... 106 INDEX.......................................................................................................
RuC3_GBcopy-F_FM.book Page 1 Wednesday, June 25, 2003 9:39 AM How to Read This Manual Symbols In this manual, the following symbols are used: R WARNING: This symbol indicates a potentially hazardous situation that might result in death or serious injury when you misuse the machine without following the instructions under this symbol. Be sure to read the instructions, all of which are included in the Safety Information section in the General Settings Guide.
RuC3_GBcopy-F_FM.book Page 2 Wednesday, June 25, 2003 9:39 AM Machine Types This machine comes in three models which vary by copy speed. To make sure which model you have, see the inside front cover of this manual.
RuC3_GBcopy-F_FM.
RuC3_GBcopy-F_FM.book Page 4 Wednesday, June 25, 2003 9:39 AM Control Panel This illustration shows the control panel of a machine that has all options fully installed. ZLFS160E 1. Screen Contrast knob 5. {Check Modes}} key Adjusts display panel brightness. Press to check the entered copy job settings. 2. Indicators Display the status of the machine or indicate errors.
RuC3_GBcopy-F_FM.book Page 5 Wednesday, June 25, 2003 9:39 AM 11. Operation switch Press to turn the power on (the On indicator goes on). To turn the power off, press again (the On indicator goes off). 12. {Sample Copy}} key Press to make a single set of copies or prints to check print quality before making multiple sets. See p.38 “Sample copy”. 13. {Start}} key Press to start copying. Press to start scanning or printing documents stored using the Document Server function. 14.
RuC3_GBcopy-F_FM.book Page 6 Wednesday, June 25, 2003 9:39 AM Display Panel The function items displayed serve as selector keys. You can select or specify an item by lightly pressing them. When you select or specify an item on the display panel, it is highlighted like . Keys appearing as cannot be used. Note ❒ The following illustration is an example based on a machine with the 1000– sheet finisher installed. ❖ Initial copy display ZLFS080E 1.
RuC3_GBcopy-F_FM.book Page 7 Wednesday, June 25, 2003 9:39 AM 1. Placing Originals Originals Sizes and Weights of Recommended Originals ❖ Metric version Original location Original size Original weight Exposure glass Up to A3 -- ADF One-sided originals: 40–128 g/m2 A3L – A5KL Two-sided originals: 52–105 g/m2 A3L – A5KL ❖ Inch version Original location Original size Original weight Exposure glass Up to 11" × 17" -- ADF One-sided originals: 11–34 lb.
RuC3_GBcopy-F_FM.book Page 8 Wednesday, June 25, 2003 9:39 AM Placing Originals Non-recommended originals for the Auto Document Feeder Placing the following types of originals in the ADF can cause paper misfeeds or result in damage to the originals. Place these originals on the exposure glass instead. • Originals other than those specified on p.7 “Sizes and Weights of Recommended Originals”.
RuC3_GBcopy-F_FM.book Page 9 Wednesday, June 25, 2003 9:39 AM Originals Sizes Detectable by Auto Paper Select ❖ Metric version Size A3L B4 JIS L *2 A4K L B5 JISK L Original location A5K L 11" × 17" L 81/2" × 14"L 81/2" × 11"K L 51/2" × 81/2" KL *1 Exposure glass ❍ ❍ ❍ ❍ × × ❍ × × ❍ ADF ❍ ❍ ❍ ❍ ❍ × × × × × *1 *2 1 81/2" × 13"L You can select from 81/2" × 13", 81/4" × 13", 8" × 13" with User Tools (System Settings).
RuC3_GBcopy-F_FM.book Page 10 Wednesday, June 25, 2003 9:39 AM Placing Originals ❖ ADF 1 CP02AEE Note ❒ When copying custom size originals, make sure you specify the size of the originals. If not, the image may not be copied properly. See p.15 “Placing custom size originals”. Sizes difficult to detect It is difficult for the machine to automatically detect sizes of the following types of original, so select the paper size manually.
RuC3_GBcopy-F_FM.book Page 11 Wednesday, June 25, 2003 9:39 AM Placing Originals Placing Originals Note ❒ Place originals only when all correction fluid and ink has completely dried. Not taking this precaution could result in a dirtied exposure glass, creating blemished copies. Reference For original sizes you can set, see p.7 “Originals” . ❖ 90°° turn Use this to copy A3K, B4 JISKor 11" × 17"K size originals. The machine rotates the copy image by 90°.
RuC3_GBcopy-F_FM.book Page 12 Wednesday, June 25, 2003 9:39 AM Placing Originals A Press [Special Original]. Placing Originals on the Exposure Glass A Lift 1 the exposure glass cover or the ADF. B Select the original orientation. Standard orientation A Make sure is selected. Important ❒ Do not lift the exposure glass cover or the ADF forcefully. If you do, the ADF cover might open or be damaged. Note ❒ Be sure to lift the exposure glass cover or ADF more than 30°.
RuC3_GBcopy-F_FM.book Page 13 Wednesday, June 25, 2003 9:39 AM Placing Originals Placing Originals in the Auto Document Feeder B Place the aligned originals face up into the ADF. 1 Settings should be made in the following situations: ❖ When placing originals consisting of more than 50 pages: p.13 “Batch” ❖ When placing originals one by one: p.14 “SADF” ❖ When placing same width originals of different sizes: p.15 “Mixed size” ❖ When placing custom size originals: p.
RuC3_GBcopy-F_FM.book Page 14 Wednesday, June 25, 2003 9:39 AM Placing Originals B Press [Batch], and then press [OK]. A Press [Special Original]. Note ❒ If [SADF] is displayed, change the settings. See p.102 “Switch to Batch (SADF)”. 1 C Place the first part of the originals, and then press the { Start} } key. D After the first part of the originals has been fed, place the next part. E When the Sort, Combine, or Du- plex function is set, press the {#} } key after all originals have been scanned.
RuC3_GBcopy-F_FM.book Page 15 Wednesday, June 25, 2003 9:39 AM Placing Originals C Align the rear and left edges of Mixed size the originals as shown. When placing different size originals of the same width in the ADF together, the machine automatically checks the size of the originals and makes copies.
RuC3_GBcopy-F_FM.book Page 16 Wednesday, June 25, 2003 9:39 AM Placing Originals C Enter the horizontal size of the original using the number keys, and then press [#]. Note ❒ If you make a mistake, press [Clear] or the {Clear/Stop} } key, and then enter the value again. 1 D Enter the vertical size of the original using the number keys, and then press [#]. E Press [OK]. F Place originals, and then press the {Start} } key.
RuC3_GBcopy-F_FM.book Page 17 Wednesday, June 25, 2003 9:39 AM 2. Copying Basic Procedure A When the machine is set for user codes, enter a user code (up to eight digits) using the number keys, and then press the {#} } key. The machine is now ready to copy. Reference For users codes, see “Key Operator Tools”, General Settings Guide. d Ready" appears on B Make sure "d the display. If any other function is displayed, press the {Copy} } key.
RuC3_GBcopy-F_FM.book Page 18 Wednesday, June 25, 2003 9:39 AM Copying Interrupt Copy Use this function to interrupt a long copy job to make urgently needed copies. Limitation ❒ You cannot use Interrupt Copy with the scanner function, or when fax originals are being scanned. 2 A Press the {Interrupt}} key. The Interrupt indicator lights. When the originals stop scanning A Remove the originals that were being copied, and then place the originals you want to copy. B Press the {Start} } key.
RuC3_GBcopy-F_FM.book Page 19 Wednesday, June 25, 2003 9:39 AM Basic Procedure D Press [To "Printing"]. Left Original Beeper The beeper sounds and an error message appears if you leave originals on the exposure glass after copying. Note ❒ See p.93 “Tone: Original remains”. Job Preset The initial copy display appears. Following the current copy job, the next job starts automatically. Note ❒ You can switch the display to the current copy job by pressing [To "Printing"].
RuC3_GBcopy-F_FM.book Page 20 Wednesday, June 25, 2003 9:39 AM Copying Copying from Paper Tray 2 Use paper tray 2 for copying onto special paper (OHP transparencies, label paper (adhesive labels), thick paper (postcards, envelopes, etc.), thin paper as well as plain paper. You can make special paper settings at any time. • You can use Paper Tray 2 as an alternative Bypass Tray when it is temporarily selected. • You can also use Paper Tray 2 as an ordinary tray.
RuC3_GBcopy-F_FM.book Page 21 Wednesday, June 25, 2003 9:39 AM Copying from Paper Tray 2 ❒ You can also specify the size of paper directly, using the paper size selector for tray 2. ❒ Some kinds of envelopes might cause misfeeds and wrinkles. If this happens, push down the fusing unit's green lever. See “Envelopes”, General Settings Guide. Also, be sure to place the front face of the envelope upward. A Press [Select Size]. B Select the paper size. C Press [OK].
RuC3_GBcopy-F_FM.book Page 22 Wednesday, June 25, 2003 9:39 AM Copying A Select paper type in "Special paper". 2 B Press [OK]. C Place originals, and then press the {Start} } key. Note ❒ The maximum limit for stacking special paper is different to that for plain paper. See "BLoading Paper", General Settings Guide. ❒ When setting OHP transparencies, thin paper, or adhesive label paper, Staple, Shift, or Sort functions cannot be used.
RuC3_GBcopy-F_FM.book Page 23 Wednesday, June 25, 2003 9:39 AM Copying from the Bypass Tray Copying from the Bypass Tray Use the bypass tray to copy onto special paper such as OHP transparencies, thick paper (postcards, envelopes, etc.), adhesive label paper, thin paper , and copy paper that cannot be loaded in the paper trays. Preparation When copying from the bypass tray, select [1 Sided] for copying in [Dup./Combine/Series] (for example [1 Sided] → [1 Sided] or [2 Sided] → [1 Sided]).
RuC3_GBcopy-F_FM.book Page 24 Wednesday, June 25, 2003 9:39 AM Copying C Lightly insert the copy paper face down, and then adjust the paper guide. E Select the paper type and size. When copying onto standard size paper A Press the {#} } key. The "Bypass Tray Paper" screen appears. B Press [Select Size]. 2 1: Extender 2: Paper guide Important ❒ If the guides are not flush against the copy paper, image skewing or misfeeds might occur.
RuC3_GBcopy-F_FM.book Page 25 Wednesday, June 25, 2003 9:39 AM Copying from the Bypass Tray D Enter the horizontal size of the paper using the number keys, and then press [#]. G When your copy job is finished, press the { Clear Modes} } key to clear the settings. Note ❒ If [Horiz mm] is not highlighted, press [Horiz mm]. ❒ To register the custom size entered, press [Program], and then press [Exit]. 2 E Press [OK]. When copying onto special paper A Press the {#} } key.
RuC3_GBcopy-F_FM.book Page 26 Wednesday, June 25, 2003 9:39 AM Copying Copier Functions Adjusting Copy Image Density There are three types of adjustment available: 2 ❖ Auto Image Density The machine automatically adjusts image density. Manual image density A Press [Auto Image Density] to cancel it. B Press [Lighter] or [Darker] to adjust image density. ❖ Manual image density You can adjust the general density of the original in seven increments.
RuC3_GBcopy-F_FM.book Page 27 Wednesday, June 25, 2003 9:39 AM Copier Functions Selecting the Original Type Setting If the original type keys do not appear Select one of the following five types to match originals: A Press [Original Type]. B Select the original type, and then press [OK]. ❖ Text When originals contain only text (no pictures). 2 ❖ Text/Photo When originals contain photographs or pictures alongside the text. ❖ Photo When you need to reproduce delicate tones of photographs and pictures.
RuC3_GBcopy-F_FM.book Page 28 Wednesday, June 25, 2003 9:39 AM Copying Selecting Copy Paper There are two ways to select copy paper: ❖ Auto Paper Select The machine selects a suitable size of copy paper automatically based on original size and reproduction ratio. 2 ❖ Manual Paper Select Choose the tray containing the paper you want to copy onto: a paper tray, bypass tray, or Large Capacity Tray (LCT). Reference p.10 “Sizes difficult to detect” p.
RuC3_GBcopy-F_FM.book Page 29 Wednesday, June 25, 2003 9:39 AM Copier Functions Auto Paper Select A Make sure [Auto Paper Select] is selected. 2 Note ❒ Trays with a key mark are not automatically selected. See “Paper Type”in “Tray Paper Settings”, General Settings Guide. Manual Paper Select A Select the paper tray, bypass tray or LCT. The selected paper tray is highlighted. Reference p.23 “Copying from the Bypass Tray” If the paper type keys do not appear A Press [Auto Paper Select].
RuC3_GBcopy-F_FM.book Page 30 Wednesday, June 25, 2003 9:39 AM Copying - Rotated copy If the orientation of original (L or K) is different to that of the paper you are copying onto, this function rotates the original image by 90°, fitting it onto the copy paper. This function works when [Auto Paper Select] or [Auto Reduce/Enlarge] is selected. See p.28 “Auto Paper Select”. 2 GCROTA0E Note ❒ The Auto Tray Switching default setting is [With Image Rotation].
RuC3_GBcopy-F_FM.book Page 31 Wednesday, June 25, 2003 9:39 AM Copier Functions A Press [Reduce/Enlarge]. Preset Reduce/Enlarge You can select a preset ratio for copying. 2 ❖ Base Point The base point of Reduce/Enlarge differs depending on how the original was scanned. When the original is placed on the exposure glass, the upper left corner is the base point. When placed in the ADF, the bottom left corner is the base point.
RuC3_GBcopy-F_FM.book Page 32 Wednesday, June 25, 2003 9:39 AM Copying A Press [Create Margin] on the initial display. B Enter the ratio. To select the ratio using [n n] and [o o] A Select a preset ratio close to the ratio using [Reduce] or [Enlarge]. B Adjust the ratio further, using [n n] or [o o]. 2 B If you do not want to combine it with the Reduce/Enlarge function, place originals, and then press the {Start} } key. Zoom You can change the reproduction ratio in increments of 1%.
RuC3_GBcopy-F_FM.book Page 33 Wednesday, June 25, 2003 9:39 AM Copier Functions Auto Reduce/Enlarge The machine can choose an appropriate reproduction ratio based on the paper and original sizes you select. ❒ You cannot use the Rotated Copy function when enlarging to B4 JIS or A3. When enlarging to B4 JIS or A3 size copy paper, place the original in the L orientation. Reference p.10 “Sizes difficult to detect” 2 You can place originals of different sizes in the ADF at the same time. See p.
RuC3_GBcopy-F_FM.book Page 34 Wednesday, June 25, 2003 9:39 AM Copying E Enter the length of the copy using Size Magnification the number keys, and then press [#]. This function calculates an enlargement or reduction ratio based on the lengths of the original and copy. 2 Note ❒ To change the length after pressing [#], select [Original] or [Copy], and then enter the length. F Press [OK] twice. G Place original, and then press the {Start} } key.
RuC3_GBcopy-F_FM.book Page 35 Wednesday, June 25, 2003 9:39 AM Copier Functions B Press [Specifd. Ratio]. C Press [Direct. Mag.%]. To enter the ratio using the number keys A Press [Horizontal]. B Enter the ratio using the number keys, and then press [#]. C Press [Vertical]. D Enter the ratio using the number keys, and then press [#]. E Press [OK]. To specify a ratio using [n n] and [o o] A Press [With no]. B Press [Horizontal]. C Adjust the ratio using [n n] or [o o].
RuC3_GBcopy-F_FM.book Page 36 Wednesday, June 25, 2003 9:39 AM Copying A Press [Reduce/Enlarge]. Sort The machine can scan originals into memory and automatically sort copies. Reference Related default settings: 2 B Press [Specifd. Ratio]. C Press [Dir. Size Mag mm]. D Enter the horizontal size of the original using the number keys, and then press [#]. E Enter the horizontal size of the copy using the number keys, and then press [#]. p.103 “Select Stack Function” p.
RuC3_GBcopy-F_FM.book Page 37 Wednesday, June 25, 2003 9:39 AM Copier Functions Reference For the paper capacity of the optional finishers: ❖ When the 1000-sheet finisher is installed ”500-Sheet Finisher”General Settings Guide, ”1000-Sheet Finisher”General Settings Guide. ❖ Shift Sort • 500-Sheet Finisher/1000-Sheet Finisher/Shift Sort Tray Each time the copies of one set or a job are delivered, the next copy is shifted to separate each set or job.
RuC3_GBcopy-F_FM.book Page 38 Wednesday, June 25, 2003 9:39 AM Copying 2 Sample copy Changing the number of sets Use this function to check copy settings before making a long copy run. You can change the number of copy sets during copying. Note ❒ This function can be used only when the Sort function is turned on. Note ❒ This function can only be used when the Sort function is turned on. A Select Sort and any other neces- A While sary functions, and then place the originals.
RuC3_GBcopy-F_FM.book Page 39 Wednesday, June 25, 2003 9:39 AM Copier Functions Stack Copies can be assembled with each page shifted. ❖ Shift Stack This function groups together copies of each page in a multi-page original. Every other page stack is shifted for ease of separation. If the shift sort tray is installed, this function is done by sliding from side to side. 2 333 A Press [Stack]. B Enter the number of copies using the number keys. C Place originals, and then press the {Start} } key.
RuC3_GBcopy-F_FM.book Page 40 Wednesday, June 25, 2003 9:39 AM Copying Staple Individual copy sets can be stapled. 2 Note ❒ You cannot use the bypass tray with this function. Stapling position and original setting Place all the originals in an orientation in which they can be read. They will be automatically rotated for copying.
RuC3_GBcopy-F_FM.book Page 41 Wednesday, June 25, 2003 9:39 AM Copier Functions ❖ 1000-sheet finisher Original location Exposure glass ADF Stapling position *1 Top K STAPLEAE 2 L K Bottom STAPLECE STAPLE25 STAPLE27 STAPLE28 STAPLE30 L STAPLEDE Left 2 K *2 L STAPLE31 K *2 STAPLE22ADA Top 2 STAPLEEE STAPLE24ADA L STAPLE10ADA *1 *2 STAPLE33 STAPLE20ADA This table shows stapling positions, not the orientation of delivered copies. Not available for larger than A4 size paper.
RuC3_GBcopy-F_FM.book Page 42 Wednesday, June 25, 2003 9:39 AM Copying A Select one of the stapling positions. ❖ 500-sheet finisher 2 ❖ 1000-sheet finisher Note ❒ When you select the stapling position, the Sort function is automatically selected. Reference p.40 “Stapling position and original setting” B Enter the number of copy sets using the number keys. C Place originals, and then press the {Start}} key. Note ❒ When placing originals on the exposure glass, start with the first page to be copied.
RuC3_GBcopy-F_FM.book Page 43 Wednesday, June 25, 2003 9:39 AM Copier Functions Duplex There are three types of duplex: ❖ 1 Sided→ →2 Sided Copies 2 one-sided pages onto a two-sided page. Original orientation and completed copies Copy images differ according to the orientation in which you place originals (vertical K or horizontal L ). 2 ❖ 2 Sided→ →2 Sided Copies 1 two-sided page onto a two-sided page. *1 ❖ 2 Sided→ →1 Sided Copies each side of a two-sided original onto two separate pages.
RuC3_GBcopy-F_FM.book Page 44 Wednesday, June 25, 2003 9:39 AM Copying A Press [Dup./Combine/Series]. ❒ When placing originals on the exposure glass or in the ADF using the Batch function, press the { #} } key after all the originals have been scanned. Originals and copy orientation 2 You can select the orientation. • Top to Top Note ❒ You can also select “1 Sided to 2 Sided” or ”2 Sided to 2 Sided”directly, by pressing the Copy Function Key. If you do this, proceed to step D.
RuC3_GBcopy-F_FM.book Page 45 Wednesday, June 25, 2003 9:39 AM Copier Functions 1 Sided Combine Combine several pages onto one side of a sheet. ❖ Orientation of the original and combine image position • Open to left R originals ❖ 1 Sided 2 Pages → Combine 1 Side Copies 2 one-sided originals onto one side of a sheet. 2 GCSHUY1E • Open to top S originals GCSHUY2E GCSHVY7E ❖ 1 Sided 4 Pages → Combine 1 Side Copies 4 one-sided originals onto one side of a sheet.
RuC3_GBcopy-F_FM.book Page 46 Wednesday, June 25, 2003 9:39 AM Copying 2 Reference Related default settings: 2 Sided Combine p.97 “Erase Original Shadow in Combine” p.99 “Copy Order in Combine” p.98 “Separation Line in Combine” Combines various pages of originals onto a two-sided sheet. A Press [Dup./Combine/Series]. B Press [1 Sided] or [2 Sided] for Original, and then press [Combine 1 Side] for Copy. Reference p.
RuC3_GBcopy-F_FM.book Page 47 Wednesday, June 25, 2003 9:39 AM Copier Functions ❖ 1 Sided 16 Pages → Combine 2 Side Copies 16 one-sided originals onto a sheet, eight pages per side. ❖ 2 Sided 16 Pages → Combine 2 Side Copies 8 two-sided originals onto a sheet, eight pages per side. 2 GCSHVY6E GCSHVY5E 1. Front 2. Back ❖ 2 Sided 4 Pages → Combine 2 Side Copies 2 two-sided originals onto a sheet, two pages per side. Note ❒ You cannot use the bypass tray with this function.
RuC3_GBcopy-F_FM.book Page 48 Wednesday, June 25, 2003 9:39 AM Copying B Press [1 Sided] or [2 Sided] for Original, and then press [Combine 2 Side] for Copy. 2 Series Copies This function copies the front and back of a two-sided original separately, or two facing pages of a bound original, onto two sheets. Limitation ❒ You cannot use the Series Copies function with the ADF. Reference p.44 “Originals and copy orientation” ❖ Book→ →1 Sided Copies a two-page spread original onto two separate pages.
RuC3_GBcopy-F_FM.book Page 49 Wednesday, June 25, 2003 9:39 AM Copier Functions ❖ Front&Back→ →2 Sided Copies both sides of a two-page spread original onto both sides of a sheet. ❖ Inch version Original Copy paper 11"× 17"L 81/2"× 11" (2–sided) 81/2"× 11"L 51/2"× 81/2" (2–sided) 2 A Press [Dup./Combine/Series]. Note ❒ See the following table for original and copy paper sizes when using a 100% ratio (Book→1 Sided).
RuC3_GBcopy-F_FM.book Page 50 Wednesday, June 25, 2003 9:39 AM Copying ❖ Open to right Copying Book Originals Copies two or more originals in page order. ❖ 1 Sided→ →Booklet Make copies in page order for a folded booklet as shown. 2 ❖ Open to left GCAH020E ❖ 1 Sided→ →Magazine Copies two or more originals into magazine page order copies (when folded and stacked).
RuC3_GBcopy-F_FM.book Page 51 Wednesday, June 25, 2003 9:39 AM Copier Functions ❖ 2 Sided→ →Magazine Copies two or more two-sided originals into magazine page order copies (when folded and stacked). How to fold and unfold copies to make a magazine ❖ Open to left 2 GCBOOK5E GCAH030E ❖ Open to right GCBOOK6E GCAH040E How to fold and unfold copies to make a booklet Note ❒ You cannot use the bypass tray with this function.
RuC3_GBcopy-F_FM.book Page 52 Wednesday, June 25, 2003 9:39 AM Copying C Press [Series/Book]. D Press [Book]. →Booklet], [2 Sided→ → E Select [1 Sided→ ❖ Original: A5K K/Copy paper: A4K K or Original: A5L L/Copy paper A4L L 4 repeats (71%) 16 repeats (35%) Booklet], [1 Sided→ →Magazine], or [2 Sided→ →Magazine], and then press [OK]. 2 F Press [OK]. G Select the paper. H Place original, and then press the {Start} } key.
RuC3_GBcopy-F_FM.book Page 53 Wednesday, June 25, 2003 9:39 AM Copier Functions Double Copies Reference Related default settings: One original image is copied twice onto one sheet, as shown. p.98 “Double Copies Separation Line” A Press [Edit/Stamp]. 2 Note ❒ You cannot use the bypass tray with this function. ❒ See the following table for original and copy paper sizes and orientations when using a 100% ratio: ❖ Metric version B Press [Edit Image]. C Press [Double copies]. D Press [OK] twice.
RuC3_GBcopy-F_FM.book Page 54 Wednesday, June 25, 2003 9:39 AM Copying ❖ Metric version 2 Original location Original size and orientation Exposure glass A3L, B4 JISL, A4KL, B5 JISKL, A5L, 81/2" × 14" L, 81/2" × 13"L ADF A3L, B4 JISL, A4KL, B5 JISKL, A5KL, 81/2" × 13"L Positive/Negative If original is black and white, the copy image is inverted.
RuC3_GBcopy-F_FM.book Page 55 Wednesday, June 25, 2003 9:39 AM Copier Functions Erase T his func tio n erases t he ce ntre and/or all four sides of the original image. This function has three modes: ❖ Centre/Border Erases both the original's centre and edge margins from the copy. 2 ❖ Border Erases the original's edge margin from the copy. GCCENT3E Reference The erase width is set to 10 mm (0.4”) as default. You can change this setting with User Tools.
RuC3_GBcopy-F_FM.book Page 56 Wednesday, June 25, 2003 9:39 AM Copying Border Erase Selecting [Diff. Width] A Press [Edit/Stamp]. A Press [Diff. Width]. B Press the key for the border you want to change, and then set the erase border width using [n n] and [o o]. 2 B Press [Erase]. C Set the erase border width. Selecting [Same Width] A Press [Same Width]. B Set an erase border width using [n n] and [o o]. C Press [OK]. D Press [OK]. E Place originals, and then press the {Start} } key.
RuC3_GBcopy-F_FM.book Page 57 Wednesday, June 25, 2003 9:39 AM Copier Functions Centre/border erase Selecting [Diff. Width] A Press [Edit/Stamp]. A Press [Diff. Width]. B Press the key for the part you want to change, and then set the erase margin width using [n n] and [o o]. B Press [Erase]. C Press [Centre/Border]. D Set the centre and border to be erased. Selecting [Same Width] A Press [Same Width]. B Press [Centre], and then set the erase centre width using [n n] and [o o].
RuC3_GBcopy-F_FM.book Page 58 Wednesday, June 25, 2003 9:39 AM Copying Note ❒ You can change the width of the binding margin as follows: 2 Metric version 0–30 mm (increments of 1 mm) Inch version 0"–1.2" (increments of 0.1") Background Numbering Use this function to have numbers printed in the background. This can help you to keep track of confidential documents. A Press [Edit/Stamp]. ZLFX170E B Press [Margin Adjustment]. C Set a binding margin for front pages.
RuC3_GBcopy-F_FM.book Page 59 Wednesday, June 25, 2003 9:39 AM Copier Functions Preset Stamp Frequently used messages can be stored in memory and stamped on copies. Note ❒ You cannot use the bypass tray with this function. ❒ Only one message can be stamped at a time. Reference p.99 “Stamp Priority” 2 p.99 “Stamp Language” p.99 “Stamp Position” p.100 “Stamp Format” A Press [Edit/Stamp].
RuC3_GBcopy-F_FM.book Page 60 Wednesday, June 25, 2003 9:39 AM Copying To change stamp position, size, and density Stamp position and original orientation A Press [Change]. B Select the position for print, size, and density, and then press [OK]. 2 User Stamp Prints a registered stamp onto copies. GCSTMP0E Preparation You have to register a user stamp before using this function. See p.61 “To program the user stamp”. Note ❒ You cannot use the bypass tray with this function.
RuC3_GBcopy-F_FM.book Page 61 Wednesday, June 25, 2003 9:39 AM Copier Functions B Press [Stamp]. C Press [User Stamp]. D Select the stamp number. E Press [All Pages] or [1st Page only] to select the print page. To program the user stamp Note ❒ The range of stamp images for readability is 10–297 mm high (0.4"–11.7") and 10–432 mm (0.4"– 17.0") wide. However, if the value exceeds the maximum area (5,000 mm2, 7.75 inch2), it is automatically adjusted to a value within range.
RuC3_GBcopy-F_FM.book Page 62 Wednesday, June 25, 2003 9:39 AM Copying G Press [Program], and then press the stamp number (1–4) you want to program. Note ❒ Stamp numbers displayed with m next to them already have settings. ❒ If the stamp number is already in use, the machine will ask you if you want to overwrite it . Press [Yes] or [No]. 2 H Enter the user stamp name using O Press [Exit]. The initial display appears. To delete the user stamp Important ❒ You cannot restore a deleted stamp.
RuC3_GBcopy-F_FM.book Page 63 Wednesday, June 25, 2003 9:39 AM Copier Functions I Press [Exit]. Stamp position and original orientation The Copier/Document Server Features main menu appears. J Press [Exit]. The initial display appears. 2 Date Stamp Use this function to print dates onto copies. GCSTMP7E GCSTMP3E You can select from the following date formats: • MM/DD/YYYY • MM.DD.YYYY • DD/MM/YYYY • DD.MM.YYYY • YYYY.MM.DD Note ❒ You cannot use the bypass tray with this function.
RuC3_GBcopy-F_FM.book Page 64 Wednesday, June 25, 2003 9:39 AM Copying B Press [Stamp]. C Press [Date Stamp]. D Press [All Pages] or [1st Page only] to select the print page. To change the stamp position A Press [Change]. B Select the date stamp position, and then press [OK]. 2 Note ❒ You can change the format and position of the date stamp. See p.64 “To change the date format”. E After Page Numbering Use this function to print page numbers onto copies. all settings are complete, press [OK].
RuC3_GBcopy-F_FM.book Page 65 Wednesday, June 25, 2003 9:39 AM Copier Functions Stamp position and orientation of originals A Press [Edit/Stamp]. 2 B Press [Stamp]. C Press [Page Numbering]. D Select the format. Note ❒ You cannot use the bypass tray with this function. Reference Related default settings: p.101 “Stamp Format” p.101 “Font” p.101 “Size” p.101 “Duplex Back Page Stamping Position” p.102 “Page Numbering in Combine” p.102 “Stamp on Designating Slip Sheet” p.102 “Stamp Position” p.
RuC3_GBcopy-F_FM.book Page 66 Wednesday, June 25, 2003 9:39 AM Copying To change the stamp position A Press [Change]. B Select the position, and then press [OK]. Note ❒ To change the number entered, press [Clear] or the {Clear/Stop} } k ey , an d t he n e n t er a ne w number. C Press [Numbering from/to], enter the number of the page from which to start numbering using the number keys, and then press the {#} } key.
RuC3_GBcopy-F_FM.book Page 67 Wednesday, June 25, 2003 9:39 AM Copier Functions If you selected (1/5, 2/5…) A Press [Change] on the right hand side of the display. B Press [First Printing Page], then enter the original page number from which to start printing using the number keys, and then press the {#} } key. ❒ The last number is the last page number printed. For example, if [Total Pages] is ten, if you want to print seven pages up to page 7, enter [7] as the [Last Number].
RuC3_GBcopy-F_FM.book Page 68 Wednesday, June 25, 2003 9:39 AM Copying C Press [First Chapter No.], enter the chapter number from which to start numbering using the number keys, and then press the {#} } key. Note ❒ You can enter between 1 and 9999 for the chapter number from which to start numbering. 2 ❖ Front cover The first page of originals is copied onto a specified cover sheet paper, or a cover sheet is inserted before the first copy page.
RuC3_GBcopy-F_FM.book Page 69 Wednesday, June 25, 2003 9:39 AM Copier Functions A Press [Cover/Slip Sheet]. Note ❒ Load slip sheets in the same size and orientation as copy paper. ❒ You cannot set copy paper in the bypass tray. ❒ You can specify up to 20 pages . A Press [Cover/Slip Sheet]. B Press 2 [Front Cover] or [Front/Back Cover]. C Select [Copy] or [Blank] for the cover sheet. D Select the paper tray containing the paper to copy the originals onto, and then press [OK].
RuC3_GBcopy-F_FM.book Page 70 Wednesday, June 25, 2003 9:39 AM Copying Chapters G When Page numbers you specify with this function will appear on the front of copy sheets. H Press [OK]. I Place originals, and then press the Preparation Before selecting this function, press [Dup./Combine/Series] and select the Duplex (1 Sided→2 Sided) or Combine function. 2 Note ❒ This function can be used only w hen yo u use t he D up lex (1 Sided→2 Sided) or Combine function. ❒ You can specify up to 20 pages.
RuC3_GBcopy-F_FM.book Page 71 Wednesday, June 25, 2003 9:39 AM Copier Functions ❖ When using OHP transparencies from the bypass tray • Copy E Place the originals, and then press the {Start} } key. 12 2 • Blank 12 Note ❒ Press the {#} } key and select [OHP Sheet] in Special paper. See p.25 “When copying onto special paper”. A Press [Cover/Slip Sheet]. B Press [Slip Sheet]. C Select [Copy] or [Blank], and then press [OK]. D Select the paper tray containing the sheet paper to copy the originals.
RuC3_GBcopy-F_FM.book Page 72 Wednesday, June 25, 2003 9:39 AM Copying Storing Data in the Document Server The Document Server enables you to store documents in memory and print them as you want. 2 Reference For details about how to register the user name, file name, or password, see General Settings Guide. Important ❒ Machine failure can result in data loss. Important data stored on the hard disk should be backed up.
RuC3_GBcopy-F_FM.book Page 73 Wednesday, June 25, 2003 9:39 AM Programs Programs You can store frequently used copy job settings in machine memory and recall them for future use. C Press [Register]. 2 Storing a Program Note ❒ You can store up to 10 programs. ❒ You can select the standard mode or program No. 10 as the mode to be set when modes are cleared or reset, or immediately after the operation switch is turned on. See p.93 “Change Initial Mode” . ❒ Paper settings are stored based on paper size.
RuC3_GBcopy-F_FM.book Page 74 Wednesday, June 25, 2003 9:39 AM Copying F Press [OK]. When the settings are successfully stored, the program name appears on the right side of the registered program number. After a while, the initial copy display appears. 2 Recalling a Program A Press the {Program}} key. B Press [Recall]. Changing a stored program A Check the program settings. Note ❒ To check the contents of a program, recall it. See p.74 “Recalling a Program”.
RuC3_GBcopy-F_FM.book Page 75 Wednesday, June 25, 2003 9:39 AM 3. Troubleshooting If Your Machine Does Not Operate As You Want When a Message Is Displayed The following chart contains explanations of common messages. If other messages appear, follow the instructions as displayed. Note ❒ For messages not listed here, see General Settings Guide. Message Causes Solutions Cannot detect original size. An irregular original is placed. See p.10 “Sizes difficult to detect”.
RuC3_GBcopy-F_FM.book Page 76 Wednesday, June 25, 2003 9:39 AM Troubleshooting 3 76 Message Causes Solutions Scanned pages exceeded max. number. Do you want to store the scanned pages as a file? The number of scanned pages exceeds the capacity per file of the Document Server. If you want to store scanned originals as a file, press [Store File]. The originals are stored as a file in the Document Server. If you do not want to store any scanned originals, press [No]. Scanned data will be cleared.
RuC3_GBcopy-F_FM.book Page 77 Wednesday, June 25, 2003 9:39 AM If You Cannot Make Clear Copies If You Cannot Make Clear Copies Problem Causes Solutions Copies appear dirty. The image density is too dark. Adjust the image density. See p.26 “Adjusting Copy Image Density”. Auto Image Density is not selected. Select Auto Image Density. See p.26 “Adjusting Copy Image Density”. The reverse side of an orig- The image density is too inal image is copied. dark.
RuC3_GBcopy-F_FM.book Page 78 Wednesday, June 25, 2003 9:39 AM Troubleshooting If You Cannot Make Copies As You Want This section explains causes of, and remedies for, unexpected copy results. ❖ Basic Problem Causes Solutions Copies are not stapled. There are jammed staples in the stapler. Remove jammed staples. See General Settings Guide. Note 3 ❒ After removing jammed staples, staples might not eject the first few times you try to use the stapler. Staples are wrongly positioned.
RuC3_GBcopy-F_FM.book Page 79 Wednesday, June 25, 2003 9:39 AM If You Cannot Make Copies As You Want ❖ Edit Problem Causes When using the Double Copies function, parts of the original image are not copied. The original and copy pa- Select A3L for A4 K originals and per combination is not cor- A4 for A5 originals. See ⇒ p.53 rect. “Double Copies”. When using the Border, You set a wide erased marCentre, or Centre/Border gin. function, parts of the original image are not copied.
RuC3_GBcopy-F_FM.book Page 80 Wednesday, June 25, 2003 9:39 AM Troubleshooting ❖ Combine Problem Causes Solutions You cannot fold copies into a book using the Booklet or Magazine function. Combine Original Booklet Format or Combine Original Magazine Format is not set correctly. Change the setting. When using the Combine function, parts of the image are not copied. You specified a reproduction ratio that does not match the sizes of originals and copy paper.
RuC3_GBcopy-F_FM.book Page 81 Wednesday, June 25, 2003 9:39 AM If You Cannot Make Copies As You Want When Memory Is Full Note ❒ If you set [Memory Full Auto Scan Restart] in User Tools (see p.103 “Memory Full Auto Scan Restart” ) to [Yes], even if memory becomes full, the memory overflow message will not appear. The machine will make copies of scanned originals first, then automatically scan and copy remaining originals. When this happens, the resulting sorted pages will not be sequential.
RuC3_GBcopy-F_FM.
RuC3_GBcopy-F_FM.book Page 83 Wednesday, June 25, 2003 9:39 AM 4. User Tools (Copier/Document Server Features) User Tools Menu (Copier/Document Server Features) User Tools item name Default 1 General Features 1/4 See p.91 “General Features /4”.
RuC3_GBcopy-F_FM.book Page 84 Wednesday, June 25, 2003 9:39 AM User Tools (Copier/Document Server Features) User Tools item name Default General Features 3/4 See p.94 “General Features 3/4”. • F1: 1 Sided→2 Sided: T to T Copy Function Key: F1–F5 • F2: 2 Sided: T to T→2 Sided: T to T • F3: 1 Sided→1 Sided Combine • F4: 1 Sided→1 Sided Combine: 4 originals • F5: Create Margin 4 General Features 4/4 See p.94 “General Features /4”.
RuC3_GBcopy-F_FM.book Page 85 Wednesday, June 25, 2003 9:39 AM User Tools Menu (Copier/Document Server Features) User Tools item name Default Reproduction Ratio 2/2 See p.95 “Reproduction Ratio 2/2”.
RuC3_GBcopy-F_FM.book Page 86 Wednesday, June 25, 2003 9:39 AM User Tools (Copier/Document Server Features) User Tools item name Default Edit 2/2 See p.97 “Edit 2/2”. Image Repeat Separation Line None Double Copies Separation Line None Separation Line in Combine None Copy on Designating Paper Yes Front Cover Copy in Combine Combine Copy on Designating Page in Combine Combine Orientation: Booklet, Magazine Open to left Copy Order in Combine From left to right Stamp See p.99 “Stamp”.
RuC3_GBcopy-F_FM.book Page 87 Wednesday, June 25, 2003 9:39 AM User Tools Menu (Copier/Document Server Features) User Tools item name Date Stamp Default Format Metric version: DD/MM/YYYY Inch version: MM/DD/YYYY Font Stamp Position Font 1 Metric version • Position: Top left • Top Margin: 8 mm • Left Margin: 32 mm Inch version • Position: Top left 4 • Top Margin: 0.3" • Left Margin: 0.
RuC3_GBcopy-F_FM.book Page 88 Wednesday, June 25, 2003 9:39 AM User Tools (Copier/Document Server Features) User Tools item name Page Numbering Default Stamp Format P1, P2... Font Font 1 Size Auto Duplex Back Page Stamping Position Opposite Position Page Numbering in Combine Per original Stamp on Designating Slip Sheet Stamp Position No Metric version • Position P1, 1/5, P.1, 1: Top right -1-, 1-1: Bottom centre 4 • Top/Bottom Margin P1, 1/5, P.
RuC3_GBcopy-F_FM.book Page 89 Wednesday, June 25, 2003 9:39 AM Accessing User Tools (Copier/Document Server Features) Accessing User Tools (Copier/Document Server Features) This section is for key operators in charge of this machine. With User Tools can change the machine's default settings. Note ❒ Be sure to exit User Tools and return to the initial copy display after all settings are finished. This section describes system settings you can set for the copier function. ❒ The selected key is highlighted.
RuC3_GBcopy-F_FM.book Page 90 Wednesday, June 25, 2003 9:39 AM User Tools (Copier/Document Server Features) Exiting User Tools A After changing default settings, press [Exit] on the User Tools main menu. Changes to User Tools are complete, and the machine is ready to copy. 4 Note ❒ You can also exit User Tools by pressing the { User Tools/Counter} } key.
RuC3_GBcopy-F_FM.book Page 91 Wednesday, June 25, 2003 9:39 AM Settings You Can Change with User Tools Settings You Can Change with User Tools General Features 1/4 ❖ Auto Paper Select Priority Auto Paper Select is the default setting. You can cancel this setting. See p.28 “Selecting Copy Paper”.
RuC3_GBcopy-F_FM.book Page 92 Wednesday, June 25, 2003 9:39 AM User Tools (Copier/Document Server Features) ❖ Auto Image Density Priority Set this function to use Auto Image Density when the power is turned on, or modes cleared. Note ❒ Default: Text: On, Text/Photo: On, Photo: Off, Pale: On, Generation Copy: On ❖ Copy Quality You can adjust the quality level of copies for each original type (Text, Text/Photo, Photo, Pale, Generation Copy). • Text Adjust text sharpness.
RuC3_GBcopy-F_FM.book Page 93 Wednesday, June 25, 2003 9:39 AM Settings You Can Change with User Tools General Features 2/4 ❖ Duplex Mode Priority You can select the type of the Duplex function effective when the power is turned on, or modes cleared. Note ❒ Default: • Metric version: 1 Sided→1 Sided • Inch version: 1 Sided→2 Sided ❖ Copy Orientation in Duplex Mode You can set the copy orientation when making two-sided copies.
RuC3_GBcopy-F_FM.book Page 94 Wednesday, June 25, 2003 9:39 AM User Tools (Copier/Document Server Features) General Features 3/4 General Features 4/4 ❖ Copy Function Key: F1-F5 You can assign frequently used functions to function keys F1 to F5. ❖ Document Server Storage Key: F1–F5 You can assign frequently used functions to function keys F1 to F5. You can also change assigned functions.
RuC3_GBcopy-F_FM.book Page 95 Wednesday, June 25, 2003 9:39 AM Settings You Can Change with User Tools Reproduction Ratio 1/2 ❖ Shortcut R/E You can register up to three frequently used Reduce/Enlarge ratios other than the fixed Reduce/Enlarge ratio and have them shown on the initial display. You can also change registered Reduce/Enlarge ratios. If no Reduce/Enlarge ratio has been set when selecting [Shortcut R/E 1], [Shortcut R/E 2], or [Shortcut R/E 3], enter the ratio using the number keys.
RuC3_GBcopy-F_FM.book Page 96 Wednesday, June 25, 2003 9:39 AM User Tools (Copier/Document Server Features) ❖ Priority Setting: Reduce You can set the ratio with priority when [Reduce/Enlarge] is pressed, followed by [Reduce]. Note ❒ Default: • Metric version: 71% • Inch version: 73% ❖ Ratio for Create Margin You can set a Reduce/Enlarge ratio when registering Create Margin in a shortcut key.
RuC3_GBcopy-F_FM.book Page 97 Wednesday, June 25, 2003 9:39 AM Settings You Can Change with User Tools ❖ 1 Sided→ →2 Sided Auto Margin: TtoT When using the 1 sided → 2 sided Duplex function, you can specify margins on the back side. The margin is set to the same value as “Back Margin: Left/Right”. Note ❒ Default: • Metric version: Right 5 mm • Inch version: Right 0.2" ❖ 1 Sided→ →2 Sided Auto Margin: TtoB When using the 1 sided → 2 sided Duplex function, you can specify margins on the back side.
RuC3_GBcopy-F_FM.book Page 98 Wednesday, June 25, 2003 9:39 AM User Tools (Copier/Document Server Features) ❖ Double Copies Separation Line You can select a separation line using the Double Copies function from: None, Solid, Broken A, Broken B, or Crop Marks. • None • Broken A • Broken B • Crop Marks • Solid 4 • Broken A • Broken B Note ❒ Default: None ❖ Copy on Designating Paper You can specify whether to copy onto slip sheets.
RuC3_GBcopy-F_FM.book Page 99 Wednesday, June 25, 2003 9:39 AM Settings You Can Change with User Tools ❖ Orientation: Booklet, Magazine You can select the orientation of copies to open when using Booklet or Magazine function. Note ❒ Default: Open to left Reference p.51 “How to fold and unfold copies to make a booklet” p.51 “How to fold and unfold copies to make a magazine” ❖ Copy Order in Combine You can set the copy order when using the Combine function to Left to Right or Top to Bottom.
RuC3_GBcopy-F_FM.book Page 100 Wednesday, June 25, 2003 9:39 AM User Tools (Copier/Document Server Features) ❖ Stamp Format You can adjust the stamp's size, density, and print page. • Size You can set the size of the stamp. Note ❒ Default: 1X • Density You can set the pattern used to print the stamp. Note ❒ Default: Normal 4 ❒ Normal: The stamp is printed on the image. You cannot check which parts will overlap. ❒ Lighter: The image can be seen through the stamp.
RuC3_GBcopy-F_FM.book Page 101 Wednesday, June 25, 2003 9:39 AM Settings You Can Change with User Tools Date Stamp ❖ Format You can select the date format for the Date Stamp function. Note ❒ Default: • Metric version: DD/MM/ YYYY • Inch version: MM/DD/YYYY ❖ Font You can select the Date Stamp font. Note ❒ Default: Font 1 ❒ This setting is linked to the Page Numbering function. ❖ Stamp Position You can set the position where the stamp is printed. Press the arrow keys to adjust the position.
RuC3_GBcopy-F_FM.book Page 102 Wednesday, June 25, 2003 9:39 AM User Tools (Copier/Document Server Features) ❖ Page Numbering in Combine You can set page numbering when using the Combine and Page Numbering function together. Note ❒ Default: Per original ❖ Stamp on Designating Slip Sheet You can print the page number onto slip sheets when using the Designate function and the Page Numbering function together. Note ❒ Default: No 4 ❖ Stamp Position P1, P2... Stamp Position: 1/5, 2/5...
RuC3_GBcopy-F_FM.book Page 103 Wednesday, June 25, 2003 9:39 AM Settings You Can Change with User Tools ❖ Auto Sort You can specify whether the Sort function is selected when the machine is turned on, or the functions are cleared. Note ❒ Default: No ❖ Memory Full Auto Scan Restart If memory becomes full while scanning originals, the machine will copy the scanned originals first, and then automatically proceed scanning remaining originals. You can enable or disable this function.
RuC3_GBcopy-F_FM.
RuC3_GBcopy-F_FM.book Page 105 Wednesday, June 25, 2003 9:39 AM 5. Specifications Combination Chart The combination chart below shows which functions can be used together. The following tables explains the symbols used in the chart. means that these functions can be used together. $ means that these functions cannot be used together. The second function selected will be the function you are working in. × means that these functions cannot be used together.
RuC3_GBcopy-F_FM.book Page 106 Wednesday, June 25, 2003 9:39 AM Specifications Supplementary Specifications ❖ Mixed Size mode • Copying and scanning speed will be reduced. • You can place originals of two different sizes at once. • The weight range for originals placed with this function is 52 – 81 g/m2, 14 – 20 lb.
RuC3_GBcopy-F_FM.
RuC3_GBcopy-F_FM.book Page 108 Wednesday, June 25, 2003 9:39 AM Specifications ❖ Directional Size Magnification • Reproduction ratios you can specify are between 25–400%. • When entering a percentage ratio, you can specify any value within permitted range, regardless of original or copy paper size. However, depending on settings and other conditions, part of the image may not be copied, or margins will appear on copies.
RuC3_GBcopy-F_FM.book Page 109 Wednesday, June 25, 2003 9:39 AM Supplementary Specifications Paper size and orientation Paper capacity and weight A4KL, B5 JISKL, A5KL, B6 JISL, A6L, PostcardL, 81/2" × 11"KL, 71/4" × 101/2"KL, 51/2" × 81/2"KL, 8" × 101/2"KL, 8" × 10"KL, 16KKL 500 sheets *1 (80 g/m2) (20 lb.) A3L, B4 JISL, 11" × 17"L, 81/2" × 14"L, 8" × 13"L, 81/2" × 13"L, 81/4" × 14"L, 81/4" × 13"L, 11" × 15"L, 11" × 14"L, 10" × 14"L, 10" × 15"L, 8KL 250 sheets *2 (80 g/m2) (20 lb.
RuC3_GBcopy-F_FM.book Page 110 Wednesday, June 25, 2003 9:39 AM Specifications • When selecting the Sort, Stack, or Staple functions, copies of some sizes can be made by feeding the paper from tray 2 or the optional bypass tray. See p.36 “Sort”, See p.39 “Stack”, See p.40 “Staple”. • When using the Rotate Sort or Staple function, the capacity may be reduced.
RuC3_GBcopy-F_FM.book Page 111 Wednesday, June 25, 2003 9:39 AM Supplementary Specifications • When using this function, the following limitations apply. When the number of copies exceeds tray capacity, copying stops. When this happens, remove copies from the shift tray, and then resume copying.
RuC3_GBcopy-F_FM.book Page 112 Wednesday, June 25, 2003 9:39 AM Specifications ❖ Duplex • You cannot use the following copy paper with this function: • Paper smaller than A5K, 51/2" × 81/2"K (possible on A5L, 51/2" × 81/2"L) • Paper thicker than 90 g/m2, 24 lb. • Paper thinner than 64 g/m2, 20 lb. • Translucent paper • Label paper (adhesive labels) • OHP transparencies • Postcards • If you place an odd number of 1-sided originals in the ADF, the reverse side of the last page is left blank.
RuC3_GBcopy-F_FM.book Page 113 Wednesday, June 25, 2003 9:39 AM Supplementary Specifications ❖ Booklet/Magazine • The machine sets the reproduction ratio automatically to meet the paper size and copies the originals together onto the paper. • The machine selects reproduction ratios of between 25 – 400% (25–200% when placing originals in the ADF). • If the calculated ratio is under the minimum ratio, it is automatically adjusted to within available range.
RuC3_GBcopy-F_FM.book Page 114 Wednesday, June 25, 2003 9:39 AM Specifications ❖ Margin Adjustment • If you set the binding margin too wide, part of the image may not copy. • When making copies using the Combine function, the binding margin is added to copies when combination is complete. • When [2 Sided → 1 Sided] is selected, set the binding margins for the original's front and back pages. ❖ Background Numbering The numbers appear to overlap areas of the copied image in some places.
RuC3_GBcopy-F_FM.
RuC3_GBcopy-F_FM.book Page 116 Wednesday, June 25, 2003 9:39 AM Specifications ❖ Front Cover, Front/Back Cover • If Blank is selected, the cover is not counted as one copy. • Front and back covers are copied two-sided depending on the Display Time settings made in Cover Sheet Tray of User Tools (System Settings). • If At Mode Selected is selected in Display Time, settings made in Cover Sheet Tray have priority. • If Full Time is selected in Display Time , settings made in Paper Type have priority.
RuC3_GBcopy-F_FM.
RuC3_GBcopy-F_FM.
RuC3_GBcopy-F_FM.
RuC3_GBcopy-F_FM.
Paper type: Wood Free 80g/m2, Paper Thickness=100 µm // Pages in book=128 // Print scale=81% Gap (when printed at 81% scale) = Pages in book × Paper thickness / 2 = 6.400000 mm Introduction This manual describes detailed instructions on the operation and notes about the use of this machine. To get maximum versatility from this machine all operators are requested to read this manual carefully and follow the instructions. Please keep this manual in a handy place near the machine.
Paper type: Wood Free 80g/m2, Paper Thickness=100 µm // Pages in book=128 // Print scale=81% Gap (when printed at 81% scale) = Pages in book × Paper thickness / 2 = 6.400000 mm RICOH COMPANY, LTD. 15-5, Minami Aoyama 1-chome, Minato-ku, Tokyo 107-8544, Japan Phone: +81-3-3479-3111 United Kingdom RICOH UK LTD.
Paper type: OK Prince Eco G100(55kg), Paper Thickness=80 µm // Pages in book=88 // Print scale=81% Gap (when printed at 81% scale) = Pages in book × Paper thickness / 2 = 3.
Paper type: OK Prince Eco G100(55kg), Paper Thickness=80 µm // Pages in book=88 // Print scale=81% Gap (when printed at 81% scale) = Pages in book × Paper thickness / 2 = 3.520000 mm Introduction This manual describes detailed instructions on the operation and notes about the use of this machine. To get maximum versatility from this machine all operators are requested to read this manual carefully and follow the instructions. Please keep this manual in a handy place near the machine.
RussianC3Fax-combine-AE_F_FM.book Page i Monday, July 14, 2003 2:30 PM NOTICE NOTICE TO USERS (NEW ZEALAND) A B C D E F G H I The grant of a Telepermit for any item of terminal equipment indicates only that Telecom has accepted that the item complies with minimum conditions for connection to its network. It indicates no endorsement of the product by Telecom, nor does it provide any sort of warranty.
RussianC3Fax-combine-AE_F_FM.book Page ii Monday, July 14, 2003 2:30 PM Manuals for This Machine The following manuals describe the operational procedures of this machine. For particular functions, see the relevant parts of the manual. Note ❒ Manuals provided are specific to machine type. ❒ Adobe Acrobat Reader is necessary to view the manuals as a PDF file.
RussianC3Fax-combine-AE_F_FM.book Page iii Monday, July 14, 2003 2:30 PM ❖ Manuals for DeskTopBinder V2 Lite DeskTopBinder V2 Lite is a utility included on the CD-ROM labeled “Scanner Driver & Document Management Utilities”. • DeskTopBinder V2 Lite Setup Guide (PDF file - CD-ROM2) Describes installation of, and the operating environment for DeskTopBinder V2 Lite in detail. This guide can be displayed from the [Setup] dialog box when DeskTopBinder V2 Lite is installed.
RussianC3Fax-combine-AE_F_FM.book Page iv Monday, July 14, 2003 2:30 PM TABLE OF CONTENTS NOTICE .................................................................................................................... i Manuals for This Machine .....................................................................................ii How to Read This Manual .....................................................................................1 Symbols ...............................................................
RussianC3Fax-combine-AE_F_FM.book Page v Monday, July 14, 2003 2:30 PM Searching for a Destination ................................................................................ 40 Search by Destination Name ................................................................................... 40 Search by Fax Number ............................................................................................ 41 Search by E-mail Address.........................................................................
RussianC3Fax-combine-AE_F_FM.
RussianC3Fax-combine-AE_F_FM.book Page 1 Monday, July 14, 2003 2:30 PM How to Read This Manual Symbols In this manual, the following symbols are used: R WARNING: This symbol indicates a potentially hazardous situation that might result in death or serious injury when you misuse the machine without following the instructions under this symbol. Be sure to read the instructions, all of which are included in “Safety Information”, General Settings Guide.
RussianC3Fax-combine-AE_F_FM.
RussianC3Fax-combine-AE_F_FM.book Page 3 Monday, July 14, 2003 2:30 PM 1. Getting Started Control Panel The actual machine control panel may differ from this illustration depending on installed optional units. This illustration has all options installed. ZLBS000A 1. Indicators 3. Display Panel Shows errors and machine status.
RussianC3Fax-combine-AE_F_FM.book Page 4 Monday, July 14, 2003 2:30 PM Getting Started Important ❒ Do not turn off the main power switch while the On indicator stays lighted or is blinking. Neglecting this may damage the hard disk. 1 Note ❒ If the main power switch is on even when the On indicator is off, the machine will receive a fax message. 9. Operation switch Press to turn the power on (the On indicator lights). To turn the power off, press this switch again (the On indicator goes off). See p.
RussianC3Fax-combine-AE_F_FM.book Page 5 Monday, July 14, 2003 2:30 PM Control Panel 18. Number keys 20. {Clear/Stop}} key Use to dial fax numbers, or enter the number of copies. Clear: Cancels entered numbers or characters. Stop: Interrupts the current operation (transmission, scanning, copying, or printing). 19. {#}} key (Enter key) Programs entered contents or settings. 1 21. {Start}} key Press to start faxing, or printing reports, or lists.
RussianC3Fax-combine-AE_F_FM.book Page 6 Monday, July 14, 2003 2:30 PM Getting Started 1 5. Displays the entered number of a destination. When adding destinations using the number keys, press [Add]. 8. Displays Quick Operation Keys 6. Press to display various informa- transmitting. tion about transmission. 7. Switches transmission mode be- set for often used functions. [TX File Status] and [RX File Status] are preset. 9. Displays various functions for 10.
RussianC3Fax-combine-AE_F_FM.book Page 7 Monday, July 14, 2003 2:30 PM Control Panel Reading the Destination List When using the facsimile function, only fax or Internet Fax destinations programmed in the Address Book appears. 1 ❖ Destination List ZLBX060E 1. Title word keys appear. Allows you to switch from one page (display) to another on the destination list. 2. Allows you to search for a destination by destination name, fax number, e-mail address, or registration number. 3.
RussianC3Fax-combine-AE_F_FM.book Page 8 Monday, July 14, 2003 2:30 PM Getting Started Standby Display While the machine is in standby mode (immediately after the {Facsimile} } key is pressed or after the {Clear Modes} } key is pressed), the following display appears.
RussianC3Fax-combine-AE_F_FM.book Page 9 Monday, July 14, 2003 2:30 PM Control Panel Communication Display While communicating, the machine status is displayed. ❖ Memory Transmission (fax transmission) 1 Note ❒ While e-mail is being sent, the "Sending E-mail...:" message appears. ❖ Reception Note ❒ Even when the machine is being used as a copier, printer, or scanner, the sender name or number will appear for received faxes.
RussianC3Fax-combine-AE_F_FM.book Page 10 Monday, July 14, 2003 2:30 PM Getting Started User Code Entry Display When the following message appears on the display, User Code Management is active. Enter a user code to deactivate User Code Management. 1 The machine can be set up so that no one can use it without entering a user code. This prevents unauthorized people from sending fax messages and helps track the activity of each user or department. Note ❒ You can specify a user code with “System Settings”.
RussianC3Fax-combine-AE_F_FM.book Page 11 Monday, July 14, 2003 2:30 PM 2. Faxing Transmission Modes There are two types of transmission: • Memory Transmission • Immediate Transmission ❖ Memory Transmission Transmission starts automatically after the original has been stored in memory. It is a convenient method for when you are in a hurry and want to take the document away with you. You can also send the same original to several destinations (broadcasting).
RussianC3Fax-combine-AE_F_FM.book Page 12 Monday, July 14, 2003 2:30 PM Faxing Note ❒ You can use Parallel Memory Transmission that dials while the original is being scanned. See p.77 “Parallel Mem ory Transmission”, Facsimile Reference . 2 Switching between Memory Transmission and Immediate Transmission Check the display to see which mode is currently active. You can change t ran sm ission mo de by p ressing [Immed. TX] or [Memory TX].
RussianC3Fax-combine-AE_F_FM.book Page 13 Monday, July 14, 2003 2:30 PM Placing Originals Placing Originals You can place the originals either in the optional ADF or on the exposure glass. Some types of originals are unsuitable for the ADF, so they must be placed on the exposure glass. Which way you place the original depends on its size and whether you are using the ADF or the exposure glass. See p.19 “Original sizes difficult to detect”.
RussianC3Fax-combine-AE_F_FM.book Page 14 Monday, July 14, 2003 2:30 PM Faxing ❒ When sending an original of irregular (i.e. custom) size or part of a large original, you can specify the scan area precisely. See p.16 “Setting a Scan Area”. ❒ Custom size documents are scanned as regular size documents, so the receiver may find extra blank margins or edges of images missing. If you specify a scan area, only that area will be scanned regardless of actual document size.
RussianC3Fax-combine-AE_F_FM.book Page 15 Monday, July 14, 2003 2:30 PM Placing Originals Bound original page order When setting bound originals (books, magazines, etc.), you can select to have either the left page or right page sent first. See p.61 “Book Fax”, Facsimile Reference . Note ❒ You can select whether the left page or right page is sent first. See p.158 “User Parameters”, Facsimile Reference (switch 06, bit 6).
RussianC3Fax-combine-AE_F_FM.book Page 16 Monday, July 14, 2003 2:30 PM Faxing Originals unsuitable for the optional Auto Document Feeder Do not place the following types of originals in the ADF because they may be damaged. Place them on the exposure glass instead. • Originals in unacceptable sizes (See p.199 “Acceptable Types of Originals”, Facsimile Reference .
RussianC3Fax-combine-AE_F_FM.book Page 17 Monday, July 14, 2003 2:30 PM Placing Originals A Place the originals, and then select any scan settings you require. B Press the size of the originals to be sent, and then press [OK]. Note ❒ When placing different size originals into the ADF, adjust the document guide to the largest original. ❒ Small-size originals may be sent at a slight slant since they do not match the document guide. B Press [Scan Area]. 2 Note ❒ 81/2"×11" indicates LT.
RussianC3Fax-combine-AE_F_FM.book Page 18 Monday, July 14, 2003 2:30 PM Faxing B Press [OK]. 2 “Area 1” or “Area 2” is shown above the highlighted [Scan Area]. Specifying Auto Detect A Make sure that [Auto Detect] is selected. Note ❒ If it is not, press [Auto Detect]. B Press [OK]. “Auto Detect” is shown above [Scan Area]. D Specify a destination and press the {Start} } key.
RussianC3Fax-combine-AE_F_FM.book Page 19 Monday, July 14, 2003 2:30 PM Placing Originals Original sizes difficult to detect The machine finds it difficult to detect the size of the following kinds of originals. If this happens, the receiving machine may not select print paper of the correct size.
RussianC3Fax-combine-AE_F_FM.book Page 20 Monday, July 14, 2003 2:30 PM Faxing Memory Transmission In Memory Transmission mode, after you press the {Start} } key, the machine does not dial the destination until all pages of your fax message have been scanned into memory (in contrast to Immediate Transmission, where the number is dialed first and pages are scanned and sent one by one). Memory Transmission is useful because: • You can take your original away from the machine without having to wait too long.
RussianC3Fax-combine-AE_F_FM.book Page 21 Monday, July 14, 2003 2:30 PM Memory Transmission ❒ You can have the machine return to the default transmission mode (Memory Transmission or Immediate Transmission) after every transmission. You can change this so that the desired setting is maintained. See p.142 “General Settings/Adjustment ”, Facsimile Reference .
RussianC3Fax-combine-AE_F_FM.book Page 22 Monday, July 14, 2003 2:30 PM Faxing D Specify a destination. F Specify a destination. 2 Note ❒ If you make a mistake, press the {Clear/Stop} } key, and then enter the correct number. Note ❒ Press to switch the destination between fax number and email address. ❒ If you want to specify another destination, repeat steps E and F. Reference p.35 “Entering a Fax Number” p.36 “Entering an E-mail Address” p.37 “Using Destination Lists” p.
RussianC3Fax-combine-AE_F_FM.book Page 23 Monday, July 14, 2003 2:30 PM Memory Transmission F Place the next original on the exposure glass within 60 seconds after the machine has finished scanning the first original. B After checking the settings on the display, press the {Check Modes} } key. The display before the { Check Modes} } key was pressed appears. 2 -Broadcasting sequence G H Repeat steps D to F for all originals. Place the last original, and then press [# #].
RussianC3Fax-combine-AE_F_FM.book Page 24 Monday, July 14, 2003 2:30 PM Faxing Canceling a Memory Transmission Even when fax number and e-mail address are simultaneously specified, or only e-mail address is specified, you can cancel the mode using the same procedure. However, you cannot cancel the transmission of an Internet Fax document being sent. 2 Before the Original Is Scanned Use this procedure to cancel a trans} key. mission before pressing the {Start} A Press the {Clear Modes}} key.
RussianC3Fax-combine-AE_F_FM.book Page 25 Monday, July 14, 2003 2:30 PM Canceling a Memory Transmission B Select the file you want to cancel. Before the Transmission Is Started Use this procedure to cancel a transmission after the original has been scanned. A Press [Change/Stop TX File]. 2 Note ❒ If the desired file is not shown, press [U U Prev.] or [T T Next] to find it. C Press [Stop Transmission]. The list of stored files being transmitted or waiting for transmission appears.
RussianC3Fax-combine-AE_F_FM.book Page 26 Monday, July 14, 2003 2:30 PM Faxing Note ❒ To cancel another file, repeat steps B and C. ❒ To cancel stopping transmission, press [Save]. D Press [Exit]. 2 The standby display appears.
RussianC3Fax-combine-AE_F_FM.book Page 27 Monday, July 14, 2003 2:30 PM Immediate Transmission Immediate Transmission With Immediate Transmission, when you press the { Start} } key, the fax number is dialed immediately. The message is scanned and transmitted page by page without being stored in memory. This contrasts with Memory Transmission which scans all pages into memory before dialing the destination.
RussianC3Fax-combine-AE_F_FM.book Page 28 Monday, July 14, 2003 2:30 PM Faxing B Place the original. Note ❒ You can scan a few pages of your original from the exposure glass and the remaining pages from the ADF. When you have finished scanning from the exposure glass, remove the original from the exposure glass and place the remaining pages in the ADF within ten seconds. ❒ To send two or more pages using the exposure glass, set them one page at a time.
RussianC3Fax-combine-AE_F_FM.book Page 29 Monday, July 14, 2003 2:30 PM Canceling an Immediate Transmission Canceling an Immediate Transmission Before You Have Pressed the {Start} } Key A Press the {Clear Modes}} key. 2 ZLBS050N Note ❒ When the original is placed in the ADF, you can also cancel an Immediate Transmission by removing the original. After You Have Pressed the {Start} } Key A Press the {Clear/Stop} } key, and then remove the original.
RussianC3Fax-combine-AE_F_FM.book Page 30 Monday, July 14, 2003 2:30 PM Faxing Scan Settings You may want to send many different types of fax messages. Some of these may be difficult to reproduce at the receiver's end. However, your machine has three settings that you can adjust to help you transmit your document with the best possible image quality.
RussianC3Fax-combine-AE_F_FM.book Page 31 Monday, July 14, 2003 2:30 PM Scan Settings ❒ You can select the resolution type that is selected right after the machine is turned on or modes are cleared with [Scan End Reset] under Gen. Settings/Adjust. See p.142 “General Settings/Adjustment”, Facsimile Reference . ❒ You can have the machine return to the resolution default setting after every transmission, with [Text Size Priority] und er Gen. Settings/Adjust. See p.
RussianC3Fax-combine-AE_F_FM.book Page 32 Monday, July 14, 2003 2:30 PM Faxing ❒ You can have the machine return to the original type default setting after every transmission, with [Scan End Reset] under Gen. Settings/Adjust. See p.142 “General Settings/Adjustment”, Facsimile Reference . A Press [Original Type]. 2 B Select the original type you require, and then press [OK].
RussianC3Fax-combine-AE_F_FM.book Page 33 Monday, July 14, 2003 2:30 PM Scan Settings A Select the type of image density. Auto Image Density A Make sure that [Auto Image Density] is selected. Combined Auto and Manual Image Density A Make sure that [Auto Image Density] is selected. Note ❒ If [Auto Image Density] has not been selected, press [Auto Image Density]. B Press [i iLighter] or [Darkerj j] to adjust the density. The square moves.
RussianC3Fax-combine-AE_F_FM.book Page 34 Monday, July 14, 2003 2:30 PM Faxing When placing originals on the exposure glass Note ❒ While the machine is beeping, you have about 60 seconds (10 seconds for Immediate Transmission) to select density, resolution, and original type. The remaining time is shown on the display. 2 A Check which pages you want to scan with different settings. B Remove the previous page and place the next page. C Select the image density, resolution, and original type.
RussianC3Fax-combine-AE_F_FM.book Page 35 Monday, July 14, 2003 2:30 PM Specifying a Destination Specifying a Destination You can specify the destination using one of three methods. A Enter the fax number using the number keys. ❖ Fax number p.35 “Entering a Fax Number” 2 ❖ E-mail address p.36 “Entering an E-mail Address” ❖ Destination list p.37 “Using Destination Lists” This section covers these functions and others in more detail.
RussianC3Fax-combine-AE_F_FM.book Page 36 Monday, July 14, 2003 2:30 PM Faxing Note ❒ You cannot insert a pause before the first digit of a fax number. If you press the {Pause/Redial} } key at the first digit, a redial occurs. See p.47 “Redial”, Facsimile Reference . ❒ A pause is shown as a “-” on the display. 2 Using the {Tone} } key with On Hook Dial A Press the {On Hook Dial}} key. B Enter the fax number using the number keys.
RussianC3Fax-combine-AE_F_FM.book Page 37 Monday, July 14, 2003 2:30 PM Specifying a Destination A Make sure that is displayed in the destination display column. Reference “Entering Text”, General Settings Guide The destination is specified. 2 Note ❒ If it is not displayed, press . B Press [Manual Input]. Note ❒ Press [ProgDest] in this order to store the entered e-mail address in the address book. Using Destination Lists C Enter the e-mail address destination and then press [OK].
RussianC3Fax-combine-AE_F_FM.book Page 38 Monday, July 14, 2003 2:30 PM Faxing Preparation In the destination list, program individual fax number, e-mail address and/or groups of destinations. See “Registering a Fax Destination”, “Registering an E-mail Destination”, and “Registering a New Group”, General Settings Guide. 2 Limitation ❒ Group Dial can be used only for Memory Transmission; it cannot be used for Immediate Transmission.
RussianC3Fax-combine-AE_F_FM.book Page 39 Monday, July 14, 2003 2:30 PM Specifying a Destination Specifying a single destination A Press the Quick Dial key programmed with the desired destination. Note ❒ If the desired Quick Dial key is not shown, press [U U] and [T T] to scroll through the list. ❒ To cancel the selection, press the selected Quick Dial key again. You can also press the {Clear / Stop} } key to cancel the selection. ❒ To select more destinations, repeat steps C and D.
RussianC3Fax-combine-AE_F_FM.book Page 40 Monday, July 14, 2003 2:30 PM Faxing Searching for a Destination Use this procedure to search through the destination lists for a particular destination. C Press [Search by Dest. Name]. ❖ Search by Destination Name p . 4 0 “Se arch b y D e st in at i o n Name” 2 ❖ Search by Fax Number p.41 “Search by Fax Number” ❖ Search by E-mail Address p.42 “Search by E-mail Address” ID D Enter a destination name to search for, and then press [OK].
RussianC3Fax-combine-AE_F_FM.book Page 41 Monday, July 14, 2003 2:30 PM Searching for a Destination E Select a destination. C Press [Search by Fax No.]. 2 Note ❒ If the desired destination does not appear, use [U U] or [T T ] to scroll through the list. ❒ If the search returns more than 100 destinations, only 100 will appear. Change the destination name to view fewer destinations. Note ❒ If [Search by Fax No.] appears dimmed, press [Fax] on the right of the display, and then press [Search by Fax No.].
RussianC3Fax-combine-AE_F_FM.book Page 42 Monday, July 14, 2003 2:30 PM Faxing Note ❒ A warning appears if the search returns more than 100 items. Press [OK] to proceed to step E. B Press , the magnifier icon. E Select a destination. 2 C Press [Search by E-mail]. Note ❒ If the desired destination does not appear, use [U U] or [T T ] to scroll through the list. Limitation ❒ If the search rerurns more than 100 destinations, only 100 will appear. Change the number to view fewer destinations.
RussianC3Fax-combine-AE_F_FM.book Page 43 Monday, July 14, 2003 2:30 PM Searching for a Destination Note ❒ If you enter a wrong e-mail address, press [← ←]/[→ →] and [Backspace]/[Delete All], and then enter the e-mail address again. A search-in-progress message appears. When the search is finished, a result appears. Specifying a Registration Number Note ❒ A warning appears if the search returns more than 100 items. Press [OK] to proceed to step E. B Press [Registration No.].
RussianC3Fax-combine-AE_F_FM.book Page 44 Monday, July 14, 2003 2:30 PM Faxing The corresponding destination appears. 2 Note ❒ The Title word key switches to that which the specified destination is programmed in. ❒ If the “Cannot find the specified Registration No. ” message appears, the specified registration number is wrong. Press [Exit], check the registration number again, and then follow the procedure from step A. ❒ If the “No valid destination under the specified No.
RussianC3Fax-combine-AE_F_FM.book Page 45 Monday, July 14, 2003 2:30 PM Reception Reception There are two ways you can set up your machine to handle incoming calls: • Manual Reception (external telephone required) • Auto Reception You can change the reception mode only if a standard G3 line is used. You cannot change the reception mode when a line other than the standard G3 line (G3-2) is used.
RussianC3Fax-combine-AE_F_FM.book Page 46 Monday, July 14, 2003 2:30 PM Faxing Receiving a Fax in Manual Reception Mode A When the machine rings, pick up the handset of the external telephone. 2 B If you hear beeps, press the {Start}} key or the {Start Manual RX} } key. (The {Start} } key is only available in facsimile mode when an original is not placed.) C Replace the handset of the external telephone. The machine will start receiving.
RussianC3Fax-combine-AE_F_FM.book Page 47 Monday, July 14, 2003 2:30 PM 3. Using Internet Fax Functions Internet Fax Functions The optional printer/scanner unit is required. This machine converts scanned document images to e-mail format and transmits the data over the Internet. The e-mail sent by this machine can be received by another Internet Fax machine. Instead of dialing the telephone number of the destination you want to send to, you enter the relevant e-mail address.
RussianC3Fax-combine-AE_F_FM.book Page 48 Monday, July 14, 2003 2:30 PM Using Internet Fax Functions Internet Fax Precautions • Internet Fax communicates with a server over a LAN. It cannot communicate directly with other parties. • If a transmission is not successful, this machine usually receives an e-mail error notification. See p.191 “Server-Generated Error E-mail”, Facsimile Reference . However, e-mail error notifications may not be transmitted for various reasons.
RussianC3Fax-combine-AE_F_FM.book Page 49 Monday, July 14, 2003 2:30 PM Internet Fax Functions Functions Not Supported by E-mail Reception The following functions are supported with standard fax reception, but not with Internet Faxing.
RussianC3Fax-combine-AE_F_FM.book Page 50 Monday, July 14, 2003 2:30 PM Using Internet Fax Functions Sending Internet Fax Documents Preparation You need to make System Settings beforehand. See “Setting Up the Machine on a Network”, Network Guide. This section describes how to scan a document into this machine's memory and send it as e-mail. Specify the destination's e-mail address instead of fax number. You can send Internet Fax documents only by Memory Transmission.
RussianC3Fax-combine-AE_F_FM.book Page 51 Monday, July 14, 2003 2:30 PM Sending Internet Fax Documents Limitation ❒ When available memory is low, you may not be able to send Internet Fax documents. Note ❒ Because this machine sends documents as e-mail messages with an attached TIFF-F image, viewer applications are required in order to view documents when they are received on a computer. ❒ You can limit the size of transmitted e-mail messages in “E-mail Settings” of “Fax Features”. See p.
RussianC3Fax-combine-AE_F_FM.book Page 52 Monday, July 14, 2003 2:30 PM Using Internet Fax Functions B Select the subject from the displayed list. 3 The selected subject appears in the manual input column. D After entering the subject, press [OK]. Reference “Entering Text”, General Settings Guide Entered characters appear in the manual input column. Note ❒ You can enter extra characters after the selected subject. If you do not need to enter extra characters, proceed to step E.
RussianC3Fax-combine-AE_F_FM.book Page 53 Monday, July 14, 2003 2:30 PM Sending Internet Fax Documents To enter the text To set BCC transmission A Press [Change] for Enter Text. A Select [Yes] or [No] for BCC TX. 3 B Select a text, and then press [OK]. C Press [OK]. D Press [OK]. To set reception notice A Select [ON] or [OFF] for Recept. Notice. E Place the original. Reference p.
RussianC3Fax-combine-AE_F_FM.book Page 54 Monday, July 14, 2003 2:30 PM Using Internet Fax Functions ❒ Note that you cannot place pages on the exposure glass after you have started using the ADF. ❒ The original can be placed either in the ADF or on the exposure glass, until the {Start} } key is pressed. G Specify the e-mail address. Reference p.13 “Placing Originals” F Select 3 the scan settings you re- quire. Note ❒ If is not displayed in the destination display column, press . Reference p.
RussianC3Fax-combine-AE_F_FM.book Page 55 Monday, July 14, 2003 2:30 PM Sending Internet Fax Documents I Specify the next destination. -About the E-mail Subject If no subject is specified for “Enter Subject / Text” under “E-mail Options”, a subject is automatically inse rt e d . T he su bj e c t is d if fe re nt according to the setting of Stamp Sender Name. Note ❒ Press to switch the destination between fax number and email address. ❒ To specify more destinations, repeat steps H and I.
RussianC3Fax-combine-AE_F_FM.book Page 56 Monday, July 14, 2003 2:30 PM Using Internet Fax Functions - E-mail Text When Internet Fax e-mail is sent to computer, the following information is always inserted in the e-mail text. To check the host name and e-mail add ress, see “Settings You Can Change with User Tools”, Network Guide.
RussianC3Fax-combine-AE_F_FM.book Page 57 Monday, July 14, 2003 2:30 PM Canceling a Transmission of an Internet Fax Canceling a Transmission of an Internet Fax When fax and Internet Fax destinations are specified simultaneously, you can cancel sending using the same method. However, you cannot cancel the transmission of an Internet Fax document being sent. Before the Original Is Scanned Use this procedure to cancel a trans} key. mission before pressing the {Start} A Press the {Clear Modes}} key.
RussianC3Fax-combine-AE_F_FM.book Page 58 Monday, July 14, 2003 2:30 PM Using Internet Fax Functions C Press [Stop Transmission]. 3 Note ❒ To cancel another file, repeat steps B and C. ❒ To save the scanned file, press [Save]. D Press [Exit]. The standby display appears.
RussianC3Fax-combine-AE_F_FM.book Page 59 Monday, July 14, 2003 2:30 PM Receiving Internet Fax Documents Receiving Internet Fax Documents You can receive e-mail documents by Internet Fax. There are two methods of receiving email: Auto E-mail Reception and Manual E-mail Reception. Limitation ❒ E-mail with attachments other than TIFF-F format files cannot be received. Senders receive an Error Mail Notification if their e-mail contains attachments.
RussianC3Fax-combine-AE_F_FM.book Page 60 Monday, July 14, 2003 2:30 PM Using Internet Fax Functions B Check the message, and then press [Exit]. 3 The standby display appears. Received Images Here is an example of an Internet Fax message sent from this machine and received on a computer using Outlook e-mail software. The received image varies according to e-mail software. ZLJX010E 1. Mail transmitted without specifying a subject in “E-mail Options”. 2.
RussianC3Fax-combine-AE_F_FM.book Page 61 Monday, July 14, 2003 2:30 PM Receiving Internet Fax Documents 4. Date The date and time of e-mail transmission 5. To The e-mail address of the recipient 6. Subject Shows the subject specified in “E-mail Options” at the time of transmission. If no subject is specified, one is automatically assigned in the format shown in 1 above. From “Own Fax Number” (“Own Name”) (Fax Message NO.
RussianC3Fax-combine-AE_F_FM.
RussianC3Fax-combine-AE_F_FM.book Page 63 Monday, July 14, 2003 2:30 PM 4. Programming Initial Settings and Adjustments You can send information to the other party when transmitting or receiving a fax message. This information is shown on the display of the other machine and printed as a report. The following information can be sent. Important ❒ You can confirm programmed settings from the user parameter list. We recommend that you print and keep the user parameter list when you program or change settings.
RussianC3Fax-combine-AE_F_FM.book Page 64 Monday, July 14, 2003 2:30 PM Programming ❖ Own Fax Number (facsimile number of sender) The sender's Own Fax Number is sent to the other party when sending a fax using a G3 line. The received facsimile number is shown on the display of the other machine and printed in a report. This function is available regardless of the manufacturer of the other party's machine. B Press [Facsimile Features].
RussianC3Fax-combine-AE_F_FM.book Page 65 Monday, July 14, 2003 2:30 PM Initial Settings and Adjustments B Enter a fax header, and then press [OK]. C Enter an own name, and then press [OK]. Reference “Entering Text”, General Settings Guide Reference “Entering Text”, General Settings Guide Programming an Own Name A Press [Own Name]. B Press [Own Name]. 4 Programming an Own Fax Number A Press [Own Fax Number]. B Select line type to program.
RussianC3Fax-combine-AE_F_FM.book Page 66 Monday, July 14, 2003 2:30 PM Programming C Enter your own facsimile's number using the number keys, and then press [OK]. B Press [Facsimile Features]. C Press [Program Fax Information]. Note ❒ To enter a + sign or a space, press [+] or [Space]. ❒ If you make a mistake, press [Clear] or the { Clear / Stop} } key, and then enter the facsimile number again. 4 E Press [Exit]. F Press the {User Tools/Counter}} key.
RussianC3Fax-combine-AE_F_FM.book Page 67 Monday, July 14, 2003 2:30 PM Initial Settings and Adjustments F Press [Backspace] or [Delete All], and then re-enter the name or number. Deleting Note ❒ The following procedure explains how to delete Own Name, as an example of deleting. A Press the {User Tools/Counter}} key. Note ❒ Press [Clear] or the {Clear/Stop} } key if you want to edit Own Fax Number. 4 G Press [OK]. B Press [Facsimile Features]. H Press [Exit]. C Press [Program Fax Information].
RussianC3Fax-combine-AE_F_FM.book Page 68 Monday, July 14, 2003 2:30 PM Programming D Press [Fax Header], [Own Name], or [Own Fax Number] to delete. E Press the item you want to delete. 4 F Press [Backspace] or [Delete All], and then press [OK]. Note ❒ Press [Clear] or the {Clear/Stop} } key if you want to edit Own Fax Number. 68 G Press [Exit]. H Press the {User Tools/Counter}} key. The standby display appears.
RussianC3Fax-combine-AE_F_FM.book Page 69 Monday, July 14, 2003 2:30 PM Programming Fax Number and E-mail Addresses Programming Fax Number and E-mail Addresses You can program fax destinations using Address Book Management in the Key Operator Tools menu under System Settings. You can also register the programmed fax numbers and e-mail addresses in a Group.
RussianC3Fax-combine-AE_F_FM.
RussianC3Fax-combine-AE_F_FM.book Page 71 Monday, July 14, 2003 2:30 PM 5. Troubleshooting Adjusting the Volume You can change the volume of the following sounds that the machine makes. B Press [Facsimile Features]. ❖ On Hook Mode Heard when the {On Hook Dial} } key is pressed. ❖ At Transmission Heard when the machine sends a message. ❖ At Reception Heard when the machine receives a message. C Press [Adjust Sound Volume].
RussianC3Fax-combine-AE_F_FM.book Page 72 Monday, July 14, 2003 2:30 PM Troubleshooting When the {Facsimile} } Key Is Lit in Red If this key is lit, press the key to enter the facsimile mode. Then, refer to the table below and take the appropriate action. ZLBS010N 5 Problem Solutions The paper output tray is full. Remove the paper from the tray. A facsimile error has occurred. The facsimile has a problem. Contact your service representative. See p.74 “Error Messages and Their Meanings”.
RussianC3Fax-combine-AE_F_FM.book Page 73 Monday, July 14, 2003 2:30 PM When Toner Runs Out When Toner Runs Out When the machine has run out of toner, the symbol appears on the display. Note that even if there is no toner left, you can still send fax messages.
RussianC3Fax-combine-AE_F_FM.book Page 74 Monday, July 14, 2003 2:30 PM Troubleshooting Error Messages and Their Meanings If there is an error, one of the following messages may appear on the display. If other message appears, follow the message. Message Causes and solutions Put original back, check it and press [Start]. Original jammed during Memory Transmission. Place originals that have not been scanned again. Error occurred, and transmission was canceled.
RussianC3Fax-combine-AE_F_FM.book Page 75 Monday, July 14, 2003 2:30 PM Error Messages and Their Meanings Message Causes and solutions Updating the destination list. Wait with the main power switch on. The machine will enter standby mode after it exits from RDS mode. Please wait. Selected destinations or function settings have been cleared. Please reselect after the update finishes. Check whether there are any network problems. [14-01] Cannot find the DNS server or SMTP server.
RussianC3Fax-combine-AE_F_FM.book Page 76 Monday, July 14, 2003 2:30 PM Troubleshooting Message Causes and solutions Check whether there are any network problems. [15-01] No POP3/IMAP4 server's address is programmed. • Check the host name or IP address of the POP3/IMAP4 server is correctly programmed using the Web browser. See the Web browser's Help. • Consult your network administrator. Check whether there are any network problems. [15-02] Cannot log on to the POP3/IMAP4 server.
RussianC3Fax-combine-AE_F_FM.book Page 77 Monday, July 14, 2003 2:30 PM Error Messages and Their Meanings Message Causes and solutions Check whether there are any network problems. [15-12] Cannot log on to the POP3/IMAP4 server. • Check the user name and password of the e-mail account are correctly programmed from File Transfer under System Settings. See “Settings You Can Change with User Tools – File Transfer”, Network Guide.
RussianC3Fax-combine-AE_F_FM.book Page 78 Monday, July 14, 2003 2:30 PM Troubleshooting Solving Problems This table lists some common problems and their solutions. Problem Causes and solutions Reference Image background appears dirty when received at the other end. Images from the back page appears. Adjust scan density. p.32 “Image Density (Contrast)” Printed or sent image contains spots. The ADF or exposure glass is dirty. Clean them.
RussianC3Fax-combine-AE_F_FM.book Page 79 Monday, July 14, 2003 2:30 PM Solving Problems Problem Causes and solutions Reference Transmission is possible, though receiving is impossible. The optional terminal adaptor setting is incorrect. Check the setting. --- Receiving is possible, though transmission is impossible. The optional terminal adaptor setting is incorrect. Check the setting. --- When using On Hook Dial or Manual Dial, “Receiving” appears and transmission is not allowed.
RussianC3Fax-combine-AE_F_FM.book Page 80 Monday, July 14, 2003 2:30 PM Troubleshooting When Things Don't Go as Expected I Want... Operation p.24 “Canceling a Memory Transmission” If the original is being sent or if it is in standby, press [Change/Stop TX File] or the {Clear/Stop} } key. p.24 “Canceling a Memory Transmission” to cancel an Immediate Trans- Press [Stop Transmission] or the mission. {Clear/Stop} } key. 5 80 Reference to cancel a Memory Transmis- If the original is being sion.
RussianC3Fax-combine-AE_F_FM.
RussianC3Fax-combine-AE_F_FM.
Paper type: OK Prince Eco G100(55kg), Paper Thickness=80 µm // Pages in book=88 // Print scale=81% Gap (when printed at 81% scale) = Pages in book × Paper thickness / 2 = 3.520000 mm Introduction This manual describes detailed instructions on the operation and notes about the use of this machine. To get maximum versatility from this machine all operators are requested to read this manual carefully and follow the instructions. Please keep this manual in a handy place near the machine.
Paper type: OK Prince Eco G100(55kg), Paper Thickness=80 µm // Pages in book=88 // Print scale=81% Gap (when printed at 81% scale) = Pages in book × Paper thickness / 2 = 3.
Paper type: OK Prince Eco G100(55kg), Paper Thickness=80 µm // Pages in book=216 // Print scale=81% Gap (when printed at 81% scale) = Pages in book × Paper thickness / 2 = 8.
Paper type: OK Prince Eco G100(55kg), Paper Thickness=80 µm // Pages in book=216 // Print scale=81% Gap (when printed at 81% scale) = Pages in book × Paper thickness / 2 = 8.640000 mm Introduction This manual describes detailed instructions on the operation and notes about the use of this machine. To get maximum versatility from this machine all operators are requested to read this manual carefully and follow the instructions. Please keep this manual in a handy place near the machine.
RussianC3Fax-combine-AE_F_FM.book Page i Monday, July 14, 2003 2:36 PM Manuals for This Machine The following manuals describe the operational procedures of this machine. For particular functions, see the relevant parts of the manual. Note ❒ Manuals provided are specific to machine type. ❒ Adobe Acrobat Reader is necessary to view the manuals as a PDF file.
RussianC3Fax-combine-AE_F_FM.book Page ii Monday, July 14, 2003 2:36 PM ❖ Manuals for DeskTopBinder V2 Lite DeskTopBinder V2 Lite is a utility included on the CD-ROM labeled “Scanner Driver & Document Management Utilities”. • DeskTopBinder V2 Lite Setup Guide (PDF file - CD-ROM2) Describes installation of, and the operating environment for DeskTopBinder V2 Lite in detail. This guide can be displayed from the [Setup] dialog box when DeskTopBinder V2 Lite is installed.
RussianC3Fax-combine-AE_F_FM.book Page iii Monday, July 14, 2003 2:36 PM TABLE OF CONTENTS Manuals for This Machine ...................................................................................... i How to Read This Manual .....................................................................................1 Symbols .....................................................................................................................1 1. Transmission Mode Sending at a Specific Time (Send Later) ......
RussianC3Fax-combine-AE_F_FM.book Page iv Monday, July 14, 2003 2:36 PM 4. Other Transmission Features Handy Dialing Functions..................................................................................... 47 Chain Dial................................................................................................................. 47 (Example) 01133-1-555333................................................................................... 47 Redial ...................................................
RussianC3Fax-combine-AE_F_FM.book Page v Monday, July 14, 2003 2:36 PM Printed Report ...................................................................................................... 81 Memory Storage Report........................................................................................... 81 Transmission Result Report (Memory Transmission) .............................................. 81 Communication Failure Report ...........................................................................
RussianC3Fax-combine-AE_F_FM.book Page vi Monday, July 14, 2003 2:36 PM 6. LAN-Fax Features Sending Fax Documents from Computers ...................................................... 105 Before Use .............................................................................................................106 Installing the Software............................................................................................106 Auto run program................................................................
RussianC3Fax-combine-AE_F_FM.book Page vii Monday, July 14, 2003 2:36 PM 8. Facsimile Features Function List ...................................................................................................... 137 Accessing User Tools (Facsimile Features).................................................... 141 Quitting Default Settings ........................................................................................142 General Settings/Adjustment ...................................................
RussianC3Fax-combine-AE_F_FM.book Page viii Monday, July 14, 2003 2:36 PM Transfer Report ......................................................................................................182 Programming a Confidential ID ..............................................................................183 Programming a Polling ID ......................................................................................183 Programming a Memory Lock ID ...........................................................
RussianC3Fax-combine-AE_F_FM.book Page 1 Monday, July 14, 2003 2:36 PM How to Read This Manual Symbols In this manual, the following symbols are used: R WARNING: This symbol indicates a potentially hazardous situation that might result in death or serious injury when you misuse the machine without following the instructions under this symbol. Be sure to read the instructions, all of which are included in “Safety Information”, General Settings Guide.
RussianC3Fax-combine-AE_F_FM.
RussianC3Fax-combine-AE_F_FM.book Page 3 Monday, July 14, 2003 2:36 PM 1. Transmission Mode Sending at a Specific Time (Send Later) Using this function, you can instruct the machine to delay transmission of your fax message until a specified later time. This allows you to take advantage of off-peak telephone charges without having to be by the machine at the time. If you have a non-urgent fax, select Send Later with Economy Transmission when you scan it.
RussianC3Fax-combine-AE_F_FM.book Page 4 Monday, July 14, 2003 2:36 PM Transmission Mode C Press [Send Later]. D Enter the time using the number keys (24 hr format), and then press [OK]. 1 The specified time is shown above the highlighted [Send Later]. Note ❒ Press [Economy Time] to specify the economy time. ❒ When entering numbers smaller than 10, add a zero at the beginning. ❒ If you make a mistake, press [Clear] or the {Clear/Stop} } key before pressing [OK], and then try again.
RussianC3Fax-combine-AE_F_FM.book Page 5 Monday, July 14, 2003 2:36 PM User Transmission User Transmission This function allows you to check each user or department's transmission history. To use the function, you need to program a user code (eight digits max.) for each user or department, to be entered before transmission. See General Settings Guide. If a user code set with an e-mail address is specified, a transmission result e-mail can be sent.
RussianC3Fax-combine-AE_F_FM.book Page 6 Monday, July 14, 2003 2:36 PM Transmission Mode When your e-mail address is programmed with the user code If your e-mail address is programmed with the user code, you can select whether the machine sends transmission by result email. A Press [Yes] or [No]. 1 Note ❒ If you select [Yes], a Transmission Result Report is sent to the programmed e-mail address after the transmission so that you can check the result of transmission. E Press [OK] twice.
RussianC3Fax-combine-AE_F_FM.book Page 7 Monday, July 14, 2003 2:36 PM Priority Transmission Priority Transmission Documents you send with Memory Transmission are sent in the order they are scanned. Therefore, if several messages are queued in memory, the next document will not be sent immediately. However, by using this function you can have your message sent before other queued messages. B Press [Transmission Mode]. 1 C Press [Priority TX], and then press [OK].
RussianC3Fax-combine-AE_F_FM.book Page 8 Monday, July 14, 2003 2:36 PM Transmission Mode Confidential Transmission If you want to limit who views your message, use this function. The message will be stored in memory at the other end and not printed until an ID is entered. 1 Transmitter Receiver Entering the Confidential ID GFSINS0N There are two types of Confidential Transmission: ❖ Default ID It is not necessary to enter an ID when transmitting.
RussianC3Fax-combine-AE_F_FM.book Page 9 Monday, July 14, 2003 2:36 PM Confidential Transmission D Depending on the Confidential Transmission type, use one of the following procedures: Note ❒ If you make a mistake, press [Clear] or the {Clear/Stop} } key before pressing [OK], and then try again. ❒ To cancel Confidential Transmission, press [Cancel]. The display returns to that of step C. 1 E Press [OK]. The standby display appears.
RussianC3Fax-combine-AE_F_FM.book Page 10 Monday, July 14, 2003 2:36 PM Transmission Mode Polling Transmission Use Polling Transmission when you want to leave an original in the machine memory for others to pick up. The message will be sent when the other party calls you up. 1 There are three types of Polling Transmission. ❖ Free Polling Transmission It is not necessary to enter the Polling ID during the procedure. Anybody can poll the message from your machine.
RussianC3Fax-combine-AE_F_FM.book Page 11 Monday, July 14, 2003 2:36 PM Polling Transmission ❒ You can set whether a Polling Transmission file is deleted after transmitting in “User Parameters”. To save the file to transmit repeatedly, set to “Standby (Save)”. See p.158 “User Parameters” (switch 11, bit 7). ❒ Polling Transmission Clear Report allows you to verify Polling Transmission has taken place. See p.12 “Polling Transmission Clear Report”.
RussianC3Fax-combine-AE_F_FM.book Page 12 Monday, July 14, 2003 2:36 PM Transmission Mode E Press [Only Once] or [Save] to delete or save the file after transmission. Note ❒ To delete the original immediately after transmission, select [Only Once]. ❒ To repeatedly send the original, select [Save]. ❒ To cancel Polling Transmission, press [Cancel]. The display returns to that of step C. 1 F Press [OK]. “pppppppppp” appears. The type of Polling Transmission is shown above the highlighted [Polling TX].
RussianC3Fax-combine-AE_F_FM.book Page 13 Monday, July 14, 2003 2:36 PM Polling Reception Polling Reception Use this function to poll a message from another terminal. You can also poll documents from many terminals with only one operation (use Groups and Keystroke Programs to fully exploit this function). There are two types of Polling Reception. ❖ Default ID/Free Polling Reception Use this method for Free Polling or Default ID Polling.
RussianC3Fax-combine-AE_F_FM.book Page 14 Monday, July 14, 2003 2:36 PM Transmission Mode A Press [Transmission Mode]. ID Override Polling Reception A Select [ID Override Polling Reception]. B Specify a 4-digit ID using the number keys and [A], [B], [C], [D], [E], and [F], and then press [OK]. 1 B Press [Polling RX]. C Depending on which method you are using, select one of the following procedures: “ID Override” and the entered Polling ID are shown above the highlighted [Polling RX].
RussianC3Fax-combine-AE_F_FM.book Page 15 Monday, July 14, 2003 2:36 PM Polling Reception Polling Reserve Report This report is printed after Polling Reception has been set up. 1 Note ❒ You can turn this function on or off with the User Parameters. See p.158 “User Parameters” (switch 03, bit 3). Polling Result Report This report is printed after a Polling Reception has been completed and shows its result.
RussianC3Fax-combine-AE_F_FM.
RussianC3Fax-combine-AE_F_FM.book Page 17 Monday, July 14, 2003 2:36 PM 2. Checking and Canceling Transmission Files After you have pressed the {Start} } key (after scanning originals), you can check and edit the destination or settings of Memory Transmission. You can also cancel a transmission, change the settings of a transmission, print a stored file, print a list of stored files, and resend a file which the machine failed to transmit.
RussianC3Fax-combine-AE_F_FM.book Page 18 Monday, July 14, 2003 2:36 PM Checking and Canceling Transmission Files Displaying Confirmation of Transmission A Press [Change/Stop TX File]. E Press [Exit]. The standby display appears. 2 B Press [Check/Change Settings]. C Select a file to check. Note ❒ If multiple destinations were specified, only the destination selected first appears. ❒ If multiple destinations were specified, only the number of unsent messages appears.
RussianC3Fax-combine-AE_F_FM.book Page 19 Monday, July 14, 2003 2:36 PM Canceling a Transmission Canceling a Transmission You can cancel transmission of a file when the file is being sent, stored in memory, or fails to transmit. All the scanned data is deleted from memory. You can cancel a file for Memory Transmission. This function is useful to cancel a transmission when you notice a mistake in destination or with the originals after storing.
RussianC3Fax-combine-AE_F_FM.book Page 20 Monday, July 14, 2003 2:36 PM Checking and Canceling Transmission Files Deleting a Destination You can delete destinations. Note ❒ If you delete a destination that is the only destination for a transmission, the transmission is canceled. 2 D Press [Change] for the destination you want to delete. A Press [Change/Stop TX File]. Note ❒ Press to switch the destination between fax number and email address. B Press [Check/Change Settings].
RussianC3Fax-combine-AE_F_FM.book Page 21 Monday, July 14, 2003 2:36 PM Adding a Destination Adding a Destination Note ❒ A destination cannot be added using a destination list. D Press [Add]. A Press [Change/Stop TX File]. B Press [Check/Change Settings]. 2 Note ❒ Press to switch the destination between fax number and email address. E Specify the destination using the number keys or soft (on-screen) keys. C Select the file to which you want to add a destination.
RussianC3Fax-combine-AE_F_FM.book Page 22 Monday, July 14, 2003 2:36 PM Checking and Canceling Transmission Files Changing the Transmission Time You can change the transmission time specified with Send Later. See p.3 “Sending at a Specific Time (Send Later)”. You can also delete the transmission time. If the transmission time is deleted, the file is transmitted immediately. 2 E Press [Change TX time]. A Press [Change/Stop TX File].
RussianC3Fax-combine-AE_F_FM.book Page 23 Monday, July 14, 2003 2:36 PM Printing a File Printing a File If you want to check the contents of a file that is stored in memory and not yet sent, use this procedure to print it out. Note ❒ Confidential Transmission files are displayed, but cannot be printed. ❒ You can also print files that have not been successfully transmitted. A Press [Change/Stop TX File]. Note ❒ If multiple destinations were specified, only the number of unsent messages appears.
RussianC3Fax-combine-AE_F_FM.book Page 24 Monday, July 14, 2003 2:36 PM Checking and Canceling Transmission Files Resending a File Machine memory stores messages that could not be successfully transmitted using Memory Transmission. Use this procedure to resend these messages. 2 C Select the file you want to resend. “TX failed” is displayed for files that could not be sent. Preparation You should select “Store for 24 hours” for “Store a message that could not be transmitted” in User Parameters. See p.
RussianC3Fax-combine-AE_F_FM.book Page 25 Monday, July 14, 2003 2:36 PM Printing a List of Files in Memory (Print TX File List) Printing a List of Files in Memory (Print TX File List) Print this list if you want to find out which files are stored in memory and what their file numbers are. Knowing the file number can be useful (for example when erasing files). Note ❒ The contents of a file stored in memory can also be printed. See p.23 “Printing a File”. A Press [Change/Stop TX File].
RussianC3Fax-combine-AE_F_FM.
RussianC3Fax-combine-AE_F_FM.book Page 27 Monday, July 14, 2003 2:36 PM 3. Communication Information Printing the Journal The Journal contains information about the last 50 communications (maximum) made by your machine. It is printed automatically after every 50 communications (receptions & transmissions). You can also print a copy of the Journal at any time by following the procedure below. If the machine is installed with the optional extra G3 interface unit, you can print the Journal of each line type.
RussianC3Fax-combine-AE_F_FM.book Page 28 Monday, July 14, 2003 2:36 PM Communication Information C Select a printing mode. Print per User Code A Select [Print per User Code]. B Specify a user code of up to 8 digits using the number keys, and then press [# #]. 3 All A Select [All]. Print per File No. A Select [Print per File No.]. B Enter a 4-digit file number. Note ❒ If you make a mistake, press [Clear] or the {Clear/Stop} } key before pressing [# # ], and then try again.
RussianC3Fax-combine-AE_F_FM.book Page 29 Monday, July 14, 2003 2:36 PM Printing the Journal Journal 1 P. 1 * * * Journal (30 . Sep 2003 18:38) * * * 6 5 4 3 1) ABC.COMPANY 2) DESIGN (Manual print) Date Time Destination Mode TXtime Page Result Pers. Name File No. —————————————————————————————————————————— 30. Sep. 14:35 NEW YORK OFFICE G3TESM 0’31” P.1 OK 0528 14:36 LONDON OFFICE G3TESM 0’07” P.2 —— 0529 14:40 PARIS OFFICE G3TESM 0’01” P.1 —— 0530 18:27 --LAN–Fax--> *DM 0’02” P.
RussianC3Fax-combine-AE_F_FM.book Page 30 Monday, July 14, 2003 2:36 PM Communication Information 3 5. Other end 8. Number of pages • For fax destinations Shows the name (for display) programmed by the other end. Shows the programmed fax number if the name (for display) has not been programmed. If neither name nor fax number has been programmed by the other end, an entered fax number or a name programm ed in a destination list is shown for transmissions. The space will be blank for receptions.
RussianC3Fax-combine-AE_F_FM.book Page 31 Monday, July 14, 2003 2:36 PM Checking the Transmission Result (TX File Status) Checking the Transmission Result (TX File Status) You can browse a part of the Transmission Result Report on the display. Note ❒ Only the transmission result of the last 200 communications (receptions & transmissions) are shown. ❒ If a transmission is completed while you are using this function, the result will not appear.
RussianC3Fax-combine-AE_F_FM.book Page 32 Monday, July 14, 2003 2:36 PM Communication Information Checking the Reception Result (RX File Status) You can browse a part of the Reception Result Report on the display. Note ❒ Only the reception result of the last 200 communications (receptions & transmissions) are shown. ❒ If a message is received while you are using this function, the result will not appear. To view the latest result, exit RX File Status, and then try again.
RussianC3Fax-combine-AE_F_FM.book Page 33 Monday, July 14, 2003 2:36 PM Displaying the Memory Status Displaying the Memory Status Use this function to display a summary of current memory usage. Items shown are the percentage of free memory space, the number of received confidential messages, the number of files to be sent, the number of Memory Lock files and the number of received messages to be printed. A Press [Information]. • When sending to the Personal Box. See p.40 “Personal Boxes”.
RussianC3Fax-combine-AE_F_FM.book Page 34 Monday, July 14, 2003 2:36 PM Communication Information Printing/Deleting Received and Stored Documents (Print Stored RX File) The optional printer/scanner unit is required. You can print documents that are received and stored on the hard disk. You can also delete unwanted documents. 3 Printing Received and Stored Documents Use the following procedure to print documents saved on the hard disk.
RussianC3Fax-combine-AE_F_FM.book Page 35 Monday, July 14, 2003 2:36 PM Printing/Deleting Received and Stored Documents (Print Stored RX File) D Select the printing mode, and then press the {Start} } key. Note ❒ To cancel printing, press [Cancel]. The display returns to that of step C. ❒ To delete the document after printing, press [Delete File after Printing]. ❒ To perform 2-sided printing (optional duplex unit required), press [Print on 2 Sides] before pressing the {Start} } key. E Press [Exit] twice.
RussianC3Fax-combine-AE_F_FM.book Page 36 Monday, July 14, 2003 2:36 PM Communication Information Printing a Confidential Message This function is designed to prevent unauthorized users from reading your messages. If someone sends you a message using Confidential Transmission, it is stored in memory but not automatically printed. To print the message you have to enter the Confidential ID Code. When your machine has received a confidential message, the Confidential File (i) indicator lights.
RussianC3Fax-combine-AE_F_FM.book Page 37 Monday, July 14, 2003 2:36 PM Printing a Confidential Message Note ❒ You must enter the Confidential ID programmed in this machine, if the received file has no Confidential ID. ❒ You must enter the Confidential ID programmed by the sender. Confirm the sender's Confidential ID in advance.
RussianC3Fax-combine-AE_F_FM.book Page 38 Monday, July 14, 2003 2:36 PM Communication Information Printing a File Received with Memory Lock This is a security function designed to prevent unauthorized users from reading your messages. If Memory Lock is switched on, all received messages are stored in memory and are not automatically printed. To print the messages, you have to enter the Memory Lock ID Code.
RussianC3Fax-combine-AE_F_FM.book Page 39 Monday, July 14, 2003 2:36 PM Printing a File Received with Memory Lock D Enter a 4-digit Memory Lock ID with the number keys, and then press the {Start} } key. 3 Note ❒ If the Memory Lock ID does not match, the message “ Specified code does not correspond to programed Memory Lock ID.” appears. Press [Exit] and retry after checking the Memory Lock ID. E Press [Exit]. The standby display appears.
RussianC3Fax-combine-AE_F_FM.book Page 40 Monday, July 14, 2003 2:36 PM Communication Information Personal Boxes Preparation Before using this function, set the Personal Box in advance. See p.173 “Programming/changing Personal Boxes”. Personal Boxes 3 This function lets you set up the machine so that incoming messages addressed to certain users are stored in memory instead of being printed out immediately.
RussianC3Fax-combine-AE_F_FM.book Page 41 Monday, July 14, 2003 2:36 PM Personal Boxes When a password is required Printing Personal Box Messages Follow these steps to print a message that has been received into a Personal Box. Note ❒ If you print a Personal Box message, it is deleted. A Make sure that the Confidential File indicator is lit. ZLBS060N B Press [Information]. The display appears, when the selected Personal Box password is set in advance.
RussianC3Fax-combine-AE_F_FM.book Page 42 Monday, July 14, 2003 2:36 PM Communication Information Information Boxes Preparation Before using this function, set the Information Box in advance. See p.176 “Programming/changing Information Boxes”. Information Boxes 3 Use the Information Box function to set up the machine as Document Server. By scanning documents into Information Boxes, other parties can receive these messages whenever they request them.
RussianC3Fax-combine-AE_F_FM.book Page 43 Monday, July 14, 2003 2:36 PM Information Boxes C Select the box in which you want D Place the original, and then select Note ❒ When there are pre-programmed files, a file mark is displayed at the end of the Box Name. Note ❒ You can also select the following settings: to store the file. ❒ A message is displayed, when selecting a box with a file stored in it. Press [Yes], when changing the file name. The file stored originally will be overwritten.
RussianC3Fax-combine-AE_F_FM.book Page 44 Monday, July 14, 2003 2:36 PM Communication Information Printing Information Box Messages Follow these steps to print a message stored in an Information Box. When a password is required A Enter the password, and then press [OK]. A Press [Information]. 3 B Press [Store/Delete/Print Information Box File.]. C Press [Print File]. D Select the box that contains the stored file you want to print. Note ❒ You cannot select a box that has no stored file.
RussianC3Fax-combine-AE_F_FM.book Page 45 Monday, July 14, 2003 2:36 PM Information Boxes Deleting Information Box Messages Follow these steps to delete a file stored in an Information Box. A Press [Information]. Note ❒ If you make a mistake, press [Clear] or the {Clear/Stop} } key before pressing [OK], and then try again. ❒ To cancel entering a password, press [Cancel]. The display returns to that of step D. E Press [Delete]. 3 Note ❒ To stop deleting, press [Do not Delete].
RussianC3Fax-combine-AE_F_FM.
RussianC3Fax-combine-AE_F_FM.book Page 47 Monday, July 14, 2003 2:36 PM 4. Other Transmission Features Handy Dialing Functions Chain Dial Redial This allows you to compose a telephone number from various parts, some of which may be stored in Quick Dials and some of which may be entered using the number keys. The machine stores the last 10 destinations specified.
RussianC3Fax-combine-AE_F_FM.book Page 48 Monday, July 14, 2003 2:36 PM Other Transmission Features A Place the original, and then select the scan settings you require. B Press the {Pause/Redial}} key. 4 C Select the destination you want to redial to. Note ❒ Now that the date and time the original was read appears as a key, select by pressing it. ❒ When you press [ProgDest], you can program a selected recipient in the destination list.
RussianC3Fax-combine-AE_F_FM.book Page 49 Monday, July 14, 2003 2:36 PM Advanced Features Advanced Features SUB Code Normally you can only use Confidential Transmission to send messages to fax machines of the same manufacturer that have the Confidential Reception function. See p.8 “Confidential Transmission”. However, if the other machine supports a similar function called “SUB Code”, you can send fax messages to the other party using this method instead. Note ❒ The ID can be up to 20 digits long.
RussianC3Fax-combine-AE_F_FM.book Page 50 Monday, July 14, 2003 2:36 PM Other Transmission Features J Press the {Start}} key. Note ❒ If you use Immediate Transmission and the fax machine at the destination does not support the SUB Code function, a message will appear on the display to inform you of this. When this happens, press [OK] to cancel the transmission. SID Code 4 There are times when you may want to use an “SID” (Sender ID) when sending confidential faxes with the SUB Code function.
RussianC3Fax-combine-AE_F_FM.book Page 51 Monday, July 14, 2003 2:36 PM Advanced Features E Enter a SEP Code, and then press [OK]. “SEP Code” appears one line above [Adv. Features] on the display. Note ❒ If you make a mistake, press [Cancel] or the {Clear/Stop} } key before pressing [OK], and then try again. F To enter a password, press [Password (PWD)]. G Enter the password using the number keys, and then press [OK]. H Press [Exit]. I Press [Transmission Mode]. J Press [Polling RX].
RussianC3Fax-combine-AE_F_FM.book Page 52 Monday, July 14, 2003 2:36 PM Other Transmission Features Transfer Request Transfer Request allows fax machines that have this function to automatically transfer incoming messages to multiple fax destinations. This function helps you save costs when you send the same message to more than one place in a distant area, and saves time since many messages can be sent in a single operation. Transfer Requests can be sent by fax or e-mail.
RussianC3Fax-combine-AE_F_FM.book Page 53 Monday, July 14, 2003 2:36 PM Advanced Features ❒ You can specify up to 100 Receiving Stations and Transfer Stations in total. ❒ When a Transfer Request is sent by e-mail, as soon as the Transfer Station completes transfer to all Receiving Stations, it sends back a Transfer Result Report by e-mail. See p.89 “Transfer Result Report (transfer request by e-mail)”.
RussianC3Fax-combine-AE_F_FM.book Page 54 Monday, July 14, 2003 2:36 PM Other Transmission Features F Specify a Receiving Station. Speed Dial A Select [q qp Speed Dial]. B Enter the number of the Speed Dial code. F o r e xa m p le , t o s e le c t t h e number stored in Speed Dial 12 of the Transfer Station, enter: {1} } {2} }. Note ❒ You cannot enter Receiving Station numbers direc tly. T he numbers must be stored in destination lists, Speed Dial, or Groups in the Transfer Station(s).
RussianC3Fax-combine-AE_F_FM.book Page 55 Monday, July 14, 2003 2:36 PM Advanced Features With transfer requests set in the system settings You can program a Quick Dial key with Transfer Station and/or Receiving Station using the Transfer Request function in the System Settings. See General Settings Guide. You can program up to 30 Receiving Stations per Transfer Station. For more information, contact your service representative. A Place the original down, and then select the desired settings.
RussianC3Fax-combine-AE_F_FM.book Page 56 Monday, July 14, 2003 2:36 PM Other Transmission Features On Hook Dial The On Hook Dial function allows you to dial while hearing tone from the internal speaker. You can send a fax checking the connection. C Dial. Limitation ❒ This function is unavailable for the optional extra G3 interface unit. Note ❒ This function is unavailable in some countries.
RussianC3Fax-combine-AE_F_FM.book Page 57 Monday, July 14, 2003 2:36 PM On Hook Dial - External Telephone On Hook Dial If you have an external telephone on the fax machine, you can speak with the other party when you hear a voice. If you hear a voice before pressing the {Start} } key, pick up the external telephone and tell the receiver you want to send a fax message (ask them to switch to facsimile mode).
RussianC3Fax-combine-AE_F_FM.book Page 58 Monday, July 14, 2003 2:36 PM Other Transmission Features Manual Dial The external telephone is required. Pick up the handset of the external telephone and dial. When the line is connected and you hear a highpitched tone, press the {Start} } key to send your fax message. If, on the other hand, you hear a voice at the other end, continue conversation as normal. Limitation ❒ This function is unavailable for the optional extra G3 interface unit.
RussianC3Fax-combine-AE_F_FM.book Page 59 Monday, July 14, 2003 2:36 PM Changing the Line Port Changing the Line Port The optional extra G3 interface unit is required. When the extra G3 interface unit is installed, you can connect to a maximum of two ports. Note ❒ When you install the extra G3 interface unit, you can specify the line port home position from “Gen. Settings/Adjust”. See p.142 “General Settings/Adjustment”.
RussianC3Fax-combine-AE_F_FM.book Page 60 Monday, July 14, 2003 2:36 PM Other Transmission Features B Select the line you want to use. When a optional extra G3 unit is installed. Note ❒ If you select “G3 Auto”, the machine will use any available line. This increases efficiency. 4 C Press [Exit]. The standby display appears.
RussianC3Fax-combine-AE_F_FM.book Page 61 Monday, July 14, 2003 2:36 PM Sub Transmission Mode Sub Transmission Mode Book Fax Use to send book originals from the exposure glass. Pages are scanned in the order shown below. Reference p.13 “Placing Originals”, Facsimile Reference p.30 “Scan Settings”, Facsimile Reference B Press [Sub TX Mode]. 4 Limitation ❒ Place the original on the exposure glass. You cannot use the optional ADF.
RussianC3Fax-combine-AE_F_FM.book Page 62 Monday, July 14, 2003 2:36 PM Other Transmission Features E Select [From first Page] or [From second Page], and then press [OK]. Two-Sided Transmission (Double-Sided Transmission) The optional ADF is required. Use this function to send two-sided originals. Note ❒ To cancel this mode, press [Cancel]. The display returns to that of step C. ❒ Select [From first Page] to send a book original from the first page.
RussianC3Fax-combine-AE_F_FM.book Page 63 Monday, July 14, 2003 2:36 PM Sub Transmission Mode Original Original position Page opening orinentation Output at the other end B Press [Sub TX Mode]. A4, 81/2" x 11" Top to Top Top to Bottom Top to Top Top to Bottom GHPY030E ❒ ❒ ❒ ❒ p.79 “Transmission with Image Rotation” This function is only available with Memory Transmission. This function is only available with the ADF.
RussianC3Fax-combine-AE_F_FM.book Page 64 Monday, July 14, 2003 2:36 PM Other Transmission Features F Specify the transmission mode from [2 Sided from 1st Page] or [1 Sided for 1st Page], and then press [OK]. The selected original position and p age opening orientation are shown above the highlighted [2 Sided Original]. 4 Note ❒ To cancel this mode, press [Cancel]. The display returns to that of step C. ❒ Select [2 Sided from 1st Page] to send a two-sided original from the first page.
RussianC3Fax-combine-AE_F_FM.book Page 65 Monday, July 14, 2003 2:36 PM Sub Transmission Mode D Select the standard message to be stamped, and then press [OK]. The selected standard message is shown above the highlighted [Std. Message]. Note ❒ To cancel the selection, press [Cancel]. The display returns to that of step C. ❒ Programmed standard messages are shown in the keys. ❒ The machine cannot stamp multiple standard messages. E Press [OK]. F Specify the destination, and then press the {Start} } key.
RussianC3Fax-combine-AE_F_FM.book Page 66 Monday, July 14, 2003 2:36 PM Other Transmission Features B Press [Sub TX Mode]. Printing documents stored as Auto Documents This function is used for printing documents stored as Auto Documents. This function is very convenient as it can be used for checking the contents of stored files. C Press [Auto Document]. D Select an Auto Document A Press [Sub TX Mode]. file, and then press [OK].
RussianC3Fax-combine-AE_F_FM.book Page 67 Monday, July 14, 2003 2:36 PM Sub Transmission Mode E Press [Cancel]. Note ❒ You can also send Auto Documents. See p.65 “Sending an Auto Document”. F Press [OK]. The standby display appears. Note ❒ Received fax documents are stored and categorized as stored reception files. See p.34 “Printing/Deleting Received and Stored Documents (Print Stored RX File)”. ❒ You can program one of the Quick Operation keys with operations for this function.
RussianC3Fax-combine-AE_F_FM.book Page 68 Monday, July 14, 2003 2:36 PM Other Transmission Features A Press [Sub TX Mode]. Specifying documents from the file list A Press [U U Prev.] or [T T Next] to display the documents to be sent. B Select the file name. Specifying documents from the User Name B Press [Select Stored File]. C Select the documents to be sent. A Select [Search by User Name]. 4 Note ❒ When multiple documents are selected, they are sent in the order of selection.
RussianC3Fax-combine-AE_F_FM.book Page 69 Monday, July 14, 2003 2:36 PM Sub Transmission Mode Specifying documents from the file name A Select [Search by File Name]. B Enter the name of the document to be sent, and then press [OK]. Note ❒ Partial matching is used when searching for a file name. See p.163 “Special Senders to Treat Differently” C Select the file name to be sent. D If you select a document with a password, enter the password, and then press [OK].
RussianC3Fax-combine-AE_F_FM.book Page 70 Monday, July 14, 2003 2:36 PM Other Transmission Features Printing stored documents Use this function to print documents stored in the Document Server. Note ❒ Only documents stored using the facsimile function can be printed. ❒ You can print documents saved from the copy or the printer function with the Document Server. You cannot print documents saved from the scanner function with this mode.
RussianC3Fax-combine-AE_F_FM.book Page 71 Monday, July 14, 2003 2:36 PM Sub Transmission Mode Specifying a document from the User Name Specifying a document from the file name A Select [Search by User Name]. A Press [Search by File Name]. B Press the user name of the document to be sent, and then press [OK]. B Enter the file name to be printed, and then press [OK]. Note ❒ To search by user name, press [Non-programmed Name], and then enter the user name. User name searches using partial matching.
RussianC3Fax-combine-AE_F_FM.book Page 72 Monday, July 14, 2003 2:36 PM Other Transmission Features E Press [Print File] or [Print 1st Page]. When [Print File] is pressed, the machine prints all the pages. When [Print 1st Page] is pressed, the machine prints only the first page. Limitation ❒ When [Print 1st Page] is selected, originals larger than A4 size are printed after they are reduced to A4 size. ❒ The machine can print up to 30 files using the Print 1st Page function.
RussianC3Fax-combine-AE_F_FM.book Page 73 Monday, July 14, 2003 2:36 PM Sub Transmission Mode ❒ A paper jam during Parallel Memory Transmission may cause the transmission to be failed even if stamping is performed. ❒ You cannot turn the Stamp function on or off while a document is being scanned. A Place the original, and then select the scan settings you require. Reference p.13 “Placing Originals”, Facsimile Reference p.
RussianC3Fax-combine-AE_F_FM.book Page 74 Monday, July 14, 2003 2:36 PM Other Transmission Features Label Insertion With this function you can have the receiver name printed on the message when it is received at the other end. The name will be printed at the top of the page and will be preceded by “To”. You can also cause the text programmed as a standard message to be printed. See p.149 “Programming, Changing, and Deleting Standard Messages”.
RussianC3Fax-combine-AE_F_FM.book Page 75 Monday, July 14, 2003 2:36 PM Sub Transmission Mode Default ID Transmission D Select options to be set up. If you turn this function on, transmission will only take place if the destination's Polling ID is the same as yours. This function can stop you accidentally sending information to the wrong place (you need to coordinate Polling ID's with the other party). Note ❒ You can program one of the Quick Operation keys with operations for this function.
RussianC3Fax-combine-AE_F_FM.book Page 76 Monday, July 14, 2003 2:36 PM Other Transmission Features Programming the Stamp Sender Name A Press [Change] for Stamp Sender Name. B Press the name of the user to be stamped, and then press [OK]. Programming the Auto Reduce A Press [ON] for Auto Reduce. Note ❒ Press [OFF] if you do not want to use the Auto Reduce function. Programming the Default ID Transmission A Press [ON] for Default ID TX. 4 Note ❒ Press [OFF] if you do not want to use ID transmission.
RussianC3Fax-combine-AE_F_FM.book Page 77 Monday, July 14, 2003 2:36 PM More Transmission Functions More Transmission Functions If Memory Runs Out While Storing an Original If you run out of memory while storing an original (free space reaches 0%), the message “Memory is full. Cannot scan more. Transmission will be stopped.” is displayed. Press [Exit] to transmit stored pages only. Note ❒ In default, scanned pages are sent.
RussianC3Fax-combine-AE_F_FM.book Page 78 Monday, July 14, 2003 2:36 PM Other Transmission Features Checking the Transmission Result • Turn the Transmission Result Report on if you want a report to be printed after every successful transmission. See p.81 “Transmiss i o n R e s u lt R e p o rt ( M e m o ry Transmission)”, Facsimile Reference . • If you leave the Transmission Result Report off, the report will not be printed after every transmission.
RussianC3Fax-combine-AE_F_FM.book Page 79 Monday, July 14, 2003 2:36 PM More Transmission Functions Dual Access Simultaneous Broadcast The machine can scan other messages into memory even while sending a fax message from memory, receiving a message into memory, or automatically printing a report. Since the machine starts sending the second message immediately after the current transmission ends, the line is used efficiently. The optional extra G3 interface unit is required.
RussianC3Fax-combine-AE_F_FM.book Page 80 Monday, July 14, 2003 2:36 PM Other Transmission Features JBIG Transmission The optional fax function upgrade unit is required. If you use JBIG (Joint Bi-level Image Experts Group) compression, you can send photographic originals faster than with other methods of compression. You can only use this function with G3 line type. Reference p.
RussianC3Fax-combine-AE_F_FM.book Page 81 Monday, July 14, 2003 2:36 PM Printed Report Printed Report Memory Storage Report This report is printed after an original is stored in memory. It helps you review the contents and the destinations of stored originals. Limitation ❒ If you use Parallel Memory Transmission, the Memory Storage Report is not printed. Note ❒ You can turn this report on and off. See p. 158 “User Parameters” (switch 03, bit 2).
RussianC3Fax-combine-AE_F_FM.book Page 82 Monday, July 14, 2003 2:36 PM Other Transmission Features Note ❒ This report is only printed if the Transmission Result Report is turned off and a message could not be successfully transmitted with Memory Transmission. ❒ You can select whether to include part of the original image on the report. See p.158 “User Parameters” (switch 04, bit 7). ❒ The Page column gives the total number of pages.
RussianC3Fax-combine-AE_F_FM.book Page 83 Monday, July 14, 2003 2:36 PM 5. Reception Features Reception Immediate Reception Each page of a fax message is printed as soon as it is received. This method is used for standard fax messages. ❖ Reception resolution This machine supports Standard, Detail, and Super Fine resolutions for reception. If you do not have the optional fax function upgrade unit, faxes sent at Super Fine resolution will be printed on your machine at Detail resolution.
RussianC3Fax-combine-AE_F_FM.book Page 84 Monday, July 14, 2003 2:36 PM Reception Features • Reverse Order Printing See p.99 “Reverse Order Printing”. • 2-sided Printing See p.96 “Two-Sided Printing”. Important ❒ When about one hour passes after power of the machine is turned off, all fax messages stored in memory will be lost. If any messages have been lost for this reason, a Power Failure Report is automatically printed when the operation switch is turned on. Use this report to identify lost messages.
RussianC3Fax-combine-AE_F_FM.book Page 85 Monday, July 14, 2003 2:36 PM Reception Note ❒ Reception may not take place if there is not enough free memory. ❒ If free memory reaches 0% during Substitute Reception, any further reception becomes impossible and the current communication is terminated. ❒ When a fax message is received after Store has been selected for Reception File Setting in the Facsimile Features menu, the Receive File indicator lights.
RussianC3Fax-combine-AE_F_FM.book Page 86 Monday, July 14, 2003 2:36 PM Reception Features ❖ When Own Name or Own Fax Number is received The machine switches to Substitute Reception only when the sender has programmed their Own Name or Own Fax Number. If the power is switched off for more than an hour, all the messages stored in memory are deleted. In that case, the Power Failure Report or the Journal can be used to identify which messages are lost so you can ask the senders to transmit them again.
RussianC3Fax-combine-AE_F_FM.book Page 87 Monday, July 14, 2003 2:36 PM Reception Functions Reception Functions Transfer Station Transfer Stations allow you to expand the standard functions of your fax machine to set up complex networks. The diagram below may make the concept clearer.
RussianC3Fax-combine-AE_F_FM.book Page 88 Monday, July 14, 2003 2:36 PM Reception Features ❒ If the Requesting Party specified a destination with both the fax number and e-mail address programmed in this machine (Transfer Station) as End Receiver, the machine sends the message to the fax number or e-mail address according to the User Parameter setting. See p.158 “User Parameters” (switch 32, bit 0).
RussianC3Fax-combine-AE_F_FM.book Page 89 Monday, July 14, 2003 2:36 PM Reception Functions Transfer Result Report (transfer request by e-mail) When this machine receives a transfer request by e-mail, the Transfer Result Report is sent by e-mail to the Requesting Party after completing all transmissions to the specified Transfer Stations. If the Key Operator's email address has been programmed, the Transfer Result Report e-mail is forwarded to that address.
RussianC3Fax-combine-AE_F_FM.book Page 90 Monday, July 14, 2003 2:36 PM Reception Features Note ❒ You need to specify the Forwarding destination in advance. See p.165 “Forwarding”. ❒ If you want to forward documents to a different destination depending on the sender, see p.163 “Special Senders to Treat Differently”. ❒ You can select whether the machine prints out the messages it forwards with user parameters (switch 11, bit 6). For details, see p.158 “User Parameters”.
RussianC3Fax-combine-AE_F_FM.book Page 91 Monday, July 14, 2003 2:36 PM Reception Functions Transferring Received Documents Originals sent with a SUB Code that matches the SUB Code programmed as a Transfer Box are received then relayed to the programmed receiver. When e-mail addresses are programmed in the Transfer Station as receivers, received messages are sent in an e-mail format to the receivers. Preparation Transfer Boxes and Receiving Stations must be set up in order to transfer received documents.
RussianC3Fax-combine-AE_F_FM.book Page 92 Monday, July 14, 2003 2:36 PM Reception Features ❒ If an error is encountered during e-mail reception, reception is aborted, the email is discarded, and Error Report is printed. Also, the SMTP server sends an error notification to the originator. ❒ This machine will respond to the SMTP server with a “busy” signal when the SMTP server attempts to route received documents to this machine while it is transmitting an e-mail.
RussianC3Fax-combine-AE_F_FM.book Page 93 Monday, July 14, 2003 2:36 PM Reception Functions ❒ You can make settings that limit transfer to specified originators. See p.145 “E-mail Settings”. ❒ Using this function, you can also send documents from your e-mail software to e-mail addresses and G3 fax machines' destinations through this machine simultaneously. For details about specifying the destinations of fax machines, see the following.
RussianC3Fax-combine-AE_F_FM.book Page 94 Monday, July 14, 2003 2:36 PM Reception Features JBIG Reception The optional fax function upgrade unit is required. If you use JBIG (Joint Bi-level Image Experts Group) compression, you can send photographic originals faster than with other methods of compression. You can only use this function with G3 line type. It allows you to receive messages sent in the JBIG format through JBIG Transmission. Limitation ❒ If ECM is turned off, JBIG Reception is unavailable.
RussianC3Fax-combine-AE_F_FM.book Page 95 Monday, July 14, 2003 2:36 PM Printing Options Printing Options Print Completion Beep Centre Mark When this function is turned on, the machine beeps to let you know when a received message has been printed. When this function is turned on, marks are printed halfway down the left side and at the top centre of each page received. This makes it easy for you to position a hole puncher correctly when you file received messages.
RussianC3Fax-combine-AE_F_FM.book Page 96 Monday, July 14, 2003 2:36 PM Reception Features Reception Time You can have the date and time printed at the bottom of the message when it is received. You can turn this function on or off using Reception Settings. See p.144 “Reception Settings”. Note ❒ When a received message is printed on two or more sheets, the date and time is printed on the last page. ❒ The date and time when the message was printed can also be recorded on the message.
RussianC3Fax-combine-AE_F_FM.book Page 97 Monday, July 14, 2003 2:36 PM Printing Options Note ❒ The machine will use Memory Reception for Two-Sided Printing. ❒ Printouts may vary depending on how the sender sets the originals. ❒ You can select to have messages only from selected senders printed in this way. See p.163 “Special Senders to Treat Differently”. ❒ Stored documents of the same size are printed on the same paper. Some stored documents may be unavailable for this printing option.
RussianC3Fax-combine-AE_F_FM.book Page 98 Monday, July 14, 2003 2:36 PM Reception Features Image Rotation If you have set paper in the standard tray K, incoming fax messages will be rotated automatically to fit onto the paper. 5 Note ❒ You can choose to have received messages printed from a specified tray. See p.144 “Reception Settings”. Combine Two Originals When two messages of the same size and orientation are received consecutively, they are printed on a single sheet when you turn this function on.
RussianC3Fax-combine-AE_F_FM.book Page 99 Monday, July 14, 2003 2:36 PM Printing Options Page Separation and Length Reduction When the size of a received message is longer than the paper loaded in the machine, each page of the message can be split and printed on several sheets, or reduced and printed on a single sheet. For example, this function splits the message if the message length is 20 mm (0.79") or longer than the paper used. The message is reduced if it is less than 20 mm (0.79").
RussianC3Fax-combine-AE_F_FM.book Page 100 Monday, July 14, 2003 2:36 PM Reception Features Page Reduction If you receive a message that is longer than the paper in the tray, the machine usually prints it on two pages. If you turn this function on, the machine reduces the width and length of the received image so that it will fit on one page. If A4L paper is loaded and a message of B4 JISL size is received, the machine will reduce the message to a single A4L sheet.
RussianC3Fax-combine-AE_F_FM.book Page 101 Monday, July 14, 2003 2:36 PM Printing Options ❖ Priority Table JIS JIS JIS JIS JIS ❒ The paper size used to print a received message may be different from the size of the sent original. ❒ If you specify a receiving tray with the setting priority under System Settings, the messages may be received in a different order by setting the priority table. The priority tray may be used only when the document received is the same size as the priority tray.
RussianC3Fax-combine-AE_F_FM.book Page 102 Monday, July 14, 2003 2:36 PM Reception Features Just size printing If you turn this function on and no paper tray is stocked with paper of a suitable size to print a received document, a message will appear on the display prompting you to load paper of the required size. When you have loaded new paper, you can then print the message.
RussianC3Fax-combine-AE_F_FM.book Page 103 Monday, July 14, 2003 2:36 PM Printing Options ❒ If paper longer than 433 mm (17") is used, the paper may get wrinkled, it may not be sent, or a paper jam may occur. ❒ The machine can detect A4L, A3L(81/2"×11"L, 11"×13"L) paper sizes. When you load any other size, specify the paper size. See p.170 “Programming Bypass Tray Paper Size” . ❒ When using tray 1 of the optional 1000-sheet finisher, paper is output to the tray even with nonstandard sizes selected.
RussianC3Fax-combine-AE_F_FM.book Page 104 Monday, July 14, 2003 2:36 PM Reception Features Where Incoming Message are Delivered Output Tray Specifying Tray for Lines The optional extra G3 interface unit is required. You can specify the document feeding tray for each port (telephone or LAN).
RussianC3Fax-combine-AE_F_FM.book Page 105 Monday, July 14, 2003 2:36 PM 6. LAN-Fax Features Sending Fax Documents from Computers The optional printer/scanner unit is required. Using computers connected to the machine through parallel ports, IEEE 1394 (IP Over 1394) ports, LANs, or wireless LANs, you can fax documents, created using Windows applications, to other fax machines over a telephone line.
RussianC3Fax-combine-AE_F_FM.book Page 106 Monday, July 14, 2003 2:36 PM LAN-Fax Features Before Use Auto run program To use these features, a LAN-Fax driver must be installed on your computer. Use the LAN -Fax driver included on the printer CD-ROM. You must also make the required computer to fax network settings on the mac h i ne , a c co r d i n g t o t he t y p e o f connection. With Windows 95/98/Me, Windows 2000/XP, and Windows NT4.
RussianC3Fax-combine-AE_F_FM.book Page 107 Monday, July 14, 2003 2:36 PM Sending Fax Documents from Computers ❒ Clicking [Cancel] during installation aborts the installation. If you cancel the installation, restart your computer and install the rest of the software or printer driver. LAN-Fax Driver, Address Book, and LAN-Fax Cover Sheet Editor can be installed by Auto Run. Installing individual applications Preparation Before installing the above applications, install SmartNetMonitor for Client.
RussianC3Fax-combine-AE_F_FM.book Page 108 Monday, July 14, 2003 2:36 PM LAN-Fax Features Applications Stored on the CD-ROM This section provides information about LAN-Fax Driver, Address Book, and LAN-Fax Cover Sheet Editor. LAN-Fax Driver This driver allows you to use LANFax functions. ❖ Location of the File The following folders are on the CD-ROM: • LAN-Fax Driver for Windows 95/98/Me DRIVERSLANFAXWIN9X_Me • LAN-Fax Driver for Windows 2000/XP DRIVERSLAN-FAXWIN2K_XP • LAN-Fax Driver for Windows NT 4.
RussianC3Fax-combine-AE_F_FM.book Page 109 Monday, July 14, 2003 2:36 PM Sending Fax Documents from Computers Note ❒ If the options on this machine are not configured as instructed, LANFax functions may fail to work as intended. ❒ If your operating system is Windows 2000/XP or Windows NT 4.0, log on using an account that has Administrator permissions. A On the [Start] menu, point to [Settings], and then click [Printers].
RussianC3Fax-combine-AE_F_FM.book Page 110 Monday, July 14, 2003 2:36 PM LAN-Fax Features Note ❒ To send to an Internet Fax destination, the destination must be set in the destination list of this machine beforehand. Use this machine's destination list to specify Internet Fax destinations. E-mail addresses cannot be entered in the LAN-Fax dialog box. A On the [File] menu, click [Print]. B Select [LAN-Fax M3] in [Printer Name]. C Click [OK]. The LAN-Fax dialog box appears.
RussianC3Fax-combine-AE_F_FM.book Page 111 Monday, July 14, 2003 2:36 PM Sending Fax Documents from Computers Specifying a destination using Address Book In order to use this method, you need to program destinations in the address list using Address Book. See p.108 “Address Book”. A Select a CSV file containing the desired address list, from the drop-down menu. Note ❒ Up to three files used most lately appear in the dropdown menu. To use an address list that did not appear, click [Browse...
RussianC3Fax-combine-AE_F_FM.book Page 112 Monday, July 14, 2003 2:36 PM LAN-Fax Features Previewing fax images Selecting the [Preview] check box allows you to check how the fax document will be output at the destination. A Select the [Preview] check box, and then click [Print] or [Send]. The [Preview] window appears. B Check the image, and then click [OK]. Note ❒ To cancel printing or sending, click [Cancel]. Images on the Preview window are not exactly the same as images to be output.
RussianC3Fax-combine-AE_F_FM.book Page 113 Monday, July 14, 2003 2:36 PM Sending Fax Documents from Computers Note ❒ You cannot receive notification when using SmartNetMonitor for Client version 5.0 or earlier. ❒ Transmission results are informed only when connected with a network using SmartNetMonitor for Client. - Managing transmission using LAN-Fax Driver From “SmartNetMonitor for Admin”, “SmartNetMonitor for Client”, or a Web browser, you can manage transmissions using LAN-Fax Driver.
RussianC3Fax-combine-AE_F_FM.book Page 114 Monday, July 14, 2003 2:36 PM LAN-Fax Features C Select a folder on the folder tree. D Select a file naming method. Note ❒ To manually enter a file name, select the [Specify file name when saving] check box. To have the program itself name the file, select the [Automatically create a new file ] check box. E Click [OK]. F Click [Save]. If you have selected [Automatically create a new file], the image file is assigned a name and saved under the specified folder.
RussianC3Fax-combine-AE_F_FM.book Page 115 Monday, July 14, 2003 2:36 PM Sending Fax Documents from Computers Deleting programmed destinations A Select the destination you want to edit in the list. The company name should appear in gray. B Click [Delete]. C Click [Yes]. D Click [Close]. E If you made changes to a destination, a confirmation message appears. To save the changes, click [Yes]. If you do not want to save the changes and want to quit editing, click [No].
RussianC3Fax-combine-AE_F_FM.book Page 116 Monday, July 14, 2003 2:36 PM LAN-Fax Features Editing Fax Cover Sheets LAN-Fax Cover Sheet Editor allows you to edit the format for fax cover sheets. It is necessary to create a cover sheet file before attaching a cover sheet to fax messages using LAN-Fax Driver. Creating a cover sheet 6 file name. E Click [Save]. Attaching a created cover sheet Use the following procedure to attach a created cover sheet file to a fax message.
RussianC3Fax-combine-AE_F_FM.book Page 117 Monday, July 14, 2003 2:36 PM Sending Fax Documents from Computers G Enter the sender information. Note ❒ You can enter company, department, and person names, and telephone and fax numbers. ❒ To add a message, select the [With a Message] check box, and then enter a message. H Click [OK]. I Specify a destination. J Select the [Attach a Cover Sheet] check box. K Click [Send].
RussianC3Fax-combine-AE_F_FM.book Page 118 Monday, July 14, 2003 2:36 PM LAN-Fax Features LAN-Fax Result by E-mail If you entered a user code in the [Options] dialog box, the result can be sent to you by e-mail, provided your e-mail address is programmed in the machine. Note ❒ You can select whether or not a LAN-Fax Result is sent to the specified e-mail address. See p.158 “User Parameters” (switch 20, bit 7).
RussianC3Fax-combine-AE_F_FM.book Page 119 Monday, July 14, 2003 2:36 PM Viewing Fax Information Using a Web Browser Viewing Fax Information Using a Web Browser The optional printer/scanner unit is required. You can view received fax messages and their lists or print these messages using a Web browser on a network computer. Note ❒ You need to select “Store” as the “Reception File Setting” in the Facsimile Features menu. See p.185 “Storing or Printing Received Documents”.
RussianC3Fax-combine-AE_F_FM.book Page 120 Monday, July 14, 2003 2:36 PM LAN-Fax Features E View the content of the fax message. Note ❒ To enlarge the preview image, click [Enlarge Image]. Enlargeme nt can no t be p erform ed without Acrobat Reader installed. For more information, see Help on the Web browser. F To download the received fax message, click [PDF] or [Multi-page TIFF]. Clicking [PDF] causes Acrobat Reader to be started and the message to be displayed.
RussianC3Fax-combine-AE_F_FM.book Page 121 Monday, July 14, 2003 2:36 PM Viewing Fax Information Using a Web Browser F Click [Delete File]. Note ❒ To cancel deletion, press [Cancel] before clicking [Delete File]. ❒ After selecting multiple messages, you can also cancel deletion of some of the selected messages. For more informat io n , se e H e lp o n t h e W e b browser. G Click [OK]. The display returns to that of step D.
RussianC3Fax-combine-AE_F_FM.book Page 122 Monday, July 14, 2003 2:36 PM LAN-Fax Features Viewing Received Messages on a Computer ScanRouter V2 Professional (sold separately) is also required as a delivery server. DesktopBinder V2 Professional Lite or DesktopBinder V2 Professional software (both sold separately) must be installed on your computer.
RussianC3Fax-combine-AE_F_FM.book Page 123 Monday, July 14, 2003 2:36 PM Viewing Received Messages on a Computer ❒ To send received messages to your computer as e-mail attachments, you need to have a ScanRouter V2 Professional-compatible e-mail program on your computer. ❒ To create a network using the delivery server, settings must be specified in the User Tools of the machine. Settings must also be specified on the delivery server.
RussianC3Fax-combine-AE_F_FM.
RussianC3Fax-combine-AE_F_FM.book Page 125 Monday, July 14, 2003 2:36 PM 7. Simplifying the Operation Programs If you regularly send messages to a particular destination or transmit using the same functions, you can save repetitive keypad operations by programming this information in a Keystroke Program. Registering and Changing Keystroke Programs Keystroke Programs can be recalled by just pressing a Quick Dial key.
RussianC3Fax-combine-AE_F_FM.book Page 126 Monday, July 14, 2003 2:36 PM Simplifying the Operation Example of registering a program using Send Later with the fax number “0123456789” A Press {0} }, {1} }, {2} }, {3} }, {4} }, {5} }, { 6} } , { 7} } , { 8} } , { 9} } using the number keys. B Perform the Send Later setting till the procedure of pressing [OK] to return to the standby mode. Reference p.3 “Sending at a Specific Time (Send Later)” C Press the {Program}} key.
RussianC3Fax-combine-AE_F_FM.book Page 127 Monday, July 14, 2003 2:36 PM Programs Note ❒ For this purpose, program No.1 does not allow you to program destinations, Polling Transmission, User Transmission, Store File, Scan Area, resolution, Image Density and Send Stored-file functions. E Enter a new program name, and then press [OK]. Note ❒ Press [Cancel] to cancel the change, and proceed to step F. F Press [Exit]. The standby display appears.
RussianC3Fax-combine-AE_F_FM.book Page 128 Monday, July 14, 2003 2:36 PM Simplifying the Operation D Select the program number you want to delete. B Place the original. Note ❒ If you have no registered destinations or scan settings as programs, enter the fax number of the destination and select the scan settings you require. C Press the {Program}} key. E Press [Yes]. ZLFS310N Note ❒ Press [No] not to delete the program. The display returns to that of step C.
RussianC3Fax-combine-AE_F_FM.book Page 129 Monday, July 14, 2003 2:36 PM Using the Document Server Using the Document Server Use this function to store documents in the Document Server on this machine. The Document Server can store documents from various applications. The documents that are stored using the facsimile function are available to transmit by facsimile.
RussianC3Fax-combine-AE_F_FM.book Page 130 Monday, July 14, 2003 2:36 PM Simplifying the Operation ❖ User Names You can set this function if necessary to know who and what departments stored documents in the machine. See p.131 “Programming a user name”. D Select [Store & Transmit] or [Store only]. Select [Store & Transmit] to send documents after they are stored. ❖ Password You can set this function so as not to send to unspecified people. See p.131 “Setting a password”.
RussianC3Fax-combine-AE_F_FM.book Page 131 Monday, July 14, 2003 2:36 PM Using the Document Server Programming a user name Note ❒ Set a user name from those programmed in the user code. User code is programmed in System Settings. See General Settings Guide. Setting a file name A Press [File Name]. A Press [User Name]. B Enter the file name, and then press [OK]. Reference “Entering Text”, General Settings Guide B Press the user name to be programmed, and then press [OK]. C Press [OK].
RussianC3Fax-combine-AE_F_FM.book Page 132 Monday, July 14, 2003 2:36 PM Simplifying the Operation Note ❒ If you make a mistake, press [Clear] or the {Clear/Stop} } key before pressing [OK], and then re-enter your password. ❒ You can enter up to four digits. C Enter the password again, and then press [# #]. D Press [OK]. Note ❒ Press [Change] to enter a different password. E Press [OK]. A Press [Sub TX Mode]. B Select [Select Stored File].
RussianC3Fax-combine-AE_F_FM.book Page 133 Monday, July 14, 2003 2:36 PM Using the Document Server E Change the desired information of the stored document. Changing the file name A Press [Change File Name]. B Press [Backspace] or [Delete All], and then re-enter the file name. Changing a user name A Press [Change User Name]. B Press [Clear]. The user name is deleted. Reference “Entering Text”, General Settings Guide C Press [OK]. Changing the password C Enter the new user name, and then press [OK].
RussianC3Fax-combine-AE_F_FM.book Page 134 Monday, July 14, 2003 2:36 PM Simplifying the Operation Deleting a Stored Document With a programmed password Use this function to delete stored documents. A Enter a password using the number keys, and then press [OK]. Note ❒ You can program one of the Quick Operation keys with operations for this function. Using the key allows you to omit steps A and B. A Press [Sub TX Mode]. E Press [Delete File]. F Press [Delete]. B Press [Select Stored File].
RussianC3Fax-combine-AE_F_FM.book Page 135 Monday, July 14, 2003 2:36 PM Using the Document Server • Deleting documents (Delete) • Copying documents to a computer (Copy) • Printing documents (Print from Document Server) • Exporting documents as files (Export Document) For more information, see DesktopBinder V2 operating instructions and Help. Note ❒ Settings made in System Settings enable you to send documents to the delivery server. See “Setting up the Machine on a Network”, Network Guide.
RussianC3Fax-combine-AE_F_FM.
RussianC3Fax-combine-AE_F_FM.book Page 137 Monday, July 14, 2003 2:36 PM 8. Facsimile Features Function List The User Tools allow you to program your identification, store frequently used numbers and settings, and customize default settings to meet your needs. The User Tools are grouped by functions so that you can quickly and easily find the desired User Tool. ❖ General Settings /Adjustment Description Reference Default Transmission Mode and scan settings.
RussianC3Fax-combine-AE_F_FM.book Page 138 Monday, July 14, 2003 2:36 PM Facsimile Features ❖ Reception Settings Description Reference Allows you to switch the following reception functions on or off: p.144 “Reception Settings” • Switch Reception Mode • Authorized RX See p.167 “Authorized RX (Authorized Reception)”. • Forwarding See p.155 “Forwarding”. • RX File Print Qty See p.165 “Reception File Print Quantity”. • Two-Sided Print See p.96 “Two-Sided Printing”. • RX Reverse Printing See p.
RussianC3Fax-combine-AE_F_FM.book Page 139 Monday, July 14, 2003 2:36 PM Function List ❖ Key Operator Tools Description Reference • Program/Change/Delete Standard Mes- p.
RussianC3Fax-combine-AE_F_FM.book Page 140 Monday, July 14, 2003 2:36 PM Facsimile Features - Key Operator Code When Key Operator Code is programmed and turned on, users have to enter a programmed Key Operator Code (eight digits maximum) to operate the User Tools. This prevents unauthorized people from changing settings. Note ❒ You can turn the Key Operator Code on or off in “User Tools Menu (System Settings)”, General Settings Guide.
RussianC3Fax-combine-AE_F_FM.book Page 141 Monday, July 14, 2003 2:36 PM Accessing User Tools (Facsimile Features) Accessing User Tools (Facsimile Features) Customize the facsimile settings according to the operations to be frequently performed. Note ❒ The machine allows you to change the facsimile defaults in a mode that is not the facsimile mode. After changing the defaults, select facsimile mode again. This section describes the facsimile defaults that the machine allows you to customize.
RussianC3Fax-combine-AE_F_FM.book Page 142 Monday, July 14, 2003 2:36 PM Facsimile Features Quitting Default Settings A After changing the defaults, press [Exit] on the main menu display for default settings. The standby display appears. Note ❒ You can also press the {User } key to quit the main Tools/Counter} menu display for default settings. General Settings/Adjustment 8 ❖ Memory/Immed. Transmission Switch Use this function to specify the Transmission Mode for document transmission.
RussianC3Fax-combine-AE_F_FM.book Page 143 Monday, July 14, 2003 2:36 PM Accessing User Tools (Facsimile Features) ❖ Program Fax Information See p.63 “Initial Settings and Adjustments”, Facsimile Reference . • Fax Header • Own Name • Own Fax Number ❖ Scan End Reset Use this function to return to the initial settings each time an original is scanned. • ON • OFF ❖ TX Stamp Priority Use this function to press a TX stamp.
RussianC3Fax-combine-AE_F_FM.book Page 144 Monday, July 14, 2003 2:36 PM Facsimile Features • TX Status Report (Transmission Status Report) • User TX (User Transmission) • E-mail TX Results (E-mail Transmission Result) Up to three functions can be programmed into a Quick Operation keys. A Select Quick Operation key you want to program. B Select the function you want to program in the Quick Operation key. Note ❒ Functions that appear dimmed have already been set.
RussianC3Fax-combine-AE_F_FM.book Page 145 Monday, July 14, 2003 2:36 PM Accessing User Tools (Facsimile Features) ❖ Specify Tray for Lines Specify a paper tray for each line (telephone/LAN). • OFF • ON A Select [ON] to select a paper tray. ❖ Checkered Mark Specify whether or not a checkered mark is to be printed on the first page of received fax messages. • ON • OFF ❖ Center Mark Specify whether or not a centre mark is to be printed halfway down the left side and at the top centre of each page received.
RussianC3Fax-combine-AE_F_FM.book Page 146 Monday, July 14, 2003 2:36 PM Facsimile Features When an authorized e-mail address is set, e-mail received from addresses that do not match the authorized e-mail address is discarded, and an error message is returned to the SMTP server. The authorized e-mail address is compared with the addresses of email originators, as illustrated by the following examples. When the authorized e-mail address is set to “@aaa.abcd.com”: abc@aaa.abcd.com - accepted def@aaa.xyz.
RussianC3Fax-combine-AE_F_FM.book Page 147 Monday, July 14, 2003 2:36 PM 9. Key Operator Setting Key Operator Tools List You can program, change, or delete standard messages and auto documents. You can also set the line type for the machine connection, program various IDs (including a Polling ID), fax destinations, and many other items. In addition, you can check the number of documents transmitted and received.
RussianC3Fax-combine-AE_F_FM.book Page 148 Monday, July 14, 2003 2:36 PM Key Operator Setting Function name Description Box Setting By using SUB and SEP Codes p.172 “Box Settings” with these functions, you can send messages to another party's box, and retrieve messages stored in boxes. Reference Transfer Report Before using Transfer Request, you need this Transfer Report setting. p.182 “Transfer Report” Program Confidential ID Programs an ID required for Confidential communication. p.
RussianC3Fax-combine-AE_F_FM.book Page 149 Monday, July 14, 2003 2:36 PM Using Key Operator Settings Using Key Operator Settings Programming, Changing, and Deleting Standard Messages Use this function to program standard messages to be printed at the top of the first page of the original. It is useful for personalizing messages such as sending greetings. Note ❒ You can program three standard messages. You cannot change the “Confidential”, “Urgent”, “Please phone”, or “Copy to corres. section” messages.
RussianC3Fax-combine-AE_F_FM.book Page 150 Monday, July 14, 2003 2:36 PM Key Operator Setting B Press [Delete]. Note ❒ To delete another message, repeat from step A. ❒ To cancel a deletion, press [Do not Delete]. The display returns to that of step A. C Press [Exit]. D Press the {User Tools/Counter} } key. The standby display appears. Important ❒ When about one hour passes after power of the machine is turned off, all fax messages stored in memory are lost.
RussianC3Fax-combine-AE_F_FM.book Page 151 Monday, July 14, 2003 2:36 PM Using Key Operator Settings Storing a file A Select [*Not Programed]. B Enter a file name, and then press [OK]. F Place the original, and then select any scan settings you require. Reference “Entering Text”,General Settings Guide Changing a file A Select the file you want to change. The message “A file is already stored. If another file is stored, previous one will be deleted. Is it OK?” is shown. B Press [Store].
RussianC3Fax-combine-AE_F_FM.book Page 152 Monday, July 14, 2003 2:36 PM Key Operator Setting A Press the {User Tools/Counter}} key. B Press [Facsimile Features]. C Press [Key Operator Tools]. D Press [Store/Change/Delete Auto Document]. E Press [Delete], and then select the file you want to delete. Programming, Changing and Deleting a Scan Size When you select a scan size to scan a non-standard size original, two custom sizes are available (Program Size 1 and Program Size 2).
RussianC3Fax-combine-AE_F_FM.book Page 153 Monday, July 14, 2003 2:36 PM Using Key Operator Settings E Select [Program Size 1] or [Program Size 2]. F Enter a horizontal size using the number keys. Note ❒ Each time you press [mm] or [inch], the units switch between “mm” and “inch”. If you enter a length and change the units by pressing [mm] or [inch], the length is converted automatically according to the unit (fractions are rounded off).
RussianC3Fax-combine-AE_F_FM.book Page 154 Monday, July 14, 2003 2:36 PM Key Operator Setting B Press [Facsimile Features]. C Press [Key Operator Tools]. D Press[Program/Change/Delete Counters Scan Size]. E Press [Delete], and then select [Program Size 1] or [Program Size 2]. This function allows you to check the total number of pages transmitted and received on the display.
RussianC3Fax-combine-AE_F_FM.book Page 155 Monday, July 14, 2003 2:36 PM Using Key Operator Settings Forwarding This function allows you to have messages printed on the machine, and sent to a specified End Receiver. This is useful if, for example, you are visiting another office and would like a copy of your messages to be sent to that office. Preparation To use this function, set Forwarding under Reception Settings to ON (enable). See p.144 “Reception Settings”.
RussianC3Fax-combine-AE_F_FM.book Page 156 Monday, July 14, 2003 2:36 PM Key Operator Setting C Press [Key Operator Tools]. D Press [Forwarding]. E Press [ON]. Note ❒ If there is an End Receiver already programmed, a receiver name is shown. If you want to change the receiver, press [Receiver] and proceed to step F. ❒ To cancel Forwarding, press [Cancel] and proceed to step H. Quitting the forwarding function A Press the {User Tools/Counter}} key. B Press [Facsimile Features].
RussianC3Fax-combine-AE_F_FM.book Page 157 Monday, July 14, 2003 2:36 PM Using Key Operator Settings Note ❒ You can specify whether or not to print a Forwarding Mark in the User Parameters. See p.158 “User Parameters” (switch 02, bit 0). Memory Lock When you switch Memory Lock on, received messages are stored in memory and not printed automatically. When a message is received in the Memory Lock mode, the Confidential File (i) indicator blinks. To print this message, enter the Memory Lock ID.
RussianC3Fax-combine-AE_F_FM.book Page 158 Monday, July 14, 2003 2:36 PM Key Operator Setting B Press [Facsimile Features]. C Press [Key Operator Tools]. D Press [ECM]. E Select [ON] or [OFF], and ECM If part of a transmission fails because of a line problem, the lost data is automatically resent. For this function to work, the other machine must have ECM. You can turn this function on or off through the following procedure. then press [OK].
RussianC3Fax-combine-AE_F_FM.book Page 159 Monday, July 14, 2003 2:36 PM Using Key Operator Settings ❖ User Parameter List User Parameter Switches are outlined below.
RussianC3Fax-combine-AE_F_FM.
RussianC3Fax-combine-AE_F_FM.
RussianC3Fax-combine-AE_F_FM.book Page 162 Monday, July 14, 2003 2:36 PM Key Operator Setting F Select the bit number you want to Changing the User Parameters change. Important ❒ We recommend you print and keep a User Parameter list when you program or change a User Parameter. See p.163 “Printing the User Parameter list”. ❒ Do not change any bit switches other than those shown on the previous pages. A Press the {User Tools/Counter}} key.
RussianC3Fax-combine-AE_F_FM.book Page 163 Monday, July 14, 2003 2:36 PM Using Key Operator Settings Printing the User Parameter list Print this list to see the current User Parameter settings. However, only items of importance or often-used items are included in the list. A Press the {User Tools/Counter}} key. B Press [Facsimile Features]. C Press [Key Operator Tools]. D Press [Print List] next to [Parameter Setting]. Note ❒ To cancel printing a list, press [Cancel].
RussianC3Fax-combine-AE_F_FM.book Page 164 Monday, July 14, 2003 2:36 PM Key Operator Setting ❖ Using a Full agreement Destination to be programmed (Own Name) Number of programmed identifications NEW YORK BRANCH 3 HONG KONG BRANCH SYDNEY BRANCH ❖ Using a Partial agreement Destination to be programmed (Own Name) Number of programmed identifications BRANCH 1 Note ❒ You can program up to 30 wild cards (50 with the optional fax function upgrade unit).
RussianC3Fax-combine-AE_F_FM.book Page 165 Monday, July 14, 2003 2:36 PM Using Key Operator Settings ❒ You can select to receive only from programmed senders or receive only from senders other than those programed in “User Parameters”. See p. 158 “User Parameters” (switch 08, bit 2). ❒ If you select “OFF” for Authorized RX in “Initial Set Up”, the settings will be the same as the Reception Mode settings. See p.144 “Reception Settings”. ❒ You can change Special Senders in the same way as you program them.
RussianC3Fax-combine-AE_F_FM.book Page 166 Monday, July 14, 2003 2:36 PM Key Operator Setting Limitation ❒ If you program the same sender in Memory Lock and Forwarding, Forwarding is disabled. Programming/ changing Special Senders A Press the {User Tools/Counter}} key. Reception Reverse Printing Use this function to print the pages in reverse order. See p.99 “Reverse Order Printing”.
RussianC3Fax-combine-AE_F_FM.book Page 167 Monday, July 14, 2003 2:36 PM Using Key Operator Settings G Press [Full agreement] or [Partial agreement]. Forwarding A Select [Forwarding]. B Select [ON] or [OFF]. H Select the item you want to program. If you select [OFF], proceed to step D. Note ❒ You must select only the item you want to program. ❒ To cancel these settings, press [Cancel]. The display returns to that of step E.
RussianC3Fax-combine-AE_F_FM.book Page 168 Monday, July 14, 2003 2:36 PM Key Operator Setting Reception File Print Qty Print 2 Sided A Select [Reception File Print Qty]. B Press [Number of Sets]. A Select [Print 2 Sided]. B Select [ON] or [OFF], and then press [OK]. Note ❒ Selecting [Same as basic settings] will result in the same setting made for “2 Sided Print” of “Reception Settings”. See p.144 “Reception Settings”.
RussianC3Fax-combine-AE_F_FM.book Page 169 Monday, July 14, 2003 2:36 PM Using Key Operator Settings Paper Tray A Select [Paper Tray]. B Select the tray you want to use, and then press [OK]. Note ❒ Selecting [Same as basic settings] will result in the same set tin g m ad e fo r “Pape r Tray” of “Reception Settings”. See p.144 “Reception Settings”. B Press [Facsimile Features]. C Press [Key Operator Tools]. D Press [Program Special Sender]. E Press [Initial Set Up]. I Press [OK].
RussianC3Fax-combine-AE_F_FM.book Page 170 Monday, July 14, 2003 2:36 PM Key Operator Setting B Select [ON] or [OFF], and then press [OK]. The illustration shows the “Authorized RX” display as an example. Programming Bypass Tray Paper Size A Press [Bypass Tray Paper Size]. You can select a size from [Auto Detect], [Standard Size], or [Custom Size]. If you select [Auto Detect], proceed to steps B and G. If you select [Standard Size], proceed to steps B, C, and G.
RussianC3Fax-combine-AE_F_FM.book Page 171 Monday, July 14, 2003 2:36 PM Using Key Operator Settings ❒ Each time you press [mm] or [inch], the units switch between “mm” and “inch”. If you enter a length and change the units by pressing [mm] or [inch], it is converted automatically (fractions are rounded off). F Enter the horizontal size of the paper using the number keys, and then press [# #]. Note ❒ You can specify a horizontal size from 148 mm (5.9 inch) to 600 mm (23.7 inch).
RussianC3Fax-combine-AE_F_FM.book Page 172 Monday, July 14, 2003 2:36 PM Key Operator Setting Printing the Special Sender List A Press the {User Tools/Counter}} key. ❖ SUB Code and SEP Code SUB Code and SEP Code are IDs of up to 20 digits long and are composed of numbers, #, * or space. To use these codes, you must program a box and SUB Code or SEP Code beforehand. The other party can send messages to the box and retrieve stored messages from the box with the code.
RussianC3Fax-combine-AE_F_FM.book Page 173 Monday, July 14, 2003 2:36 PM Using Key Operator Settings Programming/changing Personal Boxes This section describes how to program Personal Boxes. You can store the following items: • Box name (required) Up to 20 characters long • SUB Code (required) Up to 20 characters long and can be composed of digits 0-9, “#”, “*”, and spaces (the first character cannot be a space).
RussianC3Fax-combine-AE_F_FM.book Page 174 Monday, July 14, 2003 2:36 PM Key Operator Setting Note ❒ To change a box already programmed, press it and proceed to step H. F Press [Personal Box]. G Enter a box name, and then press Programming a password A Press [Password]. B Enter a password, and then press [OK]. [OK]. Reference “Entering Text”, General Settings Guide H Enter a SUB Code. Note ❒ If you make a mistake, press [Clear] or the {Clear/Stop} } key before pressing [OK], and then try again.
RussianC3Fax-combine-AE_F_FM.book Page 175 Monday, July 14, 2003 2:36 PM Using Key Operator Settings Programming an End Receiver A Press [Receiver]. B Select a destination using the Quick Dial Table, and then press [OK]. J Press [OK]. K Press [Exit]. L Press the {User Tools/Counter}} key. C Press [Key Operator Tools]. D Press [Box Setting]. E Press [Delete], and then select the box you want to delete. With a programmed password A Enter a password using the number keys, and then press [OK].
RussianC3Fax-combine-AE_F_FM.book Page 176 Monday, July 14, 2003 2:36 PM Key Operator Setting Programming/changing Information Boxes This section describes how to set up an Information Box. You can store the following items: • Box name (required) Up to 20 characters long • SEP Code (required) Up to 20 characters long and can be composed of digits 0-9, “#”, “*”, and spaces (the first character cannot be a space).
RussianC3Fax-combine-AE_F_FM.book Page 177 Monday, July 14, 2003 2:36 PM Using Key Operator Settings Note ❒ To change the SEP Code, press [Clear] or the {Clear/Stop} } key, and then try again. To change the box name, press [Box Name], and then repeat the procedure from step G. I Press [Password]. Note ❒ If you do not want to program a password, proceed to step M. J Enter a password, and then press [OK].
RussianC3Fax-combine-AE_F_FM.book Page 178 Monday, July 14, 2003 2:36 PM Key Operator Setting E Press [Delete], and then select the Programming/changing Transfer Boxes With a programmed password This function turns your machine into a fax relay station. Documents sent with a SUB Code that matches the SUB Code programmed as a Transfer Box are received, and then relayed to a programmed receiver.
RussianC3Fax-combine-AE_F_FM.book Page 179 Monday, July 14, 2003 2:36 PM Using Key Operator Settings • Password (optional) Up to 20 characters long and can be composed of digits 0-9, “#”, “*”, and spaces (the first character cannot be a space). Note ❒ When programing a password, a mark is displayed in front of the Box name. • End Receiver (required) You can store five End Receivers (destinations to which messages will be forwarded) for each box.
RussianC3Fax-combine-AE_F_FM.book Page 180 Monday, July 14, 2003 2:36 PM Key Operator Setting G Enter a box name, and then press [OK]. Reference “Entering Text”, General Settings Guide H Enter a SUB Code. Note ❒ You can also specify End Receivers with Group Dials. ❒ Repeat from step A to specify another End Receiver. Programming a password If you do not want to program a password, proceed to step J. A Press [Password]. B Enter a password, and then press [OK].
RussianC3Fax-combine-AE_F_FM.book Page 181 Monday, July 14, 2003 2:36 PM Using Key Operator Settings ❒ If you want to change the password after pressing [OK], press [Change], and then perform from step B. D Press [OK]. With a programmed password A Enter a password using the number keys, and then press [OK]. J Press [OK]. K Press [Exit]. L Press the {User Tools/Counter}} key. The standby display appears. Deleting Transfer Boxes A Press the {User Tools/Counter}} key.
RussianC3Fax-combine-AE_F_FM.book Page 182 Monday, July 14, 2003 2:36 PM Key Operator Setting B Press [Facsimile Features]. C Press [Key Operator Tools]. D Press [Print List] next to “Box Setting”. E Press the {Start}} key. After printing the list, you can then start from step D. Note ❒ To cancel printing a list before pressing the {Start} } key, press [Cancel] or the {Clear/Stop} } key. The display returns to that of step D.
RussianC3Fax-combine-AE_F_FM.book Page 183 Monday, July 14, 2003 2:36 PM Using Key Operator Settings Programming a G3 Fax Number A Press [G3 Fax No.(Dir.)]. B Enter your facsimile number using the number keys, and then press [OK]. B Press [Facsimile Features]. C Press [Key Operator Tools]. D Press [Program Confidential ID]. E Enter an ID using the number keys, and then press [OK]. Note ❒ If you make a mistake, press [Clear] or the {Clear/Stop} } key. F Press [Exit].
RussianC3Fax-combine-AE_F_FM.book Page 184 Monday, July 14, 2003 2:36 PM Key Operator Setting A Press the {User Tools/Counter}} key. Programming a Memory Lock ID Program a Memory Lock ID to be entered before printing documents when the Memory Lock function is activated. B Press [Facsimile Features]. C Press [Key Operator Tools]. D Press [Program Polling ID]. E Enter an ID using the number keys and [A] to [F], and then press [OK].
RussianC3Fax-combine-AE_F_FM.book Page 185 Monday, July 14, 2003 2:36 PM Using Key Operator Settings Note ❒ If you make a mistake, press [Clear] or the {Clear/Stop} } key before pressing [OK], and then try again. ❒ To cancel programming an ID, press [Cancel]. The display returns to that of step D. E Press [Push Button Phone] or [Dial Phone (10PPS)] to select the line, and then press [OK]. F Press the {User Tools/Counter}} key. The standby display appears.
RussianC3Fax-combine-AE_F_FM.book Page 186 Monday, July 14, 2003 2:36 PM Key Operator Setting ❒ Documents saved on the hard disk are categorized as received and stored documents. For details about printing saved documents, see p.34 “Printing/Deleting Received and Stored Documents (Print Stored RX File)”. ❒ You cannot switch the setting if rec ei v ed d o c u m en ts h a v e be en stored on the hard disk. To switch the setting, print documents stored on the hard disk if necessary, and delete them.
RussianC3Fax-combine-AE_F_FM.book Page 187 Monday, July 14, 2003 2:36 PM Using Key Operator Settings Reception Report e-mail When a received document is stored, this report is sent to the e-mail address set as the destination for notification. Setting a User Code for Viewing Received and Stored Documents You can view and print documents received and saved on the hard disk using a Web browser. Specify whether or not a user code is entered to view saved documents.
RussianC3Fax-combine-AE_F_FM.
RussianC3Fax-combine-AE_F_FM.book Page 189 Monday, July 14, 2003 2:36 PM 10. Solving Operation Problems Reading Reports Error Report Power Failure Report An Error Report is printed if a message cannot be successfully sent or received. Possible causes include a problem with your machine or noise on the telephone line. If an error occurs during transmission, resend the original. If an error occurs during reception, ask the sender to resend the message.
RussianC3Fax-combine-AE_F_FM.book Page 190 Monday, July 14, 2003 2:36 PM Solving Operation Problems ❒ Turn off the main power switch before pulling out the plug. If you pull out the plug with the switch on, the hard disk and memory may be damaged and failure could result. ❒ Make sure that 100% is shown on the display before you unplug the machine. If a lower value is shown, some data is currently present in memory.
RussianC3Fax-combine-AE_F_FM.book Page 191 Monday, July 14, 2003 2:36 PM When an Error Occurs Using Internet Fax When an Error Occurs Using Internet Fax Error Mail Notification This machine sends the Error Mail Notification to the sender when it is unable to successfully receive a particular e-mail message. A “cc” of this notification is also sent to the administrator's e-mail address when one is specified. Note ❒ You can select to send Error Mail Notification with user parameters. See p.
RussianC3Fax-combine-AE_F_FM.
RussianC3Fax-combine-AE_F_FM.book Page 193 Monday, July 14, 2003 2:36 PM 11. Appendix Replacing the Stamp Cartridge The optional ADF is required. When the stamp becomes lighter, replace the cartridge. Note ❒ Use the cartridge specified for this machine. C Set a new cartridge. Insert the cartridge until the metal parts are no longer visible. ❒ Do not add ink to the cartridge by yourself. Neglecting this can cause ink leakage. ❒ Be sure not to dirty your fingers with ink from the cartridge.
RussianC3Fax-combine-AE_F_FM.book Page 194 Monday, July 14, 2003 2:36 PM Appendix Connecting the Machine to a Telephone Line and Telephone Connecting the Telephone Line To connect the machine to a telephone line, use a snap-in modular type connector. Important ❒ Make sure the connector is the correct type before you start. ❖ Where to connect the machine ZLBH040E 1. G3 interface unit connector 2. External telephone connector 3.
RussianC3Fax-combine-AE_F_FM.book Page 195 Monday, July 14, 2003 2:36 PM Connecting the Machine to a Telephone Line and Telephone Selecting the Line Type Select the line type to which the machine is connected. There are two types: tone and pulse dial. Note ❒ This function is not available in some areas. Select the line type using “Key Operator Settings”. See p.185 “Selecting Dial/Push Phone”.
RussianC3Fax-combine-AE_F_FM.book Page 196 Monday, July 14, 2003 2:36 PM Appendix Optional Equipment Fax Function Upgrade Unit JBIG compression for transmission/reception becomes possible. You can increase the maximum programmable numbers of the following functions. See p.202 “Maximum Values”. • Quick Dial • Memory Transmission file • Auto Document • Specific Sender • Program • Transmission Result • Box Expansion Memory (32MB: DIMM) This allows you to send fax messages at high resolution (Super Fine).
RussianC3Fax-combine-AE_F_FM.book Page 197 Monday, July 14, 2003 2:36 PM Specifications Specifications ❖ Fax Transmission and Reception Standard G3 Resolution G3: 8×3.85/mm•200×100 dpi (Standard), 8×7.7/mm•200×200 dpi (Detail), 8×15.4/mm•200×400 dpi (Fine), 16×15.
RussianC3Fax-combine-AE_F_FM.
RussianC3Fax-combine-AE_F_FM.book Page 199 Monday, July 14, 2003 2:36 PM Specifications Acceptable Types of Originals Make sure your originals are completely dry before setting them in the machine. Wet ink or correcting fluid from originals will mark the exposure glass and affect the resulting image.
RussianC3Fax-combine-AE_F_FM.book Page 200 Monday, July 14, 2003 2:36 PM Appendix Limitation ❒ There may be a difference in the size of the image when it is printed at the destination. ❒ If you place an original larger than A3, 11"×17" on the exposure glass, only an A3, 11"×17" area is scanned. Note ❒ Even if an original is correctly placed on the exposure glass or in the ADF, a margin of 3 mm (0.1") around each edge of the original may not be sent.
RussianC3Fax-combine-AE_F_FM.book Page 201 Monday, July 14, 2003 2:36 PM Specifications - Maximum scan area The maximum scan area is shown below: • Memory Transmission: 297×1,200 mm/11"×47" (W×L) from the ADF • Immediate Transmission: 297×1,200mm/11"×47" (W×L) from the ADF Note ❒ During Immediate Transmission, the length of the scanning range can become narrower than 1,200 mm (47"), depending on the character size as well as the settings on the destination machine.
RussianC3Fax-combine-AE_F_FM.book Page 202 Monday, July 14, 2003 2:36 PM Appendix Maximum Values The following list contains the maximum value for each item. Note ❒ The maximum number of pages that can be stored or transmitted may decrease depending on the contents of documents.
RussianC3Fax-combine-AE_F_FM.
RussianC3Fax-combine-AE_F_FM.
RussianC3Fax-combine-AE_F_FM.
RussianC3Fax-combine-AE_F_FM.
RussianC3Fax-combine-AE_F_FM.
RussianC3Fax-combine-AE_F_FM.
Paper type: OK Prince Eco G100(55kg), Paper Thickness=80 µm // Pages in book=216 // Print scale=81% Gap (when printed at 81% scale) = Pages in book × Paper thickness / 2 = 8.640000 mm Introduction This manual describes detailed instructions on the operation and notes about the use of this machine. To get maximum versatility from this machine all operators are requested to read this manual carefully and follow the instructions. Please keep this manual in a handy place near the machine.
Paper type: OK Prince Eco G100(55kg), Paper Thickness=80 µm // Pages in book=216 // Print scale=81% Gap (when printed at 81% scale) = Pages in book × Paper thickness / 2 = 8.
Paper type: Wood Free 80g/m2, Paper Thickness=100 µm // Pages in book=48 // Print scale=81% Gap (when printed at 81% scale) = Pages in book × Paper thickness / 2 = 0 mm Printer/Scanner Unit Type 2027 Operating Instructions Printer Reference 1 Printed in The Netherlands GB GB B577-8600 Printer/Scanner Unit Type 2027 Operating Instructions Printer Reference 1 1 Getting Started 2 Preparing to Print For safe and correct use of this machine, please be sure to read the Safety Information in the "General
Paper type: Wood Free 80g/m2, Paper Thickness=100 µm // Pages in book=48 // Print scale=81% Gap (when printed at 81% scale) = Pages in book × Paper thickness / 2 = 0 mm Introduction This manual describes detailed instructions on the operation and notes about the use of this machine. To get maximum versatility from this machine all operators are requested to read this manual carefully and follow the instructions. Please keep this manual in a handy place near the machine.
RussianC3-GB-Pref1-F1_FM.book Page i Friday, June 13, 2003 2:16 PM TABLE OF CONTENTS Manuals for This Machine .....................................................................................1 How to Read This Manual .....................................................................................3 1. Getting Started Control Panel..........................................................................................................5 Display Panel ................................................
RussianC3-GB-Pref1-F1_FM.
RussianC3-GB-Pref1-F1_FM.book Page 1 Friday, June 13, 2003 2:16 PM Manuals for This Machine The following manuals describe the operational procedures of this machine. For particular functions, see the relevant parts of the manual. Note ❒ Manuals provided are specific to machine type. ❒ Adobe Acrobat Reader is necessary to view the manuals as a PDF file.
RussianC3-GB-Pref1-F1_FM.book Page 2 Friday, June 13, 2003 2:16 PM ❖ Manuals for DeskTopBinder V2 Lite DeskTopBinder V2 Lite is a utility included on the CD-ROM labeled “Scanner Driver & Document Management Utilities”. • DeskTopBinder V2 Lite Setup Guide (PDF file - CD-ROM2) Describes installation of, and the operating environment for DeskTopBinder V2 Lite in detail. This guide can be displayed from the [Setup] dialog box when DeskTopBinder V2 Lite is installed.
RussianC3-GB-Pref1-F1_FM.book Page 3 Friday, June 13, 2003 2:16 PM How to Read This Manual Symbols In this manual, the following symbols are used: R WARNING: This symbol indicates a potentially hazardous situation which, if instructions are not followed, could result in death or serious injury. R CAUTION: This symbol indicates a potentially hazardous situation which, if instructions are not followed, may result in minor or moderate injury, or damage to property.
RussianC3-GB-Pref1-F1_FM.
RussianC3-GB-Pref1-F1_FM.book Page 5 Friday, June 13, 2003 2:16 PM 1. Getting Started Control Panel 13 12 ZKQH030E 1. Indicators 4. {Energy Saver}} key Displays errors and machine status. L: Service call indicator x: Misfeed indicator M: Open Cover indicator d: Add Staple indicator D: Add Toner indicator B: Load Paper indicator See "Control Panel", General Settings Guide. Press to switch to and from Energy Saver mode. 2.
RussianC3-GB-Pref1-F1_FM.book Page 6 Friday, June 13, 2003 2:16 PM Getting Started 9. {#}} key Press after entering a value. 10. Number keys Press to enter a value for various settings. 1 11. Function keys Press to switch between the “Copy”, “Document Server”, “Facsimile”, “Printer”, and “Scanner” screens. The indicator for the selected function lights. 12. Function status indicators These show the status of the above functions: • Green: the function is active.
RussianC3-GB-Pref1-F1_FM.book Page 7 Friday, June 13, 2003 2:16 PM Control Panel Display Panel This section describes configuration using the display panel when the printer function is selected. 1 Important ❒ The machine switches to offline when you make settings when the machine is online. After you complete the setting, the machine switches to online automatically. ❒ If you make a setting when the machine is offline, it will stay offline afterward.
RussianC3-GB-Pref1-F1_FM.book Page 8 Friday, June 13, 2003 2:16 PM Getting Started Note ❒ When the power is turned on, the copier display is shown. This is a factory default. This initial setting can be changed. See “User Tools (System Settings)”, General Settings Guide. ❒ If the machine cannot be switched offline, select [Printer] for [Print Priority] on [General Features] in the System Settings. For details about the setting, see “User Tools (System Settings)”, General Settings Guide.
RussianC3-GB-Pref1-F1_FM.book Page 9 Friday, June 13, 2003 2:16 PM 2. Preparing to Print This section gives instructions for connecting the machine and computer, configuring the machine, and installing software. ❖ When operating the machine with a parallel connection, USB connection, or SCSI print (IEEE 1394) connection • Connect the machine and computer using a parallel cable, a USB cable, or an IEEE 1394 (SCSI print) cable. Reference For more information, see p.10 “Connecting the Machine”.
RussianC3-GB-Pref1-F1_FM.book Page 10 Friday, June 13, 2003 2:16 PM Preparing to Print Preparing the Machine Connecting the Machine Reference For information about connection using Ethernet and wireless LAN, see "Confirming the Connection", Network Guide. 2 For information about connection using BluetoothTM, see the manual that comes with the optional Bluetooth interface unit. Requirements Before using this machine, make sure all environmental and electrical requirements are met.
RussianC3-GB-Pref1-F1_FM.book Page 11 Friday, June 13, 2003 2:16 PM Preparing the Machine ❖ SCSI Print (IEEE 1394) Connection Follow the procedure below to connect the machine to the host computer using a USB interface cable. A Connect the USB 2.0 interface cable to the USB port on the right side of the machine's back cover. 2 ZKPS030J C Plug the other end of the cable into the connector on the computer’s interface. D Turn on the machine's main power switch. E Turn on the computer.
RussianC3-GB-Pref1-F1_FM.book Page 12 Friday, June 13, 2003 2:16 PM Preparing to Print Setting Paper on the Bypass Tray This section gives instructions for setting paper on the bypass tray. Use the bypass tray to print onto OHP transparencies, labels, thick paper, and envelopes that cannot be loaded in the paper tray. 2 Reference For details about setting paper in the regular paper tray, see General Settings Guide. Note ❒ When loading letterhead paper, pay attention to its orientation.
RussianC3-GB-Pref1-F1_FM.book Page 13 Friday, June 13, 2003 2:16 PM Preparing the Machine C Gently insert paper face down into the bypass tray until the beeper sounds. ZKPH010J 1. Extender 2. Paper guides Note ❒ The beeper will not sound if it is turned off. Gently insert paper until it stops. ❒ Do not stack paper over the limit mark, otherwise a skewed image or misfeeds might occur. ❒ Open out the extender to support paper sizes larger than A4 L, 81/2"×11" L.
RussianC3-GB-Pref1-F1_FM.book Page 14 Friday, June 13, 2003 2:16 PM Preparing to Print E Select the paper size. Note ❒ Press [U UPrev.] or [T TNext.] to scroll through the list. ❒ When printing onto thick paper or OHP transparencies, select paper type. For details, see p.14 “Setting thick paper or OHP transparencies”. F Press [OK]. G Press the {User Tools/Counter} } key. 2 Setting custom size paper Note ❒ Custom sizes can also be set using the printer driver.
RussianC3-GB-Pref1-F1_FM.book Page 15 Friday, June 13, 2003 2:16 PM Preparing the Machine D Press [TTNext.] to scroll through the list. E Press [Paper Type: Bypass tray]. 2 F Select [OHP] or [Thick Paper] G Press [OK]. The paper type selected is displayed. H Press the {User Tools/Counter}} key. Note ❒ The settings made will remain valid until they are reset again. After printing on OHP transparencies or thick paper, make sure to clear settings for the next user.
RussianC3-GB-Pref1-F1_FM.book Page 16 Friday, June 13, 2003 2:16 PM Preparing to Print Installing the Software This manual assumes you are familiar with general Windows procedures and practices. If you are not, see the operating instructions that come with Windows for details. The procedure for installing the printer driver depends on the connection with the computer. With a parallel or Ethernet connection, Quick Install is also available.
RussianC3-GB-Pref1-F1_FM.
RussianC3-GB-Pref1-F1_FM.book Page 18 Friday, June 13, 2003 2:16 PM Preparing to Print Important ❒ If your system is Windows NT 4.0, we recommend that you upgrade the Windows NT 4.0 operating system to Service Pack 4 or later before installing the PCL 6/5e or RPCS™ printer drivers. Contact your Windows retailer for more information about latest versions. 2 Note ❒ When the machine is connected to the computer using the IEEE 1394 interface or the USB 2.0 interface, Quick Install cannot be used. See p.
RussianC3-GB-Pref1-F1_FM.book Page 19 Friday, June 13, 2003 2:16 PM Installing the Software • Windows XP Professional On the [Start] menu, click [Printers and Faxes]. The [Printers and Faxes] window appears. Rightclick the machine icon, and then click [Rename]. • Windows XP Home Edition On the [Start] menu, click[Control Panel]. Click [Printers and Other Hardware], and then click [Printers and Faxes]. The [Printers and Faxes] window appears. Rightclick the machine icon, and then click [Rename].
RussianC3-GB-Pref1-F1_FM.book Page 20 Friday, June 13, 2003 2:16 PM Preparing to Print A Quit all applications running. B Insert the CD-ROM into the CDROM drive. Auto Run will start the installer. C Select a language for the interface language, and then click [OK].
RussianC3-GB-Pref1-F1_FM.book Page 21 Friday, June 13, 2003 2:16 PM Installing the Software Note ❒ NetBEUI cannot be used under Windows XP. ❒ Machines that respond to a broadcast from the computer will be displayed. To print to a machine not listed here, click [Specify Address], and then enter t h e N e t B E U I a d d r e ss . Confirm the NetBEUI address on the network is on the configuration page.
RussianC3-GB-Pref1-F1_FM.book Page 22 Friday, June 13, 2003 2:16 PM Preparing to Print • For the RPCS™ printer driver, click the [Printer Configuration] button on the [Print Settings] tab in the printer properties dialog box. Click the [User Code] button. A dialog box appears. Enter the user code in the dialog box. 2 Note ❒ When using the RPCS™ printer driver on Windows 95/98/Me, the user code cannot be changed once it is entered.
RussianC3-GB-Pref1-F1_FM.book Page 23 Friday, June 13, 2003 2:16 PM Installing the Software Setting Up Options - PCL 6/5e and RPCS If the machine has options installed, you should set the options using the printer driver. Limitation ❒ Under Windows 2000/XP, changing printer settings requires Manage Printers permission. Members of the Administrators and Power Users groups have Manage Printers permission by default. When you set up options, log on using an account that has Manage Printers permission.
RussianC3-GB-Pref1-F1_FM.book Page 24 Friday, June 13, 2003 2:16 PM Preparing to Print C On the [File] menu, click [Properties]. The printer properties dialog box appears. Note ❒ If the following message appears “Configure installed accessories in the [Accessories] tab of [Printer Configuration], which will open next.”, click [OK], and then proceed to step E. 2 D Click the [Change Accessories] tab.
RussianC3-GB-Pref1-F1_FM.book Page 25 Friday, June 13, 2003 2:16 PM Installing the Software G Select the model of the machine you are using, and then click [Next]. H In the [Available ports:] box, click [Printer Port], and then click [Next]. I Change the name of the machine if you want to, and then click [Next]. Note ❒ Click [Yes] if you want to set the machine as the default printer. J Follow the instructions on the screen.
RussianC3-GB-Pref1-F1_FM.book Page 26 Friday, June 13, 2003 2:16 PM Preparing to Print C Select a language for the interface language, and then click [OK].
RussianC3-GB-Pref1-F1_FM.book Page 27 Friday, June 13, 2003 2:16 PM Installing the Software Note ❒ In Windows XP Professional, click the [Printers and Faxes] window on the [Start] menu. ❒ In Windows XP Home Edition, access the [Printers and Faxes] window by clicking the [Start] button on the taskbar, click [Control Panel], [Printers and Other Hardware], and then click [Printers and Faxes]. B Click the icon of the machine you want to use. C On the [File] menu, click [Properties].
RussianC3-GB-Pref1-F1_FM.book Page 28 Friday, June 13, 2003 2:16 PM Preparing to Print D Click [PostScript 3 Printer Driver]. Add Printer Wizard starts. E Confirm that the [My Computer] option is selected, and then click [Next]. A dialog box for selecting the printer port appears. 2 F Select the check box of the port you want to use, and then click [Next]. A dialog box for selecting the printer appears. G Select the model of the machine you are using, and then click [Next].
RussianC3-GB-Pref1-F1_FM.book Page 29 Friday, June 13, 2003 2:16 PM Installing the Software - Bidirectional transmission When bidirectional transmission is enabled, information such as paper size and feed orientation is automatically sent to the computer. You can also check machine status from your computer. • Bidirectional transmission is supported under Windows 95/98/Me, Windows 2000/XP, and Windows NT 4.0.
RussianC3-GB-Pref1-F1_FM.book Page 30 Friday, June 13, 2003 2:16 PM Preparing to Print ❖ When connecting with IEEE 1394 • The port on the optional IEEE 1394 interface board and the IEEE 1394 port on the computer are connected using an interface cable (Windows 2000/XP, Windows Me). 2 Note ❒ [SCSI print (SBP-2)] must be set to Active and [Bidirectional SCSI print] must be set to ON in [IEEE 1394] on the [Interface Settings] tab in the machine's System Settings.
RussianC3-GB-Pref1-F1_FM.book Page 31 Friday, June 13, 2003 2:16 PM Installing the Software K Double-click the [Printer Descriptions] folder in the [Mac OS 8 and 9] folder. L Double-click [Disk 1] in the folder of the language you use. M Drag the PPD file into [Printer De- scriptions] in [Extensions] in [System Folder]. N Restart the Macintosh.
RussianC3-GB-Pref1-F1_FM.book Page 32 Friday, June 13, 2003 2:16 PM Preparing to Print D Double-click the [Mac OS 8 and 9] folder. H Restart the Macintosh. Reference For information about installing Printer Utility for Mac, see PostScript 3 Unit Type 2027 Operating Instructions Supplement. E Double-click the [ATM] folder. F Double-click the [ATM 4.6.2 installer] icon. G Follow the instructions on screen. H Restart the Macintosh. 2 Note ❒ Make sure to restart the computer.
RussianC3-GB-Pref1-F1_FM.book Page 33 Friday, June 13, 2003 2:16 PM Installing the Software Setting up the PPD file A Run Print Center. B Click [Add Printer]. Note ❒ Select [AppleTalk] in the first pop-up menu. ❒ If the zone has been set, select the zone in the second pop-up menu. C Select the PPD file for the model you are using from the [Printer Model:] pop-up menu. D Click [Add].
RussianC3-GB-Pref1-F1_FM.book Page 34 Friday, June 13, 2003 2:16 PM Preparing to Print D Insert the CD-ROM provided into the CD-ROM drive. Note ❒ When Auto Run starts, click [Exit]. ❒ If you want to disable Auto Run, press {Shift} } when inserting the CD-ROM into the drive and keep it pressed until the computer completes transmission to the drive. 2 E Select the drive where the printer driver is located according to your operating system, and then click [Next].
RussianC3-GB-Pref1-F1_FM.book Page 35 Friday, June 13, 2003 2:16 PM Installing the Software A Install the printer driver by refer- ring to the instructions for installation.
RussianC3-GB-Pref1-F1_FM.book Page 36 Friday, June 13, 2003 2:16 PM Preparing to Print 2 ❒ SCSI print using the optional IEEE 1394 interface board is not supported by Windows 95/98/Me, or Windows NT 4.0. If the “plug and play” function starts, click [Cancel] in the [New Hardware Found] or [Device Driver Wizard] dialog box. B Click [Next].
RussianC3-GB-Pref1-F1_FM.book Page 37 Friday, June 13, 2003 2:16 PM Installing the Software J Follow the instructions on the screen. -Disabling the Device Note ❒ When installation is complete, the printer with its port directed to “1394_00n” appears in the [Printers] folder. (“n” is the number of printers connected.
RussianC3-GB-Pref1-F1_FM.book Page 38 Friday, June 13, 2003 2:16 PM Preparing to Print D When “Driver Files Search Results” appears, click [Disable the device. The Add/Remove Hardware Wizard in the control panel can be used to complete the driver installations.], and then click [Finish].
RussianC3-GB-Pref1-F1_FM.book Page 39 Friday, June 13, 2003 2:16 PM Installing the Software Installing SmartNetMonitor for Client/Admin Limitation ❒ If your operating system is Windows 2000/XP or Windows NT 4.0, installing software using Auto Run requires Administrator permission. When you install a printer driver using Auto Run, log on using an account that has Administrator permission. A Quit all applications running. B Insert the CD-ROM into the CDROM drive. Auto Run will start the installer.
RussianC3-GB-Pref1-F1_FM.book Page 40 Friday, June 13, 2003 2:16 PM Preparing to Print Using Adobe PageMaker Version 6.0, 6.5, or 7.0 If you use the machine under Windows 95/98/Me, Windows 2000/XP, or Windows NT 4.0 with Adobe PageMaker, you need to copy the PPD file to the PageMaker folder. The PPD file is the file with the extension “.ppd” in the folder “DRIVERS\PS\WIN9X_ME\(Language)\ DISK1\” on the CD-ROM. The [WIN9X_ME] folder, inside the [PS] folder is for Windows 95/98/Me.
RussianC3-GB-Pref1-F1_FM.book Page 41 Friday, June 13, 2003 2:16 PM Software and Utilities Included on the CD-ROM Software and Utilities Included on the CDROM There are two CD-ROMs that come with the printer option of this machine. ❖ The Printer/Scanner Unit Type 2027 package contains the following CD-ROMs: • Printer Drivers and Utilities • Operating Instructions for Printer/Scanner The CD-ROM labeled “Printer Drivers and Utilities” is mainly used for machine printer functions.
RussianC3-GB-Pref1-F1_FM.book Page 42 Friday, June 13, 2003 2:16 PM Preparing to Print Note ❒ Some applications may require installation of the PCL 5e printer driver. In this case, you can install PCL 5e without having to install PCL 6. See p.19 “Installing the PCL 6/5e and RPCS™ Printer Driver” 2 ❖ RPCS™ printer driver The RPCS™ printer drivers are included on the CD-ROM that comes with this machine. This printer driver allows the computer to communicate with the machine via a printer language.
RussianC3-GB-Pref1-F1_FM.book Page 43 Friday, June 13, 2003 2:16 PM Software and Utilities Included on the CD-ROM ❖ Acrobat Reader This utility allows you to read PDF files (Portable Document Format). Note ❒ Documentation about using the machine is included on the CDROM in PDF format. See Acrobat Reader online Help for more information about using Acrobat Reader. 2 ❖ Printer Utility for Mac This utility allows users to download and manage a variety of fonts as well as manage printers.
RussianC3-GB-Pref1-F1_FM.
RussianC3-GB-Pref1-F1_FM.book Page 45 Friday, June 13, 2003 2:16 PM Q Quick Install, 17 R RPCS, 42 Windows 2000/XP, installing, 19 Windows 95/98/Me, installing, 19 Windows NT 4.
RussianC3-GB-Pref1-F1_FM.
Paper type: Wood Free 80g/m2, Paper Thickness=100 µm // Pages in book=48 // Print scale=81% Gap (when printed at 81% scale) = Pages in book × Paper thickness / 2 = 0 mm Introduction This manual describes detailed instructions on the operation and notes about the use of this machine. To get maximum versatility from this machine all operators are requested to read this manual carefully and follow the instructions. Please keep this manual in a handy place near the machine.
Paper type: Wood Free 80g/m2, Paper Thickness=100 µm // Pages in book=48 // Print scale=81% Gap (when printed at 81% scale) = Pages in book × Paper thickness / 2 = 0 mm Printer/Scanner Unit Type 2027 Operating Instructions Printer Reference 1 Printed in The Netherlands GB GB B577-8600 Printer/Scanner Unit Type 2027 Operating Instructions Printer Reference 1 1 Getting Started 2 Preparing to Print For safe and correct use of this machine, please be sure to read the Safety Information in the "General
Printer/Scanner Unit Type 2027 Operating Instructions Printer Reference 2 1 Setting Up the Printer Driver and Canceling a Print Job 2 Using the Document Server 3 Sample Print/Locked Print 4 Troubleshooting 5 Printer Features 6 Appendix For safe and correct use of this machine, please be sure to read the Safety Information in the "General Settings Guide" before you use it.
Introduction This manual describes detailed instructions on the operation and notes about the use of this machine. To get maximum versatility from this machine all operators are requested to read this manual carefully and follow the instructions. Please keep this manual in a handy place near the machine. Important Contents of this manual are subject to change without prior notice.
TABLE OF CONTENTS Manuals for This Machine .....................................................................................1 How to Read This Manual .....................................................................................3 1. Setting Up the Printer Driver and Canceling a Print Job Accessing Printer Properties................................................................................ 5 Windows 95/98/Me - Accessing Printer Properties ....................................................
6. Appendix Finisher ................................................................................................................. 51 Staple ....................................................................................................................52 Staple Position .........................................................................................................52 Stapling Precautions ................................................................................................
Manuals for This Machine The following manuals describe the operational procedures of this machine. For particular functions, see the relevant parts of the manual. Note ❒ Manuals provided are specific to machine type. ❒ Adobe Acrobat Reader is necessary to view the manuals as a PDF file. ❒ Two CD-ROMs are provided: • CD-ROM 1“Operating Instructions for Printer/Scanner” • CD-ROM 2“Scanner Driver & Document Management Utilities” ❖ General Settings Guide Provides an overview of the machine.
❖ Manuals for DeskTopBinder V2 Lite DeskTopBinder V2 Lite is a utility included on the CD-ROM labeled “Scanner Driver & Document Management Utilities”. • DeskTopBinder V2 Lite Setup Guide (PDF file - CD-ROM2) Describes installation of, and the operating environment for DeskTopBinder V2 Lite in detail. This guide can be displayed from the [Setup] dialog box when DeskTopBinder V2 Lite is installed.
How to Read This Manual Symbols In this manual, the following symbols are used: R WARNING: This symbol indicates a potentially hazardous situation which, if instructions are not followed, could result in death or serious injury. R CAUTION: This symbol indicates a potentially hazardous situation which, if instructions are not followed, may result in minor or moderate injury, or damage to property. * The statements above are notes for your safety.
4
1. Setting Up the Printer Driver and Canceling a Print Job Accessing Printer Properties Windows 95/98/Me Accessing Printer Properties Changing default settings A On the [Start] menu, point to [Settings], and then click [Printers]. The [Printers] window appears. B Click the icon of the machine whose default you want to change. C On the [File] menu, click [Proper- ties]. The printer properties dialog box appears. D Make the settings you require, and then click [OK].
Setting Up the Printer Driver and Canceling a Print Job Windows 2000/XP - Accessing Printer Properties 1 Changing default settings - Printer properties Limitation ❒ Changing machine settings requires Manage Printers permission. Members of Administrators and Power Users groups have Manage Printers permission by default. When you set up options, log on using an account that has Manage Printers permission. A On the [Start] menu, point to [Settings], and then click [Printers]. The [Printers] window appears.
Accessing Printer Properties D Make the settings you require, and then click [OK]. Note ❒ Settings you make here are used as default for all applications. Windows NT 4.0 - Accessing Printer Properties 1 Changing default settings - Printer properties Making settings from an application To make settings for a specific application, open the [Print] dialog box from that application. The following example describes how to make settings for the WordPad application that comes with Windows 2000/XP.
Setting Up the Printer Driver and Canceling a Print Job Changing the default settings - Default document properties Limitation ❒ Changing machine settings requires Full Control access permission. Members of the Administrators, Server Operators, Print Operators, and Power Users groups have Full Control permission by default. When you set up options, log on using an account that has Full Control permission. 1 A On the [Start] menu, point to [Settings], and then click [Printers].
Accessing Printer Properties Macintosh - Setting Up for Printing Making paper settings from an application A Open the file you want to print. B On the [File] menu, click [Page Setup]. The [AdobePS Page Setup] dialog box appears. C Make sure the machine you want Setting up for printing from an application A Open the file you want to print. B On the [File] menu, click [Print]. 1 The [Printer Features] dialog box appears. C Make sure the machine is selected in the [Printer:] box.
Setting Up the Printer Driver and Canceling a Print Job Canceling a Print Job Windows - Canceling a Print Job 1 F Press [Reset Current Job] or [Reset All Jobs]. A Double-click the printer icon on the Windows taskbar. A window appears, showing all print jobs currently queued for printing. Check the current status of the job you want to cancel. B Select the name of the job you want to cancel. C On the [Document] menu, click [Cancel Printing].
Canceling a Print Job Note ❒ You cannot stop printing data that has already been processed. For this reason, printing may continue for a few pages after you press [Job Reset]. ❒ A print job containing a large volume of data may take considerable time to stop. Macintosh - Canceling a Print Job A Double-click the printer icon on the desktop. A window appears, showing all print jobs currently queued for printing. Check the current status of the job you want to cancel.
Setting Up the Printer Driver and Canceling a Print Job 1 12
2. Using the Document Server Accessing the Document Server The Document Server enables you to store documents on the machine's hard disk, allowing you to edit and print as and when you want. Limitation ❒ Applications with their own drivers, such as PageMaker, do not support this function. Reference For more information about Document Server functions, see General Settings Guide. For information about how to access Document Server from a client, see the printer driver Help.
Using the Document Server 2 14
3. Sample Print/Locked Print Sample Print Use this function to print only the first set of a multiple-set print job. After you have checked the result, remaining sets can be printed or canceled using the machine's control panel. This can reduce misprints due to mistakes in content or settings. Note ❒ If the application has a collate option, make sure it is not selected before sending a print job. By default, sample print jobs are automatically collated by the printer driver.
Sample Print/Locked Print C On the machine's control panel, press the {Printer} } key to display the Printer screen. E Select the file you want to print by pressing it. Note ❒ Press [U UPrev.] or [T TNext.] to scroll through the list. ❒ Only one file can be selected at a time. F Press [Change Set Qty.] to change the number of sets to be printed. 3 ZFFH350E D Press [View Sample Print jobs]. If you do not want to change the set quantity, proceed to step H.
Sample Print I Press [Yes]. The remaining sets are printed. Note ❒ Press [No] to cancel printing. ❒ When printing is completed, the stored file will be deleted. ❒ If printing is stopped by pressing [Job Reset] after it has started, the file will be deleted. ❒ If there is a print job outstanding, this will be printed before the sample print job.
Sample Print/Locked Print Note ❒ Press [U UPrev.] or [T TNext.] to scroll through the error files. ❒ Press [Exit] after checking the log. ❒ To print files that appear in the error log, resend them after stored files have been printed or deleted.
Locked Print Locked Print Use this function to maintain privacy when printing confidential documents on the machine over a shared network. Usually, it is possible to print data using the display panel once it is stored in this machine. When using Locked Print, it is not possible to print unless a password is entered on the machine's display panel. Your confidential documents will be safe from being viewed by other people.
Sample Print/Locked Print D Press [View Locked Print jobs]. Note ❒ A confirmation screen will appear if the password is not entered correctly. Press [OK] to enter the password again. H Press [Yes]. A list of stored locked print files appears. 3 The locked file is printed. Note ❒ Press [No] to cancel printing. ❒ If printing is stopped by pressing [Job Reset] after it has started, the file will be deleted. The following items also appear: • User ID: The user ID set up by the printer driver.
Locked Print F Press [Yes]. After the file has been deleted, the file list screen returns. Note ❒ If you do not want to delete the file, press [No]. ❒ If you forget your password, select [Unlock] from [V VTemporarily Unlock Files] in [Password Management for Stored Files] on the [Key Operator Tools] tab of the System Settings screen. With this setting, the password screen is not displayed in the procedure above. For more information about [Display Password with Stored File], see General Settings Guide.
Sample Print/Locked Print Form Feed This section gives instructions for operating the machine when there is no tray for the selected paper size or type, or when paper loaded in the machine has run out.
Form Feed Canceling Form Feed A Press [Reset]. Delete the stored print job, and then cancel form feed. B Press [Reset Current Job] or [Reset All Jobs]. • [Reset Current Job]: cancels the print job currently being processed. • [Reset All Jobs]: cancels all jobs in the print queue. • [Resume Printing]: resumes printing jobs. A confirmation message appears. C Press [Yes] to cancel the print job. Note ❒ Press [No] to return to the previous display.
Sample Print/Locked Print 3 24
4. Troubleshooting Error & Status Messages on the Display Panel This section describes the principal messages that appear on the panel display. If a message not described here appears, act according to the message. Reference Before turning the main power off, see ‘Turning On the Power’, General Settings Guide. ❖ Status messages Message Status Hex Dump Mode In Hex Dump mode, the machine receives data in hexadecimal format. Turn off the machine after printing, and then turn back on.
Troubleshooting Messages/Second messages Causes Solutions DIMM has a problem. An error has occurred in the DIMM inside the machine. Contact your sales or service representative. Driver setting error. (Memory) There is an error in the downloaded font(s). Reset the parameter for downloading fonts. Insufficient memory or memory settings for the printer driver may not match memory actually installed. Specify correct memory capacity on the [Change Accessories...] tab in the RPCS™ printer driver.
Error & Status Messages on the Display Panel Messages/Second messages Causes Solutions Exceeded max. pages. Collate is incomplete. The maximum number of pag- Turn off the main power es has been exceeded for colla- switch, and back on again. Retion. duce the number of pages to be printed. If the message appears again, contact your sales or service representative. Finisher is in use for another function. Please wait.
Troubleshooting Messages/Second messages 4 Causes Solutions NV-RAM has a problem. An error has occurred in the optional memory unit. Turn off the main power switch, and back on again. If the message appears again, call your sales or service representative. Output tray has been changed. The output tray has been changed because of the paper size limitation of the selected tray. Select the correct output tray. Paper in duplex unit. Open cover and remove paper. There is a misfeed in the duplex unit.
Error & Status Messages on the Display Panel Messages/Second messages Causes Solutions Selected paper tray is in use for another function. Please wait. The specified paper tray is in use by another function, such as the copier function. Wait until the other function has finished using the specified paper tray. Shift tray has a problem. Call service representative. ^ A malfunction occurs when using the shift function. Contact your sales or service representative. Staple has been cancelled.
Troubleshooting The Machine Does Not Print Possible Cause Is the power on? Solutions Check the cable is securely plugged into the power outlet and the machine. Turn on the main power switch. 4 Is the machine online? If not, press [f fOnline] on the display panel. Does the printer function status indicator stay red? If so, check the error message on the display panel and take required action.
The Machine Does Not Print Possible Cause Solutions When using wireless LAN, is the access point correctly set? Check access point settings when in infrastructure mode. Depending on the access point, client access may be limited by MAC address. Also, check there are no problems in transmission between access point and wired clients, and between access point and wireless clients.
Troubleshooting Problem Is the Data In indicator blinking or lit after starting the print job? Solutions If not, data is not being sent to the machine. ❖ When the machine is connected to the computer using the interface cable Check the machine port settings are correct. For parallel port connection, port LPT1 or LPT2 should be set. • Windows 95/98/Me A Click the [Start] button, point to [Settings], and then click [Printers]. B Click the icon of the machine. On the [File] menu, click [Properties].
The Machine Does Not Print Problem Is the Data In indicator blinking or lit after starting the print job? Solutions ❖ Network connection Contact your network administrator.
Troubleshooting Other Printing Problems Problem Causes and Solutions The print on the entire page is faded. If [Toner Saving] is selected on the [Print Quality] tab in the printer driver, the entire page will be faded when printed. Print is smudges. Settings for thick paper have not been made when printing on thick paper. See the printer driver Help. • PCL 6/5e and PostScript 3 Select [Thick] in the [Type:] list on the [Paper] tab.
Other Printing Problems Problem Causes and Solutions When using Windows 95/98/Me, Windows 2000/XP, or Windows NT 4.0, either combined printing or booklet print does not come out as expected. Make sure the application's paper size and orientation settings match those of the printer driver. If a different paper size and orientation are set, select the same size and orientation. When using Windows 95/98/Me, Windows 2000/XP, or Windows NT 4.0, Auto Reduce/Enlarge print does not come out as expected.
Troubleshooting Problem It takes a long time to complete a print job. Causes and Solutions Photographs and other data intensive pages take a long time for the machine to process, so simply wait when printing such data. Changing the following settings with the printer driver may help speed up printing: • PCL 6/5e Select the lowest value for [Resolution] on the [Print Quality] tab in the printer properties dialog box.
Other Printing Problems Problem Causes and Solutions The printed image is different from the image on the computer's display. With certain functions, such as enlargement and reduction, image layout might be different to that on the computer display. You might have selected to replace True Type fonts with machine fonts in the printing process. To print an image similar to that of the computer display, make settings to print True Type fonts as an image. See the printer driver Help.
Troubleshooting 4 38
5. Printer Features Reference For more information about copier features and system settings, see Copy Reference and General Settings Guide. Printer Features Menu There are seven menu items in the Printer Features menu: • Paper Input • List/Test Print • Maintenance • System • Host Interface • PCL Menu • PS Menu (optional) You can select the functions in the following table: Menu Paper Input Default Bypass Paper Size See p.42 “Paper Input”. List/Test Print Config. Page See p.42 “List/Test Print”.
Printer Features Menu Default System Print Error Report See p.46 “System”. Auto Continue Memory Overflow Job Separation *2 Memory Usage Duplex Copies Edge Smoothing Toner Saving Printer Language Sub Paper Size Page Size 5 Letterhead Setting Edge to Edge Print Default Printer Language Host Interface I/O Buffer See p.48 “Host Interface”. I/O Timeout PCL Menu Orientation See p.49 “PCL Menu”.
Adjusting Printer Features Adjusting Printer Features Printer Features allows basic adjustment of operations when using the machine as a printer. Although factory default settings are suitable for most printing jobs, Printer Features gives you access to a number of settings that control basic printer operations. Printer Features settings you make are retained even when you turn off the machine. For more information about copier features and system settings, see Copy Reference and General Settings Guide.
Printer Features Printer Features Parameters Paper Input ❖ Bypass Paper Size The size of the paper set in the bypass tray. Reference For more information about paper sizes that can be set in the bypass tray, see General Settings Guide. For information about setting paper in the bypass tray, see Printer Reference 1. 5 Note ❒ Default: • Metric version: A4 • Inch version: 11 × 8/ Note ❒ This menu can be selected only when the optional PostScript 3 board is installed.
Printer Features Parameters Interpreting the configuration page System Reference ❖ Unit Number Displays the serial number assigned to the board by its manufacturer. ❖ Total Memory Displays the total amount of memory (SDRAM) installed on the printer. ❖ Firmware Version • Firmware Displays the version number of the printer firmware. • System Displays the version number of the system firmware. • Engine Displays the version number of the printer engine. • Panel Displays the version number of the panel display.
Printer Features System Displays the settings made under the System menu. Reference p.46 “System” PCL Menu Displays the settings you made under PCL Menu. Reference p.49 “PCL Menu” PS Menu Displays the settings you made under PS Menu. 5 Reference p.50 “PS Menu” Host Interface Displays the settings you made under the Host Interface menu. When DHCP is active on the network, the actual IP address, subnet mask and gateway address appear in parentheses on the configuration page. Reference p.
Printer Features Parameters Maintenance ❖ Menu Protect This procedure lets you protect menu settings from accidental change. It makes it impossible to change menu settings with normal procedures unless you perform the required key operations. In a network environment, only administrators can make changes to menu settings. • Level 1 You can protect “Maintenance”, ”System”, “Host Interface” and “PCL Menu”. • Level 2 You can protect ”Paper Input”, “Maintenance”, ”System”, “Host Interface” and “PCL Menu”.
Printer Features Temporarily canceling Menu Protect When you select protected items in Printer Features, a screen for entering the access codes appears. When this happens, enter the correct access codes using the number keys, and then press [OK]. Menu Protect is then temporarily canceled. Note ❒ If you enter the correct access codes, Menu Protect remains canceled while the Printer Features menu is displayed.
Printer Features Parameters ❖ Copies You can specify the number of print sets. This setting is disabled if the number of pages to print has been specified with the printer driver or another command. • 1 to 999 by 1 Note ❒ Default: 1 ❖ Edge Smoothing Set this to enable Edge Smoothing. • On • Off Note ❒ Default: On ❒ If Toner Saving is set to On, Edge Smoothing is ignored even if it is set to On. ❖ Toner Saving Set this to enable Toner Saving.
Printer Features ❖ Letterhead Setting You can rotate original images when printing. When printing, original images are always rotated by 180 degrees. Therefore, output might not be as expected when printing onto letterhead or preprinted paper requiring orientation. Using this function, you can specify image rotation. • Off • Auto Detect • On (Always) Note ❒ Default: Off 5 ❖ Default Printer Language You can set the default printer language if the machine cannot find the printer language automatically.
Printer Features Parameters PCL Menu ❖ Orientation You can set the page orientation. • Portrait • Landscape Note ❒ Default: Portrait ❖ Form Lines You can set the number of lines per page. • 5 to 128 by 1 Note ❒ Default: • Metric version: 64 • Inch version: 60 ❖ Font Source You can set the storage location of the default font. • Resident • RAM • HDD Note ❒ Default: Resident ❒ RAM and HDD can be selected only when fonts have been downloaded to the machine.
Printer Features ❖ Extend A4 Width You can extend the printing area width (when printing on A4 sheet with PCL). • On • Off Note ❒ Default: Off ❒ When the setting is On, the width will be 8/ inches. ❖ Append CR to LF When set to On, a carriage return will follow each line feed: CR=CR, LF=CR−LF, FF=CR−FF. • Off • On 5 Note ❒ Default: Off ❖ Resolution You can set the print resolution in dots per inch. • 300 dpi • 600 dpi Note ❒ Default: 600 dpi PS Menu ❖ Data Format You can select a data format.
6. Appendix Finisher You can collate or staple printed paper by installing the optional finisher. Make sure you read the following precautions when using the optional finisher: Reference For information about optional finishers, see General Settings Guide. To use the staple function, see p.52 “Staple”. ❖ Be sure to make settings for options installed on the machine in the printer drivers. Reference To make settings for options in the printer drivers, see Printer Reference 1.
Appendix Staple With the optional finisher installed, sets can be stapled individually when printing multiple sets. Staple Position The specified staple position varies depending on paper size, type, quantity and feed orientation.
Staple Reference • For paper sizes and maximum numbers of sheets available for stapling, see “Specifications”, General Settings Guide. • For printing methods, see the printer driver Help. • The staple position will vary when using the PostScript 3 printer driver. For more information, see the PostScript 3 printer driver Help. Stapling Precautions Limitation ❒ Stapling can be done only with the optional finisher installed. ❒ Stapling cannot be done when paper is fed from the bypass tray.
Appendix ❒ Staple printing will be canceled under the following conditions: • If the number of staple jobs exceeds maximum. For information about the maximum number, see “Specifications”, General Settings Guide. • If a paper size that cannot be stapled is selected. For information about paper sizes that can be stapled, see “Specifications”, General Settings Guide. • If a paper type that cannot be stapled is selected. The paper types that can be stapled are plain and recycled.
Collate Collate When printing multiple documents such as handouts for meetings, you can separate sets into order. This function is known as “Collate”. Collate stores data transmitted from a computer in memory. The following are the three types of collate: ❖ Collate Printed output is assembled as sets in sequential order. 1 2 3 1 2 3 1 2 3 1 2 3 GPSY013E ❖ Rotating Collate Every other print set is rotated by 90 degrees K.
Appendix Note ❒ You can set Collate in the RPCS™ printer driver. ❒ ❒ ❒ ❒ ❒ ❒ • If you cannot make Shift Collate even with the optional finisher installed, options may not be set up correctly in the printer driver. Correct the printer driver's option settings. For details, see the printer driver Help. If Auto Continue occurs on the first set, Collate will be canceled. If forced printing occurs on the first set, Collate will be canceled.
Spool Printing Spool Printing Spool Printing allows print jobs transferred from a computer to be temporarily stored, and then prints them after they are transferred. This shortens printing time as it maximizes printer efficiency. Important ❒ During Spool Printing, the hard disk is accessed and the Data-In indicator blinks. Turning off the computer or machine during Spool Printing can damage the hard disk. Also, if the computer or machine is turned off during Spool Printing, spooled jobs will be deleted.
Appendix - Setting Spool Printing Spool Printing can be set using telnet or a Web browser. • Using a Web browser Click [Configuration], and then click [General]. Set [Spool Printing] to [Enable]. See Network Guide or Help for more information. • Using telnet Type in “spoolsw spool on” to set Spool Printing. See Network Guide for more information about telnet.
Covers Covers Using this function, you can insert cover and back sheets fed from a different tray to that of the main paper, and print on them. Reference For printing methods, see the printer driver Help. Limitation ❒ To use this function, Collate must be set. Rotating Collate cannot be set. Note ❒ The cover sheets should be the same size and orientation as the body of the paper.
Appendix • Blank 4 4 GCPY017E ❖ Front/Back covers Prints the first and last page of the document as the cover and back cover pages. • Print on one side Prints on one side of the cover sheets only, even when duplex printing is selected. 1 6 6 4 5 2 3 1 2 3 6 4 5 GCPY018E • Print on both sides Prints on both sides of the cover sheets when duplex printing is selected.
Slip Sheets Slip Sheets ❖ Inserting a slip sheet between each page • Print GPAY019E • Blank 6 GPAY020E ❖ Inserting a slip sheet between OHP transparencies • Print 2 1 2 2 1 1 GCPY021E • Blank 2 1 12 GCPY022E 61
Appendix Note ❒ Collate cannot be set when using slip sheets. ❒ Slip sheets cannot be inserted while duplex printing. ❒ The slip sheet should be the same size and orientation as the main paper. ❒ The same paper feed tray cannot be set for the main paper and slip sheets.
Chaptering Chaptering A specified page is printed on the same side as the first page, like a book. Also, you can insert slip sheets before specified pages, and select whether or not to print onto slip sheets. Limitation ❒ This function is available with the PCL and RPCS™ printer driver. Reference For printing methods, see the printer driver Help. Note ❒ Up to 20 pages can be specified as chapter front pages using the printer driver.
Appendix ❖ Inserting slip sheets • Print Prints on slip sheets. When duplex printing is selected, both sides of the slip sheets are printed onto. 8 GCPY026E • Print on front side only Prints on the front side of slip sheets even if duplex printing is selected. 9 8 6 5 7 10 4 1 3 6 2 GCPY032E • Blank GCPY027E Note ❒ The slip sheet should be the same size and orientation as the main paper.
User Defined Pages User Defined Pages Using this function, you can specify the page numbers for each input tray. Reference For printing methods, see the printer driver Help. Limitation ❒ This function is available with the PCL printer driver only. ❒ If [Document Server] is selected under [Job Type], User Defined Page cannot be used. ❒ If [User Defined Pages] is selected under [Paper], [Layout:] and [Duplex:] cannot be selected.
Appendix System Settings (Parallel Connection) Interface Settings/Parallel Interface ❖ Parallel Timing Specifies the timing for the parallel interface. Normally, you do not need to change this setting. • ACK inside • ACK outside • STB down Note ❒ Default: ACK outside ❖ Parallel Communication Speed Specifies the communication speed of the parallel interface. If the speed is too high, data may not be transferred smoothly. If this happens, change the setting to “Standard”.
Specifications Specifications This section contains the machine's electrical and hardware specifications, including information about its options. Component Specifications Resolution PCL 6 : 600 dpi PCL 5e: 300 dpi, 600 dpi RPCS™ : 200 dpi, 300 dpi, 600 dpi PostScript 3 : 300 dpi, 600 dpi Printing speed 22 ppm/32 ppm (A4K, 8/" × 11"K plain paper) Note ❒ Printing speeds depend on the machine. Check which type of machine you have. See General Settings Guide.
Appendix Options Limitation ❒ Only one optional interface board can be installed in the machine at a time. Therefore, the optional IEEE 1394 interface board, the optional 802.11b interface kit (wireless LAN board) and the optional USB 2.0 interface board cannot be installed concurrently. IEEE 1394 Interface Board type 4510 ❖ Transmission spec.
Specifications IEEE 802.11b Interface Kit Type B ❖ Transmission spec.: Based on IEEE 802.11b (wireless LAN) ❖ Protocol: TCP/IP, NetBEUI, IPX/SPX, AppleTalk Note ❒ SmartNetMonitor and Web browser are supported. ❖ Data transfer speed: Auto select from below speed 1Mbps, 2Mbps, 5.5Mbps, 11Mbps ❖ Frequency range: • Inch version: 2400-2497 MHz (1-11 channels) • Metric version: 2400-2497 MHz (1-13 channels) 6 ❖ Transmittable distance: 1Mbps 400 m *1 2Mbps 270 m *1 5.
Appendix Note ❒ This USB 2.0 interface board is compatible with devices that support USB 1.1. ❒ For Windows 98 SE/Me, be sure to install USB Printing Support included on the CD-ROM that comes with this machine. When USB 2.0 is used under Windows 98 SE/Me, only a speed equal to that of USB 1.1 is possible. ❒ Macintosh supports only the standard USB 1.1 port.
INDEX C Canceling a job Macintosh, 11 Windows, 10 Chaptering, 63 Collate, 55 Configuration page, 42 Control panel locked print, 15 printer features, adjusting, 39 sample print, 15 Covers, 59 D Data In indicator, 32, 36 Display panel error messages, 25 Document Server, 13 E Error messages, 25 F Finisher, 51 Fonts, 67 H Hard disk, 67 Host Interface, 48 I M Macintosh canceling a job, 11 setting up, printer driver, 9 Maintenance, 45 Memory, 67 N Network Cable, 67 Network protocol, 67 O Operating system,
T Troubleshooting, 25 error messages, 25 machine does not print, 30 other printing problems, 34 status messages, 25 U USB2.0 Interface Board Type A, 69 W Windows canceling a job, 10 Windows 2000/XP printer properties, printer driver, 6 Windows 95/98/Me printer properties, printer driver, 5 Windows NT 4.
Copyright © 2003
Printer/Scanner Unit Type 2027 Operating Instructions Printer Reference 2 B577-8620 GB GB
Printer/Scanner Unit Type 2027 Operating Instructions Scanner Reference 1 Network Scanner 2 Preparations for Use as a Network Scanner 3 Setting Originals 4 Sending Scan File by E-mail 5 Sending Scan File by Scan to Folder 6 Using the Document Server Function 7 Using the Network Delivery Scanner Function 8 Using the Network TWAIN Scanner Function 9 Appendix For safe and correct use of this machine, please be sure to read the Safety Information in the General Settings Guide before you use
Introduction This manual describes detailed instructions on the operation and notes about the use of this machine. To get maximum versatility from this machine all operators are requested to read this manual carefully and follow the instructions. Please keep this manual in a handy place near the machine. The scanner function is available when the Printer/Scanner option is installed in the machine.
Manuals for This Machine The following manuals describe the operational procedures of this machine. For particular functions, see the relevant parts of the manual. Note ❒ The manuals provided are specific to machine type. ❒ Adobe Acrobat Reader is necessary to view the PDF file manuals.
❖ Manuals for DeskTopBinder V2 Lite DeskTopBinder V2 Lite is a utility included on the CD-ROM labeled "Scanner Driver & Document Management Utilities". • DeskTopBinder V2 Lite Setup Guide (PDF file - CD-ROM2) Describes the installation of DeskTopBinder V2 Lite, and the operating environment for DeskTopBinder V2 Lite in detail. This guide can be displayed from the [Setup] dialog box when DeskTopBinder V2 Lite is installed.
TABLE OF CONTENTS Manuals for This Machine ......................................................................................i How to Read This Manual .....................................................................................1 Symbols ..................................................................................................................... 1 Names of Major Options ............................................................................................ 1 1.
4. Sending Scan File by E-mail Preparation for Sending by E-mail ..................................................................... 43 E-mail Screen........................................................................................................... 44 Sending Scan File by E-mail ...............................................................................45 Procedure for Sending E-mail ..................................................................................
9. Appendix Relationship between Resolution and File Size................................................97 When Using as E-mail, Scan to Folder, Document Server or Network Delivery Scanner...97 When Using as a Network TWAIN Scanner.............................................................98 Relationship between File Type Specified and File Type Used When Sending E-mail... 100 Max. Number of Addresses Which Can Be Specified and Files Which Can Be Stored.... 101 Troubleshooting............................
vi
How to Read This Manual Symbols In this manual, the following symbols are used: Important If this instruction is not followed, paper might be misfed, originals might be damaged, or files might be lost. Be sure to read this. Preparation This symbol indicates the prior knowledge or preparations required before operating. Note This symbol indicates precautions for operation or actions to take after misoperation.
2
1. Network Scanner Outline By installing the printer/scanner controller, the machine can be used as a network scanner. As a network scanner, the machine can send e-mail, send files to the FTP server or the shared folders of client computers, store scan files in the Document Server, operate as a network delivery scanner, and operate as a network TWAIN scanner. E-mail Scan file that is attached to an e-mail can be sent using the e-mail system through a LAN or the Internet. Reference p.
Network Scanner 1 3. Client computer 4. LDAP server An e-mail with scan file attached is received from the e-mail server using email software. Check the content of the file using an application appropriate for the file type. LDAP server provides a directory service corresponding to the inquiry or reference operation from the client computer on the same network.
Outline 3. Client computer Scan file that is sent from the machine is received in the shared folders of Windows. Check the content of the file using an application appropriate for the file type. 1 Document Server Scan file from the originals is stored as a file on the hard disk of the machine and can be viewed, copied, deleted, or retrieving using DeskTopBinder V2 Lite/Professional from a client computer via a network. A file can be searched for using the user name or the file name.
Network Scanner Network Delivery Scanner The machine is used as a delivery scanner with ScanRouter V2 Lite/Professional. Scan file from the originals scanned by the machine is stored in the delivery server and delivered to the folders of client computers on the same network. 1 Reference p.
Outline Reference For more information about ScanRouter V2 Lite, DeskTopBinder V2 Lite, or Auto Document Link, see the respective documentation. See p.i “Manuals for This Machine”. 1 Network TWAIN Scanner The scanning function of this machine can be used from a client computer via a network (Ethernet, IEEE 1394 (IP over 1394) [optional], or IEEE 802.11b (Wireless LAN) [optional]). Originals can be scanned with the same operation used for SCSI- and USB-connected scanners. Reference p.
Network Scanner Control Panel This illustration shows the control panel when options are installed. 1 ZKNS011E 1. {User Tools/Counter}} key 7. {Interrupt}} key Use to change default or operation parameters according to the operating conditions. Press this key to interrupt the scanner mode and to activate the copy mode. 2. Display panel Displays the operation status and messages. 3. {Check Modes}} key Press to check the destinations which are currently selected.
Control Panel 10. Indicators 12. Function keys Display errors and the machine status. d: Add Staple indicator D: Add Toner indicator B: Add Paper indicator L: Service Call indicator M: Open Cover indicator x: Misfeed indicator Press the {Copy} }, {Document Server} }, {Facsimile} }, {Printer} }, or {Scanner} } key to activate the respective function. The display content changes accordingly. The indicator for the selected function lights up. Reference For more information, see General Settings Guide.
Network Scanner Using Scan to Folder Press the {Scanner} } key to display the Scan to Folder screen (When [E-mail/ Folder] has been selected in [Destination List Display Priority 1] and [Folder] has been selected in [Destination List Display Priority 2]). If the Network TWAIN Scanner screen appears, press [Exit]. 1 For information about Destination List Display Priority, see p.18 “Destination List Settings”.
2. Preparations for Use as a Network Scanner To use the machine as a network scanner, you must make settings required for use as a scanner as well as basic settings for use in a network. Reference First, see General Settings Guide for details about how to make basic settings, and then make scanner settings. For more information about settings for sending by e-mail, see Network Guide.
Preparations for Use as a Network Scanner ❖ Destination List Settings For explanations of settings, see p.18 “Destination List Settings”.
Initial Scanner Setup Setting procedure A Press the {User Tools/Counter}} key. B Press [Scanner Features]. C Press [Send Settings]. D Press the item to be set. 2 Example: TWAIN Standby Time setting E Change the setting. • To select an item, touch its key on the screen. The item is highlighted. • To enter numbers, use the number keys. Note ❒ To cancel changing a setting, press [Cancel]. The setting returns to the previous condition. F Press [OK]. G Repeat steps D to F to make other settings.
Preparations for Use as a Network Scanner ❖ Default Scan Settings Various basic settings (scan type, resolution, image density, scan size) can be set.
Initial Scanner Setup ❖ Wait Time for Next Orig.: Exposure Glass When dividing originals and scanning them individually with the exposure glass to form a single file, select [OFF], [Set Wait Time], or [Continuous Wait] for the waiting status. Note ❒ If either [SADF] or [Batch] is specified when scanning, this setting is invalid. ❒ If [Off] is selected, sending will start automatically after one page of original is scanned.
Preparations for Use as a Network Scanner ❒ Even if originals are placed on the exposure glass, the machine will function as the settings. However, every time originals are placed, you must press the {Start} } key to start scanning. ❒ If a paper jam occurs or any of the following operation is performed while the machine is waiting for additional originals, the countdown stops and does not start again until the {#} } key is pressed.
Initial Scanner Setup When selecting [Custom size] as the scan size, follow the procedure below. A Press [Custom size] on the Scan Size Setting screen. B Enter the original size with the number keys. Select and enter values for [X1] and [Y1], and then press the {#} } key. C Enter the scan starting point in re- lation to the standard scan starting point. Select and enter values for [X2] and [Y2], and then press the {#} } key. number keys.
Preparations for Use as a Network Scanner The range of possible original sizes and scan sizes is as follows: • Original Size X1: 140 - 432 mm (5.5” - 17.0”) Y1: 140 - 297 mm (5.5” - 11.7”) • Scan Size X3: 10 - 432 mm (0.4” - 17.0”) Y3: 10 - 297 mm (0.4” - 11.7”) Keep the scan area settings within these range. 2 E When all dimensions are entered, press [OK]. Destination List Settings This section explains how to set the defaults for the destination list and titles displayed.
Initial Scanner Setup Send Settings This section explains how to set the defaults for sending settings such as the compression level for scan file and how the machine switches to the network TWAIN scanner function. The send settings consist of the following. For the list about settings and defaults, see p.11 “Scanner Features”.
Preparations for Use as a Network Scanner ❖ Max. E-mail Size Select whether the size of an e-mail is limited or not. When [On] is selected, enter the size limit (64 - 102400 KB) with the number keys. Note ❒ When the SMTP limits the size, match that setting. 2 ❖ Divide & Send E-mail This function is effective only when [On] is selected for [Max. Email Size]. Select whether or not an image exceeding the size specified in [Max. E-mail Size] should be divided and sent using more than one e-mail.
Programs Programs You can store frequently used settings in the machine memory and recall them for future use. C Press [Register]. Note ❒ You can store up to 10 programs for the scanner mode. ❒ You can use the settings stored in program No.10 as the initial mode by selecting [Program No.10] in [Change Initial Mode] in [Scanner Features]. ❒ Programs are not deleted by turning the power off or by pressing the {Clear Modes} } key.
Preparations for Use as a Network Scanner Recalling a Program Deleting a Program A Make sure the {Scanner}} key is se- A Make sure the {Scanner}} key is se- B Press [Recall]. B Press [Delete]. C Press the number of the program C Press the number of the program lected, press the {Program} } key. lected, press the {Program} } key. 2 you want to recall. The stored settings are displayed. Note ❒ Program numbers with m already have settings in them.
Installing Software Installing Software The machine comes with two CD-ROMs containing various software. The CD-ROM labeled “Scanner Driver & Document Management Utilities” contains the necessary software to use the machine as a network scanner. The CDROM labeled “Printer Driver & Utilities” contains the necessary software to use the machine as a printer. This section explains the software to use the machine as a network scanner.
Preparations for Use as a Network Scanner The installing sequence using Auto Run is as follows: Installation Sequence Insert the CD-ROM. 2 TWAIN Driver Ver.3 TWAIN Driver The installer starts up. ScanRouter V2 Lite Select the software. ScanRouter V2 Lite ScanRouter V2 Administration Utility Install all at once, or select and install individually. DeskTopBinder V2 Lite The installation complete message is displayed. DeskTopBinder V2 Lite Acrobat Reader Restart your PC.
Installing Software Software for Using a Network TWAIN Scanner To use the machine as a network TWAIN scanner, it is essential to install the TWAIN driver. If you do not have applications that work with TWAIN, it is necessary to also install DeskTopBinder V2 Lite. For information about the installation of DeskTopBinder V2 Lite, see p.27 “DeskTopBinder V2 Lite”. 2 Preparation Before installation, check the operating environment for the TWAIN driver. See p.28 “Type2027 TWAIN Driver”.
Preparations for Use as a Network Scanner Software for Using the Network Delivery Scanner Function To use the machine as a network delivery scanner, it is essential to install ScanRouter V2 Lite on the delivery server. To check an in-tray or retrieve file, it is necessary to install TWAIN Driver on the client computer. Use Auto Run for installation. 2 Preparation Before installation, check the system requirements for the software. See p.27 “Software Supplied on CD-ROM”.
Installing Software DeskTopBinder V2 Lite Use Auto Run for installation. Preparation Before installation, check the system requirements for DeskTopBinder V2 Lite. See p.29 “DeskTopBinder V2 Lite”. 2 A Start Windows, and then insert the supplied CD-ROM labeled “Scanner Driver & Document Management Utilities” into the CD-ROM drive of the client computer. The Choose Setup Language screen appears. B Select a language, and then click [OK]. The CD-ROM Launcher screen appears.
Preparations for Use as a Network Scanner Type2027 TWAIN Driver This driver is required to scan an original on the machine. To use the machine as a network TWAIN scanner, this driver must be installed. ❖ File storage folder The files are stored in the following folder on the CD-ROM provided with this machine: \DRIVERS\TWAIN 2 ❖ System requirements Limitation ❒ Under Windows NT with RISC-based processors (MIPS R series, Alpha AXP, or PowerPC), this driver is not available.
Installing Software DeskTopBinder V2 Lite DeskTopBinder V2 Lite is to be installed on the client computers for integration and management of various kinds of file such as scan file, files created with applications, and existing scan files. This software allows you to use various functions for scan files stored in the Document Server, e.g., viewing stored files. Also, with ScanRouter V2 Lite, you can view the files stored in in-trays of the delivery server or use other functions for stored files.
Preparations for Use as a Network Scanner ❖ Software installed with DeskTopBinder V2 Lite • Auto Document Link Auto Document Link on the client computer monitors in-trays of the delivery server. In addition, the file delivered to in-trays can be retrieved or the arrival of file can be received at the client computer with this software.
Installing Software • Operating system Microsoft Windows 95 (OSR 2 or later) Microsoft Windows 98 Microsoft Windows Millennium Edition Microsoft Windows XP Professional Microsoft Windows XP Home Edition Microsoft Windows 2000 Server (Service Pack 1 or later) Microsoft Windows 2000 Professional (Service Pack 1 or later) Microsoft Windows NT Server 4.0 (Service Pack 5 or later) Microsoft Windows NT Workstation 4.
Preparations for Use as a Network Scanner 2 32
3. Setting Originals This chapter explains the procedure for placing originals on the exposure glass and in the ADF, and setting the original scan area and orientation according to the placement method. To correctly display the top/bottom orientation of the scanned original on a client computer, the placement of the original and the settings made on the control panel and scanner driver must match. Placing Originals There are two orientations for placing the original. See the table below.
Setting Originals When scanning using the e-mail function, Speci- the Scan to Folder fy the function, the Docuorien- ment Server function, tation. or the delivery scanner function. (Specified on the control panel screen) When scanning using the TWAIN scanner function 3 (Specified in the Scanner Control dialog box) The original displayed on a computer Placing on the Exposure Glass Originals which do not fit into the ADF, such as sheets with glued-on parts, books, etc.
Placing Originals ❖ When placing the original so that the top edge touches the top left of the exposure glass When using the machine as a network TWAIN scanner, this orientation is the standard setting for the TWAIN driver. Normally, use this orientation for placing originals. Placing in the Auto Document Feeder The ADF allows you to place multiple originals at one time. Originals placed in the ADF can be scanned on one side or both sides.
Setting Originals ❖ When placing the top edges of the originals first When using the machine as a network TWAIN scanner, this orientation is the standard setting for the TWAIN driver. Normally, use this orientation for placement. 3 ZKNY020E Note ❒ Originals of the same width and different length can be placed at the same time. Place the originals as shown: ZKNY080E 1. ADF placement orientation 2. Height ❒ Originals are scanned in the inserted order, starting with the topmost page.
Original Orientation and Scan Area Original Orientation and Scan Area Auto Detect Non-Mixed Original Sizes Note ❒ The difference between scanning with the TWAIN scanner function and the e-mail function, the Scan to Folder function, the Document Server function, or the network delivery scanner function is shown in the following table: TWAIN Scanner E-mail/ Scan to Folder/ Document Server/ Network Delivery Scanner A whole batch of originals is scanned using the size of the first original.
Setting Originals One-sided original/Two-sided original selection A When scanning one-sided originals, make sure that [1 Sided Orig.] is selected. B When scanning two-sided originals, press [2 Sided Orig.] to select [2 sided orig.: T to T] or [2 sided orig.: T to B] according to the binding orientation of the original.
Original Orientation and Scan Area Orientation selection A Press the key for the same orientation as the actual orientation of the original, or . Reference p.33 “Specifying original orientation and setting originals” C Press [OK]. Note ❒ The current settings are displayed. Note ❒ If originals of different sizes are placed in the ADF, specify the document size or detection method in the [Size:] box. If [Auto detection (Uni-size)] is selected, all originals are scanned using the size of the first page.
Setting Originals A Place the originals. Reference p.33 “Placing Originals” Note ❒ Originals are scanned in order. Place them from the first page. B Make settings for scanning area and original orientation. 3 B When there are additional originals, place them within the specified time, and them press the {Start} } key. Repeat this procedure until the last original is scanned. Note ❒ When the scan settings are changed while performing the procedure, the countdown for additional originals is stopped.
Original Orientation and Scan Area ❒ You can also use the exposure glass instead of the ADF. In this case, you must press the {Start} } key to start scanning. D When all originals are scanned and the countdown is finished, the machine starts storing or sending automatically. Note ❒ You can also press the {#} } key to restart storing or sending. Not specifying a time limit for additional originals A Place the originals. Reference See p.33 “Placing Originals”. Note ❒ Originals are scanned in order.
Setting Originals 3 42
4. Sending Scan File by E-mail Scan file can be sent from this machine to a specified destination using e-mail system. This chapter explains the preparation for sending file by e-mail system, various display screens, procedures for sending, and how to check the sending result when this function is used. Preparation for Sending by E-mail To send by e-mail system, the preparation described below is required. Note ❒ Set up an e-mail server on the network in advance.
Sending Scan File by E-mail E-mail Screen The screen when using the machine for e-mail is as shown. 1 2 3 4 5 6 7 4 8 1. Destination field The selected destination is shown here. If multiple destinations are selected, the destinations are displayed in the order they were selected by pressing [U U Prev.] or [T T Next]. Note ❒ Pressing the {Check Modes} } key lets you check the selected destinations. 2. [ ] E-mail/Scan to Folder Press to switch the e-mail function to the Scan to Folder function.
Sending Scan File by E-mail Sending Scan File by E-mail Procedure for Sending E-mail Recalling stored scan settings Scan file is sent after specifying scan settings and destinations. A Press the {Program} } key. B Select a program of scan settings. A Press the {Scanner}} key. 4 The settings of the selected program are applied. ZKNS020E B If user codes are set, enter a user code with the number keys, and then press the {#} } key. The Scanner Function screen appears.
Sending Scan File by E-mail B Press [Switch Destination List]. C Press [E-mail]. 4 D Press [Exit]. The E-mail screen appears. F Specify the destination. To specify a destination, you can select it from the list, select it by specifying a registration number, enter the e-mail address directly, search for the destination from the Destination List and selecting it, or search for the destination from the LDAP server and selecting it. Note ❒ Before selecting the destination, be sure to select [To].
Sending Scan File by E-mail Using a registration number to select a destination A Press [Registration No.]. B Use the number keys to enter th e five-digit registr ation number that has been assigned to a destination. If the entered number is less than five digits long, press the {#} } key after the last number. Example: To enter 00005 Press the { 5} } key, and then press the {#} } key. C To select more destinations, repeat step B. Note ❒ To deselect a destination, press [U U Prev.
Sending Scan File by E-mail Searching to select a destination from the Destination List A Press [ E Select a destination. ]. F Press [Exit]. B Press [Search by Dest. Name]. Searching to select a destination from the LDAP server A Press [ ]. 4 Note ❒ To search using e-mail addresses, press [E-mail Address]. The soft keyboard is displayed for entering a user name. C Enter part of the destination name. Note ❒ Enter the first character or characters of the destination name.
Sending Scan File by E-mail Note ❒ Press the item, and the soft keyboard is displayed for entering information appears. Enter the first character or characters of the item. ❒ One reference item of Advanced Search can be added when [Search Options] is specified in [Program/ Change LDAP Server] of [Key Operator Tools] of System Settings. For more information, see “User Tools (System Settings)”, General Settings Guide. ❒ It is necessary to differentiate between capital and small letters.
Sending Scan File by E-mail H Press [Exit]. Note ❒ A searched e-mail address can be registered in the list. Press [ProgDest], and a screen for entering the address appears. For information about registering destinations, see General Settings Guide. Checking selected destinations A Use the destination field at the top of the scre en to check which destinations are selected.
Sending Scan File by E-mail When selecting a sender from the list A Press [Attach Sender's Name]. B Select the sender. Note ❒ When [Return Receipt] is selected, an e-mail notifying that the e-mail has been read by the destination party is sent to the sender selected here. However, if the mailing software used by the destination party does not support MDN (Message Disposition Notification), the e-mail may not be sent. D Press [OK].
Sending Scan File by E-mail Note ❒ When a protection code has been set, a screen for entering the protection code appears after selecting the sender. Enter the protection code, and then press [OK]. When the protection code you entered is correct, the sender name is displayed. B Press [ ]. C Press [User (Dest.) Name]. To search using e-mail addresses, press [E-mail Address]. C For a reception confirmation email, press [Return Receipt].
Sending Scan File by E-mail Note ❒ When a protection code has been set, a screen for entering the protection code appears after selecting the sender. Enter the protection code, and then press [OK]. When the protection code you entered is correct, the sender name is displayed. G Press [Exit]. H For a reception confirmation email, press [Return Receipt]. Note ❒ When [Return Receipt] is selected, an e-mail notifying that the e-mail has been read by the destination party is sent to the sender selected here.
Sending Scan File by E-mail F Press [OK]. G Press [OK]. K Enter a messsage if necessary. Note ❒ When a message has been entered, this information is added to the scan file. ❒ Message to select from the list must be registered in System Settings in advance. See Network Guide. ❒ Message can be entered to up to 80 characters. ❒ To specify a message, you can select it from the list, or enter it directly. 4 When selecting a message from the list A Press [Subject/Message]. B Press [E-mail Message].
Sending Scan File by E-mail ❒ When using the Batch function or the SADF function, place the next original after the others have been scanned. See p.39 “Scanning Originals in Several Times”. ❒ Regardless of the divide e-mail size setting, it is not possible to send e-mail with over 725.3MB of data. It is also not possible to send over 1,000 pages of file. Simultaneous Storage and Sending by E-mail You can use e-mail with the Document Server.
Sending Scan File by E-mail Checking the Status of E-mail The status of the last 100 sendings can be checked. For every new sending record after 100, the oldest record is deleted. Note ❒ When [Print & Delete Scanner Journal] is set to [Delete all after printing], the whole journal is printed when the number of records reaches 100. ❖ Items that can be checked • Date/Time The date and time the e-mail was sent or the date which “Error” or “Cancelled” is confirmed is displayed.
5. Sending Scan File by Scan to Folder Scan file can be sent to the folders of the FTP server or the shared folders of Windows. This chapter explains the preparation for sending file by Scan to Folder, various display screens, procedures for sending, and how to check the sending result when this function is used. Preparation for Sending by Scan to Folder To send by Scan to Folder, the preparation described below is required.
Sending Scan File by Scan to Folder Scan to Folder Screen The screen when using the machine for Scan to Folder is as shown. 1 2 3 4 5 6 7 8 1. Destination field 5 The selected destination is shown here. If multiple destinations are selected, the destinations are displayed in the order they were selected by pressing [U U Prev.] or [T T Next]. Note ❒ Pressing the {Check Modes} } key lets you check the selected destinations. 2.
Sending Scan File by Scan to Folder Sending Scan File by Scan to Folder Recalling stored scan settings Procedure for Sending by Scan to Folder Scan file is sent after specifying scan settings and destinations. A Press the {Program} } key. B Select a program of scan settings. A Press the {Scanner}} key. The settings of the selected program are applied. ZKNS020E B If user codes are set, enter a user code with the number keys, and then press the {#} } key. The Scanner Function screen appears.
Sending Scan File by Scan to Folder C Press [E-mail]. D Press [Exit]. The E-mail screen appears. E Press [ ]. The Scan to Folder screen appears. F Specify the destination folder. To specify the destination folder, you can select it from the list, select it by specifying a registration number, enter the path for the folder of the client computers on the same network directly, specify the folder in the FTP server, or select the destination from the client computers on the same network.
Sending Scan File by Scan to Folder Press the { 3} } key, and then press the {#} } key. Note ❒ If a protection code has been set for the folder, a screen for entering the protection code appears. C To select more destination folders, repeat step B. Note ❒ To deselect a destination, press [U U Prev.] or [T T Next] to display the destination in the destination field, and then press the {Clear/Stop} } key.
Sending Scan File by Scan to Folder Note ❒ To change the path for the folder that has been entered, press [Change] located on the left side of the destination field. Enter a path for the folder properly, and then press [OK]. ❒ Pressing the {Check Modes} } key on the control panel lets you check the list of selected destinations. ❒ The connection test sometimes takes time. ❒ [Connection Test] can not be pressed right after [Cancel] was pressed during the connection test.
Sending Scan File by Scan to Folder I Press [OK]. J If entering a user name to log on is required, press [Manual Input] on the right side of the user name. The soft keyboard is displayed for entering the user name. K Enter the user name. L Press [OK]. M If entering a password to log on is required, press [Manual Input] for password. The soft keyboard is displayed for entering a password. N Enter a password. O Press [OK].
Sending Scan File by Scan to Folder Note ❒ Workgroup names or domain n ames m us t be s et properly to browse the network. ❒ If the client computer you want to select is not displayed, press [Up One Level] to select other workgroups, and then you can search for the client computer. ❒ The maximum number of client computers and shared folders displayed is 100. D Select the client computer that has the destination folder.
Sending Scan File by Scan to Folder Reference For information about how to enter characters, see General Settings Guide. D Press [OK]. E Select a destination folder. F Press [Exit]. Checking selected destinations A Use the destination field at the top of the scre en to check which destinations are selected. Note ❒ When multiple destinations are selected, the selected destinations are displayed in the order they were selected by pressing [U U Prev.] or [T T Next].
Sending Scan File by Scan to Folder ❒ Be sure to select or enter a sender name. Otherwise [Key Operator's E-mail Address] is used as the sender name. See General Settings Guide. Using a registration number to specify a sender name A Press [Attach Sender's Name]. When selecting a sender from the list A Press [Attach Sender's Name]. B Select the sender. 5 Note ❒ When a protection code has been set, a screen for entering the protection code appears after selecting the sender.
Sending Scan File by Scan to Folder Searching to select a sender F Select the sender. A Press [Attach Sender's Name]. B Press [ ]. C Press [User (Dest.) Name]. Note ❒ When a protection code has been set, a screen for entering the protection code appears after selecting the sender. Enter the protection code, and then press [OK]. When the protection code you entered is correct, the sender name is displayed. G Press [Exit]. H Press [OK]. 5 J Press the {Start}} key.
Sending Scan File by Scan to Folder Simultaneous Storage and Sending by Scan to Folder You can use Scan to Folder with the Document Server. Scan file is stored in the Document Server at the same time the file is sent by Scan to Folder. Note ❒ This section explains mainly the operation for simultaneous storage and sending by Scan to Folder. For more information, see p.59 “Procedure for Sending by Scan to Folder”.
Checking the Status of Scan to Folder Checking the Status of Scan to Folder The status of the last 100 sendings can be checked. For every new sending record after 100, the oldest record is deleted. Note ❒ When [Print & Delete Scanner Journal] is set to [Delete all after printing], the whole journal is printed when the number of records reaches 100. ❖ Items that can be checked • Date/Time The date and time the sending was requested or the date which “Error” or “Cancelled” is confirmed is displayed.
Sending Scan File by Scan to Folder 5 70
6. Using the Document Server Function Scan file obtained by scanning originals can be stored in the hard disk of the machine using the Document Server, and the stored file can be used later. Using DeskTopBinder V2 Lite/Professional, stored file can be viewed, retrieved, or deleted with a client computer. The stored file can also be viewed, downloaded, printed, or deleted using Web browser from a client computer. Reference For more information about using the Document Server, see General Settings Guide.
Using the Document Server Function Storage Procedure Recalling stored scan settings Scan and store the file in the Document Server. A Press the {Program} } key. B Select a user program of scan settings. A Press the {Scanner}} key. The selected user program settings are applied. ZKNS020E B If the user codes are set, enter a user code with the number keys, and then press the {#} } key. The Scanner Function screen appears. 6 Making settings individually A Press [Scan Settings].
Storing Files B Press [Store Only]. Note ❒ To store and deliver scan files, press [Send & Store]. See p.55 “Simultaneous Storage and Sending by E-mail”, p.68 “Simultaneous Storage and Sending by Scan to Folder”, or p.90 “Simultaneous Storage and Delivery”. ❒ [Store Only] cannot be pressed if even a single destination or sender is selected. G Specify file information. Specifying file information You can specify a user name, file name, and password for a stored scan file.
Using the Document Server Function B Select the user name. Note ❒ The user names shown here are names that were programed on the Key Operator Tools tab in System Settings. To enter a name not shown here, press [Non-programmed Name], and then enter the user name. C Press [OK]. 6 Specifying a file name Scan files are automatically named SCAN0001, SCAN0002, etc. If necessary, you can change the file name. A Press [File Name]. The soft keyboard is displayed for entering a file name. B Enter the file name.
Viewing a List of Stored Files Viewing a List of Stored Files From the list of stored files, you can delete the files stored in the Document Server or change the file information. To show the list of stored files, perform the following steps: A Press the {Scanner}} key. B If user codes are set, enter a user code using the number keys, and then press the {#} } key. The Scanner Function screen appears. Reference For information about the user c odes, see Genera l Setti ngs Guide.
Using the Document Server Function ❖ When displaying information of a selected stored file 2 1 7 1. Keys for searching files Switch to the screens for searching for a file by user name or file name, or to the screen for displaying all files. 2. Keys to switch to the information display 6 Use to switch between the stored file list and the detailed information of the selected file. 3. Keys for sorting files Sort the files using the selected item. Select the same item once more for a reverse sort.
Viewing a List of Stored Files - Viewing a list of stored files in DeskTopBinder V2 Lite The files stored in the Document Server are shown below using DeskTopBinder V2 Lite. 1 2 4 3 6 1. Connected device name 3. All Users The files stored in the connected device are displayed on the desk tree divided into User name and All Users folders. All files stored in the connected device are displayed. 2. User name The files in the selected folder are displayed.
Using the Document Server Function Searching for Files You can search for files from the stored files using the user name or file name. Searching by user name A On the screen with the list of stored files, press [Search by User Name]. B Select the user name to be used for the search. Searching by file name A On the screen with the list of stored files, press [Search by File Name]. The soft keyboard is displayed for searching by file name. B Enter the file name to search for.
Viewing a List of Stored Files Sending Stored Files by E-mail or Scan to Folder, or Delivering Files stored in the Document Server can be sent by e-mail or Scan to Folder, or delivered to the delivery server. Note ❒ This section explains how to select files to be sent or delivered. For more information about sending by e-mail, see p.45 “Procedure for Sending E-mail”. For more information about sending by Scan to Folder, see p.59 “Procedure for Sending by Scan to Folder”.
Using the Document Server Function Managing Stored Files - Displaying and Downloading Stored Files Using a Web Browser Using a Web browser in a client computer, you can display or download the files in the Document Server. When http:// (machine IP address) / is entered in the address bar of the Web browser in a client computer, the Stored Files List screen for the Document Server is displayed. A Display the list of stored files by pressing [Select Stored File]. Reference p.
Managing Stored Files Changing File Information The information about files stored in the Document Server (user name, file name, and password) can be changed. D Change the file information. Changing the user name A Press [Change User Name]. Limitation ❒ Information about files waiting for delivery cannot be changed. Reference Using a Web browser (See General Settings Guide) from a client computer, you can change the information of files stored in the Document Server. B Select the new user name.
Using the Document Server Function Changing the file name A Press [Change File Name]. F Press [OK]. Important ❒ Do not forget the password. If you forget it, consult the system administrator of the machine. E Make sure that the file informaThe soft keyboard is displayed for changing the file name. B Enter the new file name. Reference For information about how to enter characters, see General Settings Guide. C Press [OK]. 6 Changing the password A Press [Change Password].
7. Using the Network Delivery Scanner Function Scan file can be sent to a specified destination using the network delivery scanner function. This chapter explains the preparation sequence, various display screens, delivery procedures, and how to check the delivery result when this function is used. Important ❒ A delivery server in which ScanRouter V2 Lite/Professional is installed is necessary to use the network delivery scanner function.
Using the Network Delivery Scanner Function 6 Install Client Computer Software On the client computers, install the software required for viewing or retrieving file by connecting to the delivery server, such as DeskTopBinder V2 Lite. See p.27 “DeskTopBinder V2 Lite”. Network Delivery Scanner Screen The screen when using the machine as a network delivery scanner is as shown. 1 2 3 4 5 6 7 7 1. Network delivery scanner icon ( ) 5.
Delivering Scan File Delivering Scan File Recalling stored scan settings Delivery Procedure Scan file is delivered after scan settings and destinations are specified. If necessary, you can select a sender and a subject. A Press the {Program} } key. B Select a program of scan settings. A Press the {Scanner}} key. The settings of the selected program are applied. ZKNS020E B If user codes are set, enter a user code with the number keys, and then press the {#} } key. The Scanner Function screen appears.
Using the Network Delivery Scanner Function C Press [Delivery Server]. D Press [Exit]. The Network Delivery Scanner screen appears. F Specify the destination. To specify a destination, you can select it from the list, specifying a registration number, select it after search for it, or directly enter the email address. Note ❒ When using ScanRouter V2 Lite/Professional , the destination list is updated automatically. 7 When selecting a destination from the list A Press the title for the destination.
Delivering Scan File C To select more destinations, repeat step B. Note ❒ To deselect a destination, press [U U Prev.] or [T T Next] to display the destination in the destination field, and then press the {Clear/Stop} } key. Reference For information about how to enter characters, see General Settings Guide. E Press [OK]. F Select a destination. Searching to select a destination A Press [ ]. G Press [Exit]. H Press [OK]. Manual entry of a destination B Press [Search Address Book].
Using the Network Delivery Scanner Function C Press [OK]. D To enter more destinations, repeat steps A to C. Note ❒ To deselect a destination, press [U U Prev.] or [T T Next] to display the destination in the destination field, and then press the {Clear/Stop} } key. ❒ Pressing the {Check Modes} } key on the control panel lets you check the list of selected destinations. When selecting a sender from the list A Press [Attach Sender's Name]. B Select the sender.
Delivering Scan File Using a registration number to specify a sender name A Press [Attach Sender's Name]. B Use the number keys to enter th e five-digit registr ation number that has been assigned to a sender. Example: To enter 00007 Press the { 7} } key, and then press the {#} } key. Note ❒ When using ScanRouter V2 Professional, [Return Receipt] is displayed when a sender is selected.
Using the Network Delivery Scanner Function F Select a sender. B Press a subject [Urgent]. G Press [Exit]. H Press [OK]. C Press [Manual Input]. The soft keyboard is displayed for entering a subject. D Enter the subject “New product appearance”. H Specify a subject if necessary. Note ❒ When a subject has been specified, this information is added to the scan file. ❒ When ScanRouter V2 Professional is used to send documents using e-mail, the subject is automatically entered as the message subject.
Delivering Scan File Note ❒ This section explains mainly the operation for simultaneous delivery and storage. For more information, see p.85 “Delivering Scan File”. A Place the original, and then adjust the settings for original size and orientation if required. Reference p.33 “Setting Originals” B Make the scan settings. C Select the destination. D Specify the sender name and a subject if necessary. E Press [Store File]. 7 F Make sure [Send & Store] is selected. G Set file information if necessary.
Using the Network Delivery Scanner Function Checking the Status of Delivery The status of the last 100 deliveries can be checked. For every new delivery record after 100, the oldest record is deleted. Note ❒ When [Print & Delete Scanner Journal] is set to [Delete all after printing], the whole journal is printed when the number of records reaches 100. ❖ Items that can be checked • Date/Time The date and time the delivery was requested or the date which “Error” or “Cancelled” is confirmed is displayed.
8. Using the Network TWAIN Scanner Function This chapter describes the operations for scanning originals with the network TWAIN scanner using DeskTopBinder V2 Lite. In addition, the preparation for using the network TWAIN scanner and some functions of the TWAIN driver are introduced. Preparation for Using the Network TWAIN Scanner To use the machine as a network TWAIN scanner, the preparation described below is required.
Using the Network TWAIN Scanner Function Scanning Originals This section explains how to scan originals using the network TWAIN scanner function. A Start DeskTopBinder V2 Lite, and then select the scanner driver. A On the [Start] menu, point to [Program], point to [DeskTopBinder V2], and then click [DeskTopBinder V2]. B Click [Scanner Settings] on the [Tools] menu. If the scanner is already selected, no scanner settings are necessary.
Scanning Originals Note ❒ For advanced settings, click [Detail] to display the Detail window. For information about the Detail window, see TWAIN driver Help. C According to the settings of [Document:] and [Orientation:], change the other setting of the [Document] group. Reference p.39 “For a Network TWAIN Scanner” For information about making settings for the [Document] group, see TWAIN driver Help.
Using the Network TWAIN Scanner Function ❖ Automatic Tilt Correction This function automatically corrects character strings that were scanned slanted. ❖ Printing to the Image This function allows you to imprint dates, page numbers, or your favorite characters on a scan file. You can also change the fonts of the imprints as well as change the ascending order of images to a descending order.
9. Appendix Relationship between Resolution and File Size Resolution and scan area are inversely related. The higher the resolution is set, the smaller the area that can be scanned. Conversely, the larger the scan area, the lower the resolution that can be set. The relationship between the scanning resolution and the file size is shown below. If the file size is too large, the message “Exceeded max. data capacity. Check the scanning resolution.” appears on the control panel of the machine.
Appendix When Using as a Network TWAIN Scanner Reference To specify the scanning area or resolution when using the machine as a network TWAIN scanner, see TWAIN driver Help. ❖ When Binary or Halftone is selected as the Colors/ Gradations The originals can be scanned using combinations marked with ❍ in the table (Original orientation: S).
Relationship between Resolution and File Size ❖ When Gray Scale is selected as the Colors/ Gradations The originals can be scanned using combinations marked with ❍ in the table (Original orientation: S).
Appendix Relationship between File Type Specified and File Type Used When Sending E-mail The relationship between the file type specified when scanning originals and the file type converted into when sending e-mail or storing files is shown below by scan type.
Max. Number of Addresses Which Can Be Specified and Files Which Can Be Stored Max. Number of Addresses Which Can Be Specified and Files Which Can Be Stored E-mail The number of addresses which can be specified at a time when sending The number of addresses which can be registered in the list 500 *1 Scan to Folder *2 50 *1 When sending e-mail and sending by Scan to Folder at the same time: 550 *1 *3 3000 *4 The max. number of pages which can be stored 9000 *4 The max.
Appendix Troubleshooting This section contains advice on what to do if you have problems scanning an original, or if the network delivery scanner or e-mail function does not work. Various messages that may appear on the control panel or client computer are listed, along with causes and solutions. When Scanning Is Not Performed as Expected Problems Causes and solutions No image results from scanning. The original was placed with the front and back reversed.
Troubleshooting When an Error Message Appears on the Control Panel Note ❒ If an error message that is not included in this section appears, turn off the main power switch of the machine, and then turn it on again. If the message still appears, note the content of the message and the error number (if listed in the table), and contact your service representative. For information about how to turn off the main power switch, see General Settings Guide.
Appendix Message Causes and solutions Captured file exceeded max. number of pages per file. Cannot send the scanned data. The maximum number of pages which can be stored as a single file is 1000. Reduce the number of pages and send them again. Connection with LDAP server has failed. Check the server status. A network error has occurred and connection has failed. Try the operation once more. If the message is still shown, the network may be crowded. Check the information of System Settings.
Troubleshooting Message Causes and solutions Exceeded max. number of files which can be sent at the same time. Reduce the number of the selected files. The number of files exceeded the maximum number possible. Reduce the number of files and send them again. Exceeded max. number of files which can be used in Document Server at the same time. Make sure the files stored by the other functions, and then delete unneeded files. Exceeded max. number of pages per file.
Appendix Message Causes and solutions Memory is full. Press [Send] to send the current scanned data, or press [Cancel] to delete. Because there is not enough free hard disk space in the machine for delivering or sending by e-mail while storing into the Document Server, only some of the pages could be scanned. Specify whether to use the data or not. Memory is full. Scanning has been can- Because there is not enough free hard disk space in the machine for celled.
Troubleshooting Message Causes and solutions Selected file is currently in use. Cannot delete it. A file that is being edited with DeskTopBinder V2 Lite/Professional or that is waiting for delivery cannot be deleted. Try the operation again after editing is finished or delivery is canceled. Sender's name is not selected. Please specify sender's name. A sender's name should be specified before sending e-mail. Send e-mail after specifying the sender's name. Sending the data has failed.
Appendix Message Causes and solutions The specified group contains some invalid destination(s). Do you want to select only valid destination(s)? The specified group contains some destinations for sending by e-mail and sending by Scan to Folder. To select destinations for sending by email, press [Select] for the warning displayed on the e-mail screen. To select destination for sending by Scan to Folder, press [Select] for the warning displayed on the Scan to Folder screen. Updating the destination list.
Troubleshooting Message Causes and solutions [Cannot find the scanner. Check if the scanner main power is on.] • Check whether the main power switch of the machine is turned off. • Check whether the machine is connected to the network correctly. • Deselect the personal firewall function of the client computers. [Cannot specify any more scanning area.] The maximum number of scanning areas that can be stored is 99. Delete unneeded scanning area. [Clear Misfeed(s) in ADF.] Remove the originals jamming.
Appendix Message Causes and solutions [Insufficient memory. Reduce the scanning area.] • Reset the scan size. • Lower the resolution. • Set with no compression. See p.19 “Send Settings”. Note ❒ “The Relationship between the Resolution and the Scanning Area” chart in Help for halftone scanning might not always apply. Scanning cannot be performed if large values are set for brightness when using halftone or high resolution.
Specifications Specifications Scan method Flatbed scanning Scan speed • E-mail/Scan to Folder/Network Delivery Scanner 51 pages/minute [Scan size: A4R, Scan type: Text (Print), Resolution: 200 dpi, Compression (Black & White): On (MH)] • TWAIN Scanner 36 pages/minute [Size: A4R, Mode: Standard, Resolution: 200 dpi, Compression (Binary/Halftone): Data compression (MMR)] Maximum power consumption 1500 W Image sensor type CCD Image Sensor Scan type Sheet, book Interface Ethernet interface (10BASE-T
INDEX A Automatic Tilt Correction, 96 Auto run program, 23 C Checking the status of delivery, 92 {Check Modes} } key, 8 {Clear Modes} } key, 8 {Clear/Stop} } key, 9 Compression (Black & White), 19 Compression (Gray Scale), 19 D Default Scan Settings, 14 DeskTopBinder V2 Lite, 27, 29, 93 Destination List Display Priority 1, 18 Destination List Display Priority 2, 18 Destination List Settings, 12, 18 Display Contents E-mail, 9 Network delivery scanner, 10 Network TWAIN scanner, 10 Scan to Folder, 10 Display
S Save, 95 Scanner Features, 11 Scanning mode registration, 96 Scanning originals, 94 Scanning Originals in Several Times, 39 ScanRouter V2 Lite, 30 Scan Settings, 11, 14 Scan size, 14 Scan to Folder, 4, 57 Scan type, 14 Selecting a custom size, 17 Select Title, 18 Sender's Name Default, 20 Send Settings, 12, 19 Simultaneous Storage and Delivery, 90 Simultaneous Storage and Sending by E-mail, 55 Simultaneous Storage and Sending by Scan to Folder, 68 SMB, 4, 61 SMTP server, 3 Software supplied on CD-ROM, 27
114 GB GB B577-8700
In accordance with IEC 60417, this machine uses the following symbols for the main power switch: a means POWER ON. c means STAND BY. Declaration of Conformity “The Product complies with the requirements of the EMC Directive 89/336/EEC and its amending directives and the Low Voltage Directive 73/23/EEC and its amending directives.” Trademarks Adobe and Acrobat are trademarks of Adobe Systems Incorporated. Ethernet is a registered trademark of Xerox Corporation.
Printer/Scanner Unit Type 2027 Operating Instructions Scanner Reference B577-8700 GB GB
Network Guide 1 Functions Available over a Network 2 Connecting the Network Cable to the Network 3 Setting Up the Machine on a Network 4 Windows Configuration 5 Using the Printer Function 6 Using SmartNetMonitor for Client 7 Using SmartNetMonitor for Admin 8 Configuring the Network Interface Board Using a Web Browser 9 Appendix For safe and correct use of this machine, please be sure to read the Safety Information in the "General Settings Guide" before you use it.
Introduction This manual describes detailed instructions on the operation and notes about the use of this machine. To get maximum versatility from this machine all operators are requested to read this manual carefully and follow the instructions. Please keep this manual in a handy place near the machine. Important Contents of this manual are subject to change without prior notice.
TABLE OF CONTENTS Manuals for This Machine .....................................................................................1 How to Read This Manual .....................................................................................3 1. Functions Available over a Network Using the Printer ....................................................................................................5 Using Fax.......................................................................................................
5. Using the Printer Function Printing with Windows ........................................................................................55 Printing with a Windows 2000/XP or Windows NT Print Server...............................55 Printing without a Print Server.................................................................................. 56 Printing with a Macintosh ...................................................................................59 Changing to EtherTalk ..........................
9. Appendix Remote Maintenance by telnet ........................................................................... 93 Using telnet .............................................................................................................. 93 Commands List ........................................................................................................ 94 Using DHCP........................................................................................................ 109 Using AutoNet ..........
iv
Manuals for This Machine The following manuals describe the operational procedures of this machine. For particular functions, see the relevant parts of the manual. Note ❒ Manuals provided are specific to machine type. ❒ Adobe Acrobat Reader is necessary to view the manuals as a PDF file.
❖ Manuals for DeskTopBinder V2 Lite DeskTopBinder V2 Lite is a utility included on the CD-ROM labeled “Scanner Driver & Document Management Utilities”. • DeskTopBinder V2 Lite Setup Guide (PDF file - CD-ROM2) Describes installation of, and the operating environment for DeskTopBinder V2 Lite in detail. This guide can be displayed from the [Setup] dialog box when DeskTopBinder V2 Lite is installed.
How to Read This Manual Symbols In this manual, the following symbols are used: R WARNING: This symbol indicates a potentially hazardous situation which, if instructions are not followed, could result in death or serious injury. R CAUTION: This symbol indicates a potentially hazardous situation which, if instructions are not followed, may result in minor or moderate injury, or damage to property. * The statements above are notes for your safety.
4
1. Functions Available over a Network This machine provides printer, LAN-Fax, Internet Fax, and scanner functions over a network. Using the Document Server function, you can combine copied documents and print jobs into a single document. Not only can you print this document straight away, but you can also store it so it can be printed again whenever needed. Using the Printer The network interface board is compatible with NetWare *1 (IPX/SPX, TCP/IP), Windows NT 4.
Functions Available over a Network Using Fax Internet Fax 1 This machine converts scanned document images to e-mail format and transmits the data over the Internet. Specify the e-mail address instead of the fax number, and then send the document. E-mail can be received on a fax machine that supports Internet Fax, or on a computer that can receive normal e-mail. You can also receive e-mails or Internet faxes, and then print or forward them.
Using Fax LAN-Fax You can fax documents over phone lines from any computer connected to the machine via Ethernet, IEEE 1394 (IP over 1394), or wireless LAN. To send a fax, print from the Windows application you are working with, select LAN-Fax as the printer, and then specify the destination. You can also check the sent image data. 1 GKQH030E Reference For details about what settings to make, see p.17 “Setting Up the Machine on a Network”.
Functions Available over a Network Network Scanner E-mail 1 Scan file attached to an e-mail can be sent using the e-mail system through a LAN or the Internet. Mail Server GKQH040E Reference For details about what settings to make, see p.17 “Setting Up the Machine on a Network”. For details about using this function, see "Sending Scan File by E-mail", Scanner Reference.
Network Scanner Scan to Folder You can send scan file directly to shared folders on computers running Windows or to FTP servers. 1 GKPH150J For details about what settings to make, see p.17 “Setting Up the Machine on a Network”. For details about using this function, see “Sending Scan File by Scan to Folder”, Scanner Reference.
Functions Available over a Network Network Delivery Scanner You can use the machine as a delivery scanner for ScanRouter V2 Lite / Professional. Scan file or document received by fax can be stored in the delivery server, or delivered via the network to specified folders on client computers. 1 Delivery Server GKQH050E Reference For details about what settings to make, see p.17 “Setting Up the Machine on a Network”.
Network Scanner Network TWAIN Scanner You can use the scanning function of this machine from a computer connected via a network (Ethernet, IEEE 1394(IP over 1394), or IEEE 802.11b (wireless LAN)). You can scan documents the same way you would if you were using a scanner connected directly to your computer. 1 GKPH050J Reference For details about what settings to make, see p.17 “Setting Up the Machine on a Network”.
Functions Available over a Network Document Server You can store copy, fax, printer, and scanner documents on the hard disk. Using DeskTopBinder V2 Lite or a Web browser, you can browse, print, delete, or copy these documents over a network. 1 GKPH060J Reference For details about what settings to make, see p.17 “Setting Up the Machine on a Network”. For more information about Document Server operation from the printer, see "Using the Document Server", Printer Reference 2.
2. Connecting the Network Cable to the Network Confirming the Connection When the IEEE 1394 interface board (optional) is installed. When the wireless LAN board (optional) is installed. 1 2 3 ZKQH010E 1. 10BASE-T/100BASE-TX port 3. Wireless LAN port (optional) Port for connecting the 10BASE-T or 100BASE-TX cable Port for using the wireless LAN 2. IEEE 1394 ports (optional) Ports for connecting the IEEE 1394 interface cable Note ❒ The IEEE 1394 interface board (optional) and the IEEE 802.
Connecting the Network Cable to the Network Connecting to the Ethernet Interface Connecting to the IEEE 1394 Interface The network interface board supports 10BASE-T or 100BASE-TX connections. A Turn off the main power switch. 2 Important ❒ Make sure the main power is off. See “Turning On the Power”, General Settings Guide. B Connect the Ethernet interface cable to the 10BASE-T/100BASE-TX port. Important ❒ Before making the connection, touch the metallic part to ground yourself.
Confirming the Connection ❖ When using in ad hoc mode/802.11 ad hoc mode Using the IEEE 802.11b (Wireless LAN) A Make sure the LED of the IEEE 802.11b card is lit. ❖ When using in infrastructure mode 2 1 2 ZGDH600J 1. If the IEEE 802.11b card is working, it is lit in orange. 1 2 2. If it is connected properly to the ZGDH600J 1. If [LAN Type] on the [Interface Settings]/[Network] screen is not set to [IEEE 802.11b], it does not light, even if the main power is on. 2.
Connecting the Network Cable to the Network Checking the machine's radio wave status When using in infrastructure mode, you can check the machine's radio wave status using the control panel. Note ❒ To check the radio wave status, press [IEEE 802.11b] under [LAN Type] on the [Network] screen. 2 A Press the {User Tools/Counter}} key. B Press [System Settings]. C Press [Interface Settings]. D Press [IEEE 802.11b]. E Press [Wireless LAN Signal]. The machine's radio wave status appears.
3. Setting Up the Machine on a Network User Tools Menu (System Settings) This section describes the network settings you can change with User Tools (System Settings). Make settings according to functions you want to use and the interface to be connected. Important ❒ These settings should be made by the systems administrator, or after consulting with the systems administrator. Reference For details about settings, see p.35 “Settings You Can Change with User Tools”.
Setting Up the Machine on a Network Interface IEEE 1394 (IP over 1394) Settings Interface Settings/ IEEE 1394 *1 See p.36 “Interface Settings/IEEE 1394”. Interface Settings/ Network See p.35 “Interface Settings/Network”. 3 IEEE 802.11b (wireless LAN) Interface Settings/ Network See p.35 “Interface Settings/Network”.
User Tools Menu (System Settings) Internet Fax Interface Ethernet Settings Interface Settings/ Network See p.35 “Interface Settings/Network”. IP Address $ Gateway Address $ DNS Configuration ❍ WINS Configuration ❍ LAN Type $ *2 Effective Protocol 3 ❍ Ethernet Speed $ *5 ❍ Host Name Domain Name ❍ *3 $ File Transfer SMTP Server See p.39 “File Transfer”.
Setting Up the Machine on a Network Interface IEEE 1394 (IP over 1394) Settings IP Address $ IP over 1394 $ WINS Configuration ❍ Host Name ❍ Domain Name ❍ Gateway Address $ DNS Configuration ❍ Effective Protocol *5 $ File Transfer SMTP Server *3 $ See p.39 “File Transfer”. SMTP Authentication ❍ POP before SMTP ❍ Interface Settings/ IEEE 1394 *1 See p.36 “Interface Settings/IEEE 1394”. Interface Settings/ Network See p.35 “Interface Settings/Network”.
User Tools Menu (System Settings) Interface IEEE 802.11b (wireless LAN) Settings IP Address $ Gateway Address $ DNS Configuration ❍ WINS Configuration ❍ LAN Type *2 $ Ethernet Speed ❍ Effective Protocol *5 $ Host Name ❍ Domain Name ❍ Communication Mode $ SSID Setting ❍ Channel ❍ WEP (Encryption) Setting ❍ Transmission Speed ❍ File Transfer SMTP Server *3 $ See p.39 “File Transfer”. SMTP Authentication ❍ POP before SMTP ❍ Interface Settings/ Network See p.
Setting Up the Machine on a Network E-mail Interface Ethernet Settings Interface Settings/ Network See p.35 “Interface Settings/Network”. IP Address $ Gateway Address $ DNS Configuration ❍ WINS Configuration ❍ LAN Type 3 $ *2 ❍ Ethernet Speed Effective Protocol $ *3 Host Name ❍ Domain Name ❍ File Transfer SMTP Server $ See p.39 “File Transfer”.
User Tools Menu (System Settings) Interface IEEE 1394 (IP over 1394) Settings IP Address $ IP over 1394 $ WINS Configuration ❍ Host Name ❍ Domain Name ❍ Gateway Address $ DNS Configuration ❍ Effective Protocol *3 $ File Transfer SMTP Server $ See p.39 “File Transfer”. SMTP Authentication ❍ Interface Settings/ IEEE 1394 *1 See p.36 “Interface Settings/IEEE 1394”. Interface Settings/ Network See p.35 “Interface Settings/Network”.
Setting Up the Machine on a Network Interface IEEE 802.11b (wireless LAN) Settings IP Address $ Gateway Address $ DNS Configuration ❍ WINS Configuration ❍ LAN Type *2 $ Ethernet Speed ❍ Effective Protocol *3 $ Host Name ❍ Domain Name ❍ Communication Mode $ SSID Setting ❍ Channel ❍ WEP (Encryption) Setting ❍ Transmission Speed ❍ File Transfer SMTP Server $ See p.39 “File Transfer”.
User Tools Menu (System Settings) Scan to Folder Interface Ethernet Settings Interface Settings/ Network See p.35 “Interface Settings/Network”. IP Address $ Gateway Address $ DNS Configuration ❍ WINS Configuration ❍ LAN Type $ *2 Effective Protocol File Transfer See p.39 “File Transfer”. IEEE 1394 (IP over 1394) Interface Settings/ IEEE 1394 *1 See p.36 “Interface Settings/IEEE 1394”. Interface Settings/Network See p.35 “Interface Settings/Network”. File Transfer See p.39 “File Transfer”.
Setting Up the Machine on a Network Interface IEEE 802.11b (wireless LAN) Settings Interface Settings/ Network See p.35 “Interface Settings/Network”. 3 Interface Set-tings/ IEEE 802.11b *2 See p.38 “Interface Settings/IEEE 802.11b”. File Transfer See p.39 “File Transfer”.
User Tools Menu (System Settings) Network Delivery Scanner Interface Ethernet Settings Interface Settings/ Network See p.35 “Interface Settings/Network”. IP Address $ Gateway Address ❍ DNS Configuration ❍ WINS Configuration ❍ LAN Type $ *2 Effective Protocol *4 $ ❍ Host Name ❍ Domain Name IEEE 1394 (IP over 1394) *3 ❍ File Transfer Delivery Option See p.39 “File Transfer”.
Setting Up the Machine on a Network Interface IEEE 802.11b (wireless LAN) Settings IP Address $ Gateway Address ❍ DNS Configuration ❍ WINS Configuration ❍ LAN Type *2 $ Ethernet Speed ❍ Effective Protocol *4 $ Host Name ❍ Domain Name ❍ Communication Mode $ SSID Setting ❍ Channel ❍ WEP (Encryption) Setting ❍ Transmission Speed ❍ File Transfer Delivery Option *3 ❍ See p.39 “File Transfer”.
User Tools Menu (System Settings) Network TWAIN Scanner Interface Ethernet Settings Interface Settings/ Network See p.35 “Interface Settings/Network”. IP Address $ Gateway Address ❍ DNS Configuration ❍ WINS Configuration ❍ LAN Type *2 $ Effective Protocol IEEE 1394 (IP over 1394) Interface Settings/ IEEE 1394 *1 See p.36 “Interface Settings/IEEE 1394”. Interface Settings/ Network See p.35 “Interface Settings/Network”. IEEE 802.11b (wireless LAN) Interface Settings/ Network See p.
Setting Up the Machine on a Network Document Server Interface Ethernet Settings Interface Settings/ Network See p.35 “Interface Settings/Network”. 3 IP Address $ Gateway Address ❍ DNS Configuration ❍ WINS Configuration ❍ LAN Type *2 $ ❍ Ethernet Speed Effective Protocol IEEE 1394 (IP over 1394) Interface Settings/ IEEE 1394 *1 See p.36 “Interface Settings/IEEE 1394”. Interface Settings/ Network See p.35 “Interface Settings/Network”. IEEE 802.
User Tools Menu (System Settings) C Press [Interface Settings] or [File Transfer]. Network Configuration Any change you make with User Tools remains in effect even if the main power switch or operation switch is turned off, or the {Energy Saver} } or {Clear Modes} } key is pressed. Configuring the network using the control panel Note ❒ Operations for System Settings are different from normal operations. After using User Tools, press the {User Tools/Counter} } key to exit.
Setting Up the Machine on a Network Configuring the network using other utilities As well as using the control panel to make network settings, utilities such as a Web browser and SmartNetMonitor for Admin can also be used. The following table shows available settings: Note ❒ ❍ Indicates machine settings can be changed. ❒ - Indicates the setting cannot be changed from that device.
User Tools Menu (System Settings) Web browser SmartNetMonitor for Admin telnet TCP/IP - ❍ *1 ❍ NetWare ❍ ❍ *2 ❍ SMB ❍ ❍ ❍ AppleTalk ❍ ❍ ❍ SNMP ❍ ❍ ❍ Host Name ❍ ❍ ❍ Domain Name ❍ - ❍ ❍ - ❍ IP Address ❍ - ❍ Sub-net Mask ❍ - ❍ ❍ - ❍ WINS Server ❍ - ❍ Scope ID ❍ - ❍ SCSI print (SBP-2) ❍ - ❍ Bidirectional SCSI print ❍ - ❍ Host Name ❍ - ❍ Domain Name ❍ - ❍ Communication Mode ❍ - ❍ SSID Setting ❍ - ❍ Channel ❍ - ❍ WEP (Encryption) S
Setting Up the Machine on a Network Web browser SmartNetMonitor for Admin telnet SMTP Server ❍ - - SMTP Authentication ❍ - - POP before SMTP ❍ - - Reception Protocol ❍ - - POP3/ IMAP4 Settings ❍ - - Key Operator's E-mail Address ❍ - - E-mail Reception Port ❍ - - E-mail Reception Interval ❍ - - Max.
User Tools Menu (System Settings) Settings You Can Change with User Tools Interface Settings/Network ❖ IP Address Before using this machine in the network environment, you must configure the IP address and subnet mask. • Auto-Obtain (DHCP) • Specify When you select [Specify], enter the [IP Address]and [Sub-net Mask] as “xxx.xxx.xxx.xxx”(“x” indicates a number). • IP Address: 011.022.033.044 • Sub-net Mask: 000.000.000.
Setting Up the Machine on a Network ❖ NW Frame Type Select the frame type when you use NetWare. • Auto Select • Ethernet II • Ethernet 802.2 • Ethernet 802.3 • Ethernet SNAP Note ❒ Default: Auto Select 3 ❖ LAN Type When you have installed the IEEE 802.11b (wireless LAN) board (optional), select interface, IEEE 802.11b (wireless LAN) or Ethernet. • Ethernet • IEEE 802.11b Note ❒ Default: Ethernet ❒ Appears when the IEEE 802.11b (wireless LAN) board is installed. ❒ If Ethernet and IEEE 802.
User Tools Menu (System Settings) Note ❒ Default: Auto-Obtain (DHCP) ❒ If you use the interface for Ethernet and IEEE 1394 (IP over 1394) at the same time, settings must be made carefully. See p.109 “Using DHCP” ❒ When you use the IEEE 1394 interface on a network, you cannot use the Ethernet interface in the same domain. To use both interfaces in the same domain, set different values for the [Subnet Mask]. ❒ The physical address (MAC address) also appears.
Setting Up the Machine on a Network Interface Settings/IEEE 802.11b Preparation You must install the IEEE 802.11b (wireless LAN) board (optional) into the machine. Note ❒ Be sure to make all settings simultaneously. 3 ❖ Communication Mode Specifies the communication mode of the wireless LAN. • 802.11 Ad hoc • Ad hoc • Infrastructure Note ❒ Default: 802.11 Ad hoc ❖ SSID Setting Specifies SSID to distinguish the access point in infrastructure mode or 802.11 ad hoc mode.
User Tools Menu (System Settings) Interface Settings/Print List You can check items related to the network in use. Reference For details about printing, see p.45 “Printing the Interface Settings”. File Transfer ❖ Delivery Option Enables or disables sending stored or scanned documents via the ScanRouter V2 Professional/Lite delivery server. • ON • Main Delivery Sever • Sub Delivery Sever • OFF Note ❒ Default: OFF ❒ Set this option when specifying whether or not to use ScanRouter V2 Professional/Lite.
Setting Up the Machine on a Network ❖ SMTP Server Specify the SMTP server name. If DNS is in use, enter the host name. If DNS is not in use, enter the SMTP server IP address. • Server Name • Port No.:25 Limitation ❒ Enter the [Server Name] using up to 127 alphanumeric characters. Spaces cannot be used. 3 Note ❒ Enter [Port No.] between 1 and 65535 using the number keys, and then press the [#]key. ❖ SMTP Authentication You can configure SMTP authentication (PLAIN, LOGIN, CRAMMD5).
User Tools Menu (System Settings) Limitation ❒ Enter [User Name] using up to 63 alphanumeric characters. Spaces cannot be used. ❒ Enter [Password] using up to 63 alphanumeric characters. Spaces cannot be used. Note ❒ Default: OFF ❒ Using the number keys, you can set [Wait Time after Auth.] from zero to 10,000 milliseconds, in increments of one millisecond. ❒ If you select [ON], enter [Server Name] in [POP3/ IMAP4 Settings]. Also, check the port number for [POP3] in [E-mail Reception Port].
Setting Up the Machine on a Network ❖ E-mail Reception Port Specify the [POP3], [IMAP4], and [SMTP] port numbers for receiving Internet faxes. The specified POP3 port number is used for [POP before SMTP]. • POP3: 110 • IMAP4: 143 • SMTP: 25 Note ❒ Default: POP3/110, IMAP4/143, SMTP/25 3 ❒ Enter a port number between 1 and 65535 using the number keys, and then press the [#] key. ❖ E-mail Reception Interval Specify, in minutes, the time limit for receiving Internet faxes via POP3 or IMAP4 server.
User Tools Menu (System Settings) ❖ Program/ Change/ Delete Subject You can program, change, or delete the subject used when sending an Internet fax or scan file as an attachment. • Program/ Change • Delete Note ❒ Enter a subject using up to 20 alphanumeric characters. ❖ Scanner Recall Interval Time Specifies the interval the machine waits before resending scan file, if they cannot be sent to the delivery server or mail server.
Setting Up the Machine on a Network B Press [Change], and then enter the name. Reference For more information about entering text, see “Entering Text”, General Settings Guide. C Press [OK]. D Press [Edit], and then enter the text. To start a new line, press [OK] to return to the e-mail message screen, and then press [T T] in [Select Line to Edit:]. E Press [OK]. The e-mail message screen appears. F Press [OK]. 3 Changing an e-mail message A Select the e-mail message to change.
User Tools Menu (System Settings) Changing a subject A Select the subject to change. B Enter the text. C Press [OK]. Deleting a subject A Press [Delete]. B Select the subject to delete. T h e c on firm a t ion m es sag e about deleting appears. C To delete the subject, press [Yes]. 3 F Press [Exit]. G Press [Exit]. H Press the {User Tools/Counter}} key. You can also exit by pressing [Exit] on the User Tools main menu.
Setting Up the Machine on a Network 3 46
4. Windows Configuration Configuring TCP/IP This describes how to configure Windows for TCP/IP and IPP. Configuring a Windows 95/98/Me Computer Follow the procedure below to configure a Windows 95/98/Me computer to use TCP/IP. A Open [Control Panel], and then double-click the Network icon. Make sure [TCP/IP] is listed in the [The following network components are installed] box on the [Configuration] tab.
Windows Configuration Configuring a Windows XP Computer Configuring a Windows NT 4.0 Computer Follow the procedure below to configure a Windows XP computer to use TCP/IP. Follow the procedure below to configure a Windows NT 4.0 computer to use TCP/IP. A On the [Start] menu, click [Control A Open Panel], and then click [Network and Internet Connections]. B Click [Network Connections], and then double-click [Local Area Connection]. 4 C On the [General] tab, click [Properties].
Configuring NetBEUI Configuring NetBEUI This describes how to configure Windows to use NetBEUI. Limitation ❒ NetBEUI cannot be used under Windows XP. Note ❒ NetBEUI appears as SMB in the control panel, manual, and related utilities. Configuring a Windows 95/98/Me Computer Follow the procedure below to configure a Windows 95/98/Me computer to use NetBEUI. A Open [Control Panel], and then double-click the Network icon.
Windows Configuration Configuring a Windows NT Computer Follow the procedure below to configure a Windows NT computer to use NetBEUI. A Open [Control Panel], and then double-click the Network icon. Make sure [NetBEUI Protocol] is listed in the [Network protocols] box on the [Protocols] tab. Note ❒ If NetBEUI is not installed, click [Add] on the [Protocols] tab to install it. For more information about installing NetBEUI, see Windows NT Help. 4 B Change the Lana Number.
5. Using the Printer Function This section contains instructions for configuring the machine as a network printer. Read the section that relates to your network environment for information about correct configuration. ❖ Printing with a Windows 2000/XP or Windows NT Print Server To set up the machine as a network printer in Windows 95/98/Me, Windows 2000/XP, and Windows NT 4.0 environment, see p.55 “Printing with Windows”.
Using the Printer Function • Printing without a print server TCP/IP SMB IPP TCP/IP SMB IPP LPR Windows 95/98/Me 5 Windows 2000/XP TCP/IP SMB IPP LPR Windows NT 4.0 GKQH070E Note ❒ Under Windows XP, you cannot print via SmartNetMonitor for Client using SMB. ❖ Printing with a Macintosh To set up the machine as a network printer in a Macintosh environment, see p.59 “Printing with a Macintosh”.
❖ Printing with NetWare To set up the machine as a print server or remote printer in a NetWare environment, see p.61 “Printing with NetWare”. The network interface board allows you to use the machine as either a print server or a remote printer. • Configuring the machine as a print server Print Server NetWare File Server TCP/IP IPX/SPX 5 Windows 95/98/Me Windows 2000/XP Windows NT 4.
Using the Printer Function ❖ Printing with UNIX For UNIX printing information, visit our Web site or consult your authorized dealer.
Printing with Windows Printing with Windows Printing with a Windows 2000/XP or Windows NT Print Server This describes how to configure a client computer on a network using Windows 2000/XP, Windows NT Server or Windows NT Workstation as a print server. When using a Windows 2000/XP or Windows NT print server, select a shared printer on Windows 2000/XP or Windows NT. This section describes running [Add Printer Wizard] on each client computer, and adding the Windows 2000, Windows XP, and Windows NT 4.
Using the Printer Function F Click the name of the printer you Changing port settings G Click [OK]. H Make sure the port name is dis- This describes how to change the port settings under Windows 2000 when a printer driver has been installed. want to use, and then click [OK]. played in the [Print to the following port] box, and then click [OK]. Printing without a Print Server You can use this machine as a network printer without connecting to a print server.
Printing with Windows ❖ NetBEUI Note ❒ Do not use NetBEUI under Windows XP. A B Click [NetBEUI], and then click [Search(S)]. Available printers are listed. Click the printer you want to use, and then click [OK]. Note ❒ Printers that respond to a broadcast from the computer will be displayed. To print to a printer not listed here, click [Specify Address(P)], and then enter the NetBEUI address. Confirm the NetBEUI address on the network appears on the configuration page.
Using the Printer Function LPR Port A Click [LPR Port], and then click [New Port]. B In the [Name or address of server providing lpd] box, enter the printer's IP address. C In the [Name of printer or print queue on that server] box, enter "lp", and then click [OK]. C Click [OK]. D Check the location for the selected printer, and click [Close].
Printing with a Macintosh Printing with a Macintosh This describes how to configure a Macintosh computer to use EtherTalk. Actual procedures may vary depending on the version of the Mac OS. The following procedures describe how to configure Mac OS 9.1 and Mac OS X v10.1. If you are using other version than Mac OS 9.1 and Mac OS X v10.1, see the manual that comes with Mac OS for more information. Changing to EtherTalk Follow the procedure below to configure a Macintosh computer to use EtherTalk.
Using the Printer Function D If you change zones, select a name on the [AppleTalk Zone:] pop-up menu. E When the setting is complete, click [Apply Now]. Configuring the Printer Use the control panel to activate the AppleTalk protocol. (The default is active.) Reference For more information about configuration, see p.35 “Interface Settings/Network”. 5 Changing the Printer Name If the network has several similar model printers, the names will be the same.
Printing with NetWare Printing with NetWare This describes how to configure the machine for use as a print server or remote printer in a NetWare environment. NetWare Basic Procedure Install the NIB Setup Tool Print Server Remote Printer Configure the network interface board Restart the printer Configure the NetWare Start the print server This section assumes NetWare is functional and the necessary environment for the NetWare print service is available.
Using the Printer Function Setting Up as a Print Server NetWare 3.x A Log on to the file server as a Supervisor, or equivalent. B Start SmartNetMonitor for Ad- min. C On the [Group] menu, point to [Search Device], and then click [IPX/SPX]. A list of machines appears. D In the list, select the printer for 5 which you want to change configuration. E On the [Tools(T)] menu, click [NIB Setup Tool]. NIB Setup Tool starts. F Click [Wizard], and then click [OK].
Printing with NetWare NetWare 4.x, 5/5.1, 6 Important ❒ You must set up the print server using NDS mode in NetWare 4.x, 5/5.1, 6. ❖ To use NetWare 5/5.1, 6 • Use the printer as a print server. Do not use it as a remote printer in a PureIP environment. • If you use PureIP, configure the machine to use TCP/IP. For more information about how to make the settings, see p.17 “Setting Up the Machine on a Network”. A Log on to the file server as an administrator, or equivalent.
Using the Printer Function J Enter the print server name in the [Print Server Name(P):] box, the p r i n te r n am e in t h e [ P r i nt e r Name(N):] box, the print queue name in the [Print Queue Name(Q):] box, and the print queue volume in the [Queue Volume(V):], and then click [Next(N) >]. • In the [Print Server Name(P):] box, enter the name of the NetWare print server using up to 47 characters. • In the [Printer Name(N):] box, enter the name of the NetWare printer using up to 47 characters.
Printing with NetWare H Click the [NetWare] tab, and then make the following settings: A In the [Logon Mode] area, click [File Server Mode] or [NDS Mode]. Note ❒ If [File Server Mode] is selected, a connecting destination will be chosen based on the string entered in step C. ❒ If [NDS Mode] is selected, a connecting destination will be chosen based on the string entered in step D. B In the [Print Server Name(P):] box, enter the print server name.
Using the Printer Function Setting Up as a Remote Printer NetWare 3.x A Log on to the file server as an administrator, or equivalent. B Start SmartNetMonitor for Ad- min. C On the [Group] menu, point to [Search Device], and then click [IPX/SPX]. A list of machines appears. D In the list, select the printer for 5 which you want to change configuration. C In the [Print Server Operation Mode] area, click [As Remote Printer(R)]. D In the [Remote Printer No.(N)] box, enter the printer number.
Printing with NetWare B To create a new print server, press the { INSERT} } key, and then enter a print server name. Note ❒ If you are using a currently defined print server, select o n e o f t h e p r in t s e rv e rs shown in the [Print Server] list. Important ❒ Use the same name as that specified in NIB Setup Tool. (Step G-A). C On the [Print Server Information] menu, click [Print Server Configuration]. D On the [Print Server Configuration] menu, click [Printer Configuration].
Using the Printer Function NetWare 4.x, 5/5.1, 6 A Log on to the file server as an administrator, or equivalent. B Start SmartNetMonitor for Ad- min. C On the [Group] menu, point to [Search Device], and then click [IPX/SPX]. A list of machines appears. D In the list, select the printer for which you want to change configuration. E On the [Tools(T)] menu, click [NIB 5 Setup Tool]. NIB Setup Tool starts. F Click [Property Sheet], and then click [OK].
Printing with NetWare G In the [Remote Printer No.(N)] box, enter the number of the printer. Important ❒ Use the same number as that of the printer to be created in the print server (N-D). H Click [OK] to close the [NIB Setup Tool - Network board list] dialog box. H Quit SmartNetMonitor for Ad- min. I On Windows, start NWadmin. Reference For more information about NWadmin, see the operating instructions that come with the NetWare.
Using the Printer Function C In the [Print Server name] box, enter the name of the print server. Important ❒ Use the same name as that specified using NIB Setup Tool (step G-B). D Select the [Define additional properties] check box, and then click [Create]. N Assign the printer to the created print server as follows: A Click [Assignments], and then click [Add] in the [Assignments] area. B In the [Available objects] box, click the queue created in step J, and then click [OK].
Printing with NetWare C In the [Printers] window, click the icon of the printer you want to use. D On the [File] menu, click [Properties]. E Click the [Details] tab, and then click [Add Port]. F Click [Network], and then click [Browse]. When using the PostScript printer driver Follow the procedure below to set the PostScript printer driver: A Click the [PostScript] tab. B Click [Advanced]. C Clear the [Send CTRL+D before job] and [Send CTRL+D after job] check boxes.
Using the Printer Function D Follow the instructions on screen to complete installation of the printer driver. - NDPS The machine operates using NDPS. Operating requirements are as follows: • NetWare Version: 5.0, 5.1, 6 ❖ Printer Drivers and Operating Systems 5 Printer driver Operating system PCL Windows 95/98/Me Windows 2000 Windows XP Professional Windows NT 4.0 PostScript 3 Windows 95/98/Me Windows 2000 Windows XP Professional Windows NT 4.
6. Using SmartNetMonitor for Client SmartNetMonitor for Client SmartNetMonitor for Client is equipped with the following functions. We recommend all users of this printer to install this software.
Using SmartNetMonitor for Client • Notification function • An error message appears if there is an error on the specified printer during transfer or printing of data. • A window opens to notify you of print completion. You can also select to be notified of the print condition, such as displaying the notice only when Recovery Printing is executed. • You can have a completion notice appear after printing, document storage, and LAN-Fax transmission.
SmartNetMonitor for Client Setting the Network Monitoring Function To view the status of machines using SmartNetMonitor for Client, you must configure SmartNetMonitor for Client in advance, so that it monitors the machine whose status you want to view. A Start SmartNetMonitor for Client. The SmartNetMonitor for Client icon appears at the right end of the taskbar. B Right-click the SmartNetMonitor for Client icon, and check the desired machine is on the shortcut menu that appears.
Using SmartNetMonitor for Client 6 76
7. Using SmartNetMonitor for Admin SmartNetMonitor for Admin Using SmartNetMonitor for Admin, not only can you monitor the status of network printers, but you can also change the configuration of the network interface board using TCP/IP or IPX/SPX protocol.
Using SmartNetMonitor for Admin • Allows selection of functions such as printing and scanning for each user code. • Fax numbers and e-mail addresses stored in the machine can be changed and saved by computer. • You can check each fax job history entry. • You can make settings for and display the status changes of group devices. • Using Address Management Tool, you can manage LAN-Fax numbers, user names for Scan to Folder, and addresses for sending and receiving Internet faxes.
SmartNetMonitor for Admin Changing the Network Interface Board Configuration Limitation ❒ Internet Explorer 4.01 or a later version is required to use NIB Setup Tool. A Start SmartNetMonitor for Ad- min. B On the [Group] menu, point to [Search Device], and then click [TCP/IP] or [IPX/SPX]. A list of machines appears. Note ❒ Select the protocol of the machine for which you want to change configuration. C In the list, select the machine for which you want to change configuration.
Using SmartNetMonitor for Admin Locking the Control Panel Menu A Start SmartNetMonitor for Ad- min. B On the [Group] menu, point to [Search Device], and then click [TCP/IP] or [IPX/SPX]. A list of machines appears. Note ❒ Select the protocol of the machine for which you want to change configuration. C In the list, select the machine for which you want to change configuration. D On the [Tools(T)] menu, point to [Device Settings], and then click [Lock Operation Panel Menu].
SmartNetMonitor for Admin Managing User Information Load Fax Journal A Start A Start SmartNetMonitor for Ad- min. B On the [Group] menu, point to [Search Device], and then click [TCP/IP] or [IPX/SPX]. A list of machines appears. SmartNetMonitor for Ad- min. B On the [Group] menu, point to [Search Device], and then click [TCP/IP] or [IPX/SPX]. A list of machines appears. Note ❒ Select the protocol of the machine for which you want to change configuration.
Using SmartNetMonitor for Admin Viewing and Deleting Spool Print Jobs Managing Address Information A Start A Start SmartNetMonitor for Ad- min. B On the [Group] menu, point to [Search Device], and then click [TCP/IP] or [IPX/SPX]. A list of machines appears. the [Group] menu, point to [Search Device], and then click [TCP/IP] or [IPX/SPX]. A list of machines appears. Note ❒ Select the protocol of the machine for which you want to change configuration.
SmartNetMonitor for Admin Configuring Energy Saver Mode A Start SmartNetMonitor for Ad- min. B On the [Group] menu, point to [Search Device], and then click [TCP/IP] or [IPX/SPX]. A list of machines appears. C On the [Group] menu, point to [Energy Saver Mode]. For more information about settings, see SmartNetMonitor for Admin Help. Note ❒ Point to [Set by Group] if you want to change all devices in the area. ❒ Point to [Set Individually] if you want to change only selected devices.
Using SmartNetMonitor for Admin 7 84
8. Configuring the Network Interface Board Using a Web Browser You can check the status of a machine and change its settings using the Web browser. ❖ What can it do? You can remotely check the status of a machine or specify its settings over the network using a computer's Web browser.
Configuring the Network Interface Board Using a Web Browser Going to the Top Page 4 1 2 3 1. Header area 3. Status You can register favorite URLs using [URL]. To view the Help section, click [Help]. Displays machine status, network interface board name, and comments. 2. Menu area These buttons are for configuring the network interface board and checking machine status. 8 86 4.
Types of Menu Configuration and Mode Types of Menu Configuration and Mode Items that appear on the menu area differ between user mode and administrator mode. The work area which appears under the selected menu displays machine status under user mode and machine setting under administrator mode. Note ❒ ❍ Indicates machine status can be displayed. ❒ $ Indicates machine settings can be changed.
Configuring the Network Interface Board Using a Web Browser User mode Administrator mode Device Settings - $ E-mail ❍ $ File Transfer - $ ❍ $ TCP/IP ❍ $ NetWare ❍ $ AppleTalk ❍ $ SMB ❍ $ SNMP - $ ❍ ❍ ❍ $ Password - $ Access Control - $ IPP Authentication - $ Menu Configuration Network Interface Protocol System Log Webpage Password Limitation ❒ Documents stored under the copier and printer functions cannot be downloaded.
Verifying the Network Interface Board Settings Verifying the Network Interface Board Settings A Start the Web browser. B I n th e [ A dd r e s s ] b ox , en t er the address (for example http:// XXX.XXX,XXX,XXX, where the Xs are the numbers of the IP address). The status of the machine you chose appears on the Web browser. C In the menu area, click the selected menu. If a sub-menu appears, click it. Reference For more information about each item, see p.91 “Using Help on the Web Browser”.
Configuring the Network Interface Board Using a Web Browser Configuring the Network Interface Board Settings A Start the Web browser. B I n th e [ A dd r e s s ] b ox , en t er the address (for example http:// XXX.XXX,XXX,XXX, where the Xs are the numbers of the IP address). The status of the machine you chose appears on the Web browser. C Click [Administrator Mode]. The dialog box for entering the password and user name appears. D Enter your user name and password, and then click [OK].
Using Help on the Web Browser Using Help on the Web Browser When using Help for the first time, clicking either [Help] in the header area or the icon marked "?" in the work area makes the following screen appear. From there you can check Help in two different ways, as shown below: ❖ Checking a Help Using the Internet You can check the latest Help updates. ❖ Downloading and Checking Help You can download Help to your computer’s hard drive and view it.
Configuring the Network Interface Board Using a Web Browser 8 92
9. Appendix Remote Maintenance by telnet You can view printer status and configure the network interface board using telnet. Note ❒ You should specify a password so only the network administrator, or a person with network administrator privileges, can use remote maintenance. ❒ The password is the same as that used for configuring the network interface board with a Web browser. ❒ If you change a password using remote maintenance, the other passwords are also changed.
Appendix Commands List Use the "help" command to display remote maintenance use. Note ❒ Enter “help” to display a list of commands that can be used. msh> help ❒ Enter “help command_name” to display information about the syntax of that command. msh> help command_name TCP/IP address Use the "ifconfig" command to configure the Ethernet interface, the IEEE 1394 interface/IEEE 802.11b, and the TCP/IP (IP address, subnet mask, broadcast address, default gateway address) for the machine.
Remote Maintenance by telnet Access control - Address ❖ Sub-net Mask A number used to numerically “mask” or hide the IP address on the network by eliminating those parts of the address that are alike for all machines on the network. ❖ Broadcast address A specified address for sending data to specific devices on the network. Note ❒ To get the above addresses, contact your network administrator. ❒ If you do not know the address to configure, use the machine's default. ❒ The Ethernet interface and IEEE 802.
Appendix DHCP Protocol Use the "dhcp" command to configure the DHCP settings. Use the "set" command to allow or prevent remote access for each protocol. msh> set protocol {up | down}|{up | down} ❖ Reference The following command displays the current DHCP settings. msh> dhcp ❖ Configuration You can configure the DHCP settings. msh> dhcp interface_name [on|off]|[on|off] Note ❒ Select [on] to enable DHCP. Select [off] to disable DHCP.
Remote Maintenance by telnet Printer status System log information The following command can be used to get information about the current printer status: msh> command Use the "syslog" command to display information stored in the system log. msh> syslog Command Information that is displayed status Status of printer. Information about print jobs. info prnlog [ID] Information about the paper tray, output tray, printer language of printer. Lists the last 50 print jobs.
Appendix ❖ Display Shows SNMP information and available protocols. msh> snmp ? The following command displays the settings of registered number specified. msh> snmp [registered_number] Omitting the number displays all access settings. msh> snmp [-p] Note ❒ Add “-p” (as above) to have the in forma tion d is pla yed one screen at a time. ❖ Community name configuration You can set the community name of the registered number.
Remote Maintenance by telnet The following is a sample configur a t i o n u s i n g t h e r e g i s t r a tio n number 3 with the IP address 192.168.15.16: msh> snmp 3 ip 192.168.15.16 The following is a sample configur a t i o n u s i n g t h e r e g i s t r a tio n number 3 with the IPX address 7390A448, and the MAC address 00:00:74:62:5C:65: msh> snmp 3 ipx 7390A448:0000 IPP Use the "ipp" command to configure IPP settings.
Appendix Direct printing port SMB The direct printing port allows printing directly from a computer, connected to the network, to the printer. Use the "diprint" command to change direct printing port settings. Use the "smb" command to configure or delete the NetBEUI settings such as the computer name or workgroup name.
Remote Maintenance by telnet ROUTE SLP Use the "route" command to control the routing table. This command allows you to configure and display routing information. You can change the network configuration from remote computers using this command. Use the "slp" command to configure SLP settings. You can search the NetWare server using SLP in the PureIP environment of NetWare5/5.1, 6. Use the "slp" command to configure the value of TTL used by the SLP multi-cast-packet.
Appendix Setting IEEE 802.11b Parameter Value to be configured Use the "wiconfig" command to configure IEEE 802.11b settings. ssid ID value You can set SSID in infrastructure mode. Limitation ❒ You can make settings when installing the optional 802.11b interface kit. The characters that can be used are ASCII 0x20-0x7e (32 bytes). SSID value is set automatically to the nearest access point if the setting has not been made. ❖ View settings The following command displays the current IEEE 802.
Remote Maintenance by telnet Parameter Value to be configured key [key value] 64-bit or 128-bit can be set. Only 10 hexadecimal characters can be set when using 64-bit; or 26 hexadecimal characters when using 128bit. ❒ When configuring the IEEE 802.11b TCP/IP, see p.94 “TCP/IP address”. Also, set 0x as the prefix. Use the "spoolsw" command to configure Job Spool settings. To use this function, set the same WEP key for all ports that transmit to each other.
Appendix ❖ Protocol configuration To change protocol settings, use the following command. You can specify the setting for "lpr", "ipp" or "smb". • lpr msh> spoolsw lpr {on | off}|msh> spoolsw lpr {on | off} • ipp msh> spoolsw ipp {on | off}|msh> spoolsw ipp {on | off} • smb msh> spoolsw smb {on | off}|msh> spoolsw smb {on | off} Changing the host name Use the "hostname" command to change the printer name.
Remote Maintenance by telnet ❖ NBT scope ID setting You can configure the NBT scope ID. Limitation ❒ Enter a scope ID using up to 31 alphanumeric characters. msh> wins interface name scope scope ID Note ❒ If you receive different scope IDs from DHCP and WINS, the scope ID from DHCP takes priority. ❖ Interface Priority Configuration You can assign priorities governing which interface obtains AutoNet parameters.
Appendix Changing the password DNS U s e t h e " p a s s w d " c o m ma n d t o change the remote maintenance password. Use the "dns" command to configure or display DNS (Domain Name System) settings. Important ❒ Be sure not to forget or lose the password. ❖ View setting The following command displays current DNS settings: msh> dns Note ❒ The default password is “password”. A Enter “passwd”. msh> passwd B Enter the current password. Old password: C Enter the new password.
Remote Maintenance by telnet Domain name Use the "domainname" command to display or configure domain name settings. You can configure the Ethernet interface, IEEE 1394 interface, or IEEE 802.11b interface. ❖ View setting The following command displays the current domain name: msh> domainname ❖ Interface domain configuration The following command displays or sets the Ethernet interface domain name, IEEE 1394 interface, or IEEE 802.11b interface.
Appendix ❖ NetWare • Printer function using NetWare server Note ❒ In a PureIP environment, you can use only the print server even if this protocol has been turned off or disabled. ❒ Turning off or disabling NetWare will also disable the SNMP session using IPX/SPX.
Using DHCP Using DHCP You can use the printer in a DHCP environment. You can also register the printer NetBIOS name on a WINS server when it is running. If you connect an Ethernet interface and IEEE 1394 (IP over 1394) interface simultaneously, pay attention to the following: ❖ When a static IP address is set for both interfaces • IP Address: If interface IP addresses overlap, the Ethernet interface is selected. • Subnet Mask: If interface subnet masks overlap, the Ethernet interface is selected.
Appendix Note ❒ Printers that register the printer NetBIOS name on a WINS server must be configured for the WINS server. See p.104 “WINS”. ❒ Supported DHCP servers are Windows NT 4.0 Server Service Pack 4 or later versions, Windows 2000, Windows XP Professional Server, and NetWare 5/5.1, 6. ❒ If you do not use the WINS server, reserve the printer's IP address in the DHCP server so the same IP address is assigned every time.
SNMP SNMP The machine is equipped with an SNMP (Simple Network Management Protocol) agent that operates under UDP and IPX on the Ethernet/wireless LAN interface, and UDP on the IEEE 1394 (IP over 1394) interface. Using the SNMP manager you can get information about the machine. The default community names are “public” and “admin”. You can get MIB information using these community names.
Appendix Single-line Messages on the Display Panel This section describes the most common network-related messages that appear on the display panel. If a message not described here appears, act according to that message. Messages without Code Numbers Reference Before turning the main power off, see “Turning On the Power”, General Settings Guide. Message Causes Ethernet board has a problem. An error has occurred in the Ethernet board. IEEE1394 board has a problem.
Single-line Messages on the Display Panel Messages with Code Numbers Note ❒ A message reporting an error appears on the display panel as shown. Message Cannot connect with DHCP Server. (. Causes The DHCP server cannot be found. Solutions Check the DHCP server is running on the network. Code numbers 101 201 301 IP AdThe specified IP address overlaps dress is another IP address. already in use. : The IP address specified for the machine overlaps another IP address in use.
Appendix Message Causes Solutions Code numbers Cannot Cannot contact to the specified file connect to server in remote printer mode. the specified Netware print server. ( The print server is refusing the connection for some reason. Check the print server setting. See p.61 “Printing with NetWare”. 107 This Net- The NetBIOS name overlaps. BIOS name is already in use. ( The interface's NetBIOS name specified overlaps another interface's NetBIOS name.
Understanding Displayed Information Understanding Displayed Information This section describes how to read the status information returned by the network interface board. Print Job Information Print job status can be viewed using the following commands: • telnet : Use the "status" command. See p.97 “Printer status”.
Appendix Machine Status and Configuration You can check the machine status and configuration using telnet or UNIX. ❖ telnet Use the "info" or "status" command. ❖ UNIX Use the "lpr" or "lpstat" command, or "stat", "info" parameter of rsh, rcp, or ftp. Machine status Status 9 116 Description Call Service Center Call service center and ask for assistance. Card/Counter not inserted The machine is waiting for prepaid card or key counter to be inserted.
Understanding Displayed Information Status Description Error: Wireless Card or Board A wireless card or wireless board error has occurred. Full: Finisher Shift Tray Finisher shift tray is full. Full: Finisher Upper Tray Finisher upper tray is full. Full: Internal Tray 1 Internal tray 1 is full. Full: Internal Tray 2 Internal tray 2 is full. In Use: Finisher Finishing is in progress. In Use: Input Tray Paper tray is in use. In Use: Staple Unit Stapling is in progress.
Appendix Status 9 118 Description Not Detected: PCU Photoconductor unit is not attached or is not attached correctly. Not Detected: Selected Tray Selected tray is not attached or is not attached correctly. Panel Off Mode The machine is in Panel-Off mode. Paper in Duplex Unit Duplex unit cannot be used because there is paper left in it. Paper in Finisher Finisher cannot be used because there is paper left in it. Paper Misfeed: Duplex Unit Paper has jammed in duplex unit.
Understanding Displayed Information Machine configuration Note ❒ “*” (asterisk) is displayed with the current setting. ❒ Regarding *1-*5, see table below. Item Description Input Tray No. ID number of the paper tray Name Name of the paper tray*1 Paper Size Paper size loaded in the paper tray*2 Status Current status of the paper tray*3 Output Tray No.
Appendix Paper size Description 81/2 × 11 LTK 11 × 81/2 LTL 51/2 × 81/2 HLTK 81/2 × 51/2 HLTL Custom Size Custom Size 101/2 × 71/4 ExecutiveK 71/4 × 101/2 ExecutiveL 81/4 × 13 FolioL 81/2 × 13 FoolscapL 8 × 13 8"×13"L 8K (267 × 390) 8KL 16K (195 × 267) 16KK 16K (267 × 195) 16KL ❖ *3 Input Tray: Status Status Description Normal Not Detected There is no paper tray. No Paper There is no paper in the paper tray.
Understanding Displayed Information Configuring the Network Interface Board The network interface board settings can be displayed using the commands below. • telnet : Use the "show" command. See p.97 “Network interface board configuration settings information”. Item name Meaning Common Mode “Up” means active; “Down” means inactive.
Appendix Item name Meaning TCP/IP Mode “Up” means active, “Down” means inactive.
Understanding Displayed Information Item name Meaning SMB Switch Mode (this value is fixed) Direct print (this value is fixed) Notification Notification of print job completion Workgroup name Name of the workgroup Computer name Name of the computer Comment Comment Share name[1] Share name (name of the printer type) Protocol IEEE 802.
Appendix Item name Meaning Domain name ether ip1394 Ethernet interface domain name *1 wlan *3 IEEE 802.11b interface domain name IEEE 1394 interface domain name WINS ether Ethernet interface WINS name Primary WINS Primary WINS server address Secondary WINS Secondary WINS server address ip 1394 *1 IEEE 1394 interface WINS name Primary WINS Primary WINS server address Secondary WINS Secondary WINS server address wlan *3 IEEE 802.
Message List Message List This is a list of messages written to the machine's system log. The system log can be viewed using the "syslog" command. System Log Information You can use the following methods to view the system log: • telnet : Use the "syslog" command. See p.97 “System log information”. Message Causes and solutions Access to NetWare server denied. Either there is no account for this print server or the NetWare server or the password was incorrect.
Appendix Message 9 Cannot find rprinter (/) Check the printer number registered in the print server. Change IP address from DHCP Server. The IP address changes when DHCP LEASE is renewed. To always assign the same IP address, set a static IP address to the DHCP server. child process exec error! (process name) The network service failed to start. Turn the printer off and then on. If this does not work, contact your service or sales representatives.
Message List Message Causes and solutions Frametype = The is configured to be used on NetWare. httpd start. httpd has started. IEEE 802.11b mode Transmission mode for IEEE 802.11b (Example: current mode is infrastructure mode.) IEEE 802.11b [infrastructure] mode (Example: current mode is 802.11 ad hoc mode.) IEEE 802.11b [802.11 ad hoc] mode (Example: current mode is ad hoc mode.) IEEE 802.11b [ad hoc] mode IEEE 802.
Appendix Message Causes and solutions inetd start. An inetd has started. started with IP: has been set for and started. : Subnet overlap. Subnet from Netmask and the IP address you tried to set for overlap the subnet of another interface. Set Subnet so it does not overlap with another interface. 9 IPP cancel-job: permission denied. The printer could not authenticate the name of the user attempting to cancel a job.
Message List Message Causes and solutions Open log file (In print server mode) The specified log file has been opened. papd start. (Apple Talk) Apple Talk print service has started. permission denied. Job cancellation was determined to be unauthorized after checking the user name and host address (except for ROOT authorization). phy release file open failed. A replacement network interface board is required. Contact your sales or service representatives.
Appendix Message Causes and solutions smbd start. (NetBEUI) An smbd (SMB (Server Message Block) service) has started. Snmp over ip is ready. Communication over TCP/IP via SNMP is available. Snmp over IP over 1394 is ready. Communication over IP over 1394 via SNMP is available. Snmp over ipx is ready. Communication over IPX via SNMP is available. snmpd start. SNMP service has started. started. Direct print service has started.
Message List Message SMTPC: failed to connect smtp server. Causes and solutions Failed to connect the SMTP server. This could be because: • There is no connection to the network. • The network configuration is incorrect, so there is no response from the SMTP server. • The SMTP server name is incorrect. • The specified SMTP server is incorrect. • There is no specified SMTP server IP address in the DNS server. • Another server other than the SMTP server has been specified.
Appendix ❖ LDAP error messages Note ❒ See the description corresponding to the error message. The number in the error message is the RFC error number. LDAP errors appear thus: : • Status • init Error during LDAP initialization. • bind Error during LDAP binding. • search Error during LDAP search. • LDAP error message LDAP error message 9 132 Causes and solutions Operations error(1) An operating error has occurred. The function is not possible in the current status.
Message List LDAP error message Causes and solutions No such attribute(16) The requested attribute does not exist. Check the attribute settings. Undefined attribute type(17) The specified attribute is undefined. Inappropriate matching(18) The match is inappropriate. Constraint violation(19) A constraint violation has occurred. Type or value exists(20) The specified attribute already exists. Invalid syntax(21) The syntax of the specified attribute is invalid.
Appendix LDAP error message 9 134 Causes and solutions Can't contact LDAP server(81) Cannot contact the LDAP server. Check the server is working and communicating properly. Local error(82) A local program error or an SASL authentication error has occurred. Consult the network administrator. Encoding error(83) An error occurred while encoding the message to be transmitted. Consult the network administrator. Decoding error(84) An error occurred while decoding the received message.
When Using Windows Terminal Service/MetaFrame When Using Windows Terminal Service/MetaFrame Operating Environment Limitation The following combinations of operating system and MetaFrame are supported: The following restrictions apply in the Windows Terminal Service environment. These restrictions are due to the way Windows Terminal Service or MetaFrame works. ❖ Windows NT Server 4.0 Terminal Server Edition • MetaFrame 1.8 SP3/FR1 SP3 • MetaFrame XP 1.
Appendix • When printing a large number of bitmap images or using the server in a WAN environment over dial-up lines such as ISDN, depending on the data rate, printing may be disabled or errors may occur. • When using MetaFrame XP 1.0 or later versions, we recommend configuring [Client Printer bandwidth] available from [Citrix Management Console], according to the environment.
Precautions Precautions Please pay attention to the following when using the network interface board. When configuration is necessary, follow the appropriate procedures below. Connecting a Dial-Up Router to a Network When using NetWare (file server) If the NetWare file server and printer are on opposite sides of a router, packets are sent back and forth continuously, possibly incurring communications charges.
Appendix ❖ When a dial-up router is connected in a network environment The settings for the delivery server to be connected must be made appropriately for the machine with ScanRouter V2 Lite/Professional, Auto Document Link, or DeskTopBinder V2 Lite/Professional. In addition, set up connected devices using the I/O settings of ScanRouter V2 Administration Utility.
Precautions Banner page You should not configure a banner page on NetWare. If you want to change the banner page setting, always configure it using Windows. • Under Windows 95/98/Me, clear the [Enable banner] check box on the [Printer Settings] tab in the printer properties dialog box. • Under Windows 2000/XP, clear the [Enable banner] check box on the [NetWare Settings] tab in the printer properties dialog box. • Under Windows NT 4.
Appendix When the Wireless LAN Board (optional) Is Installed When using the wireless LAN interface on the network, note the following: ❖ When moving the machine Detach the antennas when relocating the machine locally. After moving the machine, reattach the antennas, ensuring that: • The antennas are positioned clear of obstacles. • There is 40 to 60 mm between the antennas, so that they do not touch. • The exposure glass cover and the Auto Document Feeder (ADF) do not knock the antennas.
Specifications Specifications Interface 100BASE-TX, 10BASE-T, IEEE 1394 (IP over 1394) *1 , IEEE 802.11b Frame type EthernetII, IEEE 802.2, IEEE 802.
INDEX A Access Control, 95 access type, 98 AutoNet, 105, 110 B Bidirectional SCSI print, 37 Broadcast address, 95 C Channel, 38 Communication Mode, 38 community name, 98 configuration access type, 98 community name, 98 Network Interface Board configuration, 121 Web Browser, 85 D Delivery Option, 39 DHCP, 96, 109 dial-up router, 137 Direct Printing Port, 100 DNS, 106 DNS Configuration, 35 Domain Name, 36, 37 Domainname, 107 E Effective Protocol, 36 Energy saver mode, 83 Ethernet Speed, 36 EtherTalk Macin
R remote maintenance telnet, 93 Return to Defaults, 38 ROUTE, 101 S Scanner Recall Interval Time, 43 SCSI print (SBP-2), 37 SLP, 101 SmartNetMonitor for Client, 139 SMB, 100 SMTP Server, 40 SNMP, 97, 111 specifications, 141 SPRINT, 101 SSID Setting, 38 subnet mask, 95 system Log, 125 system log information, 97 T Telnet, 116 telnet remote maintenance, 93 using, 93 Transmission Speed, 38 U UNIX, 116 W Web Browser, 85 WEP (Encryption) Setting, 38 WINS, 104 Wireless LAN Signal, 38 Z zone Macintosh, 60 143
144 GB GB EN USA B577-8640
Copyright © 2003
Network Guide GB GB EN USA B577-8640
PostScript3 Unit Type 2027 Operating Instructions Supplement
Introduction This manual describes detailed instructions on the operation and notes about the use of this machine. To get maximum versatility from this machine all operators are requested to read this manual carefully and follow the instructions. Please keep this manual in a handy place near the machine. Important Contents of this manual are subject to change without prior notice.
TABLE OF CONTENTS 1. PostScript 3 Installable Options................................................................................................. 1 Setting Up Options ..................................................................................................... 1 Printing a Document..............................................................................................3 Toner Saving, Edge Smoothing ................................................................................. 8 Staple .
ii
1. PostScript 3 Installable Options The following options are available: ❖ Input Paper Device • Tray 3 (LCT) • Lower Paper Trays ❖ Output Paper Device • Internal Tray • Finisher 500 • Finisher 1000 Setting Up Options To use installed options correctly, first set up the printer driver. If the options are not recognized, you cannot use them, even though they are physically installed. The procedure to set up a printer driver varies depending on the operating system.
PostScript 3 ❒ If you are using Adobe Page Maker 6.0, 6.5, or 7.0 with Windows 95/98/Me, Windows 2000, or Windows NT 4.0, you have to set up options in the Adobe PageMaker's print dialog box. ❖ Mac OS You can set up all options using the [Chooser] dialog box. 1 Limitation ❒ If you use Mac OS X, this functions cannot be used.
Printing a Document Printing a Document This section describes how to print documents from an application. 1 ❖ Paper Source The following table shows where you can select this function. Windows 95/98/Me [Type:] in the [Paper] tab Windows 2000/XP [Paper Source] in the [Paper/Quality] tab Windows NT 4.
PostScript 3 ❖ Duplex Printing Use this function to select duplex printing. Limitation ❒ To use this function, the duplex unit must be installed on the printer. The following table shows where you can select this function. 1 Windows 95/98/Me [Duplex] on the [Setup] tab Windows 2000/XP [Print on Both Sides] on the [Layout] tab Windows NT 4.
Printing a Document ❖ Edge Smoothing Use this function to improve the print quality of text. Indentations in curved lines are automatically smoothed producing a cleaner appearance. Limitation ❒ When [Edge Smoothing] is selected, [Toner Saving] is disabled. 1 ❒ This function is for improving the quality of printed text, so set it to OFF when printing pictures and half tone data. Note ❒ This function is for improving the quality of printed text. Do not use it for images.
PostScript 3 ❖ Staple Use this function to staple sheets of printed paper together. Limitation ❒ When stapling, use the finisher option. See Copy Reference or Printer Reference 2. 1 Note ❒ The stapling location might differ depending on the orientation of the paper set in the printer and the orientation of the data to be printed. For details, see “Staple”, Printer Reference 2. The following table shows where you can select this function.
Printing a Document ❖ Locked Print Use this function to save documents in the machine's hard disk using a password, and then print them as required. Limitation ❒ Applications, like PageMaker, which use original drivers do not work with this function. 1 Note ❒ The user ID can consist of up to eight alphanumeric (a-z, A-Z, 0-9) characters. The password must be four digits. The following table shows where you can select this function.
PostScript 3 Toner Saving, Edge Smoothing Follow the procedure below to print documents using Toner Saving or Edge Smoothing. 1 Windows 95/98/Me A From an application, click [Print] on the [File] menu. The [Print] dialog box appears. B Select the printer, and then click [Properties]. C Click the [Print Quality] tab. D Select the function you want to use. E After making the necessary settings, click [OK] to close the printer properties dialog box.
Printing a Document D Click [Print Mode] to select the function you want to use. E Click [OK] to close the [Advanced Options] dialog box. F After making the necessary settings, click [OK] to close the [Printing Preferenc- 1 es] dialog box. G Start the printing from the application's [Print] dialog box. Windows NT 4.0 A From an application, click [Print] on the [File] menu. The [Print] dialog box appears. B Select the printer, and then click [Properties]. C Click the [Advanced] tab.
PostScript 3 Staple Follow the procedure below to print a document using the Staple functions. 1 Windows 95/ 98/ Me A From an application, click [Print] on the [File] menu. The [Print] dialog box appears. B Select the printer, and then click [Properties]. C Click the [Setup] tab. D Make the necessary settings in [Staple], and then click [OK] to close the printer properties dialog box. E Start the printing from the application's [Print] dialog box.
Printing a Document E Click [OK] to close the [Advanced Options] dialog box. F After making the necessary settings, click [OK] to close the [Printing Preferences] dialog box. 1 G Start the printing from the application's [Print] dialog box. Windows NT 4.0 A From an application, click [Print] on the [File] menu. The [Print] dialog box appears. B Select the printer, and then click [Properties]. C Click the [Advanced] tab.
PostScript 3 Sample Print Follow the procedure below to print a document using the Sample Print function. 1 Windows 95/98/Me Note ❒ If the application has a collate option, make sure it is not selected before sending a print job. By default, sample print jobs are automatically collated by the printer driver. If the collate option is selected in the application's [Print] dialog box, more prints than intended may be printed. A From an application, click [Print] on the [File] menu.
Printing a Document L Press [View Sample Print jobs]. 1 A list of the sample print files stored appears. The following items will also appear: • User ID : The user ID set by the printer driver • Date/Time : The date and time the job was sent from the computer • Qty. : The number of remaining sets M Press [UUPrev.] or [TTNext.] to scroll through the files to the one you want to print. N Select the file you want to print by pressing it. • If you want to cancel a sample print file, press it again.
PostScript 3 R Press [Yes]. The remaining sets are printed. Important ❒ When printing finishes, the stored file will be deleted. 1 Note ❒ Press [No] to cancel the printing. Windows 2000/XP, Windows NT 4.0 Note ❒ If the application has a collate option, make sure it is not selected before sending a print job. By default, sample print jobs are automatically collated by the printer driver. If the collate option is selected in the application's [Print] dialog box, more prints than intended may be printed.
Printing a Document I On the machine's control panel, press the {Printer}} key to display the printer screen. J Press [View Sample Print jobs]. 1 A list of the sample print files stored appears. The following items will also appear: • User ID : The user ID set by the printer driver • Date/Time : The date and time the job was sent from the computer • Qty. : The number of remaining sets K Press [UUPrev.] or [TTNext.] to scroll through the files to the one you want to print.
PostScript 3 O Press [Print]. A print confirmation screen appears. P Press [Yes]. 1 The remaining sets are printed. Important ❒ When printing finishes, the stored file will be deleted. Note ❒ Press [No] to cancel the printing. Mac OS/Mac OS X Limitation ❒ If you use Mac OS X, this function cannot be used. A From an application, click [Print] on the [File] menu. The [Print] dialog box appears. B In the pop-up menu, click [Job Log]. C On the [Job Type:] pop-up menu, select the appropriate setting.
Printing a Document H Press [View Sample Print jobs]. 1 A list of the sample print files stored appears. The following items will also appear: • User ID : The user ID set by the printer driver • Date/Time : The date and time the job was sent from the computer • Qty. : The number of remaining sets I Press [UUPrev.] or [TTNext.] to scroll through the files to the one you want to print. J Select the file you want to print by pressing it. • If you want to cancel a sample print file, press it again.
PostScript 3 N Press [Yes]. The remaining sets are printed. Important ❒ When printing finishes, the stored file will be deleted. 1 Note ❒ Press [No] to cancel the printing. Deleting a Sample Print File If the printed document is not as you expected, you can delete the sample print file. A On the machine's control panel, press the {Printer}} key to display the printer screen. B Press [View Sample Print jobs]. A list of sample print files stored appears.
Printing a Document Locked Print Follow the procedure below to print a document using the Locked Print function. 1 Windows 95/98/Me A From an application, click [Print] on the [File] menu. The [Print] dialog box appears. B Select the printer, and then click [Properties]. C Click the [Setup] tab. D In the [Job Type:] list, click [Locked Print]. E Click [Details...].
PostScript 3 K Press [View Locked Print jobs]. 1 A list of the locked print files stored appears. The date and time the job was sent from the computer, as well as the user ID is displayed. L Select the file you want to print by pressing it. Note ❒ Press [U UPrev.] or [T TNext.] to scroll through the list. ❒ To cancel a selection, press the highlighted file again. ❒ Only one file can be selected at a time. M Press [Print]. The password screen appears.
Printing a Document Note ❒ Press [No] to cancel the printing. ❒ If printing is stopped by pressing [Job Reset] after it has started, the file will be deleted. 1 Windows 2000/XP, Windows NT 4.0 A From an application, click [Print] on the [File] menu. The [Print] dialog box appears. B Select the printer, and then click [Properties]. Note ❒ Under Windows 2000, select the printer, and then proceed to stepC. ❒ Under Windows XP, select the printer, and then click [Preferences]. C Click the [Job Log] tab.
PostScript 3 I Press [View Locked Print jobs]. 1 A list of the locked print files stored appears. The date and time the job was sent from the computer, as well as the user ID is displayed. J Select the file you want to print by pressing it. Note ❒ Press [U UPrev.] or [T TNext.] to scroll through the list. ❒ To cancel a selection, press the highlighted file again. ❒ Only one file can be selected at a time. K Press [Print]. The password screen appears.
Printing a Document Note ❒ Press [No] to cancel the printing. ❒ If printing is stopped by pressing [Job Reset] after it has started, the file will be deleted. 1 Mac OS/Mac OS X Limitation ❒ If you use Mac OS X, this function cannot be used. A From an application, click [Print] on the [File] menu. The [Print] dialog box appears. B In the pop-up menu, click [Job Log]. C On the [Job Type:] pop-up menu, click [Locked Print].
PostScript 3 H Select the file you want to print by pressing it. Note ❒ Press [U UPrev.] or [T TNext.] to scroll through the list. 1 ❒ To cancel a selection, press the highlighted file again. ❒ Only one file can be selected at a time. I Press [Print]. The password screen appears. J Enter the password using the number keys, and then press [OK]. A print confirmation screen appears. Note ❒ The confirmation screen will reappear if the password was entered incorrectly.
Printing a Document C Select the file you want to delete by pressing it. Note ❒ Press [U UPrev.] or [T TNext.] to scroll through the list. 1 ❒ To cancel a selection, press the highlighted file again. ❒ Only one file can be selected at a time. D Press [Delete]. The password screen is appears. E Enter the password using the number keys, and then press [OK]. A delete confirmation screen appears. Note ❒ The confirmation screen will reappear if the password was entered incorrectly.
PostScript 3 G Click [OK]. H Start the printing from the application's [Print] dialog box. 1 Windows 2000/XP, Windows NT 4.0 A From an application, click [Print] on the [File] menu. The [Print] dialog box appears. B Select the printer, and then click [Properties]. Note ❒ Under Windows 2000, select the printer, and then proceed to stepC. ❒ Under Windows XP, select the printer, and then click [Preferences]. C Click the [Job Log] tab. D In the [Job Type:] list, click [Document Server].
Printer Utility for Mac Printer Utility for Mac By using Printer Utility for Mac, you can download fonts, change the printer name, and so on. 1 Limitation ❒ If the Macintosh and printer are connected by USB (optional), you cannot use Printer Utility for Mac. Note ❒ Printer Utility for Mac is included on the CD-ROM labeled “Printer Drivers and Utilities”. ❒ Printer Utility for Mac requires Mac OS 8.6 ~ 9.x. (Mac OS X 10.1 is supported.
PostScript 3 Starting Printer Utility for Mac This describes how to start Printer Utility for Mac. 1 Mac OS Important ❒ Before starting Printer Utility for Mac, make sure the printer is selected in [Chooser] on the Apple menu. A Double-click the Printer Utility for Mac icon. The [Printer Utility for Mac] dialog box appears. B Click [OK]. Printer Utility for Mac will take a few seconds to start. Reference For more information, see p.29 “Printer Utility for Mac Functions”.
Printer Utility for Mac Printer Utility for Mac Functions Printer Utility for Mac functions are described below. 1 ❖ Apple menu (Mac OS), Printer Utility for Mac menu (Mac OS X) • [About Printer Utility for Mac...] • [Choose Printer...] Displays the [Choose target printer] dialog box. ❖ [File] menu • [Download PS Fonts] Downloads fonts (PostScript Type 1) to the machine. See p.30 “Downloading PS Fonts”. • [Display Printer's Fonts] Displays and deletes the fonts in machine memory and the hard disk. See p.
PostScript 3 Downloading PS Fonts You can download the PS fonts to the machine memory or hard disk. 1 Important ❒ The following download procedure assumes you are a system administrator. If you are not, consult your system administrator. ❒ Resetting the machine deletes the fonts. ❒ Make sure the machine and Macintosh are connected in the Appletalk environment. Note ❒ Some fonts cannot be downloaded. ❒ Before downloading, read the documentation of the fonts you want to use.
Printer Utility for Mac Displaying Fonts You can view available fonts that have been downloaded. Fonts in machine memory and the hard disk can be displayed. 1 A On the [File] menu, click [Display Printer's Fonts...]. The dialog box appears. B Click [Printer's disk] or [Printer's memory]. C Click [OK]. Deleting Fonts You can delete fonts from machine memory or the hard disk. A On the [File] menu, click [Display Printer's Fonts...]. The dialog box appears. B Click [Printer's disk] or [Printer's memory].
PostScript 3 Initializing the Hard Disk When initializing the machine's hard disk using Printer Utility for Mac, only fonts related to PostScript will be deleted. Before initializing, make sure you know the fonts already stored in the machine. 1 Important ❒ When initializing the machine's hard disk from the machine's control panel, all the data in the machine, such as the Document Server data, will be deleted. Before initializing, be sure to check the data on the hard disk.
Printer Utility for Mac Printing Font Samples You can print samples of fonts that have been downloaded into the hard disk and memory. 1 Limitation ❒ If you use Mac OS X, this function is not possible. Note ❒ The paper selected under [Page Setup] is used. A On the [File] menu, click [Print Fonts Sample...]. B Click [Print]. Renaming the Machine You can change the machine name that appears under Appletalk. If you connect several printers on the network, assign different names to help identify them.
PostScript 3 Restarting the Machine You can restart the machine from the [File] menu; however, the fonts in machine memory will be deleted. 1 A On the [File] menu, click [Restart Printer]. B Check the message that appears on the screen, and then click [Restart]. The machine restarts. Note ❒ If the machine is restarted, all settings return to default. For setting functions, see Printer Reference 2 provided as a PDF file on the CD-ROM labeled “Operating Instructions for Printer / Scanner”.
Printer Utility for Mac D Click [OK]. E On the Apple menu, click [Chooser]. F Click the [AdobePS] icon. G In the [Appletalk zone:] list, select the zone changed in step B . H In the [Select a PostScript Printer:] list, select the machine you want to use. I Close the [Chooser] dialog box. 1 Displaying the Machine Status You can display current machine status. A On the [Utility] menu, click [Display Printer Status...]. The current machine status appears. B Check the current machine status.
PostScript 3 D Printing is executed according to the sent PostScript file. Note ❒ The [Reply from Printer] window may open, depending on the PostScript file sent. 1 E On the [Console] menu, click [Return To Main Menu] to close the PostScript file.
INDEX C Collate, 4 D Deleting a Locked Print File, 24 Deleting a Sample Print File, 18 Deleting Fonts, 31 Destination Tray, 3 Displaying Fonts, 31 Displaying the Machine Status, 35 Document Server, 7, 25 Downloading PostScript Files, 34 Downloading PS Fonts, 30 Duplex Printing, 4 E Edge Smoothing, 5 I P Page Setup, 32 Paper Source, 3 Printer Utility for Mac Functions, 29 Printing Font Samples, 33 Printing the Font Catalog, 32 R Renaming the Machine, 33 Restarting the Machine, 34 S Sample Print, 6, 12
38 GB GB EN USA B577-8680
Copyright © 2003
PostScript3 Unit Type 2027 Operating Instructions Supplement GB GB EN USA B577-8680
UNIX Supplement
Introduction This manual describes detailed instructions on the operation and notes about the use of this machine. To get maximum versatility from this machine all operators are requested to read this manual carefully and follow the instructions. Please keep this manual in a handy place near the machine. Important Contents of this manual are subject to change without prior notice.
TABLE OF CONTENTS How to Read This Manual .....................................................................................1 1. UNIX Configuration Before Setup...........................................................................................................3 Using the “lp”/“lpr” commands.................................................................................... 3 Using the “rsh”/“rcp”/“ftp” commands .........................................................................
ii
How to Read This Manual Symbols In this manual, the following symbols are used: R WARNING: This symbol indicates a potentially hazardous situation which, if instructions are not followed, could result in death or serious injury. R CAUTION: This symbol indicates a potentially hazardous situation which, if instructions are not followed, may result in minor or moderate injury, or damage to property. * The statements above are notes for your safety.
2
1. UNIX Configuration This section explains how to set up a network printer and check print status using UNIX. Limitation ❒ To print from a UNIX workstation, use a file that the printer supports. Before Setup Setup varies depending on the printing commands. Be sure to make settings accordingly. Using the “lp”/“lpr” commands A Use the installation shell script to register the device option, as well as the printer host name and IP address. See p.4 “Using the Installation Shell Script”. B Start printing.
UNIX Configuration Using the Installation Shell Script The installation shell script helps the setup process. The installation shell script automates some of the tasks in configuring /etc/hosts, /etc/printcap; creating the spool directory for BSD UNIX; and running the “lpadmin” command for System V UNIX. 1 Preparation The installation shell script can be used on the following workstations (it cannot be used with other types of workstations): • SunOS 4.x.x, 5.x • Solaris 2.x, 7, 8 • HP-UX 8.x, 9.x, 10.
Using the Installation Shell Script Assigning the IP Address Preparation Configure the machine to use TCP/IP. 1 • Make sure that TCP/IP on the machine is set to active. (The default is active.) • Assign an IP address to the machine and configure the other settings required for TCP/IP. Reference For more information about how to make the above settings, see Network Guide. Checking the IP address configuration Follow the procedure below to make sure that the IP address is configured correctly.
UNIX Configuration Executing the Installation Shell Script Having configured the printer IP address, follow the procedure below to execute the installation shell script and set up the workstation printing environment. 1 Preparation Before executing the installation shell script, the IP address, host name and printer name, are required. The following procedures use the sample IP address: 192.168.15.16; sample host name: “nphost”; and sample printer name: “np”.
Using the Installation Shell Script C Run the installation shell script. # sh ./install Note ❒ Insert a period and slash before the current directory. 1 D Enter a number to select the workstation operating system you are using. Network printer install shell Copyright RICOH CO.,LTD. 1994-2002 Select your workstation OS type 1.SunOS 4.x.x 2.Solaris 2.x, Solaris 7-8 (SunOS5.x) 3.HP-UX 4.UnixWare 5.Linux 6.OpenServer 7.
UNIX Configuration G Configure the printer name. Enter logical printer name [default nphost_prn] If you want to use the default name, press the {RETURN} } ({ {ENTER} }) key. Enter a new name if you want to use a different one. 1 Note ❒ The host name entered in step F followed by “_prn” appears in “default”. H Set the print option. Enter remote printer name [default lp]: • Press the {RETURN} } ({ {ENTER} }) key, and printing with PCL or PostScript 3 is enabled.
Using the Installation Shell Script Deleting the printer To print using the “lp” or “lpr” commands, the option specified when the installation shell script is executed is used. Change the option in accordance with the workstation you are using. 1 ❖ BSD UNIX workstation, Linux Delete the printer entry from /etc/printcap, and then execute the installation shell script again. Select options during the setup process.
UNIX Configuration ❖ Adding an entry to the /etc/printcap file The following entry is added to the /etc/printcap file, which is the configuration for printing with the “lpr” command.
Using the Installation Shell Script ❖ Making the spool directory Create a spool directory under /var/spool/lpd. The name of the spool directory should be the name of the printer followed by “d”. Note ❒ The spool directory is used to control print job data. For example, when a print job is created, a temporary copy of the data used is created in the spool directory. All workstations accessing the network printer need to have a network printer spool directory.
UNIX Configuration Solaris ❖ Adding the IP address and host name to the /etc/hosts file The following line is added to the /etc/hosts file. The IP address and printer host name previously entered in the installation script will be used. 192.168.15.16 nphost # Network Printer • “192.168.15.16” is the IP address, “nphost” is the host name, from # to the end of the line is the comment. 1 Note ❒ The /etc/hosts file contains a list of IP addresses and names of all hosts communicating on the network.
Using the Installation Shell Script HP-UX ❖ Adding the IP address and host name to the /etc/hosts file The following line is added to the /etc/hosts file. The IP address and printer host name previously entered in the installation script will be used: 192.168.15.16 np # Network Printer • “192.168.15.16” is the IP address, “np” is the host name, the comment comes after the #. 1 Note ❒ The /etc/hosts file contains a list of IP addresses and names of all hosts communicating on the network.
UNIX Configuration Printing Methods Printing with “lpr” and “lp” 1 Execute one of the following commands according to type of workstation used: ❖ BSD UNIX workstation, Linux % lpr -Pprinter_name file_name [file_name...] For example: (printer name: “np”; file names: “file1” and “file2”) % lpr -Pnp file1 file2 ❖ Solaris, HP-UX % lp -dprinter_name file_name [file_name...
Printing Methods Printing with “rsh”, “rcp”, and “ftp” You can also print using the “rsh”, “rcp” and “ftp” commands. 1 Note ❒ Print using a format the printer supports. ❒ Try to print again when the number of requests is zero. ❒ The “print session full” appears when the maximum number of print requests is reached. ❒ The maximum number of print sessions varies depending on the command.
UNIX Configuration ftp Use the “put” or “mput” commands depending on the number of files to be printed. 1 Limitation ❒ File names cannot contain "=", "," ,"_", or ";". ❒ It is not possible to set options with the "mput" command: ❖ To print one file ftp> put file_name ❖ To print several files ftp> mput file_name [file_name...] Note ❒ You can use wild cards (“*” or “?”) for the file name with the “mput” command. The following procedure shows an example of how to print a file using the “ftp” command.
Printer Status Printer Status You can use the following commands to have information and printer status displayed or copied to a file. Use the “lpq” or “lpstat” command to display printer status, or information about print jobs. Use the “rsh”, “rcp”, or “ftp” commands to get more detailed information from the printer.
UNIX Configuration Note ❒ Leave the user name and password field blank and press the {RETURN} } ({ {ENTER} }) key. ❒ “-” indicates standard output. It will be displayed on screen if standard output has not been specified. Parameters that can be used with “rsh”, “rcp”, and “ftp” are as follows: 1 Parameter Information returned stat Status of the printer. Information about print jobs. info Information about the paper tray, output tray, and printer language.
Specifying the Device Option Specifying the Device Option With the following options, you can print with specific printer functions. 1 Configuring the Device Option The configuration of the print option varies, depending on printing commands. • rsh % rsh host_name print option1=value1,… < file_name • rcp % rcp file_name host_name:option1=value1,… • ftp ftp> put file_name option1=value1,… “host_name” is the printer host name. “file_name” is the file name you want to print.
UNIX Configuration Limitation ❒ The optional character strings the printer can recognize contain a maximum of 512 bytes. ❒ The number of available characters used as options is limited, depending on operating systems. 1 - Using the “cd” command with ftp For printing with ftp, if the option is specified using the “cd” command, it becomes available whenever the “put” or “mput” command is used. ftp> cd option Note ❒ The “pwd” command shows the current option settings.
Specifying the Device Option Device option Value Function summary orientation portrait, landscape Specifies the paper feed direction. resolution 200, 300, 400, 600 Specifies the print resolution. staple off, lefttop, righttop, leftSpecifies the staple position.
UNIX Configuration Text Printing Set this function when printing text files directly. filter=text flt=text The following sample shows how to print text files directly. • rsh % rsh nphost print filter=text < file1 • rcp % rcp file1 nphost:filter=text • ftp ftp> put file1 filter=text 1 Input Tray Specify a default input tray. Limitation ❒ Only installed input trays are available. ❒ Before printing a PostScript 3 file, the input tray option must be set to “on”.
Specifying the Device Option Paper Size Specify the paper size. 1 Limitation ❒ Only the loaded paper sizes are available.
UNIX Configuration Paper Type Specify the paper type. 1 Limitation ❒ This function is only for PostScript 3. ❒ Only the loaded paper types are available.
Specifying the Device Option Output Tray Specify the output tray. outbin=value of output tray 1 Limitation ❒ Only installed output trays are available. Note ❒ The output tray value corresponds to the ID number of the output tray obtained from the printer information (for example: “info” command in ftp, “info” command in telnet. For more information about telnet, see Network Guide.). ❒ You can select an output tray using alphabetical letters instead of the output tray's ID number.
UNIX Configuration Copies Specify the number of copies. copies=number of copies (1 to 999) 1 Limitation ❒ Do not specify “copies” and “qty *1 ” commands at the same time. *1 “qty” is a collate function. The following sample shows how to print 10 copies (host name: “nphost”; file name: “file1”): • rsh % rsh nphost print copies=10 < file1 • rcp % rcp file1 nphost:copies=10 • ftp ftp> put file1 copies=10 Collating Specify the number of collated sets.
Specifying the Device Option Duplex Printing Specify whether to use duplex printing. 1 Note ❒ Before specifying the binding option, the duplex option must be set to on. ❒ Data and paper volume affect the completion of the print job. duplex=value of duplex printing Duplex printing Value enable on disable off Reference For more information about available paper size for duplex printing, see General Settings Guide.
UNIX Configuration Binding Specify the binding side for duplex printing. 1 Note ❒ Before specifying the binding option, the duplex option must be set to “on”. ❒ Data and paper volume affect completion of the print job.
Specifying the Device Option Resolution Specify the printing resolution. resolution=value of resolution Resolution Value 200 dpi 200 300 dpi 300 400 dpi 400 600 dpi 600 1 The following sample shows how to print with 600 dpi and better quality.
UNIX Configuration Staple Specify the staple position. 1 Limitation ❒ Before executing the “staple” command, make sure the number of collated sets and the output tray is specified. ❒ When using this option, the optional finisher unit is required. ❒ When printing with this option, be sure to specify the optional finisher using “finisherproof” or “finishershift” as the value, for example “outbin=finisherproof”. For more information about the optional finisher unit, see p.25 “Output Tray”.
Specifying the Device Option Symbol Set Specify the set of print characters for the chosen font. 1 Limitation ❒ Only the selected PCL 5e/6 from the printer language option is available.
UNIX Configuration 1 Font Value Win L1 winl1 Win L2 winl2 Win L5 winl5 The following sample shows how to print using the ISO 4 character set (host name: “nphost”; file name: “file1”): • rsh % rsh nphost print symset=iso4 < file1 • rcp % rcp file1 nphost:symset=iso4 • ftp ftp> put file1 symset=iso4 32
INDEX B O Binding Option, 28 BSD UNIX workstation Deleting the printer, 9 Printer Status, 17 Printing Method, 14 C Collating Option, 26 configuration UNIX, 3 Copies Option, 26 D Deleting the printer, 9 Device Option, 19 Duplex Printing Option, 27 F ftp Printing, 16 H HP-UX Deleting the printer, 9 Printer Status, 17 Printing Method, 14 I Input Tray Option, 22 Installation Shell Script, 4, 6, 9 IP Address, 5 L Linux Deleting the printer, 9 Printer Status, 17 Printing Method, 14 lp Printing, 14 lpr Pri
34 GB GB EN USA B577
Copyright © 2003
UNIX Supplement GB GB EN USA B577