
Operating instructions


Placing Originals
15
1
Placing Originals
Note
❒ Place the original after any correc-
tion fluid or ink has completely
dried. Not taking this precaution
will result in a dirtied exposure
glass and blemished copies.
❒
Dust and residue from pencil-drawn
originals can result in a dirtied ex-
posure glass and blemished cop-
ies. We recommend using the
carrier sheet for this type of origi-
nal. See p.18 “Setting the Carrier
Sheet”.
❒ If the original's rear edge is badly
curled, smooth it out with both
hands before scanning. If the origi-
nal is inserted as is, it may be dam-
aged.
❒
When copying curled originals, use
the front copy output auxiliary tray.
Reference
For details about precautions for
originals, see p.12 “Originals”.
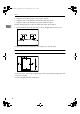
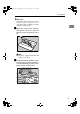
A
AA
A
Adjust the original guides to the
size and orientation of the origi-
nal width.
Note
❒ Make sure the original guides
are flush against the original.
❒ Do not push the original guide
side fence with force.
B
BB
B
Using both hands, carefully insert
the original between the original
guides, copy side up.
Important
❒ Once originals start to feed in,
do not push or pull them. This
may damage them.
❒ Do not operate the document
roller while originals are being
fed through the machine. Origi-
nals may be damaged.
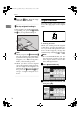
Note
❒ Do not release your hands until
the original is pulled in. Release
when it has gone slightly in.
❒
You can change the original feed
delay setting if originals are re-
peatedly feeding in slanted, or if
you need to adjust the delay for
the type of originals you are us-
ing. See “Original Feed Delay
1”, General Settings Guide.
❒ If the leading edge of the origi-
nal is badly curled, smooth out
the curl, and then place the orig-
inal in the insertion area.
❒
When inserting long length orig-
inals,
there may be some move-
ment to either side. If this
happens, correct the movement
manually while feeding the
originals into the machine.
ZEDH190E
ZEDH180E
DolphinC2_GBcopy_F_FM.book Page 15 Friday, February 4, 2005 3:32 PM