
Owner's Manual
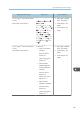
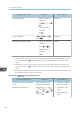
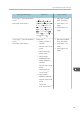
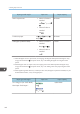


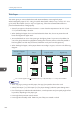
Table Of Contents
- TABLE OF CONTENTS
- How to Read the Manuals
- Model-Specific Information
- Names of Major Features
- 1. What You Can Do with This Machine
- I Want to Save Paper
- I Want to Convert Documents to Electronic Formats Easily
- I Want to Register Destinations
- I Want to Operate the Machine More Effectively
- You Can Customize the [Home] Screen as You Like
- You Can Make Copies Using Various Functions
- You Can Print Data Using Various Functions
- You Can Utilize Stored Documents
- You Can Connect Two Machines for Copying
- You Can Send and Receive Faxes without Paper
- You Can Send and Receive Faxes Using the Internet
- You Can Send and Receive Faxes by Using the Machine without Fax Unit Installed
- You Can Use the Facsimile and the Scanner in a Network Environment
- You Can Prevent Information Leakage (Security Functions)
- You Can Monitor and Set the Machine Using a Computer
- You Can Prevent an Unauthorized Copy
- 2. Getting Started
- 3. Copy
- 4. Fax
- 5. Print
- 6. Scan
- Basic Procedure When Using Scan to Folder
- Basic Procedure for Sending Scan Files by E-mail
- Basic Procedure for Storing Scan Files
- Specifying the File Type
- Specifying Scan Settings
- 7. Document Server
- 8. Web Image Monitor
- 9. Adding Paper and Toner
- 10. Troubleshooting
- Indicators
- When an Indicator for the [Check Status] Key Is Lit
- Panel Tone
- When You Have Problems Operating the Machine
- When Messages Are Displayed on the Control Panel
- When Messages Are Displayed on Your Computer Screen
- 11. Appendix
- INDEX
Thick Paper
This section gives you various details about and recommendations concerning thick paper.
When loading thick paper of 157–169 g/m
2
(42 lb. Bond–90 lb. Index) in trays 1 and 2, 157–216
g/m
2
(42 lb. Bond–80 lb. Cover) in tray 3 or bypass tray, follow the recommendations below to
prevent misfeeds and loss of image quality.
• Store all your paper in the same environment - a room where the temperature is 20–25 °C (68–
77 °F) and the humidity is 30–65%.
• When loading thick paper, be sure to load at least 20 sheets. Also, be sure to position the side
fences flush against the paper stack.
• Jams and misfeeds can occur when printing on thick glossy sheets. To prevent such problems, be
sure to fan glossy sheets thoroughly before loading them. If sheets continue to become jammed or
feed in together even after they are fanned, load them one by one from the bypass tray.
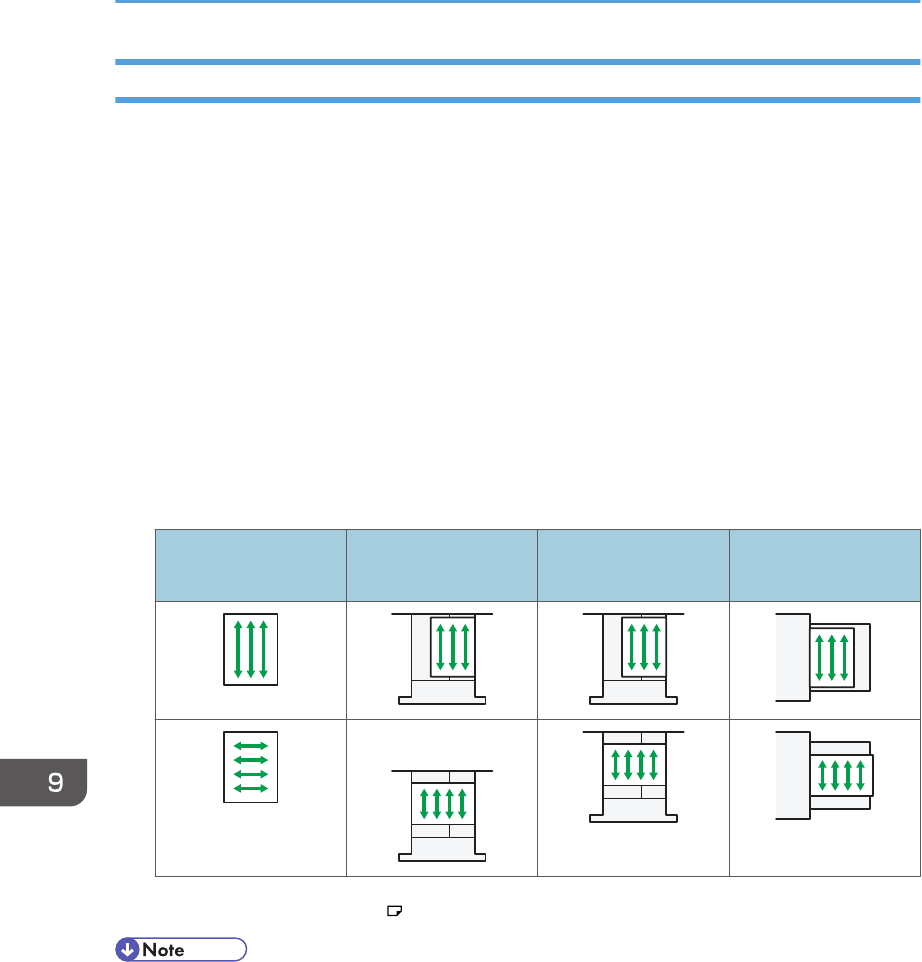
• When loading thick paper, set the paper direction according to its grain, as shown in the following
diagram:
Direction of paper
grain
Tray 1 Trays 2 and 3 Bypass tray
*1
*1
You can load paper in the orientation into tray 1 only if the A3/11 × 17 tray unit is installed.
• When copying or printing onto thick paper, the copy/print speed is slower than usual.
• Select [Thick Paper 1] or [Thick Paper 2] in [Tray Paper Settings] under the System Settings menu.
• Even if thick paper is loaded as described above, normal operations and print quality might still not
be possible, depending on the paper type.
• Prints might have prominent vertical creases.
• Prints might be noticeably curled. Flatten out prints if they are creased or curled.
9. Adding Paper and Toner
146