Printer/Scanner Unit Type 2018 Operating Instructions Scanner Reference Network Scanner Preparations for Use as a Network Scanner Setting Originals Sending Scan Files by E-mail Using the Network Delivery Scanner Function Using the Network TWAIN Scanner Function Appendix Read this manual carefully before you use this machine and keep it handy for future reference. For safe and correct use, be sure to read the Safety Information in the "Copy Reference" before using the machine.
Introduction This manual contains detailed instructions and notes on the operation and use of this machine. For your safety and benefit, read this manual carefully before using the machine. Keep this manual in a handy place for quick reference. The scanner function is available when the Printer/Scanner option is installed in the machine. Caution: Use of controls or adjustment or performance of procedures other than those specified in this manual might result in hazardous radiation exposure.
Manuals for This Machine The following manuals describe the operational procedures of this machine. For particular functions, see the relevant parts of the manual. Note ❒ The manuals provided are specific to machine type. ❒ Adobe Acrobat Reader is necessary to view the manuals as a PDF file.
❖ Manuals for DeskTopBinder Lite DeskTopBinder Lite is a utility included on the CD-ROM labeled "Scanner Driver & Document Management Utilities". • DeskTopBinder Lite Setup Guide (PDF file - CD-ROM2) Describes the installation of DeskTopBinder Lite, and the operating environment for DeskTopBinder Lite in detail. This guide can be displayed from the [Setup] dialog box when DeskTopBinder Lite is installed.
TABLE OF CONTENTS Manuals for This Machine ......................................................................................i How to Read This Manual .....................................................................................1 Symbols ..................................................................................................................... 1 Names of Major Options ............................................................................................ 2 1.
5. Using the Network Delivery Scanner Function Preparation for Delivering...................................................................................51 Network Delivery Scanner Screen ........................................................................... 52 Delivering Scan Files........................................................................................... 54 Delivery Procedure...................................................................................................
How to Read This Manual Symbols In this manual, the following symbols are used: Important If this instruction is not followed, paper might be misfed, originals might be damaged, or files might be lost. Be sure to read this. Preparation This symbol indicates the prior knowledge or preparations required before operating. Note This symbol indicates precautions for operation or actions to take after misoperation.
Names of Major Options Major options of this machine are referred to as follows in this manual: • Exposure Glass Cover • Auto Document Feeder → ADF • Auto Document Feeder capable of scanning both sides of a sheet → ARDF • Printer/Scanner Unit Type 2018 → printer/scanner controller The following software products are referred to using a general name: • DeskTopBinder Lite and DeskTopBinder Professional* → DeskTopBinder • ScanRouter V2 Lite, ScanRouter EX Professional* and ScanRouter EX Enterprise* → the ScanR
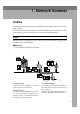
1. Network Scanner Outline By installing the printer/scanner controller, the machine can be used as a network scanner. As a network scanner, the machine can send scan files by e-mail, operate as a network delivery scanner, and operate as a network TWAIN scanner. E-mail Scan files that are attached to an e-mail can be sent using the e-mail system through a LAN or the Internet. Reference p.35 “Sending Scan Files by E-mail” AAH008S 1. This machine 3.
Network Scanner Network Delivery Scanner The machine is used as a delivery scanner with the ScanRouter delivery software. Scan files are stored in the delivery server and delivered to the folders of client computers on the same network. 1 Reference p.51 “Using the Network Delivery Scanner Function” Note ❒ When the optional ScanRouter EX Professional is used, the machine can also deliver scan files using e-mail, and the files can be viewed from a client computer using a Web browser. AAH009S 1.
Outline Reference For more information about ScanRouter V2 Lite, DeskTopBinder Lite, or Auto Document Link, see p.i “Manuals for This Machine”. 1 Network TWAIN Scanner The scanning function of this machine can be used from a client computer via a network (Ethernet, IEEE 1394 (IP over 1394) [optional], or IEEE 802.11b (Wireless LAN) [optional]). Reference p.65 “Using the Network TWAIN Scanner Function” AAH010S 1. This machine 2.
Network Scanner Control Panel This illustration shows the control panel when options are installed. 1 1 Start Manual Reception Receive File Immediate Trance. Memory Trance. 01 ABC 05 Transmission Stamp 02 DEF 06 03 Scanner 6 7 8 09 Standard YZ Detail Fine 13 Shift PQR 10 @. ___ @.
Control Panel 14. Quick Dial keys Press to select the registered destination with a single touch, or to enter letters and symbols. 1 Reference For more information, see General Settings Guide. Note ❒ You can register up to 32 destinations using the Quick Dial keys. 15. Quick Dial Flip Plate Flip this plate down to access the Quick Dial keys 01 through 16; flip it up to access keys 17 through 32. 16. {Lighter}} and {Darker}} keys Press to change the image density setting.
Network Scanner Reading the Display and Using Keys This section explains how to read the display and use the selection key. 1 Note ❒ The copy screen is set as the default screen when the machine is turned on. You can change the settings in [ System Settings ]. See General Setting Guide. 4 1 8 Cancel OK 2 3 AAH032S 1. Selection keys 2. {Cancel}} key Correspond to items at the bottom line on the display. Example: The E-mail screen Press to cancel an operation or return to the previous display.
2. Preparations for Use as a Network Scanner To use the machine as a network scanner, you must make settings required for use as a scanner as well as basic settings for use in a network. Reference First, see General Settings Guide for details about how to make basic settings, and then make scanner settings. For more information about settings for sending by e-mail, see Network Guide.
Preparations for Use as a Network Scanner ❖ Destination List Settings For explanations of settings, see p.14 “Destination List Settings”. Settings Destination List Settings 2 Destination List Priority Default E-mail Delivery Delivery Server ❍ ❍ Update Server Dest. List TWAIN ❍ — ❖ Send Settings For explanations of settings, see p.14 “Send Settings”. Settings Send Settings Default E-mail Delivery TWAIN TWAIN Standby Time 10 sec.
Initial Scanner Setup B Select [Scanner Features] using {U} or {T}, and then press the {OK}} key. 2 C Select a menu using {U} or {T}, and then press the {OK}} key. D Select a setting using {U} or {T}, and then press the {OK}} key. Example: TWAIN Standby Time setting E Change the settings. • Select an item using {U} or {T}, and then press the {OK} } key. • Enter numbers using the number keys, and then press the {OK} } key. The “Programmed” message appears, and then the Send Settings screen returns.
Preparations for Use as a Network Scanner G Repeat steps C to F to make other settings. H Press the {Cancel}} key. The main menu appears. Scan Settings 2 This section explains how to set the defaults for scan settings. The scan settings consist of the following. For the list about settings and defaults, see p.9 “Scanner Features”. ❖ Default Scan Settings Resolution and scan size can be set. • Resolution Select the resolution from 100dpi, 200dpi, 300dpi, 400dpi, or 600dpi.
Initial Scanner Setup ❖ Orig. Orientation Priority Select the default for original placement orientation. When originals are always positioned the same way, select that orientation as the default to make operation easier. Reference p.31 “Original Orientation and Scan Area” ❖ Original Type Setting Select the original type registered in [Type 1(Text):] or [Type 2(Photo):].
Preparations for Use as a Network Scanner Destination List Settings This section explains how to set the defaults for the destination list displayed. The destination list settings consist of the following. For the list about settings and defaults, see p.9 “Scanner Features”. 2 ❖ Destination List Priority Select a destination list to be displayed when the machine is in the initial state. You can select either [E-mail] or [Delivery Server]. ❖ Update Server Dest.
Initial Scanner Setup Note ❒ When [On] is selected, all records are deleted after printing. When [Off] is selected, records that exceed the limit are automatically deleted from the oldest records. ❖ Max. E-mail Size Select whether the size of an e-mail with a scan file attached is limited or not. When [On] is selected, enter the size limit (64 - 8580 KB) with the number keys. Note ❒ When the SMTP limits the size, match that setting.
Preparations for Use as a Network Scanner Important ❒ It is recommended that a sender's password be set to prevent the sender's name from being misused. ❒ When [On] is selected for [Key Operator Code] in [Key Operator Tools] of [System Settings] and [On: Partial] is set for the range, enter the key operator code when [Sender's Name Default] in [Send Settings] of [Scanner Features] is selected. For more information about System Settings, see General Settings Guide.
Installing Software Installing Software The machine comes with three CD-ROMs containing various software. The CD-ROM labeled“Scanner Driver & Document Management Utilities” contains the necessary software to use the machine as a network scanner. The CDROM labeled “Printer Driver & Utilities” contains the necessary software to use the machine as a printer. This section explains the software to use the machine as a network scanner.
Preparations for Use as a Network Scanner The installing sequence using Auto Run is as follows. Installation Sequence Insert the CD-ROM. 2 TWAIN Driver Ver.3 TWAIN Driver The installer starts up. ScanRouter V2 Lite Select the software. ScanRouter V2 Lite ScanRouter V2 Administration Utility Install all at once, or select and install individually. DeskTopBinder Lite The installation complete message is displayed. DeskTopBinder Lite Acrobat Reader Restart your PC.
Installing Software Software for Using a Network TWAIN Scanner To use the machine as a network TWAIN scanner, it is essential to install the TWAIN driver. If you do not have applications that work with TWAIN, it is necessary to also install DeskTopBinder Lite. For information about the installation of DeskTopBinder Lite, see p.21 “DeskTopBinder Lite”. 2 Preparation Before installation, check the operating environment for the TWAIN driver. See p.21 “Type2018 TWAIN Driver”.
Preparations for Use as a Network Scanner Software for Using the Network Delivery Scanner Function To use the machine as a network delivery scanner, it is essential to install ScanRouter V2 Lite on the delivery server. To check an in-tray or retrieve files, it is necessary to install DeskTopBinder Lite on the client computer. Use Auto Run for installation. 2 Preparation Before installation, check the system requirements for the software. See p.21 “Software Supplied on CD-ROM”.
Installing Software DeskTopBinder Lite Use Auto Run for installation. Preparation Before installation, check the system requirements for DeskTopBinder Lite. See p.22 “DeskTopBinder Lite”. 2 A Start Windows, and then insert the supplied CD-ROM labeled “Scanner Driver & Document Management Utilities” into the CD-ROM drive of the client computer. The CD-ROM Launcher screen appears. B Click [DeskTopBinder Lite]. The DeskTopBinder Lite Setup screen appears. C Click [DeskTopBinder Lite].
Preparations for Use as a Network Scanner ❖ System requirements Limitation ❒ Under Windows NT with RISC-based processors (MIPS R series, Alpha AXP, or PowerPC), this driver is not available.
Installing Software ❖ System requirements • Hardware PC/AT compatible • CPU Pentium 133 MHz or faster (Pentium II 266 MHz or faster recommended) • Operating system Microsoft Windows 95 (OSR 2 or later) Microsoft Windows 98 Microsoft Windows Millennium Edition Microsoft Windows 2000 Professional (Service Pack 1 or later) Microsoft Windows 2000 Server (Service Pack 1 or later) Microsoft Windows XP Home Edition Microsoft Windows XP Professional Microsoft Windows Server 2003 Standard Edition Microsoft Windows
Preparations for Use as a Network Scanner ScanRouter V2 Lite ScanRouter V2 Lite is to be installed on the delivery server. Scan files can be sorted in the delivery server, stored in specified in-trays, or saved in folders of client computers on the same network. Reference See ScanRouter V2 Lite Help or the manuals for ScanRouter V2 Lite.
Installing Software ❖ Software installed with ScanRouter V2 Lite • ScanRouter V2 Administration Utility ScanRouter V2 Administration Utility manages the delivery system run by ScanRouter V2 Lite. You can register destination and sender information for the scan files in the delivery server. In addition, you can perform maintenance for free disk space monitoring, error log recording, and other features of the delivery server.
Preparations for Use as a Network Scanner 2 26
3. Setting Originals This chapter explains the procedure for placing originals on the exposure glass and in the ADF, and setting the original scan area and orientation according to the placement method. To correctly display the top/bottom orientation of the scanned original on a client computer, the placement of the original and the settings made on the control panel and scanner driver must match. Placing Originals There are two orientations for placing the original. See the table below.
Setting Originals When scanning using the e-mail function or the delivery scanner function Specify the orien(Specified on the contation. trol panel screen) When scanning using the TWAIN scanner function (Specified in the Scanner Control dialog box) 3 The original displayed on a computer Placing on the Exposure Glass Originals which do not fit into the ADF, such as sheets with glued-on parts, books, etc., can be placed directly on the exposure glass for scanning.
Placing Originals ❖ When placing the original so that the top edge touches the top left of the exposure glass When using the machine as a network TWAIN scanner, this orientation is the standard setting for the TWAIN driver. Normally, use this orientation for placing originals. AAH005S 1. Positioning mark C Lower the exposure glass cover or the ADF. D Select the original orientation ac- cording to the orientation of the placed original. Reference p.
Setting Originals ❖ When placing the originals so that the top edges touch the back of the ADF Note ❒ Originals of the same width and different length can be placed at the same time. Place the originals as shown: 3 AAH022S AAH006S ❖ When placing the top edges of the originals first When using the machine as a network TWAIN scanner, this orientation is the standard setting for the TWAIN driver. Normally, use this orientation for placing originals. 1. ADF placement orientation 2. Height Reference p.
Original Orientation and Scan Area Original Orientation and Scan Area Note ❒ The difference between scanning with the TWAIN scanner function and the e-mail function or the network delivery scanner function is shown in the following table. Auto Detect Non-Mixed Original Sizes TWAIN Scanner E-mail/Network Delivery Scanner A whole batch of originals is scanned using the size of the first original. Auto detection is used to determine the size of each original placed on the exposure glass.
Setting Originals ❒ The duplex function is available only when you have installed the optional ADF capable of scanning both sides of a sheet (ARDF). Orientation selection A Select [Original Orientation] using {U} or {T}, and then press the {OK} } key. 3 B Select the icon for the same orientation as the actual orientation of the original, [ ] or [ ], and then press the {OK} } key. B When scanning one-sided originals, select [1 Sided Original] using {U} or {T}, and then press the {OK} } key.
Original Orientation and Scan Area B When originals of the same width and different length are placed, select [On] using {U} or {T}, and then press the {OK} } key. For a Network TWAIN Scanner A Open the scanner properties dialog box. Reference p.66 “Scanning Originals” B Select the position from the [Document] list in the [Document] area. The “ Accepted” message appears, and then the Send Options screen returns.
Setting Originals Scanning Originals in Several Times using the Exposure Glass A Place the originals. Reference p.27 “Placing Originals” Note ❒ Originals are scanned in order. Place them from the first page. 3 B Make settings for scanning area and original orientation. Reference p.31 “Original Orientation and Scan Area” C Make settings for sending by email or delivering. Reference p.37 “Procedure for Sending by E-mail” p.54 “Delivery Procedure” D Press the {Start}} key.
4. Sending Scan Files by E-mail Scan files can be sent from this machine to a specified destination using e-mail. This chapter explains the preparation for sending scan files by e-mail, various display screens, procedures for sending, and how to check the sending result when this function is used. Preparation for Sending by E-mail To send by e-mail system, the preparation described below is required. Note ❒ Set up an e-mail server on the network in advance.
Sending Scan Files by E-mail E-mail Screen These screens are shown when using the machine for e-mail . ❖ Main display 2 1 4 3 4 5 AAH018S ❖ When a destination is selected. 6 1. E-mail icon ( ) Indicates that the E-mail screen is displayed. 2. Destination field Displays the selected destination. If multiple destinations are selected, the destinations are displayed in the order they were selected by pressing {U} or {T}. Note ❒ Press the {Check Destination} } key to check the selected destination.
Sending Scan Files by E-mail Sending Scan Files by E-mail Procedure for Sending by Email Scan files are sent after specifying scan settings and destinations. A Press the {Scanner}} key. Search Check Job Destination Destination Information 01 ABC 05 MNO 09 YZ 13 Shift 02 DEF 06 PQR 10 @. ___ @. 14 Space 03 GHI 07 STU 11 tings remain. Note ❒ If a previous setting remains, press the {Clear Modes} } key.
Sending Scan Files by E-mail Using a Quick Dial key to select a destination Searching to select a destination by name A Press the Quick Dial key in which the destination is registered. A Press the {Search Destination} } key. Search Check Job Destination Destination Information Search Check Job Destination Destination Information 01 Scanner 02 ABC 01 02 ABC 05 06 MNO 09 4 DEF PQR 10 YZ 13 @. ___ @. 14 03 GHI 07 STU 11 05 04 MNO JKL 09 08 PQR 10 YZ VWX 13 12 DEF 06 @. ___ @.
Sending Scan Files by E-mail D Select the destination using {U} or {T}, and then press the {OK} } key. C Select the destination using {U} or {T}, and then press the {OK} } key. E To select more destinations, repeat steps A to D. D To select more destinations, repeat steps A to C. Note ❒ To deselect a destination, press {U} or {T} to display the destination in the Destination field, and then press the {Clear/Stop} } key.
Sending Scan Files by E-mail C Enter a 3-digit registration number that has been assigned to a destination using the number keys, and then press the {OK} } key. B Select [Search by E-mail Address] using { U } or { T } , and then press the {OK} } key. C Enter the beginning of the email address, and then press the {OK} } key twice. D Press the {OK} } key. 4 E To select more destinations, repeat steps A to D.
Sending Scan Files by E-mail Manual entry of an e-mail address A Press [Manual]. B Enter the e-mail address. Note ❒ Letters, number, and periods can be used. The symbols ()\,;:” cannot be used. Reference For information about how to enter characters, see General Settings Guide. C Press the {OK} } key. Note ❒ To change an e-mail address that has been entered, press [EditDest]. The E-mail Address screen appears. Enter the new e-mail address, and then press the {OK} } key.
Sending Scan Files by E-mail H Specify the e-mail sender. To specify a sender, you can select it using the Quick Dial key, search for and select it from the Destination List, or select it by specifying a registration number. A Press [Options]. B Select [Sender's Name] using {U} or {T}, and then press the {OK} } key. Using a Quick Dial key to select a sender A Press the Quick Dial key in which the sender is registered.
Sending Scan Files by E-mail C For receiving a return receipt confirmation, select [On] using {U} or {T}, and then press the {OK} } key. The “ Accepted” message appears, and then the Send Options screen returns. Note ❒ When [On] is selected, an email notifying that the e-mail has been read by the recipient is sent to the sender selected here. However, if the mailing software used by the recipient does not support MDN (Message Disposition Notification), the e-mail may not be sent.
Sending Scan Files by E-mail Note ❒ When a sender's password is set, a screen for entering the sender's password appears. Enter the sender's password using the number keys, and then press the { OK} } or {#} } key. If the password entered is correct, the sender name is displayed. E Press the {OK} } key. Selecting a sender from Destination List A Press the {Search Destination} } key. Search Check Job Destination Destination Information 01 ABC 05 MNO 09 YZ 13 4 Shift 02 DEF 06 PQR 10 @. ___ @.
Sending Scan Files by E-mail D Press the {OK} } key. Searching to select a sender using a registration number A Press the {Search Destination} } key. Search Check Job Destination Destination Information The “ Accepted” message appears, and then the Return Receipt screen returns. E For receiving a return receipt confirmation, select [On] using {U} or {T}, and then press the {OK} } key. 01 ABC 05 MNO 09 YZ 13 Shift 02 DEF 06 PQR 10 @. ___ @.
Sending Scan Files by E-mail Note ❒ When a sender's password is set, a screen for entering the sender's password appears. Enter the sender's password using the number keys, and then press the { OK} } or {#} } key. If the password entered is correct, the sender name is displayed. D Press the {OK} } key. Searching to select a sender by e-mail address A Press the {Search Destination} } key. Search Check Job Destination Destination Information 01 02 ABC 05 MNO 09 PQR 10 YZ 13 4 DEF 06 @. ___ @.
Sending Scan Files by E-mail D Select the sender using {U} or {T}, and then press the {OK} } key. Note ❒ When a sender's password is set, a screen for entering the sender's password appears. Enter the sender's password using the number keys, and then press the { OK} } or {#} } key. If the password entered is correct, the sender name is displayed. Note ❒ When [On] is selected, an email notifying that the e-mail has been read by the recipient is sent to the sender selected here.
Sending Scan Files by E-mail Manual entry of a subject A Select [Manual Input] using {U} or {T}, and then press the {OK} } key. B Enter a subject, and then press the {OK} } key. 4 B Select a subject using {U} or {T}, and then press the {OK} } key. The “Accepted ” message appears, and then the Send Options screen returns. J Press the {Cancel}} key. The initial scanner screen appears. K Press the {Start}} key. The “ Accepted” message appears, and then the Send Options screen returns.
Checking the Status of E-mail Checking the Status of E-mail The status of the last 50 sendings can be checked. For every new sending record after 50, the oldest record is deleted. Important ❒ When the main power switch is turned off, all records are deleted. A Press the {Job Information}} key. Search Check Job Destination Destination Information 01 ABC 05 MNO Note ❒ When [Print&Del. Scanner Journal] is set to [On], the whole scanner journal is printed when the number of records reaches 50.
Sending Scan Files by E-mail 4 50
5. Using the Network Delivery Scanner Function Scan files can be sent to a specified destination using the network delivery scanner function. This chapter explains the preparation sequence, various display screens, delivery procedures, and how to check the delivery result when this function is used. Important ❒ A delivery server in which the ScanRouter delivery software is installed is necessary to use the network delivery scanner function.
Using the Network Delivery Scanner Function 5 6 Set Destination Information, Sender Information, and connected devices Install Client Computer Software Set the destination, sender information, and connected devices in the ScanRouter delivery software. On the client computers, install the application required for viewing or retrieving files by connecting to the delivery server, such as DeskTopBinder Lite. See p.22 “DeskTopBinder Lite”.
Preparation for Delivering 3. [ ] E-mail/Network Delivery Scanner Press to switch between the network delivery scanner function and the email function. 4. [Manual] When specifying a destination that is not registered, press [Manual], and then enter the e-mail address of the destination using the Quick Dial keys. 5. [Options] Press to make the scan settings such as resolution or scan size, the sender, and the subject of the e-mail to be sent. 6.
Using the Network Delivery Scanner Function Delivering Scan Files D Make sure that no previous set- Delivery Procedure tings remain. Scan files are delivered after scan settings and destinations are specified. If necessary, you can select a sender and a subject. A Press the {Scanner}} key. Search Check Job Destination Destination Information 01 ABC 05 5 MNO 09 YZ 13 Shift 02 DEF 06 PQR 10 @. ___ @.
Delivering Scan Files Note ❒ When using ScanRouter V2 Lite/Professional , the Destination List is updated automatically. Searching to select a destination by name A Press the {Search Destination} } key. Search Check Job Destination Destination Information Using a Quick Dial key to select a destination 01 02 ABC A Press the Quick Dial key in which the destination is registered. 05 MNO 09 YZ 02 ABC 05 DEF 06 MNO 09 PQR 10 YZ 13 @. ___ @. 14 Shift Space 03 GHI 07 STU 11 @. ___ @.
Using the Network Delivery Scanner Function 5 D Select the destination using {U} or {T}, and then press the {OK} } key. C Select the destination using {U} or {T}, and then press the {OK} } key. E To select more destinations, repeat steps A toD D. D To select more destinations, repeat steps A to C. Note ❒ To deselect a destination, press {U} or {T} to display the destination in the Destination field, and then press the {Clear/Stop} } key.
Delivering Scan Files C Enter a 3-digit registration number that has been assigned to a destination using the number keys, and then press the {OK} } key. C Enter the beginning of the comment, and then press the {OK} } key twice. D Press the {OK} } key. E To select more destinations, repeat steps A to D. Note ❒ To deselect a destination, press {U} or {T} to display the destination in the Destination field, and then press the {Clear/Stop} } key.
Using the Network Delivery Scanner Function Manual entry of a destination Note ❒ When using ScanRouter V2 Professional, it is possible to enter the e-mail address of the destination directly. However, settings for sending e-mail must be made in advance. A Press [Manual]. B Enter the e-mail address. 5 Note ❒ It is possible to use letters, number, and periods. The symbols ()\,;:” cannot be used. Reference For information about how to enter characters, see General Settings Guide. C Press the {OK} } key.
Delivering Scan Files Note ❒ When a sender is selected, the sender name is automatically placed in the From field of the e-mail so that the sender can be identified by the recipient. Using a Quick Dial key to select a sender A Press the Quick Dial key in which the sender is registered. Search Check Job Destination Destination Information 01 02 ABC 05 DEF 06 MNO 09 PQR 10 YZ 13 @. ___ @.
Using the Network Delivery Scanner Function C Enter the beginning of the sender name, and then press the {OK} } key twice. Note ❒ Enter the first character or ch arac ters of th e s en der name. ❒ It is necessary to differentiate between uppercase and lowercase. 5 Reference For information about how to enter characters, see General Settings Guide. D Select the sender using {U} or {T}, and then press the {OK} } key.
Delivering Scan Files B Select [Display Destination List] using { U } or { T } , and then press the {OK} } key. C Select the sender using {U} or {T}, and then press the {OK} } key. Note ❒ When [On] is selected, an email notifying that the e-mail has been read by the recipient is sent to the sender selected here. However, if the mailing software used by the recipient does not support MDN (Message Disposition Notification), the e-mail may not be sent.
Using the Network Delivery Scanner Function C Enter a 3-digit registration number that has been assigned to a sender using the number keys, and then press the {OK} } key twice. H Specify a subject if necessary. A Press [Options]. B Select[Attach Subject] using {U} or {T}, and then press the {OK} } key. D Press the {OK} } key. Note ❒ When a subject has been set, this information is added to the scan file. 5 The “ Accepted” message appears, and then the Return Receipt screen returns.
Delivering Scan Files B Enter a subject, and then press the {OK} } key. The “ Accepted” message appears, and then the Send Options screen returns. Note ❒ When the subject to be entered exceeds 64 characters, “U” appears. B Select a subject using {U} or {T}, and then press the {OK} } key. The “Accepted ” message appears, and then the Send Options screen returns. I Press the {Cancel}} key. The initial scanner screen appears. J Press the {Start}} key.
Using the Network Delivery Scanner Function Checking the Status of Delivery The status of the last 50 deliveries can be checked. For every new delivery record after 50, the oldest record is deleted. Important ❒ When the main power switch is turned off, all records are deleted. A Press the {Job Information}} key. Search Check Job Destination Destination Information 01 ABC 05 MNO Note ❒ When [Print&Del.
6. Using the Network TWAIN Scanner Function This chapter describes the operations for scanning originals with the network TWAIN scanner using DeskTopBinder Lite. In addition, the preparation for using the network TWAIN scanner and some functions of the TWAIN driver are introduced. Preparation for Using the Network TWAIN Scanner To use the machine as a network TWAIN scanner, the preparation described below is required.
Using the Network TWAIN Scanner Function Scanning Originals This section explains how to scan originals using the network TWAIN scanner function. A Start DeskTopBinder Lite, and then select the scanner driver. A On the [Start] menu, point to [Program], point to [DeskTopBinder], and then click [DeskTopBinder]. B Click [Scanner Settings] on the [Tools] menu. If the scanner is already selected, no scanner settings are necessary.
Scanning Originals Note ❒ For advanced settings, click [Detail] to display the Detail window. For information about the Detail window, see TWAIN driver Help. C According to the settings of [Document] and [Orientation:], change the other setting of the [Document] group. Reference p.33 “For a Network TWAIN Scanner” For information about making settings for the [Document] group, see TWAIN driver Help.
Using the Network TWAIN Scanner Function Functions of the TWAIN Driver The following is an introduction to the various functions of the TWAIN driver: ❖ Automatic Tilt Correction This function automatically corrects character strings that were scanned slanted. ❖ Printing to the Image This function allows you to imprint dates, page numbers, or your favorite characters on a scan file. You can also change the fonts of the imprints as well as change the ascending order of images to a descending order.
7. Appendix Relationship between Resolution and File Size Resolution and scan area are inversely related. The higher the resolution is set, the smaller the area that can be scanned. Conversely, the larger the scan area, the lower the resolution that can be set. The relationship between the scanning resolution and the file size is shown below. If the file size is too large, the message “Exceeded max.data capacity. Check the scanning resolution.” appears on the control panel of the machine.
Appendix Max. Number of Addresses Which Can Be Specified The number of addresses which can be specified at a time when sending The number of addresses which can be registered in the list E-mail Delivery Server 100 *1 100 *2 150 See the manuals for the ScanRouter Delivery software The max. number of files which can be scanned 1 The max. number of pages which can be scanned 100 The max. number of pages which can be scanned as a single file 100 *1 *2 Up to 50 addresses can be entered directly.
Troubleshooting Troubleshooting This section contains advice on what to do if you have problems scanning an original, or if the network delivery scanner or e-mail function does not work. Various messages that may appear on the control panel or client computer are listed, along with causes and solutions. When Scanning Is Not Performed as Expected Problems Causes and solutions No image results from scanning. The original was placed with the front and back reversed.
Appendix When an Error Message Appears on the Control Panel Note ❒ If an error message that is not included in this section appears, turn off the main power switch of the machine, and then turn it on again. If the message still appears, note the content of the message and the error number (if listed in the table), and contact your service representative. For information about how to turn off the main power switch, see General Settings Guide.
Troubleshooting Message Causes and solutions Exceeded max. page capacity. Do you want to send the scanned data? Scanned data will be cleared when selecting [No]. Because the number of pages has reached the maximum number that can be sent, the data up to this point is sent. Scan the remaining pages after transmission. Exceeded max.memory capa. Scanning will be cancelled. Scanned data will be cleared. Because of insufficient memory space, the first page could not be scanned.
Appendix Message Causes and solutions Specified group contains some invalid dest. Do you want to select only valid dest.? The group contains members whose e-mail addresses are not registered. Please check the e-mail addresses of the group and make selections again. Updating destination list. Reselect destination(s) or sender's name later. If a destination or a sender's name was already selected, re-select it after this message disappears. Updating destination list has failed.
Troubleshooting Message Causes and solutions [Clear Misfeed(s) in ADF.] Remove the jammed originals. When originals are misfed, place them again. Check whether the originals are suitable to be scanned by the machine. [Communication error has occurred on the network.] Check whether the client computer can use the TCP/IP protocol. [Error has occurred in the scanner.] Check whether the scanning settings made with the application exceed the setting range of the machine.
Appendix Message Causes and solutions [Scanner is in use for other function. Please wait.] A function of the machine other than the scanner function is being used such as the copier function. Wait for a while and reconnect. [Scanner is not available. Check the scanner connection status.] • Check whether the main power switch of the machine is turned off. • Check whether the machine is connected to the network correctly. • Deselect the personal firewall function of the client computers.
Specifications Specifications Scan method Scan speed *1 Flatbed scanning • E-mail/Network Delivery Scanner Approx.43 pages/minute [Scan size:A4R, Original type: Text(Print), Resolution: 200dpi, Compression: On (MH), Document feeder: ADF, ITU-T No.1 Chart] • TWAIN Scanner Approx.25 pages/minute [Scan size:A4R, Colors/Gradations:Binary, Resolution: 200dpi, Select device data compression (Binary/Halftone): Data compression (MMR), Document feeder: ADF, ITU-T No.
INDEX A E Automatic Tilt Correction, 68 Auto run program, 17 E-mail, 35 E-mail Informatn.
P Placing Originals, 27 Placing on the exposure glass, 28 Placing original in the Auto Document Feeder (ADF), 29 Preparation for Delivering, 51 Preparation for Sending by E-mail, 35 Preview, 67 Print & Del.
80 EN USA B263-8580
In accordance with IEC 60417, this machine uses the following symbols for the main power switch: a means POWER ON. c means STAND BY. Note to users in the United States of America Note: This equipment has been tested and found to comply with the limits for a Class B digital device, pursuant to Part 15 of the FCC Rules. These limits are designed to provide reasonable protection against harmful interference in a residential installation.
Printer/Scanner Unit Type 2018 Operating Instructions Scanner Reference EN USA B263-8580