
Specifications


Table Of Contents
- Operation Manual
- Chapter 1 Using Your Camera
- Section 1 Getting Started
- Checking that Everything is Packed
- Names of Parts
- How to Use the Mode Dial
- Using the up/down dial
- Inserting the Batteries
- Using the Batteries
- Using the Rechargeable Battery
- Using the AC Adapter
- Turning the Power On/ Off
- Inserting an SD Memory Card (Available in Stores)
- How to Use the LCD Monitor
- Switching the Screen Display
- Button Functions
- Screens
- Section 2 Basic Shooting
- Section 3 Using Special Features for Improved Photography
- Using the Flash
- Using the Self-Timer
- Shooting in Aperture Priority/Manual Exposure Mode
- Shooting a Still Image with Sound (IMAGE WITH SOUND)
- Using the ADJ. (Adjust) Button
- Changing the Exposure (EXPOSURE COMP.)
- Using Natural and Artificial Lighting (WHITE BALANCE)
- Sensitivity Settings (ISO SETTING)
- Changing Shading for Shooting Text (DENSITY)
- Shooting Consecutively with Different White Balance (WHITE BALANCE BRACKET)
- Choosing Picture Quality Mode/Image Size (PIC QUALITY/SIZE)
- Manual Focus Shooting (FOCUS)
- Changing the Light Metering (PHOTOMETRY)
- Changing the Edge Quality of Still Images (SHARPNESS)
- Shooting Consecutively with Different Exposures (AUTO BRACKET)
- Setting the Shutter Speed (TIME EXPOSURE)
- Shooting Pictures Automatically at Set Intervals (INTERVAL)
- Inserting the Date into a Still Image (DATE IMPRINT)
- Returning the Shooting Menu Settings to their Defaults (RESTORE DEFAULTS)
- Section 4 Playing Back/Deleting Still Images, Movies, and Sounds
- Viewing the Photo You Just Took (Quick Review)
- Viewing a Still Image or Movie
- Viewing Movies
- Playing Back Sound
- Viewing Thumbnail Images on the LCD Monitor
- Enlarged Viewing
- Viewing an S Multi-Shot or M Multi-Shot Still Image in Enlarged Display Mode
- Showing Photos in Order Automatically (SLIDE SHOW)
- Viewing on a Television
- Deleting Unwanted Still Images/Movies/Sounds
- Section 5 Direct Printing
- Section 6 About Other Functions
- Section 7 Changing Camera Settings
- Getting the SD Memory Card Ready for Use (CARD FORMAT)
- Formatting Internal Memory (IN FORMAT)
- Adjusting the Brightness of the LCD Monitor (LCD BRIGHTNESS)
- Setting a Function to the ADJ. Button (ADJ BTN.SET.)
- Changing the Operation Sound Setting (BEEP SOUND)
- Changing Image Confirmation Time (LCD CONFIRM.)
- Changing Auto Power- Off Settings (AUTO POWER OFF)
- Changing File Name Settings (SEQUENTIAL NO.)
- Changing Power-Save Mode Settings (POWER- SAVE)
- Setting the Date and Time (DATE SETTINGS)
- Changing the Display Language (LANGUAGE)
- Changing the Playback Method for Viewing on TV (VIDEO OUT MODE)
- Changing the setting of step zooming (STEP ZOOM)
- Section 1 Getting Started
- Chapter 2 Playing Back Images (Pictures/Movies) on a Computer (For Windows)
- Section 1 Installing Software
- Section 2 Downloading Images to a Computer
- Section 3 Displaying Thumbnail Images (How to Use DU-10x)
- Starting and Exiting DU-10x
- Thumbnail Display Description
- Switching the Ordering of Images
- Changing the Display Size
- Viewing Images in a Slide Show
- Renaming an Image in Thumbnail View
- Copying a Reduced Image File
- Enabling or Disabling the Camera Memo Function or Functions Available with Other Models of Caplio
- Deleting Images
- Viewing Image Information
- Displaying the Viewer Screen
- Printing an Image
- Chapter 3 Playing Back Images (Pictures/Movies) on a Computer (For Macintosh)
- Appendices
102
5
11.
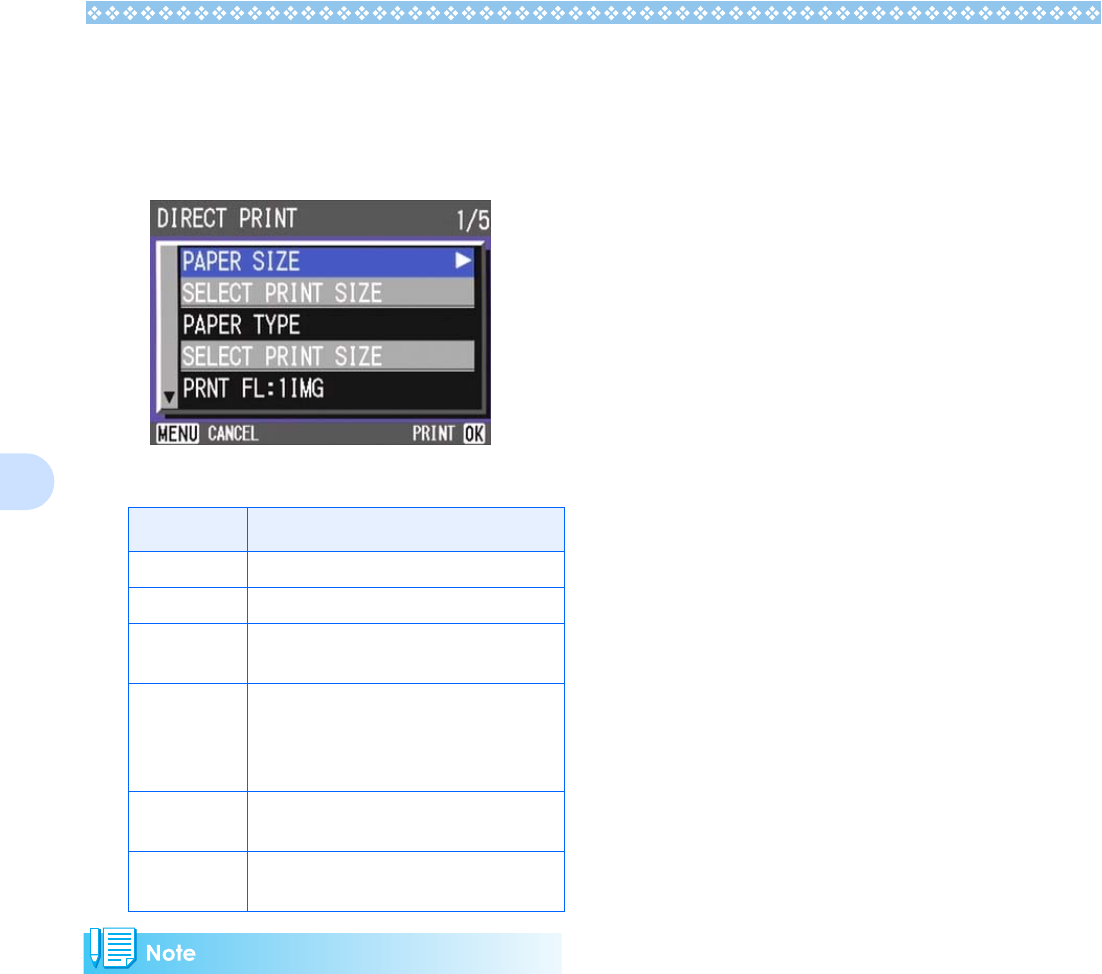
Press the !"
!"!"
!" buttons to select
an item, and then press the $
$$
$
button to display the detailed
options screen.
The following items are available:
• The items available vary depending on the
functions of the printer.
• If there are no options available for an
item, the detailed options screen does not
appear even if you press the $ button.
Also, items that are not available on the
printer do not appear.
• To print images using the printer's default
settings, select Printer Setting on the
detailed options screen.
12.Press the O
OO
O button.
The display returns to the Direct Print
menu.
13.Repeat steps 12 and 13 to
change the settings as required.
14.Press the O
OO
O button.
The selected images are sent to the
printer and the "Connecting" screen
appears.
Press the M button to cancel the
operation.
Upon completion of transmission of
images for a page, printing starts.
When all the selected images have been
sent from the camera to the printer, the
camera display returns to the Direct Print
playback mode screen.
Item Name Function
PAPER SIZE Sets the paper size.
PAPER TYPE Sets the paper type.
LAYOUT Sets the number of images printed on a
sheet of paper.
DATE PRINT Selects whether to print the date (shoot-
ing date). The date format can be set
using the date/time option in the Setup
Mode.
FILE NAME
PRINT
Selects whether to print the file name.
OPTIMIZE
IMAGE
Selects whether to optimize the image
data prior to printing on the printer.