Operation Manual For the safe use of your camera, be sure to read the Safety Precautions thoroughly before use.
Using These Manuals The two manuals included are for your Caplio 300G. Please read this first: Quick Start guide (printed manual) This booklet is designed to help you enjoy your Caplio 300G right away by providing quick explanations: "Getting Ready to Shoot", "Shooting Images", "Viewing Images", and "Connecting to Your PC." Before using your camera, first read this manual. Please read as needed: Operation Manual (this manual). This explains how to use all the functions of your Caplio 300G.
Table of Contents Using These Manuals ................................................ 2 Meaning of Symbols .................................................. 2 Chapter 1 Using Your Camera Section 1 Getting Started Checking that everything is Packed........................... 6 Names of Parts .......................................................... 7 How to Use the Mode Dial ......................................... 8 Inserting the Batteries ................................................
Deleting Multiple Frames at Once ..................... 87 Write-protecting Your Images (PROTECT).............. 88 Protecting the Displayed Still Image.................. 88 Protecting All Still Images.................................. 90 Protecting Multiple Still Images or Movies at Once 91 Copying the Contents of Internal Memory to a Memory Card (COPY TO CARD) ..................................... 92 Using a Printing Service (PRINT) ............................ 93 Setting DPOF for the Still Image Displayed.
Chapter 1 Using Your Camera Section 1 Getting Started This section explains how to get your camera ready, from taking it out of the package to preparing to shoot.
Chapter 1 / Section 1 Getting Started Checking that everything is Packed The following items should be included with the camera. Please make sure everything was packed. CD-ROM Caplio 300G The software and the operation manual are included on this CD-ROM. CD-ROM from Kodak Contains the Kodak EasyShare software.
Chapter 1 / Section 1 Getting Started Names of Parts It is necessary to know these in order to understand the explanations in this manual. Check the following. TCamera Front View 1. 2. 3. 4. 5. 6. 7. 8. 9. 10. 11. Shutter release button Power button Mode Dial Flash Accessory Shoe AF Window Viewfinder Terminal Cover Lens USB Terminal Video Out Terminal 1. 2. 3. 4. 5. 6. 7. 8. 9. 10. 11. 12. 13. 14. 15. 16. 17.
Chapter 1 / Section 1 Getting Started How to Use the Mode Dial The Mode Dial is on the top of the camera. The Mode Dial is used to select the desired mode and operation for shooting and playback (still image viewing). Turn the Mode Dial to the symbol of the mode you want to use. Mode Dial Symbols and Functions Symbol Mode Name Function Setup Mode Allows you to set and confirm camera settings. Movie Mode Allows you to record movies.
Chapter 1 / Section 1 Getting Started Inserting the Batteries The following batteries can be used in the camera. Please choose which kind to use according to your needs. Battery Type AA Alkaline Batteries (LR6) (included) Rechargeable Battery (DB43, DB-40) (sold separately) Nickel-Hydrogen Battery (available in stores) Feature You can obtain them anywhere, so they are convenient for travel. However, in a low-temperature environment the number of shots you can take will decrease.
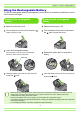
Chapter 1 / Section 1 Getting Started Using the Rechargeable Battery The DB-43 rechargeable battery (sold separately) is convenient for extended use because it can be used over and over again. Inserting the rechargeable battery Removing the rechargeable battery Make sure the power is off. Make sure the power is off. Turn the battery/card cover's knob toward the mark to open the cover. Turn the battery/card cover's knob toward mark to open the cover. the Insert the rechargeable battery.
Chapter 1 / Section 1 Getting Started Using the AC Adaptor When shooting or viewing still images for a long time, or when connecting to your computer, use of the AC Adaptor (sold separately) is recommended. Battery for use with the AC Adaptor AC Adaptor Setting up the AC adaptor Plug the power cord into an outlet. Make sure the power is off. Turn the battery/card cover's knob toward the mark to open the cover. Insert the AC Adaptor Battery.
Chapter 1 / Section 1 Getting Started Removing the AC adaptor Make sure the power is off. Unplug the power plug from the outlet. Release the yellow latch to remove the battery. Close the battery/card cover and turn the knob toward the mark.
Chapter 1 / Section 1 Getting Started Turning the Power On/Off The camera is switched between On and Off as follows. To turn the camera On To turn the camera Off Press the power button Press the power button The flash lamp and auto-focus lamp will flash altermately for several seconds. To turn the camera Off Auto Power-off • If the camera goes unused for a set period of time, it will automatically turn itself off to save power. To use the camera again, simply press the power switch.
Chapter 1 / Section 1 Getting Started Setting the Date and Time You can take still images with the time or date stamped onto the picture. Immediately after purchasing the camera, the date and time settings will not be correct, so be sure to set the date and time before using this feature. To set the date and time, follow the steps below. Set the year, month, date and time by pressing . Buttons used here If you hold down the buttons, you can increase/ decrease the value quickly.
Chapter 1 / Section 1 Getting Started Inserting the SD Memory Card You can record the still images and movies you have taken on SD Memory Cards (available in stores) or in the camera's internal memory. Write-protecting your images If you move the card's write-protection switch to LOCK, your still images cannot be accidentally erased, and the memory card cannot be formatted. If you return the switch to the former position, it is once again possible to erase images and format the card.
Chapter 1 / Section 1 Getting Started Close the battery/card cover and turn the knob toward the mark. Removing the SD Memory Card Make sure the power is off. Turn the battery/card cover's knob toward the mark to open the cover. Press the card gently and release it. The card pops out just a little. Gently take the card out of the camera.
Chapter 1 / Section 1 Getting Started How to Use the LCD Monitor The LCD Monitor can be used to view the subject when you are shooting an image, as well as for playing back movies and still images. Symbols and numbers indicating the camera's status and settings are displayed on the screen of the LCD Monitor. Screen Examples when Shooting Pictures Still Image Mode Movie Mode Symbol 1.Flash Flash Off Display Contents Refer to Current flash mode. p.47 White Balance set value. p.
Chapter 1 / Section 1 Getting Started Still Image Mode Movie Mode Symbol 3.FOCUS (No Display) AF(Auto-Focus) MF(Manual Focus) Display Contents Refer to Focus set value. p.58 Recording to internal memory. p.15 Recording to an SD Memory Card. p.15 Still Image Shooting Mode. p.33 Movie Mode. p.42 Multi-Shot Mode. p.39 S Multi-Shot Mode p.39 M Multi-Shot Mode p.39 PORTRAIT Mode. p.36 SPORTS Mode. p.36 LANDSCAPE Mode. p.36 NIGHTSCAPE Mode. p.36 TEXT Mode. p.
Chapter 1 / Section 1 Getting Started Still Image Mode Movie Mode Symbol 9.Remaining Number of Still Images 10.Image Size 11.ISO SETTING 12.EXPOSURE COMP. 13.AUTO BRACKET 14.SHARPNESS (Value) (Setting Value) (Setting Value) (Setting Value) AB SOFT (No display) Standard SHARP 15.Date/Time 16.TIME EXPOSURE 17.Battery 18.Zoom Bar 19.PHOTOMETRY Display Contents Refer to Number of photos that can be taken with the current settings. Image Size setting. ISO Speed set value. Exposure compensation set value.
Chapter 1 / Section 1 Getting Started The Screen During Playback Still Image Mode Movie Mode Symbol Display Contents Refer to 1.PRINT DPOF specified. p.93 2.PROTECT Protected status. p.88 3.Playback data source Indicates playback from internal memory. p.78 Indicates playback from an SD Memory Card. p.77 Still Image Mode. p.77 Movie Mode. p.79 Picture Quality setting. p.55 4.Mode Types 5.Picture Quality Fine Normal 6.
Chapter 1 / Section 1 Getting Started Switching the Screen Display If you press , you can change the screen display mode, such as switching between display/no display of symbols, etc. TWhen Shooting Display Symbols Grid Guide Display No Display Synchro-Monitor Mode button ÅEIn the Synchro-Monitor Mode except with the following operations, the LCD Monitor is turned off (No Display). This is a useful mode to reduce power consumption. Half-press the shutter release button.
Chapter 1 / Section 1 Getting Started Button Functions The following table summarizes the functions of the camera's buttons. Power Button, see p.13. Mode Dial, see p.8. Shutter Release Button, see p.30.
Chapter 1 / Section 1 Getting Started Screens Default values set when you purchased your camera are surrounded by brackets [ ] in the selection options. TShooting Menu (Shooting Mode) In Shooting Mode, display by pressing the button. Setting EXPOSURE COMP. WHITE BALANCE Option Refer to -2.0 ~ +2.0 [ ]/ p.50 (Daylight)/ (Fluorescent light)/ (Overcast)/ (Tungsten light)/ p.52 (One Push) PIC QUALITY/SIZE F2048/N2048/F1280/[N1280]/N640 p.55 FOCUS [AF]/MF/SNAP/∞ p.58 CONT.
Chapter 1 / Section 1 Getting Started TShooting Menu (Movie Mode) In Movie Mode, display by pressing the button. Setting MOVIE SIZE WHITE BALANCE Option [320×240] / 160×120 [ ]/ p.42 (Daylight)/ (Overcast)/ (Fluorescent light)/ FOCUS Refer to (Tungsten light)/ p.52 (One Push) [AF]/MF/SNAP/∞ p.58 TShooting Menu (Scene Mode/except in Text Mode) In Scene Mode, display by pressing the button.
Chapter 1 / Section 1 Getting Started TShooting Menu (Text Mode) In Text Mode, display by pressing the button. Setting DENSITY Option DEEP/[NORMAL]/LIGHT Refer to p.72 TPlayback Menu In Playback Mode, display by pressing the Setting button. Option Refer to SLIDE SHOW ON/[OFF] p.82 PROTECT Select/Release 1 FILE/ Select/Release ALL FILES p.88 PRINT Select/Release 1 FILE/ Select/Release ALL FILES p.93 COPY TO CARD p.
Chapter 1 / Section 1 Getting Started Tscene-selection Screen (Scene Mode) In Scene Mode, the screen is displayed when you select a scene. Symbol Setting Content Refer to PORTRAIT p.36 SPORTS p.36 LANDSCAPE p.36 NIGHTSCAPE p.36 TEXT MODE p.36 HIGH SENSITIVITY p.36 TSetup Screen (Setup Mode) This screen is displayed in Setup Mode. Setting CARD FORMAT IN FORMAT DATE SETTINGS POWER SAVE AUTO POWER OFF BEEP SOUND SEQUENTIAL NO.
Chapter 1 / Section 1 Getting Started The Basics of the Shooting Menu/Playback Menu Operation To display the menu: Turn the Mode Dial to Press the (Shooting Mode) or (Playback Mode). button. The menu appears. On the menu screen, you can move between screens by pressing the buttons and between items by pressing the buttons. To switch between menu screens (Shooting Menu): Press the To select an item: Press the buttons. You can switch the menu screen from [1] to [3].
Chapter 1 / Section 1 Getting Started The Basics of the Setup Screen Operation To display the Setup Screen: Turn the Mode Dial to (Setup Mode). The Setup Screen is displayed. To select an item: Press the To select a setting value: Press the When you have selected [EXECUTE]: Press the To close the Setup Screen: buttons to select the desired item. buttons to select the desired item. button. The following screen is displayed, so make the necessary settings. Switch the Mode Dial to another mode.
Section 2 Basic Shooting The basics of shooting are explained here, from how to hold your camera to how to shoot still images and movies.
Chapter 1 / Section 2 Basic Shooting How to Hold the Camera If the camera moves when you press the shutter release button, your still images might not come out clearly (due to camera shake). Hold the camera as below for best results. Hold the camera with both hands and lightly press both elbows against your body. Put your finger on the shutter release button • Be careful when you are shooting not to get a finger, your hair, or the strap in front of the lens or the flash.
Chapter 1 / Section 2 Basic Shooting How to Focus The area displayed on the LCD Monitor is shot as a still image or a movie. When adjusting focus, press the shutter release button halfway (half-press). To adjust focus, follow the steps below. If the camera cannot automatically focus, the crosshairs in the center of the LCD monitor turn red and the auto-focus lamp in the lower left of the viewfinder blinks in green. Point the lens toward the subject you want to shoot.
Chapter 1 / Section 2 Basic Shooting If the subject is not centered on your composition, see p.35. • There is another shooting method, which is to fully press the shutter once, without using the half-press method. Full-press shooting is good for capturing the moment. However, you cannot check that your shot is in focus while shooting. (see p.34) • You can use the battery for a longer period of time by using the viewfinder and shooting in power-save mode (see p.99).
Chapter 1 / Section 2 Basic Shooting Shooting Still Images Use the Shooting Mode to take still images. There are two methods of using the shutter release button, pressing the shutter in two stages (halfpress) and pressing it all the way down at once (full-press). When you use half-press, you can confirm that your shot is in focus on the LCD Monitor. When you want to capture the moment, full-press is • For how to shoot with Zoom, see p.43 • For how to shoot Close-ups, see p.
Chapter 1 / Section 2 Basic Shooting Put the subject of your photo right in the center and press the shutter release button all the way. Capture the Moment Shooting (Full-press) Buttons used here After the camera focuses automatically, the still image is taken and recorded. Turn the Mode Dial to (Shooting Mode). Compose your shot either by looking through the Viewfinder or at the LCD Monitor.
Chapter 1 / Section 2 Basic Shooting When the Subject is not Centered on Your Composition (Focus Lock) When the subject of your composition is not centered, you can compose your picture after setting the focus and then shoot. This method is called "Focus-Lock." With the shutter half-pressed, compose your shot. Buttons used here Gently press the shutter release button all the way. Turn the Mode Dial to (Shooting Mode).
Chapter 1 / Section 2 Basic Shooting Shooting with Scenery-Matching If you use the Scene Mode, you can select from among six types of shooting modes and shoot automatically with optimal settings for the scene. You can select a mode from the following six types, in Scene Mode. PORTRAIT NIGHTSCAPE This is best for taking pictures of people. Use when shooting night scenes.You can also shoot with people in the frame. SPORTS TEXT MODE This is best for pictures of moving objects.
Chapter 1 / Section 2 Basic Shooting To select a Scene Mode, follow the steps below. Press the buttons to select the mode you want to use. Buttons used here Press the button. The camera switches to the Scene Mode shooting screen and the symbol of the Mode you selected is displayed in the top of the screen. Turn the Mode Dial to (Scene Mode). The scene–selection screen appears. If you press the button, the scene-selection screen is displayed and you can change the mode. If you press appears.
Chapter 1 / Section 2 Basic Shooting Combination of Scene Mode and Function Depending on the Scene Mode, the way functions work may differ from when in normal shooting mode. Refer to the table below.
Chapter 1 / Section 2 Basic Shooting Shooting with Multi-Shot If you switch to Multi-Shot, you can shoot consecutive images. This is convenient when you want to capture the moment. There are three ways to shoot Multi-Shots, "CONT", "SCONT" and "MCONT". CONT (Multi-Shot) SCONT (S Multi-Shot) As long as you hold the shutter release button down, pictures continue to be taken. The still images are recorded one file each, just as in normal shooting. Shoots a continuous stream of images.
Chapter 1 / Section 2 Basic Shooting Making Multi-Shot Settings (CONT. MODE) Press the buttons to select [CONT], [SCONT], or [MCONT]. To make Multi-Shot settings, follow the steps below. Buttons used here Press the Press the button. button. The Shooting Menu closes and the symbol is displayed above the screen. Turn the Mode Dial to Press the (Shooting Mode). button. The Shooting menu is displayed. Select [CONT. MODE] and press the button.
Chapter 1 / Section 2 Basic Shooting Shooting with Multi-Shot Shooting with M Multi-Shot Buttons used here Buttons used here Operation continued from the previous page: Operation continued from the previous page: Compose your picture, then press and hold the shutter release button. Compose your picture, then press and hold the shutter release button. As long as you hold the shutter release button down, pictures continue to be taken. Storing to memory begins.
Chapter 1 / Section 2 Basic Shooting Shooting Movies You can shoot movies in Movie Mode. You can select the image size, either 320 × 240, or 160 × 120 pixels. The maximum shooting time of each is 30 seconds (320 × 240) and 120 seconds (160 × 120). Each movie you shoot is recorded as one AVI file. To shoot a movie, follow the steps below. Press the shutter release button. The camera starts recording. Recording continues until you press the shutter release button again.
Chapter 1 / Section 2 Basic Shooting Shooting with the Zoom If you use the (Telephoto):T/ (Wide-angle):W buttons, you can alter the size of the subject in your photo without having to change your distance from the subject. (Equivalent to a 35mm camera's 35 to 105mm zoom.) To shoot with the zoom, follow the steps below. By pressing the (Telephoto) button, the subject you see in the LCD Monitor and the Viewfinder becomes larger.
Chapter 1 / Section 2 Basic Shooting Shooting with the Digital Zoom The Digital Zoom function enlarges images by processing them. When you use the digital zoom, pressing the (Telephoto) button enlarges the subject even more than the specified enlargement ratio (optical zoom). (Maximum of 3.4 magnification.) To shoot with the Digital Zoom, follow the steps below. Zoom in to the maximum by pressing the button, while viewing through the LCD Monitor.
Chapter 1 / Section 2 Basic Shooting Shooting Close-ups (Macro Photo) If you use the (Macro) button, you can get up close with the lens and take a photo (Macro Photo). This is good for shooting flowers, insects and other small subjects, because you can get a close-up of one centimeter (1/2 inch) from your subject. To shoot close-ups, follow the steps below. Press the (Macro) button. The Macro symbol is displayed on the left side of the screen. Buttons used here Press the shutter release button.
Section 3 Using Special Features for Improved Photography This section describes how to change the various shooting-related settings.
Chapter 1 / Section 3 Using Special Features for Improved Photography Using the Flash If you press the (Flash) button, you can switch into Flash Mode (Flash, Flash Off, and other settings). Switch settings according to time, conditions and your preference, and shoot your pictures. The light of the flash can reach the following distances: in wide-angle, about 0.2 to 4.5 m, in telephoto, approximately 0.16 to 2.5 m.
Chapter 1 / Section 3 Using Special Features for Improved Photography Slow Synchronized When you shoot pictures in dark places and want to capture background as well, use this mode, which slows shutter speed and sets the flash to Flash Off. Red-Eye If you shoot with the flash ( phenomenon. ) in a dark place, people's eyes will appear red. This is called the "red-eye" • At purchase your camera is set to Flash Off. • The settings are saved until you press the (Flash) button to change them.
Chapter 1 / Section 3 Using Special Features for Improved Photography Using the Self-Timer You can set the Self-timer to shoot after either two or ten seconds. If the person who takes the photo wants to be in the still image as well, it is convenient to use a setting of ten seconds; a setting of two seconds is useful for preventing camera shake. Attach a tripod securely to the tripod mount on the bottom of the camera. To shoot with the Self-timer, follow the steps below. Press the (Self-timer) button.
Chapter 1 / Section 3 Using Special Features for Improved Photography Changing the Exposure (EXPOSURE COMP.) The exposure setting allows you to select brightness levels for your shots. Normally, if your subject is centered, backlight compensation is automatically activated, and you can shoot with correct exposure. However, in the following cases, or when you intentionally want to change the exposure, you can change the exposure setting. Exposure can be specified in the range of -2.0 and +2.0.
Chapter 1 / Section 3 Using Special Features for Improved Photography To make changes to exposure settings, follow the steps below. Press the buttons and specify a value. Moving it to the - (minus) side makes darker. Moving it to the + (plus) side makes it brighter. Buttons used here Turn the Mode Dial to Press the (Shooting Mode). button. The Shooting menu appears. Press the button. Exposure Compensation settings are completed. Select [EXPOSURE COMP.] and then press the button.
Chapter 1 / Section 3 Using Special Features for Improved Photography Using Natural and Artificial Lighting (WHITE BALANCE) With a normal camera, a white subject may not be reproduced as white depending on lighting around the subject. Digital cameras have a function called White Balance, which automatically adjusts white balance so white subjects are reproduced as white.
Chapter 1 / Section 3 Using Special Features for Improved Photography TIf you select / / / Press the / button. White Balance settings are complete. Buttons used here Press the button. The Shooting Menu closes and the setting value is displayed on the upper left of the screen. This setting will be used for shooting until you change it. Press the buttons to select a mode. • In Auto Mode, if the subject has limited white area, White Balance may not adjust properly.
Chapter 1 / Section 3 Using Special Features for Improved Photography TIf you select (One Push) Point the camera at a piece of paper or something white under the lighting conditions for your picture. Buttons used here Press the button. White Balance is set. Press the button. White Balance settings are complete. Press the button. The Shooting Menu closes and the setting value is displayed on the upper left of the screen. Press to select (One Push).
Chapter 1 / Section 3 Using Special Features for Improved Photography Choosing Picture Quality Mode/Image Size (PIC QUALITY/SIZE) The size of stored still image and movie files depends on picture quality and size settings. About Picture Quality Mode About Image Size When still images and movies are saved as image files, the image data is saved in a compressed file. Picture Quality Mode specifies the compression ratio to use. In Picture Quality Mode, there are two types, N (Normal) and F (Fine).
Chapter 1 / Section 3 Using Special Features for Improved Photography Select [PIC QUALITY/SIZE] and then press the button. Changing Picture Quality Mode/ Image Size of a Still Image Combining Picture Quality Mode and Image Size. Size 2048×1536 1280×960 640×480 Mode F (Fine) F2048 F1280 N (Normal) N2048 N1280 N640 Press the buttons to select [PIC QUALITY/SIZE]. Figures inside the bold frame indicate those shown on the screen. There is no Fine Mode for 640×480. For details, see p.150.
Chapter 1 / Section 3 Using Special Features for Improved Photography Select [MOVIE SIZE] and then press the button. Changing the Image Size of a Movie Image Quality Mode settings cannot be made for movies. Two Image sizes are available: 320 × 240, and 260 × 120 pixels. • At purchase, your camera is set to 320 × 240. To make changes to Image Size, follow the steps below. Press the buttons to select Size. Press the button. Buttons used here Movie Size settings are complete. Press the button.
Chapter 1 / Section 3 Using Special Features for Improved Photography Manual Focus Shooting (FOCUS) When Auto-Focus does not focus as desired, you can focus manually (Manual Focus). You can also shoot with a fixed shooting distance. When using a fixed shooting distance, it can be set to either Snapshot or Infinity (∞). Manual Focus Shooting Press the buttons to select [MF]. For Manual Focus Shooting, follow the steps below. Buttons used here Press the button. Focus settings are complete.
Chapter 1 / Section 3 Using Special Features for Improved Photography Shooting at a Fixed Distance Press the [∞] (Infinity). buttons to select [SNAP] or To shoot with the shooting distance fixed, follow the steps below. Buttons used here Press the button. Focus settings are complete. Press the button. The Shooting Menu closes and the specified value is displayed on the upper part of the screen. Turn the Mode Dial to (Shooting Mode).
Chapter 1 / Section 3 Using Special Features for Improved Photography Changing the Light Metering (PHOTOMETRY) You can change the metering method (the range to use for metering) to determine the exposure value. There are three Light Metering Methods available: MULTI, CENTRE, and SPOT. MULTI (No Symbol) To select light metering method, follow the steps below. The entire shooting range is divided into 256 partitions, and subjected to photometry for overall decision.
Chapter 1 / Section 3 Using Special Features for Improved Photography Select [PHOTOMETRY] and then press the button. Press the button. Light Metering Method setting is complete. Press the button. The Shooting Menu closes and the specified value is displayed on the left side of the screen. Press the setting. buttons to select the desired This setting will be used for shooting until you change it. • At purchase, the setting is Multi.
Chapter 1 / Section 3 Using Special Features for Improved Photography Sensitivity Settings (ISO SETTING) You can set the sensitivity (ISO SETTING) of your camera according to your preferences. At purchase, the sensitivity is set to Auto. When you want it to be very sensitive, select from among the following three settings: ISO200, ISO400, ISO800. To set sensitivity, follow the steps below. Select [ISO SETTING] and then press the button. Buttons used here Press the SETTING].
Chapter 1 / Section 3 Using Special Features for Improved Photography Changing the Edge Quality of Still Images (SHARPNESS) You can change the definition of your still images to either sharp or soft. Select [SHARPNESS] and then press the button. At purchase, your camera is set to Normal. To make changes to the sharpness of still images, follow the steps below. Buttons used here Turn the Mode Dial to Press the Press the setting. buttons to select the desired Press the button. (Shooting Mode).
Chapter 1 / Section 3 Using Special Features for Improved Photography Shooting Consecutively with Different Exposures (AUTO BRACKET) The Auto Bracketing function automatically shoots three consecutive shots, with the specified exposure value as standard, at three exposure levels, at -0.5EV, +/-0, and +0.5EV. Select [AUTO BRACKET] and then press the button. At purchase, this feature is set to OFF. To shoot with Auto Bracket, follow the steps below.
Chapter 1 / Section 3 Using Special Features for Improved Photography Press the shutter release button. Three consecutive shots are taken, with the specified Exposure Compensation value as the standard, at -0.5EV, +/-0, and +0.5EV. After shooting, the three shots are displayed on the LCD Monitor. They are from the left, -0.5EV, the standard compensation value, and +0.5EV. This setting will be used for shooting until you change it. • For how to change the Exposure Compensation see p.50.
Chapter 1 / Section 3 Using Special Features for Improved Photography Setting the Exposure Time (TIME EXPOSURE) If you set the camera to TIME EXPOSURE, when you shoot, the shutter stays open for the time specified. By setting an exposure time, you can capture the track of moving subjects such as fireworks and car lights, when you shoot a night scene. You can select an exposure time of 1, 2, 4 or 8 seconds. To set the exposure Time, follow the steps below.
Chapter 1 / Section 3 Using Special Features for Improved Photography Shooting Pictures Automatically at Set Intervals (INTERVAL) You can set the camera to automatically take pictures at fixed intervals. The interval between shots You can set the shooting interval to 30 seconds to 3 hours in increments of 30 seconds. For Interval Shooting, follow the steps below. Select [INTERVAL] and then press the button. Buttons used here Press the of time.
Chapter 1 / Section 3 Using Special Features for Improved Photography Press the Press the shutter release button. button. A picture is taken every time the fixed interval elapses. The Shooting Menu closes and "Interval" is displayed on the upper part of the screen. To stop shooting, press the button. Interval Shooting settings are cleared when the power is turned off. • In steps to , if you press and hold the buttons, you can quickly raise or lower the setting value.
Chapter 1 / Section 3 Using Special Features for Improved Photography Inserting the Date into a Still Image (DATE IMPRINT) You can stamp the date on the bottom right of your still images. You can choose to display the date in one of two formats, Date (Y/M/D) or Date and Time (Y/M/D/H:M). To enter the date or date and time, follow the steps below. Press the button to select [DATE IMPRINT] and then press the button. Buttons used here Press the setting. Press the buttons to select the desired button.
Chapter 1 / Section 3 Using Special Features for Improved Photography Returning the Shooting Menu Settings to their Defaults (RESTORE DEFAULTS) You can restore the Shooting Menu defaults, returing the settings to what they were at the time of purchase. To restore the Shooting Menu to its initial settings, follow the steps below. Press the buttons to switch between displays as required. Buttons used here Select [RESTORE DEFAULTS] and then press the button.
Chapter 1 / Section 3 Using Special Features for Improved Photography Displaying the Grid Guide on the LCD Monitor When you want to shoot an image evenly in the vertical or horizontal direction, it is convenient to display the Grid Guide (calibration scale) and make your composition. The Grid Guide is made of lines that divide the LCD Monitor screen into thirds both vertically and horizontally. The Grid Guide is displayed only as an aid in shooting and is not part of the picture.
Chapter 1 / Section 3 Using Special Features for Improved Photography Changing Shading for Shooting Text (DENSITY) When you are shooting text, you can change the DENSITY settings. You can select from DEEP, NORMAL and LIGHT. For information on how to shoot text, see p.36. To make changes to the DENSITY, follow the steps below. Press the button. The Shooting menu appears. Buttons used here Select [DENSITY] and then press the button. Press the buttons to select the desired density setting.
Section 4 Viewing Still Images and Movies You can display still images or movies on the LCD Monitor and check them. This section explains displaying still images and movies on the LCD Monitor. It is recommended you plug in the AC Adaptor whenever viewing still images or movies on the LCD Monitor.
Chapter 1 / Section 4 Viewing Still Images and Movies Viewing the Photo You Just Took Right after shooting a still image, if you want to see it immediately, you can display the shot in Shooting Mode. This function is called Quick Review. For movies, the first frame appears as a still image. To display the still image you just took, follow the steps below. While still in the Shooting Mode, press the (Quick Review) button. The still image you just took is displayed on the LCD Monitor.
Chapter 1 / Section 4 Viewing Still Images and Movies Displaying an Enlarged View of the Still Image Displayed Press the (Enlarged View) button. The still image is enlarged. One part of the still image is displayed on the LCD Monitor. The enlargement ratio changes each time you press The still image you displayed with the (Quick Review) button can be displayed enlarged up to 3.4 times using the (Enlarged View) button. the button.
Chapter 1 / Section 4 Viewing Still Images and Movies Deleting the Displayed Still Image or Movie While using the Quick Review function, press the (Delete) button. Press the The movie or still image you displayed using the (Quick Review) button can be deleted by pressing the (DELETE) button. button to select [DELETE]. To delete a still image or movie that is displayed, follow the steps below. Buttons used here Press the button.
Chapter 1 / Section 4 Viewing Still Images and Movies Viewing a Still Image or Movie When you take a still image or movie, it is immediately stored in internal memory or on an SD Memory Card. Still images and movies in internal memory or on an SD Memory Card can be displayed on the LCD Monitor. Viewing Still Images Recorded on an SD Memory Card Turn the Mode Dial to (Playback Mode). The last still image taken is displayed. To view still images, follow the steps below.
Chapter 1 / Section 4 Viewing Still Images and Movies Viewing Still Images Recorded on Internal Memory To view still images recorded on internal memory, follow the steps below. If an SD Memory Card is loaded, turn off the power, remove the SD Memory Card and turn the power back on. Turn the Mode Dial to (Playback Mode). The last still image taken is displayed. For movies, the first frame is displayed as a still image. Move to the still image you want to view using the buttons.
Chapter 1 / Section 4 Viewing Still Images and Movies Press the shutter release button. Viewing Movies Playback begins. The elapsed playback indicator or the elapsed time is displayed on the LCD Monitor. To view movies, follow the steps below. Buttons used here Turn the Mode Dial to (Playback Mode). The last still image taken is displayed. For movies, the first frame is displayed as a still image. Move to the movie you want to see using the buttons. If you press the image or movie.
Chapter 1 / Section 4 Viewing Still Images and Movies Viewing at a Glance The LCD Monitor screen is split into six thumbnail images, allowing you to view your still images or movies at one glance (Thumbnail Display). If you select a still image or movie you want to see from Thumbnail Display Mode, you can view it normally with just the one shot displayed. To view the Thumbnail Display and select the still image for viewing, follow the steps below. Press the (Thumbnail Display) button.
Chapter 1 / Section 4 Viewing Still Images and Movies Enlarged Viewing When you are displaying a still image, if you press the still image up to 3.4 times larger. To view still images in Enlarged Display Mode, follow the steps below. (Enlarged View) button, you can display the Display the still image you want to enlarge. Press the Buttons used here Press the want to display. Turn the Mode Dial to (Enlarged View) button. The still image is enlarged.
Chapter 1 / Section 4 Viewing Still Images and Movies Showing Photos in Order Automatically (SLIDE SHOW) You can show still images or movies recorded in internal memory or on an SD Memory Card sequentially on the LCD Monitor. This function is called a slide show. To view a slide show, follow the steps below. Press the button. The Playback menu is displayed. Buttons used here Confirm you are selecting [SLIDE SHOW] and then press the button.
Chapter 1 / Section 4 Viewing Still Images and Movies Viewing on a Television You can also view the still images and movies you have taken on a TV screen. The camera displays everything on the TV screen just as on its LCD Monitor. To use your television for viewing, connect your camera to the television with the video cable that came with your camera. To view still images and/or movies on a television, follow the steps below. Make sure the power is off.
Section 5 Deleting Still Images and Movies One of the big advantages of digital cameras is that you can delete unwanted still images and movies on the spot. This section explains deleting still images and movies you have taken. For how to protect still images from accidental deletion, see p.88.
Chapter 1 / Section 5 Deleting Still Images and Movies Deleting Unwanted Still Images or Movies You can easily delete still images and movies that have not come out right. The following are the three ways to delete photos: • One shot at a time • All frames at once • Select multiple frames and delete together Still images and movies set to Protect cannot be deleted. Still images or movies recorded on the following media are deleted.
Chapter 1 / Section 5 Deleting Still Images and Movies Deleting All Frames at Once Press the (Delete) button. Press the button to select [DELETE ALL] and press the button. To delete all still images or movies, follow the steps below. A screen appears to confirm the deletion. Buttons used here Press the Turn the Mode Dial to button to select [YES]. (Playback Mode). The last still image taken is displayed. Press the button.
Chapter 1 / Section 5 Deleting Still Images and Movies Press the buttons to select the still images or movies you want to delete. Deleting Multiple Frames at Once To delete selected still images or movies all at once, follow the steps below. Press the (Delete) button. The trash symbol appears in the upper left of the still image (or movie). Buttons used here Repeat Steps and to select all the still images you wish to delete.
Chapter 1 / Section 5 Deleting Still Images and Movies Write-protecting Your Images (PROTECT) You can protect still images and movies from being accidentally deleted. There are 3 methods of making Protect settings: • One shot at a time • All frames at once • Select multiple frames and protect together Still images and movies that are protected cannot be deleted. However, when the memory is formatted, it makes no difference whether files are protected or not: all are deleted.
Chapter 1 / Section 5 Deleting Still Images and Movies Press the button. When set to Protect, the Protect symbol appears in the upper left of the screen. The procedure for releasing protection from one file at a time is the same as that for setting protection. • For how to display still images (or movies), see p.77. • To set/remove protection of all still images (or movies) at once, see p.90. • To set/remove protection of selections made on the Thumbnail Display screen, see p.91.
Chapter 1 / Section 5 Deleting Still Images and Movies Protecting All Still Images Press the button to select [ALL FILES]. To protect all your still images (or movies), follow the steps below. Buttons used here Confirm you are choosing [SELECT] and then press . When set to Protect, the Protect symbol appears in the upper left of the screen. Turn the Mode Dial to Press the (Playback Mode). button. The Playback menu is displayed. Press the button to select [PROTECT] and then press the button.
Chapter 1 / Section 5 Deleting Still Images and Movies Protecting Multiple Still Images or Movies at Once Press the button to select [PROTECT] and then press the button. The Protect symbol appears in the upper left of the first still image (or movie). To protect selected still images or movies all at once, follow the steps below. Buttons used here Press the buttons to select the still image or movie you wish to Protect and press the button.
Chapter 1 / Section 5 Deleting Still Images and Movies Copying the Contents of Internal Memory to a Memory Card (COPY TO CARD) You can copy all the movie and still image data stored in internal memory onto an SD Memory Card at once. To copy still images and movies from internal memory to SD Memory Card, follow the steps below. Turn the camera on. Turn the Mode Dial to Buttons used here Press the (Playback Mode). button. The Playback menu appears. Press the CARD].
Chapter 1 / Section 5 Deleting Still Images and Movies Using a Printing Service (PRINT) The still images recorded on SD Memory Card can be printed out if you take them to a shop that offers a digital camera print service. To use a print service, it is necessary to make settings required for printing. These settings are called DPOF (Dee-Pof) settings.
Chapter 1 / Section 5 Deleting Still Images and Movies Setting DPOF for All Still Images Press the button to select [ALL FILES]. To apply DPOF settings to all your still images, follow the steps below. Buttons used here Confirm you are choosing [SELECT] and then press . Once the DPOF setting is made, the DPOF symbol appears in the upper left of the screen. Turn the Mode Dial to Press the (Playback Mode). button. The Playback menu appears. Press the button to select [PRINT] and press button.
Chapter 1 / Section 5 Deleting Still Images and Movies Setting DPOF for Multiple Still Images Press the button. The Playback menu appears. Press the button to select [PRINT] and then press the button. To make the DPOF setting for selected still images all at once, follow the steps below. The DPOF symbol appears in the upper left of the first still image. Buttons used here Press the buttons to select the next still image you wish to set to DPOF, and then press the button.
Section 6 Changing Camera Settings This section explains how to make changes to the camera's settings. In this section, still images and movies will both be referred to as "images".
Chapter 1 / Section 6 Changing Camera Settings Getting the SD Memory Card Ready for Use (CARD FORMAT) If the error message "This card cannot be used" is displayed, or if you have formatted the card with a computer or some other device, it will be necessary to format the SD Memory Card prior to use. If you format a card that still has images stored on it, these will be lost. For how to format internal memory, see p.98. To format a memory card, follow the steps below.
Chapter 1 / Section 6 Changing Camera Settings Formatting Internal Memory (IN FORMAT) If the error message "Format the internal memory" is displayed, it will be necessary to format the internal memory prior to use. Formatting the internal memory clears all the images recorded in the memory. If you have images that you do not want to clear from the memory, please contact the Ricoh Service offices (see p.163) prior to formatting the internal memory. To format the internal memory, follow the steps below.
Chapter 1 / Section 6 Changing Camera Settings Changing Power-Save Mode Settings (POWER SAVE) You can reduce the power consumption of the LCD Monitor and extend the life of your batteries. At the time of purchase, Power-Save Mode is set to [OFF]. Press the SAVE]. Possible Settings OFF (Power Save Mode Inactivated) (Set at purchase) ON (Activate Power Save Mode) button to select [POWER To change the Power-Save Mode, follow the steps below. Turn the Mode Dial to (Setup Mode). The Setup Screen appears.
Chapter 1 / Section 6 Changing Camera Settings Changing Auto Power-Off Settings (AUTO POWER OFF) If you do not operate the camera for the set period of time, it will shut off automatically (Auto Poweroff) to conserve battery power. At the time of purchase, Auto Power-Off is set to one minute, but you can change this setting. Possible Settings OFF (The Auto Power-Off function does not work) 1 Minute (Default) 5 Minutes 30 Minutes Press the OFF]. button to select [AUTO POWER Press the setting.
Chapter 1 / Section 6 Changing Camera Settings Beep at Recording (BEEP SOUND) When you shoot an image, it is immediately recorded to internal memory or SD Memory Card. When recording, your camera makes a beep sound to let you know it is recording. You can set the camera so it does not make this sound. Press the SOUND]. Possible Settings ON (Make sound) (Default) OFF (Silent) button to select [BEEP To make changes to the beep sound, follow the steps below. Turn the Mode Dial to (Setup Mode).
Chapter 1 / Section 6 Changing Camera Settings Changing File Name Settings (SEQUENTIAL NO.) When you shoot a still image, it is stored on SD Memory Card or in internal memory, with a consecutively-numbered file name automatically assigned. When you are switching SD Memory Cards, you can set your camera to continue consecutive numbering from the previously loaded SD Memory Card. Possible Settings ON (Continue numbering) Press the NO.]. button to select [SEQUENTIAL Press the setting.
Chapter 1 / Section 6 Changing Camera Settings Changing Image Confirmation Time (LCD CONFIRM.) Immediately after pressing the shutter release button, the still image taken is displayed for a moment so you can check it. At purchase, Confirmation Time is set to one second, but this can be changed. Press the button to select [LCD CONFIRM.]. Possible Settings OFF (Photo not displayed for confirmation) 1 Minute (Default) 2 Seconds 3 Seconds To change Confirmation Time, follow the steps below.
Chapter 1 / Section 6 Changing Camera Settings Adjusting the Brightness of the LCD Monitor (LCD BRIGHTNESS) You can adjust the brightness of the LCD Monitor. To adjust the brightness of the LCD Monitor, follow the steps below. Turn the Mode Dial to Press the button. The LCD Brightness Adjustment bar appears. (Setup Mode). The Setup Screen appears. Press the brightness. Press the button to select [LCD BRIGHTNESS]. Moving it to the the buttons to adjust the side makes it darker.
Chapter 1 / Section 6 Changing Camera Settings Changing the Display Language (LANGUAGE) You can change the language displayed on the LCD Monitor. Possible Settings Press the button to select [LANGUAGE]. Press the setting. buttons to select the desired JPN (Japanese) ENG (English) (Default) FRE (French) GER (German) CHI (Chinese, simplified characters) To change the display language, follow the steps below. Turn the Mode Dial to (Setup Mode). The Setup Screen appears.
Chapter 1 / Section 6 Changing Camera Settings Changing the Playback Method for Viewing on TV (VIDEO OUT MODE) You can view your still images and movies on a television screen by connecting your camera to a television with the video cable (included). Your camera is set to NTSC video format (used in Japan and other countries) for use with television equipment, etc. If the equipment you want to connect to uses PAL format (used in Europe and elsewhere), then switch your camera to PAL format before connecting.
Chapter 2 Playing back Images on a Computer (Pictures/Movies) Section 1 Downloading Images to a Computer (For Windows) This section explains displaying still images and movies you have downloaded to your computer. Please do not connect your camera to the computer before installing the software for downloading.
Chapter 2 / Section 1 Downloading Images to a Computer (For Windows) Using the Software Provided The CD-ROM that comes with your camera contains software for downloading images from the camera to a computer and displaying them on it. The following software is included.
Chapter 2 / Section 1 Downloading Images to a Computer (For Windows) System Requirements The following environments are necessary for using the provided software. Please check your computer, or the computer's user manual.
Chapter 2 / Section 1 Downloading Images to a Computer (For Windows) Preparing to Download Images to Your Computer This section shows the flow of downloading images to your computer by using the Caplio CD-ROM included with the camera. Insert the included CD-ROM into the CD-ROM drive of your computer and the screen shown on the right appears. The screen shown here is from Windows XP. You can browse the manuals on CD-ROM by clicking this button. Install the software.
Chapter 2 / Section 1 Downloading Images to a Computer (For Windows) Installation For Windows 98/98SE/Me/2000 Click [Next]. After a few moments, the [Choose Destination Location] screen appears. In Windows 2000, only a user with administrative privileges can perform the installation. Start your computer. Insert the CD-ROM in the CD-ROM drive. The following screen appears automatically. Confirm where you want to install and then click [Next].
Chapter 2 / Section 1 Downloading Images to a Computer (For Windows) Uninstalling the Software (For Windows 98/98SE/Me/2000) Select [Caplio Software] and then click [Change/Remove]. When you want to remove the software, follow the steps below (this operation is called uninstallation). In Windows 2000, only a user with administrative privileges can uninstall the software. Click [Start] on the Windows task bar. The [Start] menu appears. Select the language to use and then click the [OK] button.
Chapter 2 / Section 1 Downloading Images to a Computer (For Windows) For Windows XP Confirm where you want to install and then click [Next]. After a few moments, the [Select Components] screen appears. In Windows XP, only a user with administrative privileges can perform the installation. Start your computer. Insert the CD-ROM in the CD-ROM drive. The following screen appears automatically on your computer screen. Confirm the software you want to install and then click [Next]. Click [Install Software].
Chapter 2 / Section 1 Downloading Images to a Computer (For Windows) Uninstalling the Software (For Windows XP) Select the language to use and then click the [OK] button. A message appears to confirm whether you want to remove the program: click [OK]. When you want to remove the software, follow the steps below (this operation is called uninstallation). For Windows XP, only a user with administrative privileges can perform the uninstallation.
Chapter 1 / Section 1 Getting Started Installing Acrobat Reader Acrobat Reader is software used to browse the contents of a manual in a PDF file. If you are using Windows, you can install Acrobat Reader in your computer. In Windows XP or 2000, only a user with administrative privileges can perform the installation. Power on the computer, and insert the included Caplio CD-ROM into the CD-ROM drive. The following screen appears automatically. Click [Browse CD-ROM]. The files on the CD-ROM are listed.
Chapter 2 / Section 1 Downloading Images to a Computer (For Windows) Connecting the Camera to a Computer After installing the software on your computer, connect your camera to it. In Windows XP, the first time you connect your camera to the computer using a USB cable, the [Found New Hardware Wizard] screen will appear. Make sure the power is off. Connect the USB cable to the USB port of your computer. Select [Install from a list or specific location (Advanced)]. Open the terminal cover. Select [Next].
Chapter 2 / Section 1 Downloading Images to a Computer (For Windows) Downloading Pictures to Your Computer After you have connected your camera to the computer, images are downloaded automatically. Images are downloaded to your computer from the following memory sources. When an SD Memory Card is loaded When no memory card is loaded Downloads from internal memory Downloads from SD Memory Card For how to change files names when recording, see p.102.
Chapter 2 / Section 1 Downloading Images to a Computer (For Windows) For Windows XP Click [Next]. The [Choose Pictures to Copy] screen appears. Connect your camera to the computer using the USB cable. Your camera turns on and the following dialog box appears. If the screen below appears, select "Microsoft Scanner and Camera Wizard Download pictures from a camera or scanner", check the box next to "Always use this program for this action" and then press [OK].
Chapter 2 / Section 1 Downloading Images to a Computer (For Windows) Make the necessary settings and then click the [Next] button. You are prompted to confirm [Job Finished] by pressing the [Next] button. The [Copying Images] screen appears and the transfer begins. The [Completing the Scanner and Camera Wizard] screen appears. Once the transfer is complete, the [Other Options] screen appears. Click the [Finish] button.
Chapter 2 / Section 1 Downloading Images to a Computer (For Windows) How to Use the RICOH Gate L When you are in the RICOH Gate L window, you can specify settings for each of the various functions, such as automatically saving when connected, the destination for downloading images (save destination), and so on. 2. [Save Button] The RICOH Gate L Window Click this and the images are downloaded from your camera.
Chapter 2 / Section 1 Downloading Images to a Computer (For Windows) How to Use the Optional settings If you select [Option settings] from the menu displayed on a button in the RICOH Gate L window, the [Option settings] dialog box appears. Item 1.[Automatically save on connection] 2.[Destination folder] 3.[Create folder] 4.[The same image will not be saved.] 5.[Application software settings] 6.
Chapter 2 / Section 1 Downloading Images to a Computer (For Windows) How to Use the Background Illustration Settings 1. [Background illustration pattern] You can select a background for the RICOH Gate L window from three types of patterns. If you select [Background illustration setting] from the menu displayed by the [MENU] button in the RICOH Gate L window, the [Background illustration settings] dialog box appears. Select the pattern you wish to use from the three available. 2.
Chapter 2 / Section 1 Downloading Images to a Computer (For Windows) For Downloading Images Directly to Your Computer from an SD Memory Card Downloading images via USB connection between computer and camera was explained previously, but it is possible to download images from SD Memory Card to computer via a PC Card Slot or Card Reader. The FM-SD53 PC Card adaptor (sold separately) is required to load an SD Memory Card into a PC Card Slot or Card Reader.
Section 2 Downloading Images to a Computer (For Macintosh) This section explains displaying still images and movies you have downloaded to your computer. Please do not connect your camera to the computer before installing the software for downloading. • For the rest of this explanation, still images and movies will be referred to together as "images". • When downloading images from your camera, it is recommended you safeguard the power supply by using the AC Adaptor (sold separately).
Chapter 2 / Section 2 Downloading Images to a Computer (For Macintosh) Using the Software Provided The CD-ROM that comes with your camera contains software for downloading images from the camera to a computer and displaying them on it. The following software is included.
Chapter 2 / Section 2 Downloading Images to a Computer (For Macintosh) System Requirements The following environments are necessary for using the provided software. Please check your computer, or the computer's user manual. System Requirements Specification Operating System Mac OS 8.6 to 9.2.2/Mac OS X 10.1.2 to 10.2 Macintosh A USB port standard-equipped Apple Macintosh Series Internal Memory Mac OS 8.6 to 9.2.2 96 MB or more (128 MB or more recommended) Mac OS X 10.1.2 to 10.
Chapter 2 / Section 2 Downloading Images to a Computer (For Macintosh) Preparing to Download Images to Your Computer This section shows the flow of downloading images to your computer by using the Caplio CD-ROM included with the camera. Mac OS 8.6 to 9.2.2 Mac OS X 10.1.2 to 10.2 Insert the included CD-ROM into the CD-ROM drive of your computer and the window or icon shown on the left appears. Install the software. Mac OS 8.6 to 9.2.2...p.128 Mac OS X 10.1.2 to 10.2...p.
Chapter 2 / Section 2 Downloading Images to a Computer (For Macintosh) Installation For Mac OS 8.6 to 9.2.2 Click [Install]. If RCD-iMounter 6.0 was previously installed, remove files in the following manner. • Delete files that start with RDC that are in the Control Panel folder. • Delete files that start with RDC that are in the Function Extensions folder. • Delete files that start with RDC that are in the Initial Settings Folder. Turn on your Macintosh. Click [Continue].
Chapter 2 / Section 2 Downloading Images to a Computer (For Macintosh) For Mac OS X 10.1.2 to 10.2 Click the destination volume you want, then click [Continue]. Turn on your Macintosh. Insert the CD-ROM provided into the CDROM drive. Double-click the CD-ROM icon, and then open the Mac OS X folder. The [Caplio Mounter.pkg] icon appears. Double-click the Mounter icon [Caplio Mounter.pkg]. Click [Install]. The Installer is launched and a screen appears prompting you for the administrator's password.
Chapter 2 / Section 2 Downloading Images to a Computer (For Macintosh) Uninstalling the Software (For Mac OS 8.6 to 9.2.2) To remove (uninstall) the software from your Macintosh, drag and drop the installed file into the Trash. Please remove the following files from their respective folders.
Chapter 2 / Section 2 Downloading Images to a Computer (For Macintosh) Connecting the Camera to a Computer After installing the software on your computer, connect your camera to it. Make sure the power is off. Connect the USB cable to the USB port of your computer. Open the terminal cover. Connect the USB cable to its USB terminal. Your camera turns on. Disconnecting your camera from computer 1. Turn your camera off by pressing the power button. 2. Unplug the USB cable.
Chapter 2 / Section 2 Downloading Images to a Computer (For Macintosh) Downloading Pictures to Your Computer After you have connected your camera to the computer, images are downloaded automatically. Images are downloaded to your computer from the following memory sources. When an SD Memory Card is loaded When no memory card is loaded Downloads from internal memory Downloads from SD Memory Card For how to change files names when recording, see p.102.
Chapter 2 / Section 2 Downloading Images to a Computer (For Macintosh) Using the Mounter For Mac OS 8.6 to 9.2.2 You can transfer images using the Mounter. In Mac OS 8.6, Mac OS 9.1, or earlier versions, a folder called [Caplio] is created inside the root directory on the start-up disc [Macintosh HD]. In Mac OS 9.1 to 9.2.2, a folder called [Caplio] is automatically created inside the [Documents] folder on the start-up disc [Macintosh HD]. Connect your camera to the computer using the USB cable.
Chapter 2 / Section 2 Downloading Images to a Computer (For Macintosh) For Mac OS X 10.1.2 to 10.2 Double-click the displayed icon. It can be handled in the same way as a normal drive. If you double-click the icon, a folder called [DCIM] is displayed and a folder called [100RICOH] within that folder is displayed. The image files you shot are inside the [100RICOH] folder. Connect your camera to the computer using the USB cable. Your camera turns on. Drag and drop the file and copy to the hard disc.
Chapter 2 / Section 2 Downloading Images to a Computer (For Macintosh) The RICOH Gate L Window 3. [Option settings] Specifies where to save images and which application will launch if you press the Application button or after saving. (See p.136.) Once RICOH Gate L starts up, the following RICOH Gate L menu bar and window appear on the computer screen. [Background illustration] If you select this, a sub-menu will appear, allowing you to change the background design of the RICOH Gate L window.
Chapter 2 / Section 2 Downloading Images to a Computer (For Macintosh) How to Use the Optional Settings If you select [Optional Settings] from the [RICOH Gate Settings] menu, the [Optional Settings] dialog box appears. Item 1.[Automatically save on connection] 2.[Choose] 3.[Automatically create folder on saving] 4.[The same image will not be saved.] 5.[Save and start application software] 6.
Section 3 Displaying Thumbnail Images (How to Use DU-10) DU-10 enables you to view downloaded images at a glance–as well as edit, rotate and resave images. This section explains how to use DU-10. • DU-10 can only be used in Windows.
Chapter 2 / Section 3 Displaying Thumbnail Images (How to Use DU-10) Starting and Exiting DU-10 There are two methods of starting DU-10: • Auto Start from RICOH Gate L In the RICOH Gate L option settings, if the Application Software is set to DU-10, and if [After saving, launch Application software] is checked, DU-10 will start automatically after image files have downloaded from your camera with RICOH Gate L.
Chapter 2 / Section 3 Displaying Thumbnail Images (How to Use DU-10) Thumbnail Display Description Once you start DU-10, images appear as thumbnails. 4. Folder Display Area The folders inside [My Computer] are displayed in a hierarchy. The images inside folders selected here appear in the Thumbnail Display Area. 5. Thumbnail Image 1. Menu Bar 6. File Name You can change the display size and ordering of images. 7. Sound Setting Y/N Display 2. Tool Bar 8.
Chapter 2 / Section 3 Displaying Thumbnail Images (How to Use DU-10) Switching the Ordering of Images Displayed thumbnail images are ordered according to date (descending order). You can change the ordering method to by file type or by name. You can also choose whether each of the above is ordered according to ascending or descending order. To change the ordering of images, use either the tool bar or [Arrange] from the [View] menu. 1. Name order Switches to By File Name. 2.
Chapter 2 / Section 3 Displaying Thumbnail Images (How to Use DU-10) Changing the Display Size To change the display size, use either the tool bar or [Display size] from the [View] menu. 2. Large 3. Medium 4. Medium+ memo You can change the display size to one of five sizes available. 1. Extra-large 5.
Chapter 2 / Section 3 Displaying Thumbnail Images (How to Use DU-10) Viewing Images in a slide show You can view images sequentially and automatically in either a slide show (selected images only) or auto slide show (all images). The [slide show] dialog box is displayed, so make the necessary settings. To View a slide show You can select one or more images and display them as a slide show. To start slide show, follow the steps below. Select the images you wish to see in slide show.
Chapter 2 / Section 3 Displaying Thumbnail Image (How to Use DU-10) Using Auto slide show How to Use the slide show Dialog Box In Auto slide show, all the images displayed as thumbnails appear in order. To start Auto slide show, follow the steps below. You can make slide show display settings in the [slide show] dialog box. Using one of the steps below, select [Auto slide show]. • Select [Image] then [slide show] from the menu bar. • Click the button on the tool bar.
Chapter 2 / Section 3 Displaying Thumbnail Images (How to Use DU-10) Viewing Image Information You can display image information, such as the date and time a photo was shot, the size of the image, and so on. Using the Shortcut Menu Right-click on the image in the Thumbnail Display Area. The menu appears. Select [Properties] from the menu. Information Dialog Box To display image information, follow one of the steps below.
Chapter 2 / Section 3 Displaying Thumbnail Images (How to Use DU-10) Displaying the Viewer Screen If you use the Viewer screen, images are not displayed as thumbnails, so you can view them at full size. To open the Viewer screen, follow one of the steps below. • Double click the image you want to display from the thumbnail selection. • Click the image you want to display from the thumbnail display area, then select [Display/Playback] from the [Image] menu.
Appendices
Appendices A.
Appendices Pixels • Still Images • Text • Movies File Formats • Still Images • Text • Movies Camera File System Standard Compression Format Image Size • 2048 X 1536 • 1280 X 960 • 640 X 480 : 2048 × 1536, 1280 × 960, 640 × 480 : 1280 × 960 : 320 × 240, 160 × 120 : Compressed: JPEG (Exif2.2) : TIFF (MMR Method ITU-T.6) : AVI (Open DML Motion JPEG Format Compliant) : DCF/DCF, is an abbreviation for "Design rule for Camera File system", standardized by JEITA.
Appendices B. Optional Accessories The Caplio 300G can be used with the items (sold separately) listed below. Item Model AC Adaptor PC Card Adaptor AC-4a FM-SD53 Rechargeable Battery Battery Charger DB-43 BJ-2 Remarks For when you want to supply power directly from a wall outlet. For when you want to load an SD Memory Card directly into your computer's PC Card Slot. Available for this camera. This is a special high-speed (rechargeable) battery charger. C.
Appendices D. SD Memory Card Recording Capacities The following table shows the approximate number of images that can be recorded onto an SD Memory Card at various image size and picture quality settings.
Appendices F. Cautions on Use Waterproofing z Although this camera conforms to the specification for the JIS Protection Level 7. z z z After shooting in the rain or cleaning in water, water may seep through the eyepiece of the lens segment and the tripod screw holes on the underside. This is not a problem because these sections are of double structure. The internal mechanisms of the camera is neither waterproof nor dustproof.
Appendices G. Care and Storage Care z Please note that if fingerprints, dirt, etc. get onto the lens, picture quality will suffer. z When dust or dirt does get on the lens, do not touch it directly with your fingers, and either use a blower (available in stores) to blow it off, or a soft cloth to gently dust it off. z If the camera has gotten dirty, take the following steps: Make sure the battery/card cover and terminal cover are securely closed.
Appendices H. Troubleshooting Refer to the symptoms and measures listed below before submiting the camera for repairs. If the problem persists, contact your nearest Ricoh Service Center. Power Supply Symptom Cause The power does not come on. Batteries are not loaded. Or they are exhausted. Load the batteries correctly. Recharge or use the AC Adaptor. The AC Adaptor is not connected correctly. Because the camera overheated the power was automatically turned off. Reconnect it properly.
Appendices Symptom Cause I cannot check shot images. Images do not appear on the LCD Monitor. The image confirmation time is too short. The power is not on. Or the LCD Monitor is dark. The video cable is connected. The screen display status is in [SYNCHRO-MONITOR MODE]. It is set to [POWER SAVE]. The lens is dirty. The subject is not in the center of the shooting range. It is a hard-to-focus subject. Although it is set to Auto Focus, it does not focus. The flash does not fire.
Appendices Playback/Deleting Symptom Cause Measure Cannot Playback. Or It is not set to (Playback). Turn the Mode Dial to the Playback screen does not come out. The VIDEO cable was not connected Reconnect it properly. properly. The contents of SD Memory Card cannot be replayed, or the replay screen does not appear. An image disappeared. An SD Memory Card is not loaded. Or an SD Memory Card with no stored images is loaded. (Playback Mode). Load a card with stored images. Page p.77 p.83 p.
Appendices Other Problems Symptom Cannot load the SD Memory Card. Cause The card is facing the wrong way. Even when the Batteries are running low. camera's buttons are pressed, it does not operate. Camera Malfunction. Measure Page Load correctly. p.15 If using alkaline batteries, replace with a new set. If using rechargeable batteries, recharge or use the AC Adaptor. p.9 p.10 p.11 Turn the power off once, turn it back on and p.8 p.13 switch to (Still Image). Reset the camera. p.9 p.10 p.
Appendices About connecting to your computer/software Symptom Cannot download images Cause Connect your camera via the USB hub to your computer. Cannot download The COM Port setting is images wrong. (Only for Windows98/ 98SE/Me) Cannot download images (For all Windows OS's) The computer is not recognizing the camera correctly. Measure 1. Your camera may not be recognized correctly if you connect to the USB Port of your computer via a USB hub. Connect it directly to the USB port of your computer. 1.
Appendices Symptom Cause Measure The computer is not Cannot download recognizing the camera images (For Windows 2000) correctly. 1. Connect your camera to the computer with the USB cable. 2. Click [Start] on the Windows task bar. 3. Select Settings, open [System] from inside the [Control Panel], then open the [Device Manager] in the [System Properties] dialog box. 4.
Appendices I. Error Messages If an error message is displayed on the LCD Monitor, follow the steps below. Error Message Countermeasure Page INSERT CARD A card is not loaded. Insert a card. p.15 SET DATE The date is not set. Set the date. p.14 FILE NUMBER OVER LIMIT The file number limit has been exceeded. Please use another card, or delete unwanted files. p.15 p.85 UNMATCHED FILE A file that cannot be played back was selected. INSUFFICCIENT MEMORY.
Appendices J. About the Warranty and Servicing 1. This product is backed by a limited warranty. During the warranty period mentioned in the Warranty supplied with your camera, any defective parts will be repaired free of charge. In the event of a camera malfunction, contact the dealer from which you purchased the camera or your nearest Ricoh service office. Please note that you will be not be reimbursed for the cost of bringing the camera to the Ricoh service office. 2.
Appendices INFORMATION TO THE USER USA FCC Part15 Class B The equipment has been tested and found to comply with the limits for a Class B digital device, pursuant to part 15 of the FCC Rules. These limits are designed to provide reasonable protection against harmful interference in a residential installation. This equipment generates, uses, and can radiate radio frequency energy and if not installed and used in accordance with the instructions, may cause harmful interference to radio communications.
Chapter 1 / Section 1 Getting Started Ricoh Service Offices Ricoh Company, Ltd. 3-2-3, Shin-yokohama Kohoku-ku, Yokohama-shi 222-8530 Japan http://www.ricoh.co.jp/r_dc RICOH HONG KONG LIMITED Personal Multimedia Products Center 21/F., Tai Yau Building, 181 Johnston Road, Wan Chai, Hong Kong Ricoh Australia Pty. Ltd. 8 Rodborough Road Frenchs Forrest, N.S.W. 2086 Australia http://www.ricoh.com.au Ricoh Factory Service Center 250 North 54th Street Chandler, AZ 85226 http://www.ricohzone.