
Operation Manual


118
Chapter 2 / Section 1 Downloading Images to a Computer (For Windows)
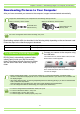
For Windows XP
Connect your camera to the computer using
the USB cable.
Your camera turns on and the following dialog box
appears.
If the screen below appears, select "Microsoft
Scanner and Camera Wizard Download pictures from
a camera or scanner", check the box next to "Always
use this program for this action" and then press [OK].
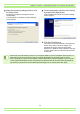
The scanner and camera wizard starts and the
following screen appears.
Click [Next].
The [Choose Pictures to Copy] screen appears.
The images in your camera are displayed and marked
as checked. Images that are checked will be
transferred to your computer.
Uncheck images you do not want to transfer.
Click [Next].
The [Picture Name and Destination] screen appears.
Once you enter a name in [1. Type a name for this
group of pictures], the computer saves images with
that name followed by a consecutive number.
Enter where you want to save the images in [2.
Choose a place to save this group of pictures].
If you check the box in [Delete pictures from my
device after copying them], once the images have
been transferred to the computer, they will be deleted
from your camera's SD Memory Card.