Software User Guide • For the safe use of your camera, be sure to read the “Safety Precautions” thoroughly before use. • Types of software installed on your computer varies depending on the method of installation from the Caplio Software CD-ROM. For details, see the “Camera User Guide”.
Chapter 1 Downloading Images to Your Computer (Windows) This section explains how to download still images and movies to your computer (Windows).
4. Connecting the Camera to a Computer There are two methods for downloading images from the camera to your computer. The first method is to use RICOH Gate La. To use RICOH Gate La, Caplio Software must be installed. The second method is to download images without using RICOH Gate La. In this case, the camera is recognized by the computer as a separate drive and appears on [My Computer]. To use RICOH Gate La, select [ORIGINAL] for [USB CONNECTION] on the camera.
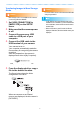
. Downloading Images to Your Computer Connect the USB cable to the USB terminal of your camera. When you connect the camera to your computer, you can download images from the camera. Downloading Images Using RICOH Gate La The camera turns on, RICOH Gate La starts, and the RICOH Gate La window appears. Images are downloaded to your computer from the following memory sources.
2. If the screen below appears, select [RICOH Gate La], check the box next to [Always use this program for this action] and then click [OK]. Insert the Caplio Software CDROM into the CD-ROM drive on your computer. Installation of the WIA driver automatically starts. If the CD-ROM is already on your computer when the [Found New Hardware Wizard] window is displayed, simply click [Next] to start installation.
If you clicked the [Keep Blocking] button: Follow the steps below to check to see the Windows Firewall settings. 1. Click [Start] and then [Control Panel]. 2. Double-click [Windows Firewall]. Warning Messages Under Windows XP Service Pack 2 When software for Ricoh’s digital camera is used on a computer with Windows XP Service Pack 2 installed, the following warning message may appear at software activation or USB connection. Change the setting while referring to the following.
Transferring Images in Mass Storage Mode Caution Do not turn off the camera or disconnect the USB cable during image transfer. Caution Mass storage mode is not available on this camera if you are using Windows 98/98SE. 1. Set [USB CONNECTION] to [MASS STR] on the SETUP menu. • If a file with the same name already exists at the destination, it is overwritten. If you do not want the file to be overwritten, rename the file or transfer data to another folder. 2. Make sure that the camera power is off.
How to Use RICOH Gate La 1 [MENU] Button Click this and the following menu appears. RICOH Gate La is a software program to import images from the camera to a computer. By simply connecting the camera to your computer via a USB cable, images are automatically imported to the computer. On the RICOH Gate La window, you can make various settings including auto-saving upon connection and the destination folder (where images will be saved).
How to Use the [Option settings] If you click the [MENU] button on the RICOH Gate La window and select [Option settings] from the displayed menu, the [Option settings] dialog box appears. Item Description Initial Setting 1 [Save automatically when connected to USB] Select the check box to have images downloaded and saved automatically in your Save computer when the camera is connected to your computer with the USB cable.
Downloading Images from an SD Memory Card How to Use the [Background illustration settings] You can select a background for the RICOH Gate La window from three types of patterns. If you click the [MENU] button on the RICOH Gate La window and select [Background illustration settings] from the displayed menu, the [Background illustration settings] dialog box appears. It is possible to download images from an SD memory card to computer via a PC card slot or card reader.
Chapter 2 Downloading Images to Your Computer (Macintosh) This section explains how to download still images and movies to your computer (Macintosh).
4. Connecting the Camera to a Computer The following methods can be used to download images from the camera to your computer. The first method is to use RICOH Gate La or Caplio Mounter. To use these software titles, Caplio Software must be installed. The second method is to download images without using software. In this case, the camera is recognized by the computer as a separate drive and appears on [My Computer]. To use software to download images, select [ORIGINAL] for [USB CONNECTION] on the camera.
Downloading Images to Your Computer When you connect the camera to your computer, you can download images from the camera. Using the Caplio Software to Download Images 1. Set [USB CONNECTION] to [ORIGINAL] on the SETUP menu. 2. Make sure that the camera power is off. 3. Connect your camera to the computer using the USB cable. The camera turns on, RICOH Gate La starts, and the RICOH Gate La window appears. Images are downloaded to your computer from the following memory sources.
When an SD memory card is loaded, the [Caplio.SD] icon is displayed and you can view the image files stored on the SD memory card loaded. • For details about the RICOH Gate La [Option settings] dialog box, see P.19. • For details about [USB CONNECTION] (MASS STR/ ORIGINAL), see the “Camera User Guide”. • For how to change the Save Destination Folder, see P.19. • For how to start RICOH Gate La, see P.18. • For the RICOH Gate La window, see P.18. Example of the display in Mac OS 10.1.2 to 10.4.6 4.
Transferring Images in Mass Storage Mode Caution Do not turn off the camera or disconnect the USB cable during image transfer. Caution Mass storage mode is not available on this camera if you are using Mac OS 8.6. 1. • If a file with the same name already exists at the destination, it is overwritten. If you do not want the file to be overwritten, rename the file or transfer data to another folder. Set [USB CONNECTION] to [MASS STR] on the SETUP menu. 2. Make sure that the camera power is off. 3.
How to Use RICOH Gate La 1 [About RICOH Gate La] Displays the version of RICOH Gate La. RICOH Gate La is a software program to import images from the camera to a computer. By simply connecting the camera to your computer via a USB cable, images are automatically imported to the computer. On the RICOH Gate La window, you can make various settings including auto-saving upon connection and the destination folder (where images will be saved). 2 [Quit] Closes RICOH Gate La.
How to Use the [Option settings] If you select [Option settings] from the [RICOH Gate La Setup] menu, the [Option settings] dialog box appears. Item Description Initial Setting 1 [Automatically save on connection] Select the check box to have images downloaded and saved automatically Transfer files in your computer when the camera is connected to your computer with the automatically USB cable.
Downloading Images from an SD Memory Card It is possible to download images from an SD memory card to computer via a PC card slot or card reader. Images in an SD Memory Card Images are stored on an SD memory card in a hierarchy, as shown here. Image files Depending on the type of PC card slot or card reader, a memory card adapter may be required when using an SD memory card. If the SD memory card can be used in the PC card slot, no memory card adapter is required.
Appendices
Troubleshooting Problem 1 Cannot download images Solution 1 The [USB CONNECTION] setting on the camera’s SETUP menu may not match the transfer method preferred. Make settings for [USB CONNECTION] according to the software used for transfer as follows: Software used for transfer [USB CONNECTION] setting The computer recognizes the camera as a drive without using software. MASS STR Auto Document Link ORIGINAL RICOH Gate La ORIGINAL Solution 2 Your computer does not recognize the camera correctly.
Procedure 2: If your computer still does not recognize the camera, follow the steps below. 1. Load the Caplio Software CD-ROM into your computer. 2. Connect your camera via the USB cable to your computer. 3. Click the [Start] button on the Windows taskbar to display the [Start] menu. 4. Select [Settings], and then click [Control Panel]. 5. On the Control Panel displayed, double-click the [System] icon. 6. On the [System Properties] screen displayed, click the [Device Manager] tab. 7.
zFor Windows 2000 Procedure 1: First, follow the steps below. 1. Load the Caplio Software CD-ROM into your computer. 2. Connect your camera via the USB cable to your computer. 3. Click the [Start] button on the Windows taskbar to display the [Start] menu. 4. Select [Settings], and then click [Control Panel]. 5. On the Control Panel displayed, double-click the [System] icon. 6. On the [System Properties] screen displayed, click the [Hardware] tab. 7.
Procedure 2: If your computer still does not recognize the camera, follow the steps below. 1. Load the Caplio Software CD-ROM into your computer. 2. Connect your camera via the USB cable to your computer. 3. Click the [Start] button on the Windows taskbar to display the [Start] menu. 4. Select [Settings], and then click [Control Panel]. 5. On the Control Panel displayed, double-click the [System] icon. 6. On the [System Properties] screen displayed, click the [Hardware] tab. 7.
zFor Windows XP Procedure 1: First, follow the steps below. 1. Load the Caplio Software CD-ROM into your computer. 2. Connect your camera via the USB cable to your computer. 3. Click the [Start] button on the Windows taskbar to display the [Start] menu. 4. Click [Control Panel]. 5. On the Control Panel displayed, click [Switch to Classic View]. The display changes its appearance and the [System] icon appears. 6. Double-click the [System] icon. 7.
Procedure 2: If your computer still does not recognize the camera, follow the steps below. 1. Load the Caplio Software CD-ROM into your computer. 2. Connect your camera via the USB cable to your computer. 3. Click the [Start] button on the Windows taskbar to display the [Start] menu. 4. Click [Control Panel]. 5. On the Control Panel displayed, click [Switch to Classic View]. The display changes its appearance and the [System] icon appears. 6. Double-click the [System] icon. 7.
Solution 3 For Windows 98/98SE/Me, the COM Port setting may be wrong. Follow the steps below. 1. Connect your camera via the USB cable to your computer. 2. Click the [Start] button on the Windows taskbar to display the [Start] menu. 3. Select [Settings], and then click [Control Panel]. 4. On the Control Panel displayed, double-click the [System] icon. 5. On the [System Properties] screen displayed, click the [Device Manager] tab. 6.
Problem 2 Even if you check [The same image will not be saved] in the RICOH Gate La [Option settings], the same images are loaded into your computer. Solution The camera’s clock is incorrectly set or the camera’s clock information has been reset. To allow the [The same image will not be saved] function to work properly, the camera’s clock information must be set properly. Set it properly. Problem 3 Files loaded from the camera into the computer were deleted.
Problem 7 RICOH Gate La does not appear in the [Device connected] screen when the camera is connected to a Windows XP computer through a USB cable. Solution Set the camera to Playback Mode and check if the message [FORMAT CARD] is displayed. If the message is displayed, check that the SD memory card does not contain any image you do not want to delete, and then select [FORMAT [CARD]] (see the “Camera User Guide”) on the SETUP menu to format the SD memory card.