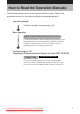
How to Read the Operation Manuals The following operation manuals are supplied with this camera. Refer to the appropriate manual for instructions relating to the required operation. Open the package Check the contents of the package. (p.2) Basic operation Digital Camera Operation Manual (this manual) This manual explains how to operate the camera, from the preparations that are necessary before using the camera to instructions on how to use the various shooting functions and play back files.
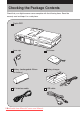
Checking the Package Contents Check that your digital camera comes complete with the following items. Read the warranty card and keep it in a safe place. Caplio RR1 Lens cap Soft case Battery (rechargeable lithium ion battery) Battery charger AV interface cable USB cable 2 Downloaded from ManualsCamera.
Wrist strap Software CD-ROM Software Operation Manual for Caplio RR1 (CD-ROM) Operation manual (this manual) Warranty card Downloaded from ManualsCamera.
CONTENTS How to Read the Operation Manuals ..................................................... 1 Checking the Package Contents ............................................................ 2 CONTENTS ............................................................................................ 4 Parts & Names ....................................................................................... 8 Basic Operation/Quick Reference ........................................................ 10 Preparations .......
Sound Recording .................................................................................... 56 Continuous Shooting .............................................................................. 56 Motion Picture Recording ....................................................................... 57 Still Picture/Text Shooting with Sound .................................................... 58 Changing Flash Modes ...........................................................................
Chapter 5 SETTINGS/MISCELLANEOUS Changing Camera Settings ................................................................ 120 Formatting a Card/Internal Memory ...................................................... 120 Keep Settings ........................................................................................ 121 Changing LCD Confirmation Time ........................................................ 122 Auto Power Off Setting ....................................................................
Tips Tips to Extend Recording and Playback Times .......................................... 23 Auto Power Off ........................................................................................... 30 How to check the date and time ................................................................. 39 LCD Monitor Display (Shooting Mode) ....................................................... 46 Focus Lock Shooting ..................................................................................
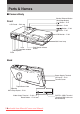
Parts & Names ■ Camera Body Shutter Release Button (Start/Stop Button) Front Button ...P.47 LCD Panel ...P.32 Button ...P.60 Button ...P.46 Button ...P.67 LCD Monitor ...P.32 Self timer lamp Lens AF viewfinder window Microphone Flash Sub Shutter release button Back Power Supply Terminal (DC Input) ...P.25 Terminal cover Tripod Screw Hole Speaker Wrist Strap Eyelet ...P.20 Video Output Terminal ...P.90 Reset Button ...P.141 8 Downloaded from ManualsCamera.
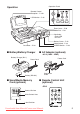
Operation Panel Operation Remote Control Reception ...P.129 LCD Monitor ...P.32 Zoom Lever ...P.50 Mode Dial ...P.31 Viewfinder • Flash LED • AF LED Battery Cover ...P.22 Dioptor Knob ...P.42 POWER Switch ...P.30 Card Door ...P.
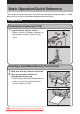
Basic Operation/Quick Reference This section provides introductory information for operating the digital camera. Further details can be found in the reference pages mentioned below. Preparations Powering the Camera (p.21-25) 1 Load the battery into the camera. * When using an AC adapter, connect it to the camera and then to the AC outlet. (p.25) Inserting a SmartMedia Memory Card (p.26-29) 1 2 Make sure that the camera is turned off. Open the card door and insert a SmartMedia memory card.
Setting the Date and Time (p.37-39) 1 2 3 4 5 6 7 Turn the power switch on and set the mode dial to [SET]. Press the or button to select [DATE SETTING]. Press the DISPLAY button to select the display method. Press the ENTER button. Press the or button to change the highlighted digit. Press the or button to select the digit you wish to change. Repeat steps 5 and 6 above to complete the settings. * Each time you press the or button, the flashing digit changes, from year to month, day, hour and minute.
Changing the Flash Mode (p.60-61) 1 2 3 Set the mode dial to [ ] or [ ]. Press the button to select a flash mode. ), Auto You can choose Flash Off ( ), Forced Flash ( ), or Slow Synchro ( mode ( blinks). The mark for the selected mode will be displayed on the LCD panel and on the LCD monitor. Press the shutter release button. Using the Self-Timer (p.67) 1 2 3 Set the mode dial to [ ] or [ ]. Press the button. mark will be displayed on the LCD The panel and on the LCD monitor.
Erasing Erasing Files (p.114-117) 1 Press the POWER switch to turn the camera on and set the mode dial to ]. [ 2 Press the erase source. 3 Press the 4 Press the or button to select the erase mode and press the ENTER button. button to select the button. * Remember that files cannot be restored once they are erased. Before starting to erase a file, make sure that you want to erase it.
Safety Precautions Warning Symbols Various symbols are used throughout this instruction manual and on the product to prevent physical harm to you or other people and damage to property. The symbols and their meanings are explained below. RDanger This symbol indicates items that may imminently lead to death or serious injury if ignored or incorrectly handled. RWarning This symbol indicates matters that may lead to death or serious injury if ignored or incorrectly handled.
RDanger m ● Do not dispose of the battery in fire, subject it to heat, or use or leave it where it is exposed to high temperature, such as near fire or inside a car. Keep away from water and do not allow it to get wet. m ● Do not pierce the battery with a needle, hit it with a hammer, m ● Do not use the battery if the outer casing is damaged or it is tread on it, drop it or subject it to severe impact. suspiciously deformed.
RWarning o ● Avoid any contact with the liquid crystal inside the LCD monitor, should the monitor be damaged. Follow the emergency measures below in the following circumstances. • SKIN: If any of the liquid crystal gets on your skin, wipe it off and rinse the affected area thoroughly with water, then wash well with soap. • EYES: If it gets in your eyes, wash your eyes with clean water for at least 15 minutes and seek medical advice immediately.
RWarning o ● Keep the battery used in this equipment out of the reach of children to prevent accidental ingestion of harmful substances. Consumption of battery fluid is extremely harmful to human beings. If swallowed, seek immediate medical assistance. m ● Keep the equipment out of the reach of children. Their inability to read and understand warnings and safety precautions may lead to accidents.
Observe the following precautions to ensure safe use of this unit. RCaution o ● Contact with fluid leaking from a battery can lead to burns. If part of your body comes in contact with a damaged battery, wash the area with water immediately. (Do not use soap.) If a battery starts to leak, remove it immediately from the equipment and wipe the battery chamber thoroughly before replacing it with a new battery. o m ● Plug the power cords securely into the electrical outlets. Loose cords pose a fire hazard.