GF-1 External TTL Flash INSTRUCTION MANUAL Externer TTL-Blitz BEDIENUNGSANLEITUNG Flash TTL externe MANUEL D’INSTRUCTIONS Flash externo TTL MANUAL DE INSTRUCCIONES Flash TTL esterno MANUALE DI ISTRUZIONI Внешняя вспышка TTL РУКОВОДСТВО ПО ЭКСПЛУАТАЦИИ
GF-1 External TTL Flash INSTRUCTION MANUAL Read Before Use Thank you for purchasing this Ricoh equipment. • The GF-1 is a flash designed for use exclusively with cameras equipped with the Ricoh flash interface (hereafter, Type R cameras). • When the GF-1 is attached to compatible Type R cameras, it can be used as a TTL automatically controlled flash. Cameras other than Type R: All other cameras except those described above.
Safety Precautions Warning Symbols Various symbols are used throughout this instruction manual and on the product to prevent physical harm to you or other people and damage to property. The symbols and their meanings are explained below. Danger This symbol indicates matters that may lead to imminent risk of death or serious injury if ignored or incorrectly handled. Warning This symbol indicates matters that may lead to death or serious injury if ignored or incorrectly handled.
Do not use a battery that is significantly damaged or deformed. Warning Turn off the power immediately in the event of abnormalities such as smoke or unusual odors being emitted. Remove the batteries as soon as possible, being careful to avoid electric shocks or burns. Turn off the power immediately if any metallic object, water, liquid or other foreign object gets into the flash unit. Remove the batteries as soon as possible, being careful to avoid electric shocks or burns.
Do not fire the flash direct to the eye at short distance. It may damage the eye. When taking flash picture especially toward a baby, it is recommended to keep the flash unit at least 1 meter (3.3 feet) away from the subject. Do not leave or store the flash unit in temperatures over 40˚C, such as in an automobile. Caution Contact with fluid leaking from a battery can lead to burns. If part of your body comes in contact with a damaged battery, rinse the area with water immediately. (Do not use soap.
Supplied Equipment • Flash • Flash stand • Warranty • Instruction manual • Pouch Name of Parts 1 Flash head 2 Catch-light panel 3 Wide panel (18 mm) 4 Slave sensor 5 Flash element 6 AF auxiliary light 7 Ambient light automatic sensor 8 Lock ring 9 Hot shoe mounting foot 0 Hot shoe contacts a Battery magazine EN -
Flash stand b PILOT lamp / Test flash button c ON/OFF button d Mode select button (NORMAL → SLAVE1 → SLAVE2) e Flash power level indication lamps (6 LEDs) f Flash power level select button AUTO MANUAL TTL-A → F2.8 → 4 → 5.6 → 1/4 → FULL → Manual flash output adjustment * In manual flash output adjustment mode, the two rightmost flash power level indication lamps (1/4 and FULL) will light up.
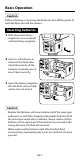
Basic Operation Caution Before attaching or removing the flash unit, turn off the power of both the flash unit and the camera. Inserting batteries 1 Slide down the battery magazine's cover and pull out the battery magazine. 2 Insert 4× AA batteries as shown in the illustration. Check the polarity of the batteries and make sure to insert them correctly. 3 Insert the battery magazine into the flash unit and slide up the cover to close it.
Mounting the flash on a camera 1 Turn the lock ring as shown in the illustration to loosen it. 2 Insert the flash unit into the hot shoe on the camera. Securely insert the flash unit all the way into the hot shoe. 3 Turn the lock ring as shown in the illustration to fix the flash unit to the camera. Removing the flash from a camera 1 Loosen the lock ring completely before removing the flash unit. Turning on the flash 1 Press the ON/OFF button to turn on the flash.
Turning off the flash 1 Keep the ON/OFF button pressed for about 2 seconds to turn off the flash. Power saving mode To save battery power, the flash unit will automatically enter stand-by mode about 2 minutes after the camera's Auto Power Off is activated. In stand-by mode, the PILOT lamp blinks in red every 2 seconds. If you operate any of the buttons on the flash unit, or if the camera is turned on, the flash will automatically wake up from stand-by mode.
TTL flash photography —Pre-flash — Only with Type R cameras In this mode, when you press the shutter release button the flash will automatically fire at the most appropriate level. * In movie, dynamic range (DR), interval shooting, or M-Cont Plus (HI) mode, the flash will not fire. 1 Turn on the camera. 2 When you press the ON/OFF button on the flash unit, it will turn on automatically in TTL mode. 3 When the PILOT lamp turns green, the flash is ready for shooting.
Reference About the illumination coverage With Type R cameras, the illumination coverage will vary from 24 mm to 105 mm, depending on the focal length. You can use a illumination coverage of 105 mm to cover also focal lengths beyond 105 mm toward the telephoto end. However, when using focal lengths under 24 mm toward the wide angle end, please use the wide panel (18 mm). In such case, the illumination coverage will not be automatically linked to the zoom position.
Type R cameras Set the shooting mode to Manual exposure or Aperture priority mode. The correct exposure cannot be achieved in 5 mode, Program shift mode or Shutter priority mode. Also, when the ISO setting is set to AUTO, the flash unit will be automatically adjusted to match the selected setting. If the ISO setting is set to a certain value, please check the procedure for cameras other than Type R. * In movie, dynamic range (DR), interval shooting, or M-Cont Plus (HI) mode, the flash will not fire.
* For details on the camera's settings, see the Camera User Guide. * In movie, dynamic range (DR), interval shooting, or M-Cont Plus (HI) mode, the flash will not fire. Only with Type R cameras With Type R cameras the flash output level can be changed on the camera within the range 1/1 to 1/64.
SLAVE1: Mode for cameras with a pre-flash (triggered once) and a main flash (Type R and other cameras) SLAVE2: Mode for cameras with a main flash only Following is the explanation for how to use the camera's built-in flash as a trigger. Type R cameras If you are using the camera’s built-in flash as a trigger, do not attach this flash unit to the hot shoe. The built-in flash may not be able to open. 1 Turn on the power of the camera and the flash unit and set the flash to always fire.
When using Manual flash Use the following formula to select the aperture value. Aperture value = Guide No. of this flash unit ÷ Distance between the main light source and the subject For details about this flash unit's guide No., refer to “Guide No. Table (ISO 100)” on the page EN - 18. Cameras other than Type R Using the Mode select button, set the flash mode to SLAVE1 or SLAVE2, according to the type of the camera's built-in flash. In this case, the camera's Red-eye flash function is not available.
Caution When using bounce flash, the illumination coverage is fixed at 50 mm. • When the ceiling or walls are too far, the reflected light of the flash may not be enough and the bounce flash may not be effective. • If the ceiling or walls are not white, the reflected light may be affected, taking their color. • If the reflected light is attenuated too much and the bounce flash is not effective enough, select a higher ISO setting on the camera.
Specifications Guide No. 20 (at 24 mm) - 30 (at 105 mm) 16 (at 24 mm, using the wide panel) Illumination Coverage 24 mm - 105 mm (18 mm with the wide panel) Automatically linked to the focal length of the lens as per the auto power zoom (only Type R cameras) Power Source 4 × AA batteries (sold separately) • Lithium batteries and rechargeable NiMH batteries can be used. Battery Life Approx.
Guide No. Table (ISO 100) Flash output level Zoom position FULL 1/2 1/4 1/8 1/16 1/32 1/64 24mm 20 14 10 7 5 4 3 28mm 22 16 11 8 6 4 3 35mm 24 17 12 8 6 4 3 50mm 26 18 13 9 7 5 3 70mm 28 20 14 10 7 5 4 85mm 29 21 15 10 7 5 4 105mm 30 21 15 11 8 5 4 * All values given at ISO100. For values at ISO200 multiply by 1.4×; for values at ISO400 multiply by 2×.
INFORMATION TO THE USER USA FCC Part15 Class B The equipment has been tested and found to comply with the limits for a Class B digital device, pursuant to part 15 of the FCC Rules. These limits are designed to provide reasonable protection against harmful interference in a residential installation. This equipment generates, uses, and can radiate radio frequency energy and if not installed and used in accordance with the instructions, may cause harmful interference to radio communications.
GF-1 Externer TTL-Blitz BEDIENUNGSANLEITUNG Bitte vor Inbetriebnahme lesen Herzlichen Glückwunsch zu Ihrer Ricoh-Ausrüstung. • Das GF-1 ist ein Blitzgerät, das ausschließlich für Kameras, die mit der Ricoh Blitzschnittstelle ausgerüstet sind, entwickelt wurde (nachstehend Kameras vom Typ R genannt). • Wenn das GF-1 auf einer kompatiblen Kamera vom Typ R angebracht wird, kann es zur automatischen TTL-Blitzsteuerung verwendet werden. Andere Kameras: Alle anderen Kameras, außer den oben beschriebenen.
Sicherheitshinweise Warnsymbole Verschiedene Symbole werden in dieser Bedienungsanleitung und auf dem Produkt verwendet, die Sie auf die Gefahr von Verletzungen des Benutzers und anderer Personen und die Gefahr von Sachbeschädigung hinweisen sollen. Die Symbole und ihre Bedeutung werden im Folgenden beschrieben. Gefahr Dieses Symbol kennzeichnet Punkte, die bei Missachtung oder falscher Handhabung unmittelbar zu schweren Verletzungen oder Tod führen können.
Die Batterien dürfen weder ins Feuer geworfen, noch erhitzt oder bei hohen Temperaturen verwendet oder gelagert werden, wie z. B. in der Nähe eines Feuers oder im Auto. Tauchen Sie die Batterien nicht in Süß- oder Salzwasser, und schützen Sie sie vor Nässe. Die Batterien dürfen nicht aufgebohrt und zusammengedrückt werden und sollten nicht fallen gelassen oder anderen Kräften ausgesetzt werden. Verwenden Sie keine Batterien, die stark beschädigt oder verformt ist.
Benutzen Sie das Gerät nicht in einer feuchten Umgebung, weil dies zu einem Brand oder elektrischen Schlag führen könnte. Benutzen Sie das Gerät nicht in der Nähe von brennbaren Gasen, Benzin, Benzol, Verdünner oder ähnlichen Substanzen, weil sonst die Gefahr von Explosionen, Brand oder Verbrennungen besteht. Benutzen Sie das Gerät nicht an Orten, wo der Gebrauch eingeschränkt oder verboten ist, weil dies zu Katastrophen oder Unfällen führen kann.
Lieferumfang • Blitzgerät • Blitzgeräteständer • Bedienungsanleitung • Blitzgerättasche • Garantiekarte Teilebezeichnungen 1 Blitzkopf 2 Aufhellreflektor 3 Streuscheibe (18 mm) 4 Nebenblitzsensor 5 Blitzelement 6 AF-Hilfslicht 7 Automatischer Umgebungslichtsensor 8 Sperrring 9 Montagefuß für Zubehörschuh 0 Zubehörschuhkontakte a Batterie-Magazin DE -
Blitzgeräteständer b PILOT-Lampe / Testblitztaste c ON/OFF-Taste (EIN/AUS) d Modusknopf (NORMAL → SLAVE1 → SLAVE2) e Blitzleistungsanzeigelampen (6 LEDs) f Blitzleistungsauswahlknopf AUTO MANUAL TTL-A → F2.8 → 4 → 5.6 → 1/4 → FULL → Manuelle Anpassung der Blitzleistung (VOLL) * Im Modus zur manuellen Anpassung der Blitzleistung leuchten die beiden Blitzleistungslampen ganz rechts (1/4 und FULL) auf.
Grundlegende Funktionen Wichtig Schalten Sie die Kamera sowie das Blitzgerät vor dessen Anbringen oder Entfernen aus. Batterien einlegen 1 Schieben Sie die Abdeckung des Batteriemagazins nach unten und ziehen Sie das Magazin heraus. 2 Legen Sie 4 AA-Batterien wie in der Abbildung gezeigt ein. Prüfen Sie die Polarität der Batterien und stellen Sie sicher, dass Sie sie korrekt einlegen. 3 Legen Sie das BatterieMagazin in das Blitzgerät ein und schieben Sie die Abdeckung hoch, um das Magazin zu schließen.
Befestigung des Blitzgerätes an der Kamera 1 Drehen Sie den Sperrring wie in der Abbildung gezeigt, um ihn zu lösen. 2 Stecken Sie das Blitzgerät auf den Zubehörschuh an der Kamera. Achten Sie darauf, dass das Blitzgerät vollständig eingesteckt ist. 3 Drehen Sie den Sperrring wie in der Abbildung gezeigt, um ihn fest mit der Kamera zu verbinden. Abnehmen des Blitzgerätes von der Kamera 1 Lösen Sie den Sperrring vollständig, bevor Sie das Blitzgerät abnehmen.
Ausschalten des Blitzgerätes 1 Halten Sie die ON/OFF-Taste für ca. 2 Sekunden gedrückt, um das Blitzgerät auszuschalten. Stromsparmodus Um die Batterie zu schonen, schaltet das Blitzgerät ca. 2 Minuten nachdem die Abschaltautomatik der Kamera aktiviert wurde automatisch auf den Bereitschaftsmodus. Im Bereitschaftsmodus blinkt die PILOT-Lampe rot im 2-Sekunden-Rhythmus.
TTL-Blitzfotografie — Vorblitz — Nur mit Kameras vom Typ R Wenn Sie in diesem Modus den Auslöser drücken, wird der Blitz automatisch mit der richtigen Stärke ausgelöst. * Der Blitz löst nicht aus, wenn sich die Kamera im Filmmodus, Dynamikbereichsmodus, Intervallaufnahmemodus oder im MSerien-Plus Modus (HI) befindet. 1 Schalten Sie die Kamera ein. 2 Wenn Sie die ON/OFF-Taste am Blitzgerät drücken, schaltet es automatisch auf den TTL-Modus um.
Referenz Informationen zur Blitzausleuchtung Bei Kameras vom Typ R variiert die Blitzausleuchtung je nach Brennweite zwischen 24 und 105 mm. Sie können eine Blitzausleuchtung von 105 mm verwenden, um außerdem Brennweiten über 105 mm bis hin zur TeleobjektivBrennweite zu decken. Verwenden Sie die Streuscheibe (18 mm) bei Aufnahmen mit einer Brennweite unter 24 mm, also in Weitwinkel-Richtung. In diesem Fall wird die Blitzausleuchtung nicht automatisch mit der Zoomposition verknüpft.
Kameras vom Typ R Stellen Sie den Aufnahmemodus auf manuelle Belichtung oder Blendenpriorität ein. Im 5-Modus, Programmschaltmodus oder Auslöseprioritätsmodus kann keine korrekte Belichtung erzielt werden. Ferner wird das Blitzgerät automatisch entsprechend der ausgewählten Einstellung angepasst, wenn die ISO-Empfindlichkeit auf AUTO eingestellt ist. Ist die ISO-Empfindlichkeit auf einen bestimmen Wert eingestellt, prüfen Sie bitte das Verfahren für andere Kameras als die vom Typ R.
* Der Blitz löst nicht aus, wenn sich die Kamera im Filmmodus, Dynamikbereichsmodus, Intervallaufnahmemodus oder im MSerien-Plus Modus (HI) befindet. Nur bei Kameras vom Typ R Bei Kameras vom Typ R kann die Blitzleistung an der Kamera auf einen Wert zwischen 1/1 und 1/64 eingestellt werden. 1 Stellen Sie den Blitzmodus mit Hilfe des Modusknopfes auf NORMAL und die Blitzleistung mit Hilfe des Blitzleistungsauswahlknopfes auf Manuell (beide Blitzleistungsanzeigelampen ganz rechts leuchten).
Im Folgenden wird erläutert, wie der in die Kamera integrierte Blitz als Auslöser verwendet werden kann. Kameras vom Typ R Wenn Sie den in der Kamera integrierten Blitz als Auslöser verwenden, dürfen Sie dieses Blitzgerät nicht auf den Zubehörschuh stecken. Andernfalls kann sich der eingebaute Blitz möglicherweise nicht öffnen. 1 Schalten Sie die Kamera und das Blitzgerät ein und stellen Sie den Blitz auf ständige Betriebsbereitschaft. 2 Stellen Sie den Blitzmodus anhand des Modusknopfes auf SLAVE1.
Andere Kameras Stellen Sie mit Hilfe des Modusknopfes den Blitzmodus je nach dem integrierten Blitz der Kamera auf SLAVE1 oder SLAVE2. In diesem Fall steht die Rote-Augen-Reduzierung nicht zur Verfügung. Streuscheibe • Sie können die integrierte Streuscheibe herausziehen und sie wie in der Abbildung dargestellt vor dem Blitz positionieren, um einen Aufnahmewinkel von 18 mm zu erreichen. • Der Aufhellreflektor wird dabei ebenfalls herausgezogen. Schieben Sie ihn deshalb wieder hinein.
Wichtig Wenn Sie den indirekten Blitz verwenden, ist die Blitzausleuchtung auf 50 mm begrenzt. • Wenn die Decke oder Wand zu weit entfernt ist, kann das reflektierte Licht möglicherweise für eine ausreichende Beleuchtung ungenügend sein. • Wenn die Decke oder Wand nicht weiß ist, kann das Licht durch die jeweilige Farbe beeinflusst werden. • Wenn das reflektierte Licht zu schwach und der indirekte Blitz nicht effektiv genug ist, wählen Sie eine höhere ISO-Empfindlichkeit an der Kamera aus.
Technische Daten Leitzahl 20 (bei 24 mm) - 30 (bei 105 mm) 16 (bei 24 mm mit Streuscheibe) 24 mm - 105 mm (18 mm mit Streuscheibe) Blitzausleuchtung Ist wie beim automatischen Powerzoom automatisch mit der Brennweite der Linse verknüpft (nur bei Kameras vom Typ R) Stromquelle 4 × AA-Batterien (nicht im Lieferumfang enthalten) • Es können Lithium-Batterien und NiMH-Akkus verwendet werden. Batterielebensdauer Mit Alkalibatterien kann das Blitzgerät ca. 200 Blitze erzeugen (basierend auf Ricoh-Messungen).
Leitzahlentabelle (ISO100) Blitzleistung Zoomposition FULL (VOLL) 1/2 1/4 1/8 1/16 1/32 1/64 24 mm 20 14 10 7 5 4 3 28 mm 22 16 11 8 6 4 3 35 mm 24 17 12 8 6 4 3 50 mm 26 18 13 9 7 5 3 70 mm 28 20 14 10 7 5 4 85 mm 29 21 15 10 7 5 4 105 mm 30 21 15 11 8 5 4 * Alle Werte sind bei ISO100 angegeben. Wenn Sie einen Wert bei ISO200 wünschen, multiplizieren Sie den hier angegebenen Wert mit 1,4 und für Werte bei ISO400 mit 2.
Garantie Bitte füllen Sie die vorgeschriebenen Details aus und bewahren Sie die Garantie sorgfältig auf, nachdem Sie sich von der Korrektheit aller Informationen überzeugt haben. Kundenbetreuung Ricoh-Kundendienststellen Bei Fehlfunktionen wenden Sie sich bitte an eine der im KameraBenutzerhandbuch angegebenen Ricoh-Kundendienststellen. • Die vollständige oder teilweise Reproduktion ist ohne Erlaubnis untersagt. © 2009 Ricoh Co., Ltd.
GF-1 Flash TTL externe MANUEL D’INSTRUCTIONS À lire avant utilisation Nous vous remercions d’avoir fait l’acquisition de cet appareil Ricoh. • Le flash GF-1 est conçu pour être utilisé exclusivement avec les appareils photo équipés d’une interface de flash Ricoh (ci-après, les appareils photo de type R). • Lorsque le flash GF-1 est installé sur des appareils photo de type R compatibles, il peut être utilisé en tant que flash à posemètre automatiquement contrôlé.
Consignes de sécurité Symboles d’avertissement Divers symboles sont utilisés tout au long de ce manuel et sur le produit lui-même pour prévenir tout risque de blessure ou de dommage aux biens. Ces symboles et leur signification sont détaillés ci-dessous. Danger Ce symbole signale des dangers qui peuvent entraîner rapidement la mort ou des blessures corporelles sérieuses si les instructions correspondantes ne sont pas ou sont mal suivies.
N’essayez pas de percer les batteries ou de les compresser. Veillez à ne pas faire tomber les batteries, ni à leur faire subir de choc important. N’utilisez pas de batterie visiblement endommagée ou déformée. Avertissement En cas d’anomalies telles que de la fumée ou des odeurs inhabituelles, mettez le flash immédiatement hors tension. Retirez les batteries dès que possible, en prenant soin d’éviter tout choc électrique ou brûlure.
N’utilisez pas l’appareil à proximité de gaz inflammables, d’essence, de benzène, de solvant ou de substances du même type pour éviter tout risque d’explosion, d’incendie ou de brûlure. N’utilisez pas l’appareil dans des lieux où son usage est limité ou interdit afin d’éviter tout risque de catastrophe ou d’accident. Ne déclenchez pas le flash à faible distance des yeux. Cela peut entraîner des lésions oculaires.
Matériel fourni • Flash • Support de flash • Garantie • Manuel d’instructions • Pochette Nomenclature 1 Tête du flash 2 Panneau reflet 3 Grand panneau (18 mm) 4 Capteur asservi 5 Élément de flash 6 Lumière AF auxiliaire 7 Capteur automatique de lumière ambiante 8 Bague de verrouillage 9 Pied de montage de la griffe alimentée 0 Contacts de la griffe alimentée a Logement des batteries FR -
Support de flash b Témoin PILOT/bouton de flash test c Bouton ON/OFF d Bouton de sélection du mode (NORMAL → SLAVE1 → SLAVE2) e Témoins indicateurs du niveau de puissance du flash (6 diodes électroluminescentes) f Bouton de sélection du niveau de puissance du flash AUTO MANUAL TTL-A → F2.8 → 4 → 5.
Fonctionnement de base Attention Avant d’installer ou de retirer le flash, mettez le flash et l’appareil photo hors tension. Insertion des batteries 1 Faites glisser le couvercle du logement des batteries et retirez le logement des batteries. 2 Insérez quatre batteries AA comme indiqué sur l’illustration. Vérifiez la polarité des batteries et veillez à les insérer correctement. 3 Insérez le logement des batteries dans le flash et faites glisser le couvercle vers le haut pour fermer le logement.
Installation du flash sur un appareil photo 1 Tournez la bague de verrouillage comme indiqué sur l’illustration pour la desserrer. 2 Insérez le flash dans la griffe alimentée située sur l’appareil photo. Insérez le flash fermement et à fond dans la griffe alimentée. 3 Tournez la bague de verrouillage comme indiqué sur l’illustration pour fixer le flash sur l’appareil photo. Retrait du flash de l’appareil photo 1 Desserrez complètement la bague de verrouillage avant de retirer le flash.
Mise hors tension du flash 1 Maintenez le bouton ON/OFF enfoncé pendant environ deux secondes pour mettre le flash hors tension. Mode d’économie d’énergie Afin économiser l’énergie de la batterie, le flash passe automatiquement en veille 2 minutes environ après l’activation de la fonction Extinction auto de l’appareil photo. En mode de veille, le témoin PILOT clignote en rouge toutes les deux secondes.
Photographie avec flash à posemètre intégré —Pré-flash — Uniquement avec des appareils photo de type R Si ce mode est activé, le niveau adapté du flash est automatiquement sélectionné lorsque vous appuyez sur le déclencheur. * En mode vidéo, gamme dynamique, prise de vue à intervalles ou Cont.M Plus (HI), le flash ne se déclenche pas. 1 Mettez l’appareil photo sous tension. 2 Lorsque vous appuyez sur le bouton ON/OFF du flash, ce dernier s’allume automatiquement en mode TTL.
Référence À propos de la couverture d’éclairage Avec des appareils photo de type R, la couverture d’éclairage varie de 24 à 105 mm en fonction de la distance focale. Vous pouvez utiliser une couverture d’éclairage de 105 mm pour couvrir également des distances focales de plus de 105 mm en direction de l’extrémité du téléobjectif. Avec des distances focales inférieures à 24 mm en direction de l’extrémité du grand angle, utilisez toutefois le grand panneau (18 mm).
Appareils photo de type R Réglez le mode de prise de vue sur Exposition manuelle ou Mode Priorité ouverture. Il n’est pas possible d’obtenir une exposition correcte en mode 5, en mode changement de programme ou en mode priorité obturation. De même, si le réglage ISO AUTO est sélectionné, le flash est automatiquement réglé en fonction du réglage sélectionné. Si le réglage ISO est fixé à une certaine valeur, veuillez consulter la procédure pour les appareils photo de type autre que le type R.
* En mode vidéo, gamme dynamique, prise de vue à intervalles ou Cont.M Plus (HI), le flash ne se déclenche pas. Uniquement avec les appareils photo de type R Avec les appareils photo de type R, le niveau de puissance du flash peut être modifié sur l’appareil photo selon une plage comprise entre 1/1 et 1/64.
Voici comment utiliser le flash intégré à l’appareil photo comme déclencheur. Appareils photo de type R Si vous utilisez le flash intégré à l’appareil photo comme déclencheur, n’installez pas ce flash sur la griffe alimentée. Il est possible que le flash intégré ne puisse pas s’ouvrir. 1 Mettez l’appareil photo et le flash sous tension et réglez le flash de manière à ce qu’il se déclenche toujours. 2 Sélectionnez le mode de flash SLAVE1 à l’aide du bouton de sélection du mode.
Appareils photo de type autre que le type R À l’aide du bouton de sélection du mode, réglez le mode de flash sur SLAVE1 ou SLAVE2, selon le type de flash intégré à l’appareil photo. La fonction de flash yeux rouges de l’appareil photo n’est alors pas disponible. Grand panneau • Vous pouvez retirer le grand panneau intégré et le placer sur le flash comme illustré afin d’obtenir un angle de prise de vue de 18 mm. • Le panneau reflet est retiré en même temps.
Attention Lors de l’utilisation du flash rebondissant, la couverture d’éclairage est de 50 mm. • Si le plafond ou les murs sont trop éloignés, il est possible que la lumière réfléchie du flash ne soit pas suffisante et que le flash rebondissant ne soit pas efficace. • Si le plafond ou les murs ne sont pas blancs, il est possible que la lumière réfléchie soit affectée et prenne leur couleur.
Caractéristiques N° de guide 20 (à 24 mm) - 30 (à 105 mm) 16 (à 24 mm, avec le grand panneau) Couverture d’éclairage 24 mm - 105 mm (18 mm avec le grand panneau) Automatiquement reliée à la distance focale de l’objectif conformément au zoom automatique (appareils photo de type R uniquement) Source d’alimentation 4 × batteries AA (vendues séparément) • Il est possible d’utiliser des batteries au lithium et des batteries NiMH rechargeables.
Tableau des numéros de guide (ISO 100) Niveau de puissance du flash Position du zoom FULL 1/2 1/4 1/8 1/16 1/32 1/64 24 mm 20 14 10 7 5 4 3 28 mm 22 16 11 8 6 4 3 35 mm 24 17 12 8 6 4 3 50 mm 26 18 13 9 7 5 3 70 mm 28 20 14 10 7 5 4 85 mm 29 21 15 10 7 5 4 105 mm 30 21 15 11 8 5 4 * Valeurs données avec un réglage ISO100. Pour les valeurs avec un réglage ISO200, multipliez par 1,4. Pour les valeurs avec un réglage ISO400, multipliez par 2.
Garantie Fournissez les détails demandés et conservez la garantie en lieu sûr après avoir vérifié que toutes les informations sont correctes. Assistance clientèle Services après-vente Ricoh En cas d’anomalie de fonctionnement, veuillez contacter un des services après-vente Ricoh répertoriés dans le Mode d’emploi de l’appareil photo numérique. • Reproduction, en totalité ou en partie, interdite sans autorisation. © 2009 Ricoh Co., Ltd.
GF-1 Flash externo TTL MANUAL DE INSTRUCCIONES Léase antes del uso Gracias por adquirir este equipo Ricoh. • El GF-1 es un flash diseñado para utilizarse exclusivamente con cámaras equipadas con la interfaz de flash Ricoh (en adelante, cámaras de tipo R). • Cuando el GF-1 se coloca en una cámara compatible de tipo R, puede utilizarse como flash controlado automáticamente por TTL. Cámaras que no son de tipo R: Todas las demás cámaras, excepto las descritas arriba.
Consejos de seguridad Símbolos de aviso En este manual de instrucciones y en el producto aparecen diversos símbolos de aviso que se deben tener en cuenta para evitarle lesiones a usted o a terceros, así como también daños materiales. A continuación se explican los símbolos y sus significados. Peligro Este símbolo indica que hay peligro inminente de muerte o de lesiones de gravedad debido a negligencia u operación incorrecta.
No utilice una pila que esté muy dañada o deformada. Advertencia Apague la cámara inmediatamente en caso de anomalías, tales como la emisión de humo u olores extraños. Extraiga las pilas lo más pronto posible, teniendo cuidado de evitar descargas eléctricas o quemaduras. Apague el equipo inmediatamente si algún objeto metálico, agua, líquido u otros objetos se llegaran a introducir en la unidad del flash.
No dispare el flash directamente a los ojos a corta distancia. Podría dañar los ojos. Al tomar una fotografía con flash, especialmente de cara a un bebé, se recomienda mantener la unidad de flash a al menos 1 metro (3,3 pies) del sujeto. No deje ni guarde la unidad de flash en lugares donde la temperatura supere los 40˚C, como en un automóvil. Precaución El contacto con el líquido de la pila puede provocar quemaduras.
Equipo suministrado • Flash • Soporte del flash • Manual de instrucciones • Garantía • Bolsa Nomenclatura 1 Cabeza del flash 2 Panel difusor de luz 3 Panel amplio (18 mm) 4 Sensor esclavo 5 Elemento de flash 6 Luz auxiliar AF 7 Sensor automático de luz ambiente 8 Anillo de bloqueo 9 Pie de montaje para la zapata para accesorios 0 Contactos para la zapata para accesorios a Portapilas ES -
Soporte del flash b Indicador luminoso PILOT / botón de prueba del flash c Botón ON/OFF d Botón de selección de modo (NORMAL → SLAVE1 → SLAVE2) e Indicadores luminosos de nivel de potencia del flash (6 LED) f Botón de selección de nivel de potencia del flash AUTO MANUAL TTL-A → F2.8 → 4 → 5.
Funcionamiento básico Precaución Antes de colocar o retirar la unidad de flash, apague tanto la unidad de flash como la cámara. Inserción de las pilas 1 Deslice hacia abajo la cubierta del portapilas y extráigalo. 2 Inserte 4 × pilas AA tal como se muestra en la ilustración. Compruebe la polaridad de las pilas y asegúrese de insertarlas correctamente. 3 Inserte el portapilas en la unidad de flash y deslice la cubierta hacia arriba para cerrarla.
Montaje del flash en una cámara 1 Gire el anillo de bloqueo tal como se muestra en la ilustración para aflojarlo. 2 Inserte la unidad de flash en la zapata para accesorios de la cámara. Inserte bien la unidad de flash hasta el tope de la zapata. 3 Gire el anillo de bloqueo tal como se muestra en la ilustración para fijar la unidad de flash en la cámara. Retirada del flash de la cámara 1 Afloje completamente el anillo de bloqueo antes de retirar la unidad de flash.
Apagado del flash 1 Mantenga pulsado el botón ON/OFF durante unos 2 segundos para apagar el flash. Modo de ahorro de energía Para ahorrar energía de las pilas, la unidad de flash pasará automáticamente a modo standby unos 2 minutos después de activarse la función de apagado automático de la cámara. En modo standby, el indicador luminoso PILOT parpadeará en rojo cada 2 segundos.
Fotografía con flash TTL —Flash previo— Sólo con cámaras de tipo R En este modo, al pulsar el disparador, el flash se disparará automáticamente al nivel más apropiado. * En el modo de vídeo, de rango dinámico (DR), de intervalo de disparo y M-Cont + Alta (HI), el flash no se dispara. 1 Encienda la cámara. 2 Al pulsar el botón ON/OFF de la unidad del flash, se encenderá automáticamente en modo TTL. 3 Cuando el indicador luminoso PILOT se ilumine en verde, el flash estará listo para disparar.
Referencia Acerca de la cobertura de iluminación Con las cámaras de tipo R, la cobertura de iluminación variará de 24 mm a 105 mm, según la distancia focal. Puede utilizar la cobertura de iluminación de 105 mm para cubrir también distancias focales de más de 105 mm, hacia el extremo de telefoto. Sin embargo, al utilizar distancias focales de menos de 24 mm, hacia el extremo de gran angular, utilice el panel amplio (18 mm).
Cámaras de tipo R Ajuste el modo de disparo a Exposición manual o a Prioridad de apertura. La exposición correcta no se puede lograr en modo 5, en Modo de cambio de programas ni en Modo de prioridad de obturación. Asimismo, cuando el ajuste ISO está en AUTO, la unidad de flash se ajusta automáticamente para adaptarse al ajuste seleccionado. Si el ajuste ISO se configura con un valor concreto, consulte el procedimiento de las cámaras que no sean de tipo R.
* En el modo de vídeo, de rango dinámico (DR), de intervalo de disparo y M-Cont + Alta (HI), el flash no se dispara. Sólo con cámaras de tipo R Con las cámaras de tipo R, el nivel de salida del flash puede cambiarse en la cámara dentro del rango de 1/1 a 1/64.
A continuación se explica cómo utilizar el flash incorporado de la cámara como mecanismo de disparo. Cámaras de tipo R Si utiliza el flash incorporado de la cámara como activador, no coloque esta unidad de flash en la zapata para accesorios. Puede que el flash incorporado no se pueda abrir. 1 Encienda la cámara y la unidad de flash, y ajuste el flash para que se dispare siempre. 2 Ajuste el modo de flash a SLAVE1 con el botón de selección de modo.
Cámaras que no son de tipo R Con el botón de selección de modo, ajuste el modo de flash a SLAVE1 o SLAVE2, según el tipo de flash incorporado de la cámara. En este caso, la función de flash con ojos rojos de la cámara no está disponible. Panel amplio • Puede extraer el panel amplio incorporado y colocarlo en el flash tal como se muestra en la ilustración para emplear un ángulo de disparo de 18 mm. • El panel difusor de luz se extraerá a la vez, de modo que deberá volver a insertarlo.
Precaución Al utilizar el flash de rebote, la cobertura de iluminación se fija en 50 mm. • Si el techo y las paredes están demasiado lejos, la luz reflejada del flash puede no ser suficiente y el flash de rebote puede perder su eficacia. • Si el techo o las paredes no son blancos, la luz reflejada puede verse afectada y adquirir su color. • Si la luz reflejada se atenúa demasiado y el flash de rebote no es suficientemente eficaz, seleccione una sensibilidad ISO más elevada en la cámara.
Especificaciones Nº de guía De 20 (a 24 mm) a 30 (a 105 mm) 16 (a 24 mm, utilizando el panel amplio) Cobertura de iluminación De 24 mm a 105 mm (18 mm con el panel amplio) Automáticamente vinculado a la longitud focal del objetivo según el zoom eléctrico automático (sólo cámaras de tipo R) Fuente de energía 4 × pilas AA (vendidas por separado) • Pueden utilizarse pilas de litio y pilas NiMH recargables. Duración de las pilas Aprox.
Tabla de números de guía (ISO 100) Nivel de salida del flash Posición del zoom FULL 1/2 1/4 1/8 1/16 1/32 1/64 24 mm 20 14 10 7 5 4 3 28 mm 22 16 11 8 6 4 3 35 mm 24 17 12 8 6 4 3 50 mm 26 18 13 9 7 5 3 70 mm 28 20 14 10 7 5 4 85 mm 29 21 15 10 7 5 4 105 mm 30 21 15 11 8 5 4 * Todos los valores dados en ISO100. Para valores en ISO200, multiplique por 1,4×; para valores en ISO400, multiplique por 2×.
Garantía Rellene todos los datos prescritos y guarde la garantía en un lugar seguro tras verificar que toda la información sea correcta. Asistencia al cliente Centros de asistencia técnica Ricoh En caso de avería, póngase en contacto con uno de los centros de asistencia técnica Ricoh indicados en la Guía del usuario de la cámara digital. • Queda prohibida la reproducción total o parcial sin autorización. © 2009 Ricoh Co., Ltd. • El contenido de este manual de instrucciones puede cambiar sin previo aviso.
GF-1 Flash TTL esterno MANUALE DI ISTRUZIONI Leggere prima dell’uso Grazie per aver acquistato questo apparecchio Ricoh. • Il GF-1 è un flash progettato per essere utilizzato esclusivamente con fotocamere dotate di interfaccia flash Ricoh (da qui in avanti, fotocamere di tipo R). • Quando il GF-1 è montato su fotocamere compatibili di tipo R, può essere utilizzato come flash controllato automaticamente da TTL. Fotocamere diverse dal tipo R: Tutte le fotocamere tranne quelle indicate in precedenza.
Norme di sicurezza Simboli di allarme In tutto il presente manuale di istruzioni e sul prodotto sono utilizzati vari simboli al fine di prevenire danni fisici a voi o a terzi e alla proprietà. I simboli e il loro significato sono illustrati qui sotto. Osservare le seguenti norme per un utilizzo sicuro dell’apparecchio. Pericolo Questo simbolo indica un possibile pericolo mortale imminente o una grave lesione se ignorato o affrontato in modo errato.
Non cercare di forare le batterie con un ago, colpirle con un martello, calpestarle, farle cadere né sottoporle ad un forte impatto. Non utilizzare una batteria molto difettosa o deformata. Allarme In caso di anomalie di funzionamento, ad esempio se la fotocamera fa fumo o produce odori strani, spegnere immediatamente la fotocamera. Estrarre le batterie il prima possibile, stando attenti ad evitare scosse elettriche o ustioni.
Non utilizzare l’apparecchio in luoghi in cui il suo utilizzo sia limitato o proibito perché può provocare disastri o incidenti. Non attivare il flash direttamente verso gli occhi a breve distanza. Ciò potrebbe danneggiare la vista. Quando si scatta una foto con il flash, soprattutto se il soggetto è un bambino, si consiglia di mantenersi a una distanza di almeno 1 metro. Non lasciare né conservare il flash in ambienti con temperature superiori ai 40˚C, ad esempio in un’automobile.
Oggetti in dotazione • Flash • Supporto per flash • Garanzia • Manuale di istruzioni • Custodia Nomenclatura 1 Testa del flash 2 Pannello per luce occhi 3 Pannello ampio (18 mm) 4 Sensore slave 5 Elemento flash 6 Luce ausiliaria AF 7 Sensore automatico per luce ambientale 8 Anello di blocco 9 Base per montaggio slitta alimentata 0 Contatti slitta alimentata a Comparto batterie IT -
Supporto per flash b Spia PILOT / Tasto per test del flash c Tasto ON/OFF d Tasto di selezione modalità (NORMAL → SLAVE1 → SLAVE2) e Spie livello di potenza del flash (6 LED) f Tasto di selezione potenza flash AUTO MANUAL TTL-A → F2.8 → 4 → 5.6 → 1/4 → FULL → Regolazione manuale della potenza del flash * In modalità di regolazione manuale della potenza del flash, si accendono le due spie più a destra (1/4 e FULL).
Operazioni di base Attenzione Prima di collegare o rimuovere l’unità flash, spegnere sia questa che la fotocamera. Inserimento delle batterie 1 Far scorrere verso il basso il coperchio del comparto batterie ed estrarlo. 2 Inserire 4 batterie AA come indicato nell’illustrazione. Controllare la polarità delle batterie e assicurarsi di inserirle correttamente. 3 Inserire il comparto batterie nel flash e far scorrere verso l’alto il coperchio per chiuderlo.
Montaggio del flash su una fotocamera 1 Ruotare l’anello di blocco come indicato nell’illustrazione per allentarlo. 2 Inserire il flash nella slitta alimentata sulla fotocamera. Far scorrere completamente e fissare il flash nella slitta alimentata. 3 Ruotare l’anello di blocco come indicato nell’illustrazione per fissare il flash alla fotocamera. Rimozione del flash da una fotocamera 1 Svitare completamente l’anello di blocco prima di rimuovere il flash.
Spegnimento del flash 1 Tenere premuto il tasto ON/OFF per circa 2 secondi per spegnere il flash. Modalità di risparmio energetico Per risparmiare l’energia delle batterie, il flash passa automaticamente in modalità stand-by dopo circa 2 minuti dall’attivazione della funzione Spegnimento Auto della fotocamera. In modalità stand-by, la spia PILOT rossa lampeggia ogni 2 secondi.
Fotografie con flash TTL —Pre-flash — Solo fotocamere di tipo R In questa modalità, se si preme il tasto di scatto, il flash verrà attivato automaticamente al livello più adeguato. * Nei modi Filmato, Gamma dinamica (DR), Riprese intervallate o M-Cont + (Alta), il flash non scatterà. 1 Accendere la fotocamera. 2 Quando si preme il tasto ON/OFF dell’unità flash, verrà attivata automaticamente la modalità TTL. 3 Quando la spia PILOT diventa verde, il flash è pronto a scattare.
Riferimento Informazioni sull’ampiezza dell’illuminazione Nelle fotocamere di tipo R l’ampiezza dell’illuminazione varia da 24 mm a 105 mm, a seconda della lunghezza focale. È possibile utilizzare un’ampiezza dell’illuminazione pari a 105 mm per coprire lunghezze focali anche superiori ai 105 mm verso la fine del telefoto. Se, invece, si utilizzano lunghezze focali inferiori ai 24 mm verso la fine del grandangolo, utilizzare il pannello ampio (18 mm).
Fotocamere di tipo R Impostare il modo di ripresa su esposizione manuale o priorità apertura. Non è possibile ottenere l’esposizione corretta in modalità 5, modifica programma o priorità scatto. Inoltre, se l’impostazione ISO è su AUTO, il flash verrà automaticamente regolato in modo che corrisponda all’impostazione selezionata. Se l’impostazione ISO è impostata su un valore determinato, controllare la procedura per le fotocamere diverse dal tipo R.
* Nei modi Filmato, Gamma dinamica (DR), Riprese intervallate o M-Cont + (Alta), il flash non scatterà. Solo fotocamere di tipo R Nelle fotocamere di tipo R è possibile cambiare la potenza del flash sulla fotocamera, in un intervallo compreso tra 1/1 e 1/64.
Di seguito viene spiegato in che modo utilizzare il flash incorporato della fotocamera come attivatore. Fotocamere di tipo R Se si utilizza il flash incorporato della fotocamera come attivatore, non montare questa unità flash sulla slitta alimentata. Il flash incorporato potrebbe non aprirsi. 1 Accendere la fotocamera e l’unità flash e impostare il flash per farlo scattare sempre. 2 Impostare la modalità del flash su SLAVE1 con il tasto di selezione delle modalità.
Fotocamere diverse dal tipo R Mediante il tasto di selezione delle modalità, impostare la modalità del flash su SLAVE1 o SLAVE2, a seconda del tipo di flash incorporato della fotocamera. In questo caso, la funzione Flash O. Rossi della fotocamera non è disponibile. Pannello ampio • È possibile estrarre il pannello ampio incorporato e posizionarlo sul flash per avere un angolo di scatto di 18 mm, come indicato nell’illustrazione.
Attenzione Quando si usa il flash di rimbalzo, l’ampiezza della luce è fissa a 50 mm. • Se il soffitto o le pareti sono troppo lontane, la luce riflessa del flash potrebbe non essere sufficiente, andando così a vanificare l’uso del flash di rimbalzo. • Se il soffitto o le pareti non sono bianche, la luce riflessa potrebbe risentirne, dato che ne assorbirebbe il colore.
Caratteristiche tecniche N. guida 20 (a 24 mm) - 30 (a 105 mm) 16 (a 24 mm, utilizzando il pannello ampio) Ampiezza del flash 24 mm - 105 mm (a 18 mm, utilizzando il pannello ampio) Collegata automaticamente alla lunghezza focale dell’obiettivo in base allo zoom automatico (solo per fotocamere di tipo R) Alimentazione 4 × batterie AA (in vendita separatamente) • È possibile utilizzare batterie al litio e batterie NiMH ricaricabili.
Tabella dei numeri guida (ISO 100) Potenza del flash Posizione zoom FULL 1/2 1/4 1/8 1/16 1/32 1/64 24 mm 20 14 10 7 5 4 3 28 mm 22 16 11 8 6 4 3 35 mm 24 17 12 8 6 4 3 50 mm 26 18 13 9 7 5 3 70 mm 28 20 14 10 7 5 4 85 mm 29 21 15 10 7 5 4 105 mm 30 21 15 11 8 5 4 * Tutti i valori sono specificati a ISO100. Per i valori a ISO200, moltiplicare per 1,4; per i valori a ISO400, moltiplicare per 2.
Garanzia Immettere tutte le informazioni richieste, verificarne la correttezza e conservare la garanzia. Assistenza clienti Centri assistenza Ricoh In caso di malfunzionamento, contattare uno dei centri assistenza Ricoh elencati nel Manuale d’istruzioni della fotocamera digitale. • La riproduzione completa o parziale di questo documento è vietata senza autorizzazione. © 2009 Ricoh Co., Ltd. • I contenuti di questo manuale di istruzioni possono cambiare senza preavviso. RICOH COMPANY, LTD.
GF-1 Внешняя вспышка TTL РУКОВОДСТВО ПО ЭКСПЛУАТАЦИИ Прочтите перед началом эксплуатации Благодарим вас за приобретение данного устройства Ricoh. • Вспышка GF-1 разработана специально для использования с камерами, оснащенными интерфейсом вспышки Ricoh (далее камеры Type R). • Когда GF-1 установлена на совместимые камеры Type R, она может использоваться как вспышка TTL с автоматическим управлением. Камеры, отличные от Type R: Все фотокамеры, кроме описанных выше.
Меры предосторожности Предупреждающие знаки С целью предотвращения вреда пользователю и окружающим, а также ущерба имуществу, в данном руководстве и на изделии используются различные предупреждающие знаки. Знаки и их смысл описаны ниже. Опасно! Этот знак указывает на действия, невыполнение или неправильное выполнение которых с высокой степенью вероятности может стать причиной нанесения вреда здоровью вплоть до летального исхода.
Не протыкайте, не бейте, не сдавливайте, не бросайте аккумуляторы, не применяйте к ним чрезмерной силы. Не пользуйтесь поврежденным и деформированным аккумулятором. Осторожно! В случае необычной работы (например, появления дыма или необычного запаха) незамедлительно выключите питание. Как можно скорее извлеките аккумуляторы, будьте осторожны, избегайте ожогов и поражения электрическим током.
Во избежание взрыва, возгорания и ожогов не пользуйтесь устройством вблизи горючих газов, бензина, растворителей и аналогичных субстанций. Не пользуйтесь устройством в местах, где использование таких устройств ограничено или запрещено; это может стать причиной несчастного случая. Не используйте вспышку в непосредственной близости от глаз. Это может привести к травме глаз. При съемке со вспышкой (особенно детей) рекомендуется, чтобы вспышка находилась не менее чем в 1 м (3,3 футах) от объекта съемки.
Комплект поставки • Вспышка • Адаптер для крепления вспышки • Руководство по эксплуатации • Чехол • Гарантия Описание элементов 1 Головка вспышки 2 Панель для создания бликов в глазах 3 Широкоугольный рассеиватель (18 мм) 4 Датчик синхронизации 5 Рабочий элемент вспышки 6 Вспомогательная вспышка для автофокуса 7 Автоматический датчик внешнего освещения 8 Кольцо-фиксатор 9 Опора адаптера Hot Shoe 0 Контакты адаптера Hot Shoe a Магазин аккумуляторов RU -
Адаптер для крепления вспышки b Лампа PILOT / кнопка проверки вспышки c Кнопка ON/OFF d Кнопка выбора режима (NORMAL → SLAVE1 → SLAVE2) e Индикаторы мощности вспышки (6 светодиодов) f Кнопка выбора мощности вспышки AUTO MANUAL TTL-A → F2.8 → 4 → 5.6 → 1/4 → FULL → Ручная регулировка мощности вспышки * In ручной режим регулировки вспышки, включаются два крайних правых индикатора мощности вспышки (1/4 и FULL).
Основные операции Внимание! Перед установкой или снятием внешней вспышки отключите питание вспышки и фотокамеры. Установка аккумуляторов 1 Сдвиньте крышку аккумуляторного отсека и извлеките магазин аккумулятора. 2 Вставьте 4 аккумулятора AA как показано на рисунке. Проверьте полярность аккумуляторов и убедитесь, что они вставлены правильно. 3 Вставьте аккумуляторный магазин в корпус вспышки и закройте крышку, сдвинув ее вверх.
Установка вспышки на камеру 1 Поверните кольцофиксатор как показано на рисунке, чтобы ослабить его. 2 Вставьте вспышку в крепление адаптера Hot Shoe на камере. Вставьте вспышку в адаптер Hot Shoe до упора. 3 Поверните кольцофиксатор как показано на рисунке, чтобы закрепить вспышку на камере. Снятие вспышки с камеры 1 Прежде чем снимать вспышку, полностью ослабьте кольцофиксатор. Включение вспышки 1 Чтобы включить вспышку, нажмите кнопку ON/OFF на корпусе.
Выключение вспышки 1 Для выключения вспышки нажмите кнопку ON/OFF и удерживайте в течение примерно 2 секунд. Режим энергосбережения Для экономии заряда аккумуляторов вспышка автоматически входит в режим готовности примерно через 2 минуты после того, как срабатывает функция автоотключения камеры. В режиме готовности лампа PILOT мигает красным через каждые 2 секунды. При нажатии любой кнопки на вспышке или при включении камеры вспышка автоматически переходит в рабочий режим.
Фотографирование в режиме TTL с вспыш —Предварительная вспышка — Только с камерами Type R В этом режиме при нажатии спусковой кнопки вспышка срабатывает автоматически с оптимальной мощностью. * В режимах видеосъемки, динамического диапазона, съемки с интервалом и режиме Предыд. плюс (выс.) вспышка не срабатывает. 1 Включите камеру. 2 При нажатии кнопки ON/OFF на вспышке она автоматически включается в режиме TTL. 3 Когда лампа PILOT станет зеленым, вспышка готова к работе.
Пояснение О зоне освещения вспышкой В камерах Type R зона освещения вспышкой варьируется от 24 до 105 мм в зависимости от фокусного расстояния. Можно использовать зону освещения вспышкой 105 мм для работы с фокусными расстояниями свыше 105 мм в режиме "телефото". Однако при использовании фокусных расстояний менее 24 мм в широкоугольном положении рекомендуется применять широкоугольный рассеиватель (18 мм). В этом случае зона освещения вспышкой не будет автоматически привязываться к положению зума.
Фотокамеры Type R Выберите режим ручной экспозиции или режим приоритета диафрагмы. В режиме 5, программном режиме или в режиме приоритета выдержки возможны ошибки экспозиции. Также, если для ISO выбрано положение AUTO, вспышка будет настроена автоматически в соответствии с выбранным значением. Если выбрано определенное значение ISO, проверьте процедуру для камер, отличных от Type R. * В режимах видеосъемки, динамического диапазона, съемки с интервалом и режиме Предыд. плюс (выс.) вспышка не срабатывает.
* В режимах видеосъемки, динамического диапазона, съемки с интервалом и режиме Предыд. плюс (выс.) вспышка не срабатывает. Только на камерах Type R В камерах Type R уровень мощности вспышки можно изменять на фотокамере в диапазоне от 1/1 до 1/64. 1 С помощью кнопки выбора режима установите режим вспышки NORMAL, а с помощью кнопки выбора мощности вспышки задайте Ручную настройку интенсивности вспышки (загорятся два крайних справа индикатора уровня мощности вспышки).
Далее приведено пояснение использования встроенной вспышки камеры в качестве триггера. Фотокамеры Type R При использовании встроенной вспышки камеры в качестве пускового устройства не подсоединяйте данную вспышку к адаптеру hot shoe. Встроенная вспышка может не открыться. 1 Включите питание камеры и вспышки и установите последнюю в режим постоянного срабатывания. 2 Кнопкой выбора режимов установите для вспышки режим SLAVE1.
Камеры, отличные от Type R Кнопкой выбора режима установите режим вспышки SLAVE1 или SLAVE2, в зависимости от типа встроенной вспышки камеры. В этом случае функция камеры "Красные глаза" недоступна. Широкоугольный рассеиватель • Вы можете выдвинуть широкоугольный рассеиватель и установить его на вспышку как показано на рисунке, чтобы использовать угол съемки 18 мм. • Одновременно выдвинется панель для создания бликов в глазах, ее следует задвинуть на место.
Внимание! При использовании отраженной вспышки зона действия составляет 50 мм. • Если потолок или стены находятся слишком далеко, отраженный свет может оказаться недостаточно сильным, и отраженная вспышка будет неэффективной. • Если потолок или стены не белые, это может повлиять на отраженный свет, который приобретет соответствующую окраску. • Если отраженный свет слишком сильно ослабляется и отраженная вспышка неэффективна, выберите на камере более высокое значение ISO.
Характеристики Ведущее число 20 (при 24 мм) - 30 (при 105 мм) 16 (при 24 мм, с широкоугольным рассеивателем) Зона действия 24 мм - 105 мм (при 18 мм, с широкоугольным рассеивателем) Автоматически привязывается к фокусному расстоянию объектива в соответствии с автоматическим зумом (только на камерах Type R) Источник питания 4 × аккумулятора AA (приобретаются отдельно) • Могут использоваться литиевые батареи и перезаряжаемые никель-металлогидридные аккумуляторы.
Таблица ведущих чисел (ISO 100) Мощность вспышки Положение зума FULL 1/2 1/4 1/8 1/16 1/32 1/64 24мм 20 14 10 7 5 4 3 28мм 22 16 11 8 6 4 3 35мм 24 17 12 8 6 4 3 50мм 26 18 13 9 7 5 3 70мм 28 20 14 10 7 5 4 85мм 29 21 15 10 7 5 4 105мм 30 21 15 11 8 5 4 * Все значения приведены для ISO100. Для значений ISO200 умножать на 1,4×; для значений ISO400 умножать на 2×.
Гарантия Заполните все надлежащие данные, проверьте правильность информации и сохраните гарантию в надежном месте. Техническая поддержка для клиентов Сервисные центры Ricoh В случае неисправности обратитесь в один из сервисных центров Ricoh, указанных в Руководство по эксплуатации цифровой фотокамеры. • Полное или частичное воспроизведение запрещено без соответствующего разрешения. © 2009 Ricoh Co., Ltd. • Содержание данного руководства по эксплуатации может быть изменено без предварительного уведомления.
Printed in China *L239 2981A*