Operating Instructions Printer/Scanner Reference 1 Using the Printer Function 2 Using the Scanner Function 3 Appendix Read this manual carefully before you use this machine and keep it handy for future reference. For safe and correct use, be sure to read the Safety Information in "About This Machine" before using the machine.
Introduction This manual contains detailed instructions and notes on the operation and use of this machine. For your safety and benefit, read this manual carefully before using the machine. Keep this manual in a handy place for quick reference. Important Contents of this manual are subject to change without prior notice. In no event will the company be liable for direct, indirect, special, incidental, or consequential damages as a result of handling or operating the machine.
Manuals for This Machine Refer to the manuals that are relevant to what you want to do with the machine. Important ❒ Media differ according to manual. ❒ The printed and electronic versions of a manual have the same contents. ❒ Adobe Acrobat Reader/Adobe Reader must be installed in order to view the manuals as PDF files. ❒ Depending on which country you are in, there may also be html manuals. To view these manuals, a Web browser must be installed.
TABLE OF CONTENTS Manuals for This Machine ......................................................................................i Notice ......................................................................................................................1 How to Read This Manual .....................................................................................3 Symbols .....................................................................................................................3 Display Panel...
2. Using the Scanner Function TWAIN Scanner ....................................................................................................45 Process Flow............................................................................................................46 Preparation for Using the TWAIN Scanner........................................................47 Installing the TWAIN Driver................................................................................. 48 Setting Originals ..............
iv
Notice Note to users in the United States of America Note: This equipment has been tested and found to comply with the limits for a Class B digital device, pursuant to Part 15 of the FCC Rules. These limits are designed to provide reasonable protection against harmful interference in a residential installation. This equipment generates, uses and can radiate radio frequency energy and, if not installed and used in accordance with the instructions, may cause harmful interference to radio communications.
Note to users in Canada Note: This Class B digital apparatus complies with Canadian ICES-003. Remarque concernant les utilisateurs au Canada Avertissement: Cet appareil numérique de la classe B est conforme à la norme NMB-003 du Canada.
How to Read This Manual Symbols This manual uses the following symbols: Indicates important safety notes. Ignoring these notes could result in serious injury or death. Be sure to read these notes. They can be found in the “Safety Information” section of About This Machine. Indicates important safety notes. Ignoring these notes could result in moderate or minor injury, or damage to the machine or to property. Be sure to read these notes.
Display Panel This section describes configuration using the display panel when the printer function is selected. 4 AYM008S 1. Operational status or messages 3. [JobReset] Displays current machine status, such as “Ready”, “Offline”, and “Printing...”. Press to cancel the current print job. If you press it when the machine is offline and Hex Dump is selected, Hex Dump is canceled. 2.
Reading the Display and Using Keys This section explains how to read the display and using the selection key for the initial display. AYM013S 1. Selection keys 3. {OK} key Correspond to the function items at the bottom line on the display. Example: Basic screen When the instruction “press [JobReset]” appears in this manual, press the center selection key. Press to set a selected item or entered numeric value. 2. {Escape} key Press to cancel an operation or return to the previous display. 4.
Printer Features Menu The following explains settings and meanings of functions on Printer Feature. Printer Feature screen appears when you press the {User Tools/Counter} key. For details, see “Printer Features”, General Settings Guide. Important ❒ The settings that appear depend on whether or not the printer enhance option is installed. =Appears - =Does not appear ❖ Paper Input Menu Description Printer Enhance Option Not Installed Bypass Paper Size The size of the paper set in the bypass tray.
❖ Maintenance Menu Description Printer Enhance Option Not Installed Menu Protect Installed This function lets you protect menu settings from accidental change. It makes it impossible to change menu settings with normal procedures unless you perform the required key operations. In a network environment, only administrators can make changes to menu settings.
❖ Host Interface Menu Description Printer Enhance Option Not Installed I/O Timeout Installed You can set how many seconds the machine should wait before ending a print job. If data from another port usually arrives in the middle of a print job, you should increase this timeout period. ❖ PCL Menu Menu Description Printer Enhance Option Not Installed Orientation You can set the page orientation. - Form Lines You can set the number of lines per page.
Setting Paper on the Bypass Tray This section gives instructions for setting paper on the bypass tray. For details about paper size and paper type, see “Recommended Paper Sizes and Types”, About This Machine.
C Adjust the paper guides to the paper size, and then gently insert paper face down into the bypass tray. AYM004S 1. Extender 2. Paper guides • Open out the extender to support paper sizes larger than A4 L, 81/2 ×11 L. • If the paper guides are not flush against the paper, skewing and misfeeds might occur. • Gently insert paper until it stops. • Do not stack paper over the limit mark, otherwise a skewed image or misfeeds might occur.
Note ❒ Paper within the following dimensions can be set in the bypass tray: • Vertical: 90 - 297 mm (3.55 - 11.69 in.) • Horizontal: 148 - 600 mm (5.83 - 23.62 in.) ❒ Be sure to set the paper with the side you want to print facing down in the bypass tray. ❒ The number of sheets that can be loaded in the bypass tray depends on the paper type. ❒ When loading OHP transparencies or thick paper in the bypass tray, make the paper setting using the control panel or printer driver.
B Select [Printer Features] using {T} or {U}, and then press the {OK} key. C Select [Paper Input] using {T} or {U}, and then press the {OK} key. D Select [Bypass Paper Size] using {T} or {U}, and then press the {OK} key. E Select the paper size using the scroll keys, and then press the {OK} key. F Press the {User Tools/Counter} key to return to the default screen. Reference See the printer driver Help about the settings from the printer drivers.
Setting the Custom Size Paper Using the Control Panel The following procedures are not required if you select the printer driver for the settings. In that case, set the paper size using the printer driver. Important ❒ Custom size settings set using the printer driver have priority over those set using the machine's control panel. ❒ When the printer driver is not used, make settings using the control panel. A Press the {User Tools/Counter} key.
F Enter the horizontal size of the paper using the number keys, and press the {OK} key. Available size: 148 - 600 mm (5.83 - 23.62 in.) G Enter the vertical size of the paper using the number keys, and press the {OK} key. Available size: 90 - 297 mm (3.55 - 11.69 in.) H Press the {User Tools/Counter} key to return to the default screen. Reference For printer driver settings, see the printer driver Help.
B Select [System Settings] using {T} or {U}, and then press the {OK} key. C Select [Tray Paper Settings] using {T} or {U}, and then press the {OK} key. D Select [Paper Type: Bypass Tray] using {T} or {U}, and then press the {OK} key. E Select paper type from the menu using {T} or {U}, and then press the {OK} key. F Press the {User Tools/Counter} key to return to the default screen. Note ❒ The settings made will remain valid until they are reset again.
Setting Envelope Using the Control Panel A Press the {User Tools/Counter} key. B Select [System Settings] using {U} or {T}, and then press the {OK} key. C Select [Tray Paper Settings] using {U} or {T}, and then press the {OK} key. D Select [Paper Type: Bypass Tray] using {U} or {T}, and then press the {OK} key. E Select [Thick Paper] using {U} or {T}, and then press the {OK} key. F Press the {User Tools/Counter} key twice. G Select [Printer Features] using {U} or {T}, and then press the {OK} key.
I Select [Bypass Paper Size], and then press the {OK} key. J Select the paper envelope size from [C5envL], [C6envL], or [DlenvL], and then press the {OK} key. K Press the {User Tools/Counter} key to return to the default screen.
18
1. Using the Printer Function Confirming the Connection Method This machine supports network and USB connection. Before installing the printer driver, check how the machine is connected. Follow the driver installation procedure that is appropriate to the connection method. Network Connection This machine can be used as a Windows printing port or network printer. Using This Machine as the Windows Printing port Network connections can be established through Ethernet.
Using the Printer Function ❖ LPR port Print via TCP/IP using an LPR port. An LPR port can be used with Windows 2000 / XP, or Windows Server 2003. ❖ IPP port Print via ipp or http using an IPP port. An IPP port can be used with Windows XP, or Windows Server 2003. 1 Reference About the install of the printer driver see p.21 “Installing the Printer Driver”. See the explanation about how to configure the each type of port, see p.22 “Configure the port”.
Installing the Printer Driver Installing the Printer Driver To use the printer function, you must first install the printer driver from the supplied CD-ROM. 1 Important ❒ If you install the Printer Enhance Option, the DDST printer driver is disabled. ❒ When the DDST printer driver disabled, it cannot be used even if you remove the Printer Enhance Option. ❒ If your operating system is Windows XP x64, download printer driver for Windows XP x64 from the supplier's Web site.
Using the Printer Function Configure the port You can use this machine as a network printer without connecting to a print server. 1 Using TCP/IP Port Type P10001 TCP/IP Port Type P10001 can be used with Windows 98 / Me if the necessary printer driver has been installed. The TCP/IP Port Type P10001 paths is as follow: • CD-ROM drive:\PORT A In the [Printers] window, click the icon of the printer you want to use. On the [File] menu, click [Properties].
Configure the port Using Standard TCP/IP Port This procedure explains changing the port settings under Windows 2000 when a printer driver has been installed. 1 A In the [Printers] window, click the icon of the printer you want to use. On the [File] menu, click [Properties]. B Click the [Ports] tab, and then click [Add Port]. C Click [Standard TCP/IP], and then click [New Port...]. D In the [Add Standard TCP/IP Printer Port Wizard] dialog box, click [Next >].
Using the Printer Function Using the IPP Port An IPP port can be used with Windows 2000 / XP or Windows Server 2003. This procedure explains making the port settings under Windows XP. 1 Important ❒ If you want to use the PCL 5e printer driver, you must download it from the supplier's Web site. ❒ If your operating system is Windows XP x64, download printer driver for Windows XP x64 from the supplier's Web site. A In the [Printers and Faxes] window, click [Add Printer] on the [File] menu.
Configure the port H Select the printer driver. The printer driver paths are as follows: ❖ DDST • Windows 98 / Me CD-ROM drive:\DRIVERS\DDST\WIN9X_ME\(language)\DISK1 • Windows 2000 / XP or Windows Server 2003 CD-ROM drive:\DRIVERS\DDST\WIN2K_XP\(language)\DISK1 1 ❖ PCL 6 • Windows 98 / Me CD-ROM drive:\DRIVERS\PCL6\WIN9X_ME\(language)\DISK1 • Windows 2000 / XP or Windows Server 2003 CD-ROM drive:\DRIVERS\PCL6\WIN2K_XP\(language)\DISK1 I Click [OK] twice. J Click [Next >], and then [Finish].
Using the Printer Function Printing with a Print Server Important ❒ This section assumes the client is already configured to communicate with a Windows 2000 / XP, or Windows Server 2003 print server. Do not begin the following procedure until the client computer is set up and configured correctly. 1 This section explains configuring a network client computer when using Windows 2000 / XP or Windows Server 2003 as a print server.
Installing the Printer Driver Using USB Installing the Printer Driver Using USB This section explains how to install printer drivers using USB. Before installing, check that only the operating system is running on the computer and no print jobs are in progress. The printer drivers can be installed from the supplied CD-ROM provided with this machine. 1 Important ❒ If you install the Printer Enhance Option, the DDST printer driver is disabled.
Using the Printer Function G Click [Finish]. If the printer driver has already been installed, plug and play is enabled, and the icon of the printer connected to the “USB001” port is added to the [Printers] window. 1 H Install the printer driver. Click [Search for the best driver for your device. [Recommended]], and then click [Next >]. I Select the [Specify a location:] check box, and then click [Browse...]. The [Browse for Folder] dialog box appears. J Insert the CD-ROM into the CD-ROM drive.
Installing the Printer Driver Using USB Windows 2000 - USB Important ❒ Installing a printer driver requires Administrator permission. Log on using an account that has Administrator permission. When USB is first used, Found New Hardware Wizard starts, and USB Printing Support is installed automatically. If the printer driver has already been installed, plug and play is enabled, and the icon of the printer connected to the “USB” port is added to the [Printers] window.
Using the Printer Function Windows XP, Windows Server 2003 - USB Important ❒ Installing a printer driver requires Administrators permission. Log on using an account that has Administrators permission. When USB is first used, Found New Hardware Wizard starts, and USB Printing Support is installed automatically. If the printer driver has already been installed, plug and play is enabled, and the icon of the printer connected to the “USB” port is added to the [Printers] window.
Setting Up the Printer Driver Setting Up the Printer Driver Windows 98 / Me - Accessing the Printer Properties 1 There are two methods to open the printer properties dialog box. Making Printer Default Settings To make the printer default settings, open the printer properties dialog box from the [Printers] window. Important ❒ You cannot change the printer default settings for each user. Settings made in the printer properties dialog box are applied to all users.
Using the Printer Function Note ❒ The procedure to open the printer properties dialog box may vary depending on the application. For details, see the manuals provided with the application you use. 1 ❒ With some applications, the printer driver settings are not used, and the application's own default settings are applied. ❒ Any settings you make in the following procedure are valid for the current application only.
Setting Up the Printer Driver Making Printer Default Settings - Printing Preferences Important ❒ You cannot change the printer default settings for each user. Settings made in the printer properties dialog box are applied to all users. 1 A On the [Start] menu, point to [Settings], and then click [Printers]. The [Printers] window appears. B Click the icon of the printer you want to use. C On the [File] menu, click [Printing Preferences...]. The [Printing Preferences] dialog box appears.
Using the Printer Function Windows XP, Windows Server 2003 - Accessing the Printer Properties 1 Making Printer Default Settings - The Printer Properties Important ❒ To change the printer default settings including option configuration settings, log on using an account that has Manage Printers permission. Members of the Administrators and Power Users groups have Manage Printers permission by default. ❒ You cannot change the printer default settings for each user.
Setting Up the Printer Driver Reference For details, see the printer driver Help. Making Printer Settings from an Application 1 You can make printer settings for a specific application. To make printer settings for a specific application, open the [Printing Preferences] dialog box from that application. The following explains how to make settings for the WordPad application provided with Windows XP. A On the [File] menu, click [Print...]. The [Print] dialog box appears.
Using the Printer Function Form Feed This section gives instructions for operating the machine when there is no tray for the selected paper size or type, or when paper loaded in the machine has run out.
Canceling a Print Job Canceling a Print Job This section gives instruction to stop printing from the computer or the control panel. 1 Canceling a Print Job Using the Control Panel A Press [JobReset] on the display panel. A confirmation message appears. B Press [Current]. To resume printing jobs, press [Resume]. C Press [Yes] to cancel the print job. Press [No] to return to the previous display.
Using the Printer Function Note ❒ If the machine is shared by multiple computers, be careful not to accidentally cancel someone else's print job. ❒ If the machine is connected to the computer using a parallel cable, sent print jobs may be canceled if [JobReset] is pressed while “Waiting...” is displayed on the control panel. After the interval set in [I/O Timeout] in Printer Features has passed, the next print job can be sent.
Checking the Error Log Checking the Error Log If files could not be stored due to printing errors, identify the cause of the errors by checking the error log on the control panel. 1 Important ❒ The most recent 30 errors are stored in the error log. If a new error is added when there are 30 errors already stored, the oldest error is deleted. ❒ If the main power switch is turned off, the log is deleted. A Press the {Printer} key to display the Printer screen. B Press [Menu]. C Press the {OK} key.
Using the Printer Function Collate When printing multiple documents such as handouts for meetings, you can separate sets into order. This function is known as “Collate”. Collate stores data transmitted from a computer to the printer memory. The following are the two types of collate: 1 Important ❒ If the following functions are selected, Collate will be applied even if Rotating Collate is selected: • • • • • When combined with staple function. When feeding paper from the bypass tray.
Collate Note ❒ You can set Collate in the printer driver settings. ❒ If Auto Continue occurs on the first set, Collate will be canceled. ❒ If forced printing occurs on the first set, Collate will be canceled. ❒ When Rotating Collate has been selected, printing speed will be slower than with other collate functions. ❒ When setting Collate in the printer driver settings, make sure that a collate option is not selected in the application's print settings.
Using the Printer Function Staple With the optional Finisher SR3010 sets can be stapled individually when printing multiple sets. 1 Staple Position The specified staple position varies depending on paper size, type, quantity and feed orientation. The following table shows staple positions: AYM001S Note ❒ Stapling might not be in the specified position if combine (layout) and duplex printing are both selected.
Staple Stapling Precautions Important ❒ Stapling can be done only with the optional finisher installed. 1 ❖ Staple printing will be canceled under the following conditions: • If the number of pages to staple exceeds maximum. • If a paper size that cannot be stapled is selected. • If a paper type that cannot be stapled is selected. • If positions other than those fixed for stapling are specified. • If there are inconsistencies between the orientation in the duplex mode and the staple position.
Using the Printer Function 1 44
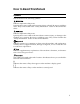
2. Using the Scanner Function TWAIN Scanner Client computers can use this machine as a network TWAIN scanner. Using direct USB connection, stand alone computers can also use this machine as a TWAIN scanner. Procedures for network scanning are the same as those for scanning via USB connection. AYM010S 1. This machine 3. Stand-alone computer Connects to computers via Ethernet (TCP/IP) and/or USB. Uses the scanner via direct USB connection and a TWAIN-compliant application (such as Imaging). 2.
Using the Scanner Function Process Flow A Scanning commands are sent to the machine (1.) via the TWAIN driver from a TWAIN-compliant application installed on the client (2.) or standalone (3.) computer. B The machine (1.) scans the originals. C Scanned data is edited and stored using the TWAIN-compliant application 2 on the client (2.) or stand-alone (3.) computer. Note ❒ When using the machine as the TWAIN scanner, it is not necessary to press the {Scanner} key on the control panel.
Preparation for Using the TWAIN Scanner Preparation for Using the TWAIN Scanner The following diagrams show the preparation required to use this machine as a TWAIN scanner. ❖ Network connection (Network TWAIN scanner) 2 Install the TWAIN driver on a client computer. *1 See p.48 “Installing the TWAIN Driver”. Connect the scanner and client computer with a cable. See “Connecting the Machine” in General Settings Guide. Make the necessary network settings in [Interface Settings].
Using the Scanner Function Installing the TWAIN Driver To use the scanner function, you must first install the TWAIN driver on the supplied CD-ROM. A Quit all applications currently running. B Insert the CD-ROM into the CD-ROM drive. 2 The driver installer starts. C Select an interface language, and then click [OK]. The default interface language is English. D Click [DDST TWAIN Driver]. The DDST TWAIN Driver installer starts. E Click [OK]. F Click [Close].
Setting Originals Setting Originals The following explains the procedure for placing originals on the exposure glass and in the ARDF, and setting the scan area and orientation according to how you have set your originals. To correctly display the top/bottom orientation of the scanned original on a client computer, the placement of the original and the settings made on the control panel and scanner driver must match.
Using the Scanner Function Placing on the Exposure Glass Originals that do not fit into the ARDF, such as sheets with glued-on parts, books, etc., can be placed directly on the exposure glass for scanning. For details about originals that you can place on the exposure glass, see Copy Reference. A Lift the exposure glass cover or the ARDF. 2 Lift the exposure glass cover or ARDF to an angle of more than 30 degrees. The opening/closing action triggers the automatic original size detection process.
Setting Originals ❖ When placing the original so that the top edge touches the top left of the exposure glass When using the machine as a network TWAIN scanner, this orientation is the standard setting for the TWAIN driver. This orientation is suitable for most originals. R 2 ABF008S 1. Positioning mark C Lower the exposure glass cover or the ARDF. D Select the original orientation according to the orientation of the placed original. Reference p.
Using the Scanner Function ❖ When placing the originals so that the top edges touch the back of the ARDF 2 AYM011S ❖ When placing the top edges of the originals first When using the machine as a network TWAIN scanner, this orientation is the standard setting for the TWAIN driver. This orientation is suitable for most originals. AYM012S C Select the original orientation according to the orientation of the placed originals.
Scanning Originals Scanning Originals This section explains how to scan originals using the TWAIN scanner function. This procedure explains scanning originals using Imaging under Windows 2000. A On the [Start] menu, point to [Program], point to [Product Name], and then 2 click [Setting]. The TWAIN Driver dialog box appears. B Select the connection method. If you are using Network TWAIN, click [Discover]. The IP address appears in the [Select Scanner].
Using the Scanner Function Relationship between Resolution and File Size Resolution and scan area are inversely related. The higher the resolution is set, the smaller the area that can be scanned. Similarly, the larger the scan area, the lower the resolution that can be set. The relationship between scanning resolution and file size is shown below. If the file size is too large, the message “Exceeded max.data capacity. Check the scanning resolution.
3. Appendix Specifications Printer This section details the machine's electrical and hardware specifications, including information about its options. Component Specifications Resolution 600 dpi Printing speed 25 ppm (A4K, 81/2" × 11"K plain paper) Interface USB 2.
Appendix Scanner 3 Scan method Flatbed scanning Scan speed *1 Approx. 25 pages/minute [Scan size: A4K, Colors/Gradations:Binary, Resolution: 200dpi, Select device data compression (Binary/Halftone): Data compression (MMR), Document feeder: ARDF, ITU-T No.1 Chart] Image sensor type CCD Image Sensor Scan types Sheet, book Interface USB interface, Ethernet interface (10BASE-T or 100BASE-TX) Maximum scan size 297 × 432 mm/11.7 × 17.
INDEX B Bypass tray, 9, 11 C Canceling a job, 37 Collate, 40 Control keys, 5 Control panel, 6 Custom size paper, 9, 13 D Display panel, 4 E Envelope, 14 Error log, 39 H How to Read This Manual, 3 I installing, 48 Installing the DDST or PCL Printer Driver Using USB, 27 Interface, 55 IPP Port, 24 L LPR Port, 23 M Memory, 55 N P Placing on the exposure glass, 50 Placing original in the Auto Document Feeder (ARDF), 51 Placing Originals, 49, 50, 51 Printer Features Menu, 6 Printer Language, 55 printer p
58 EN USA D010-7693
In accordance with IEC 60417, this machine uses the following symbols for the main power switch: a means POWER ON. b means POWER OFF. c means STAND BY. Trademarks Microsoft®, Windows® and Windows NT® are registered trademarks of Microsoft Corporation in the United States and/or other countries. Acrobat® is a registered trademark of Adobe Systems Incorporated. PCL® is a registered trademark of Hewlett-Packard Company. UPnP is a trademark of the UPnP Implementers Corporation.
Operating Instructions Printer/Scanner Reference EN USA D010-7693