
User's Manual


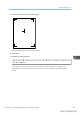


Table Of Contents
- 6. Troubleshooting
- 7. Maintenance and Specifications
- General Requirements
- Moving the Printer
- Cleaning the Printer
- Adjusting the Color Registration
- Correcting the Color Gradation
- Adjusting Printing Position
- Replenishing and Replacing Consumables
- Consumables
- Specifications
- Information for This Printer
- User Information on Electrical & Electronic Equipment
- EMC Directive
- Note for the Battery and/or Accumulator Symbol (For EU countries only)
- Environmental Advice for Users
- Notes for users in the state of California
- ENERGY STAR Program
- Environmental protection expiration date for use
- Fixed form sentences 11 _ china environmental labeling notice _ LP_Title Sentence 1
- Appendix

1. Press the [User Tools] key, and then correct the gradation.
[Maintenance: Image] [Color Calibration] [Adjust Auto Density] [Start]
The confirmation message appears when complete. Press [Exit].
2. Print the selected sheet, and then correct the gradation.
[Print Test Pattern 1 for Calibration] or [Print Test Pattern 2 for Calibration] Select the color you
want to adjust Adjust the correction value for the selected color [OK]
Enter the value between 0 and 6.
3. Check the result by printing the calibration sheet, and then save the settings.
[Print Result] [Yes]
Resetting the Gradation Correction Value to the Default Value
Press the [Menu] key, and then select the setting items using the [ ] or [ ] key.
1. Select [Maintenance] Press [OK]
2. Select [Quality Maintenance] Press [OK]
3. Select [Color Calibration] Press [OK]
4. Select [Reset] Press [OK]
5. Press [Yes]
1. Press the [User Tools] key, and then reset the gradation correction value to the default
value.
[Maintenance: Image] [Color Calibrt.] [Reset Setting] [OK]
The confirmation message appears when complete. Press [Exit].
7. Maintenance and Specifications
444 midas-p3_com_operating_instructions_gb_00198792_eng.xml
Draft 2016/01/18