
User's Manual
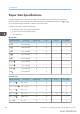
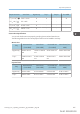
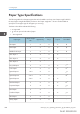
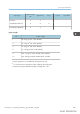
Table Of Contents
- TABLE OF CONTENTS
- 1. Getting Started
- Before You Start
- Manuals for This Machine
- Guide to Names and Functions of Components
- Using the Screen on the Control Panel
- Logging in to the Printer
- User Code Authentication Using the Control Panel
- User Code Authentication Using a Printer Driver
- Logging In Using the Control Panel
- Logging Out Using the Control Panel
- Logging In Using a Printer Driver
- Logging In Using Web Image Monitor
- Logging Out Using Web Image Monitor
- User Lockout Function
- Changing the Login Password
- Downloading Utility Software
- 2. Setting Up the Printer
- Printer Set Up Procedure
- Install Location
- Checking the Contents of the Box
- Unpacking
- Installing Options
- Connecting the Power Cord
- Turning On/Off the Power
- Selecting the Display Language
- Connecting the Printer
- Configuration
- Test Printing
- 3. Loading Paper

Paper Type Specifications
The following table show the paper types that can be loaded in each tray. See “Paper weight” table for
the actual paper weight indicated by numbers in the “Paper weight No.” column. Use both tables to
specify the correct paper type for the paper you are using.
The letters in the tables indicate the following:
• A: Supported
• : You can print on both sides of paper.
• -: Not supported
Paper type
Paper weight
No.
Bypass tray Tray 1 Trays 2 Two-sided
Thin Paper 1 A A A
Plain Paper 2 A A A
Middle Thick Paper 3 A A A
Thick Paper 1 4 A A A -
Thick Paper 2 5 A A A -
Thick Paper 3 6 A - - -
Recycled Paper 2 A A A
*3
Color Paper 2 A A A
*3
Special Paper 1 1 to 2 A A -
*3
Special Paper 2 3 to 4 A A -
*3
Special Paper 3 5 to 6 A A A -
Letterhead Paper 2 A A A
*3
Preprinted Paper 2 A A A
*3
Bond Paper 2 A - - -
Cardstock Paper 2 A A A
*3
Label Paper 2 A A - -
Glossy Paper 2 A A - -
3. Loading Paper
108 midas-p3_com_operating_instructions_gb_00198514_eng.xml
Draft 2016/01/18