
User's Manual

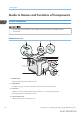
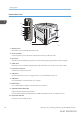
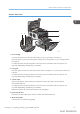
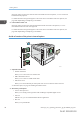
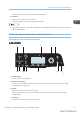
Table Of Contents
- TABLE OF CONTENTS
- 1. Getting Started
- Before You Start
- Manuals for This Machine
- Guide to Names and Functions of Components
- Using the Screen on the Control Panel
- Logging in to the Printer
- User Code Authentication Using the Control Panel
- User Code Authentication Using a Printer Driver
- Logging In Using the Control Panel
- Logging Out Using the Control Panel
- Logging In Using a Printer Driver
- Logging In Using Web Image Monitor
- Logging Out Using Web Image Monitor
- User Lockout Function
- Changing the Login Password
- Downloading Utility Software
- 2. Setting Up the Printer
- Printer Set Up Procedure
- Install Location
- Checking the Contents of the Box
- Unpacking
- Installing Options
- Connecting the Power Cord
- Turning On/Off the Power
- Selecting the Display Language
- Connecting the Printer
- Configuration
- Test Printing
- 3. Loading Paper

When the [ ] [ ] [ ] [ ] keys appear in this manual, press the applicable key for the direction that you want
to move the cursor.
5. [Escape] key
Press this key to cancel an operation or return to the previous display.
6. [Suspend/Resume] key
Press this to suspend the print job currently being processed. The indicator remains lit as long as the job is
suspended.
To resume the job, press this key again. The suspended job will resume automatically when the time specified
in [Auto Reset Timer] elapses (default: 60 seconds).
For details about the [Auto Reset Timer] setting, see page 233 "Timer Settings (SP C340DN)".
7. Power indicator
Lights up when the printer is ready to receive data from a computer. Flashes when the printer is warming up or
receiving data. It is unlit when the power is off or when the printer is in energy saver mode.
8. Alert indicator
Lights up or flashes when a printer error occurs.
Steady red: printing is not possible, or is possible but print quality cannot be ensured.
Flashing yellow: the printer will soon require maintenance or a replacement consumable such as print
cartridge.
Follow the instructions that appear on the display.
9. [Menu] key
Press this key to configure and check the current printer settings.
Press to change the default settings to meet your requirements. See page 211 "Displaying the Printer
Configuration Screens Using the Control Panel".
10. Data in indicator
Flashes when the printer is receiving data from a computer. The data in indicator is lit if there is data to be
printed.
11. Selection keys
Correspond to the function items at the bottom line on the display.
Example: When this manual instructs you to press [Option], press the selection key on the left below the initial
screen.
12. [OK] key
Use this key to confirm settings or setting values, or move to the next menu level.
13. Light sensor
The sensor that detects the ambient light level when the ECO Night Sensor function is enabled.
1. Getting Started
20 midas-p3_com_operating_instructions_gb_00198424_eng.xml
Draft 2016/01/18