
User's Manual


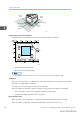
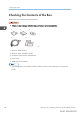
Table Of Contents
- TABLE OF CONTENTS
- 1. Getting Started
- Before You Start
- Manuals for This Machine
- Guide to Names and Functions of Components
- Using the Screen on the Control Panel
- Logging in to the Printer
- User Code Authentication Using the Control Panel
- User Code Authentication Using a Printer Driver
- Logging In Using the Control Panel
- Logging Out Using the Control Panel
- Logging In Using a Printer Driver
- Logging In Using Web Image Monitor
- Logging Out Using Web Image Monitor
- User Lockout Function
- Changing the Login Password
- Downloading Utility Software
- 2. Setting Up the Printer
- Printer Set Up Procedure
- Install Location
- Checking the Contents of the Box
- Unpacking
- Installing Options
- Connecting the Power Cord
- Turning On/Off the Power
- Selecting the Display Language
- Connecting the Printer
- Configuration
- Test Printing
- 3. Loading Paper

2. Setting Up the Printer
This chapter explains the procedures for setting up the printer and installing options.
Printer Set Up Procedure
Use the following procedure to set up the printer:
1. Select a suitable location for your printer.
For details, see page 47 "Install Location".
2. Take the printer out of its box.
• Check the items that come with the printer.
For details, see page 50 "Checking the Contents of the Box".
• Remove the protective materials and adhesive tape.
For details, see page 51 "Unpacking".
3. Install the optional unit(s) and board(s) to the printer as necessary.
For details, see page 57 "Installing Options".
4. Load paper in the paper feed tray.
For details, see page 105 "Loading Paper".
5. Plug in the power cord, and then turn on the printer.
For details, see page 70 "Connecting the Power Cord", and page 73 "Turning On/Off the
Power".
6. Select the language used on the display.
For details, see page 77 "Selecting the Display Language".
7. Print a test page.
For details, see page 100 "Test Printing".
8. Connect the printer to your network.
For details, see page 78 "Connecting the Printer".
9. Configure the printer’s network settings.
For details, see page 90 "Configuration".
10. Install the printer driver.
For details, see Driver Installation Guide.
midas-p3_com_operating_instructions_gb_00198470_eng.xml
45
Draft 2016/01/18