
User's Manual
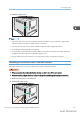
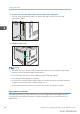
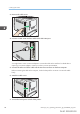
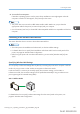
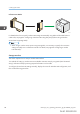

Table Of Contents
- TABLE OF CONTENTS
- 1. Getting Started
- Before You Start
- Manuals for This Machine
- Guide to Names and Functions of Components
- Using the Screen on the Control Panel
- Logging in to the Printer
- User Code Authentication Using the Control Panel
- User Code Authentication Using a Printer Driver
- Logging In Using the Control Panel
- Logging Out Using the Control Panel
- Logging In Using a Printer Driver
- Logging In Using Web Image Monitor
- Logging Out Using Web Image Monitor
- User Lockout Function
- Changing the Login Password
- Downloading Utility Software
- 2. Setting Up the Printer
- Printer Set Up Procedure
- Install Location
- Checking the Contents of the Box
- Unpacking
- Installing Options
- Connecting the Power Cord
- Turning On/Off the Power
- Selecting the Display Language
- Connecting the Printer
- Configuration
- Test Printing
- 3. Loading Paper

3. Connect one end of the USB interface device to the printer's USB port A.
If you are using a USB interface cable, connect the other end to a device such as a card
authentication device.
DPP039
4. Attach the cable cover.
DPP029
• This printer does not come with a USB interface cable. Make sure you purchase the appropriate
cable for the printer (connector shape) and the device.
• Use a five meter (16.4 foot) or shorter cable that supports USB Host Interface.
• Check the type of the plug before connecting.
• Do not pull the connected cable forcefully. Make sure the cable is properly connected. Otherwise,
it might become disconnected or somebody might trip on it.
• Using a cable with some connectors or converters may result in an improper connection.
Digital camera connection
This printer supports direct printing, which allows you to print images taken with a digital camera by
connecting the camera directly to the printer. The following explains how to connect the printer to a
digital camera.
2. Setting Up the Printer
82 midas-p3_com_operating_instructions_gb_00198490_eng.xml
Draft 2016/01/18