
User's Manual
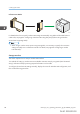
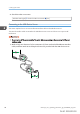

Table Of Contents
- TABLE OF CONTENTS
- 1. Getting Started
- Before You Start
- Manuals for This Machine
- Guide to Names and Functions of Components
- Using the Screen on the Control Panel
- Logging in to the Printer
- User Code Authentication Using the Control Panel
- User Code Authentication Using a Printer Driver
- Logging In Using the Control Panel
- Logging Out Using the Control Panel
- Logging In Using a Printer Driver
- Logging In Using Web Image Monitor
- Logging Out Using Web Image Monitor
- User Lockout Function
- Changing the Login Password
- Downloading Utility Software
- 2. Setting Up the Printer
- Printer Set Up Procedure
- Install Location
- Checking the Contents of the Box
- Unpacking
- Installing Options
- Connecting the Power Cord
- Turning On/Off the Power
- Selecting the Display Language
- Connecting the Printer
- Configuration
- Test Printing
- 3. Loading Paper

Configuration
This section describes supported network connections and settings for IP addresses and wireless LAN
security.
Ethernet Configuration
Configure the printer for the network using the control panel.
After configuring network settings, you can print the configuration page to confirm the settings. For
details, see page 100 "Test Printing".
• Contact your network administrator for information about configuring network settings.
• For details about setting items and their default values, see:
• page 255 "Host Interface (SP C340DN)" (for SP C340DN)
• page 291 "Interface Settings" (for SP C342DN)
• You can also use Web Image Monitor to configure the IP address-related settings. For details, see
Web Image Monitor Help.
Specifying an IP address (no DHCP)
If you want to use the printer on a network without using DHCP or want to use a static IP address, use the
following procedure to assign a specific IPv4 address to the printer. Before making any changes,
contact your network administrator to obtain the IP address, subnet mask, and gateway address to be
specified on the printer.
Press the [Menu] key, and then select the setting items using the [ ] or [ ] key.
1. Select [Host Interface]
Press [OK]
2. Select [Network] Press [OK]
3. Select [Effective Protocol] Press [OK]
4. Select [IPv4] Press [OK]
5. Select [Active] Press [OK] Press [Escape]
Set other protocols you need to set in the same way.
6. Select [Machine IPv4 Address] Press [OK]
7. Select [Specify] Press [IP Add.] Specify the IPv4 address for the printer Press [OK]
2. Setting Up the Printer
90 midas-p3_com_operating_instructions_gb_00198499_eng.xml
Draft 2016/01/18