
User's Manual

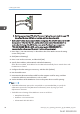
Table Of Contents
- TABLE OF CONTENTS
- 1. Getting Started
- Before You Start
- Manuals for This Machine
- Guide to Names and Functions of Components
- Using the Screen on the Control Panel
- Logging in to the Printer
- User Code Authentication Using the Control Panel
- User Code Authentication Using a Printer Driver
- Logging In Using the Control Panel
- Logging Out Using the Control Panel
- Logging In Using a Printer Driver
- Logging In Using Web Image Monitor
- Logging Out Using Web Image Monitor
- User Lockout Function
- Changing the Login Password
- Downloading Utility Software
- 2. Setting Up the Printer
- Printer Set Up Procedure
- Install Location
- Checking the Contents of the Box
- Unpacking
- Installing Options
- Connecting the Power Cord
- Turning On/Off the Power
- Selecting the Display Language
- Connecting the Printer
- Configuration
- Test Printing
- 3. Loading Paper

CQS704
3. Both the upper and lower LEDs of the Ethernet port light up. Be sure to check the upper LED
turns off and the lower LED lights up in yellow, and then release the switch.
• Confirm the IP address of your computer before starting setup. The default IP address for the USB
device server is "192.168.100.100", and the default subnet mask is "255.255.255.0". To
perform the initial setup of the USB device server, set the IP address for your computer to
"192.168.100.XXX" (XXX: 0 to 255), and the subnet mask to "255.255.255.0". It is
recommended to make a note of the current IP address before changing it.
1. Enter "http://192.168.100.100/" in the address bar of the Web to access the setting
screen of the printer.
2. Click [Network Settings].
3. Enter "root" as the user name, and then click [OK].
4. Specify the IP address, Subnet Mask, and Default Gateway.
When DHCP is enabled, the IP address can be obtained automatically from a network device with
the DHCP server function.
5. Configure the other settings as necessary, and then click [Submit].
6. Exit the web browser.
7. Disconnect the Ethernet interface cable from the computer used for setup, and then
connect the cable to a network device, such as a hub.
8. Set the IP address of the USB device server in the printer driver used for printing.
• The default administrator password is not specified. It is recommended that you specify the
administrator password on the [Maintenance Information] screen by using up to seven
alphanumeric characters.
• The default network settings of the USB device server are as follows:
• DHCP/BOOTP: Disable
• IP Address: 192.168.100.100
• Subnet Mask: 255.255.255.0
2. Setting Up the Printer
98 midas-p3_com_operating_instructions_gb_00198499_eng.xml
Draft 2016/01/18