Connecting to a Personal Computer Operation Manual RICOH CO., LTD. 3-2-3, Shin-yokohama Kohoku-ku, Yokohama-shi 222-8530, Japan L2172553 Connecting to a Personal Computer Operation Manual To ensure correct use of your camera, read this manual carefully before use. Keep the manual handy for future use.
Introduction Ricoh Service Offices Thank you for purchasing a Ricoh RDC-i500. This manual explains the correct handling procedures and precautions for your camera. To ensure the best performance, please read the manual thoroughly before using the camera. Keep the manual handy for quick future reference. Ricoh Co., Ltd. 3-2-3, Shin-yokohama Kohoku-ku, Yokohama-shi 222-8530, Japan http://www.ricoh.co.
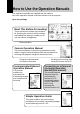
How to Use the Operation Manuals Five operation manuals are supplied with this camera. Use each operation manual as shown below to suit the purpose. Open the package ➜ Read This Before Proceeding! These instructions explain the procedure for checking the contents of the package and loading the battery to enable you to use the camera straightaway.
CONTENTS How to Use the Operation Manuals ...................................................... 1 Chapter 1 Getting Started Using a Personal Computer .................................................................. 8 What You Can Do Using a PC ............................................................... 8 PC Environment ................................................................................... 10 Connecting Methods ............................................................................
Chapter 3 Recording Images with the Camera Shooting Still Images .......................................................................... 44 Shooting ............................................................................................... 44 Checking the Image ............................................................................. 47 Saving the Image ................................................................................. 48 Shooting Text Files ......................................
Direct Upload Settings ........................................................................ 87 Displaying the Direct Upload Dial-Up Accounts .................................. 87 Selecting a Direct Upload Dial-Up Account ......................................... 88 Setting the Send-To Folder Name and Server .................................... 89 Quick Send Settings .......................................................................... 90 Displaying the Quick Send Dial-Up Accounts .................
Chapter 6 Using the Extension Functions Using the RDC-i Explorer Plug-In ..................................................... 130 Using the RDC-i Mounter .................................................................. 133 Making a Backup File of the Camera Settings ................................. 136 Making a Backup File ......................................................................... 136 Restoring the Backup Settings to the Camera ..................................
6
Chapter 1 Getting Started Using a Personal Computer ..... 8 What You Can Do Using a PC ....... 8 PC Environment ........................... 10 Connecting Methods .................... 12 Installing the USB Driver ........ 13 For Windows ................................ 13 For Macintosh .............................. 14 Installing the Application Software ................................... 15 For Windows ................................ 15 For Macintosh ..............................
Using a Personal Computer The range of available applications can be greatly increased by connecting the camera to a PC. What You Can Do Using a PC By connecting the camera to a PC, you can take advantage of the following functions. ■ Using the Camera Control Functions from the Browser By accessing the camera’s homepage from the PC Web browser, you can use the following functions.
See • To use the Image Capture Guide List Tool Kit, after installing the software and connecting the camera according to the instructions in the latter half of this chapter, refer to Chapter 5 “Using JOB Navi. Func. Image Capture Guide List”.
PC Environment To connect the camera to a PC, the PC must meet the following conditions. ■ For a PC running Windows • One of the following Windows programs must be installed. Microsoft Windows® 98 Microsoft Windows® 98 Second Edition Microsoft Windows® Me Microsoft Windows® 2000 • USB port: When you use the USB cable to connect the camera with a PC, the PC must be factory equipped with a USB port guaranteed by the PC manufacturer.
■ For Macintosh • If you use the USB cable to connect the camera to a Macintosh equipped with a standard USB port, a MacOS 8.6~9.1 operating system must be installed. • CPU: PowerPC • Memory: 96 MB or more • Hard disk space: 6 MB or more Note • To access the camera from the Web browser, Internet Explorer • • • 11 1 Getting Started • (version 5), Netscape Communicator (version 4.7) or other Web browser must be installed. To use the TWAIN function, application software compatible with TWAIN is required.
Connecting Methods The camera can be connected to the PC by one of the following methods. Decide which method you will use. (Connect the camera after the software has been installed.) ■ Connecting the Camera to the USB Port This method is for connecting the camera to the PC using the USB cable, supplied with the camera. USB cable supplied ■ Connecting the Camera to a Network You can connect the camera to an existing network (LAN by Ethernet, etc.) using the recommended LAN card.
Installing the USB Driver This section explains how to install the software for connecting the camera to the PC by USB cable. Follow these instructions only if connecting the camera to the PC by USB cable. Important Note 1 Getting Started • Do not connect the camera to the PC until the software has been installed, otherwise installation will not proceed smoothly. When you have established a connection, click [Cancel] on a plug & play window that appears and remove the USB cable.
Note • Updated information on installation is provided in the [Readme] file in the [Usb drvs] folders. If necessary, refer to this information. • When you connect/remove the USB cable or cancel installation before installing the USB driver, the cable may be recognized as an unknown device for a PC. Refer to page 166 “Troubleshooting” for troubleshooting. For Macintosh If you are using a Macintosh, install the USB driver as follows. A Turn the PC on.
Installing the Application Software This section explains how to install the various application software for using the camera. For Windows 1 Install the application software for Windows. Note • This procedure will install the following items: RDC-i Explorer Plug-In, RDC-i Direct upload, RDC-i virtual server process, RDC-i TWAIN Driver, RDC-i Signature transfer. Use the custom installation to install only the specified items.
■ Installing QuickTime Note • QuickTime is software for viewing a motion picture recorded with the camera. • If QuickTime 4 has already been installed on the PC, this procedure is not necessary. A Check that the PC is turned on. B Check that the CD-ROM supplied is inserted in the CD-ROM drive of the PC. C Double-click on [My Computer] and then double-click on the CDROM. Next, double click on the [QuickTime] folder. D Double-click on [QuickTime Installer].
D Double-click on [Setup]. The Image Capture Guide List Tool Kit installer will start up. Follow the instructions displayed on the screen. 1 Note • You can choose whichever kit (Excel or Word) you need. Getting Started For Macintosh This section explains how to install the application software for Macintosh. ■ Installing the RDC-i Mounter A Check that the PC is turned on. B Check that the CD-ROM supplied is inserted in the CD-ROM drive of the PC.
C Double-click on the CD-ROM, then double-click on [RDC-i TWAIN Inst]. Installation of the TWAIN driver will start. Follow the instructions displayed on the screen. ■ Installing QuickTime Note • QuickTime is a software required for viewing a motion picture file with a camera. • This procedure is not required if QuickTime 4 has already been installed on your Macintosh. A Check that the PC is turned on. B Check that the CD-ROM supplied is inserted in the CD-ROM drive of the PC.
■ Installing RDC-i Direct upload Note • RDC-i Direct upload is software for preparing and setting the PC that will receive direct upload from the camera. A Check that the PC is turned on. B Check that the provided CD-ROM is placed in the CD-ROM drive of the PC. D Double-click on the CD-ROM, then double-click on [RDC-i Direct Inst]. The installation of Direct upload will start. Follow the instructions displayed on the screen.
Connecting the Camera to a PC This section explains how to connect the camera to a PC. Connecting the Camera to the USB Port This method is for connecting the camera to the PC using the USB cable. Important Note • Make sure that the USB driver is installed before connecting to a USB port. • The flash lamp (red) on the camera blinks while data is being transmitted.
C Insert the connector on the other end of the cable into the USB port of the PC. D Turn the camera on. 1 USB connection is completed. Before disconnecting the USB cable, check that data transmission is not performed between a camera and a PC, turn off the camera and disconnect the USB cable.
■ For Macintosh You can connect the camera to a Macintosh using the USB cable supplied with the camera. A Open the terminal cover on the leftside of the camera. B Insert the smaller connector on one end of the USB cable supplied into the DIGITAL (USB) terminal of the camera. C Insert the connector on the other end of the cable into the USB port of the PC. D Turn the camera on. The PC will automatically detect the equipment which has been connected and operate accordingly.
Connecting the Camera to a Network You can connect the camera to an existing internal network or household network (LAN using Ethernet, etc.). Important Note ■ Requirements • LAN connection CF card suitable for the network to which the camera will be connected • Connection cable Important Note • If you use this method to connect the camera to a PC, the CF card slot will be used for the LAN connection CF card. You will therefore be unable to view images recorded on the CF card or send them to the PC.
■ Connecting Procedure A Check that the PC and the camera are turned off. B Insert the LAN connection CF card into the CF card slot of the camera. C Insert the connection cable into the LAN connection CF card. D Insert the connector on the other end of the connection cable into the connector of the LAN cable. E Insert the connector on the other end of the LAN cable into the free terminal of the LAN hub. Connection of the camera to the LAN is now completed.
Making the Camera Settings COM Port Settings for Windows 98/ME The USB driver for Windows treats the camera as equipment that uses the COM port virtually. For Windows 98/Me, if the COM port conflicts with other equipment, the camera may fail to be detected even when the driver has been correctly installed. In this case, change the COM port used by the following procedure. A Connect the camera to the PC using the USB cable and turn the camera on. B Start the device manager.
26
Chapter 2 Viewing Images on a PC Controlling the Camera from the Browser ............................. 28 Preparing the Camera .................. 28 Opening the Camera’s Homepage on the Browser ............................. 28 Displaying Thumbnail Images ...................................... 31 Viewing Thumbnail Images .......... 31 Displaying File Properties ............ 33 Checking the Data ........................ 34 Saving Data in the PC ..................
Controlling the Camera from the Browser You can access the camera’s homepage from the PC using the Web browser and view data recorded in the camera or make various camera settings. This section explains how to access the homepage. Preparing the Camera To perform an operation when the camera is connected to a PC, set the mode ] (PC). dial to [ A Check that the camera and PC are properly connected. See • P.20 “Connecting the Camera to a PC” B Check that the camera and the PC are turned on.
A Start up the browser on the PC. B Check that the [IP address] is displayed on the camera’s LCD monitor. The address is displayed in the form of [xxx.xxx.xxx.xxx] (figures separated by dots). C Enter [http://] in the [Address] area at the top of the PC screen, then enter the figures of the IP address in step B. For example, if the IP address is [127.0.0.1], enter the address as follows. 2 Viewing Images on a PC If the IP address is [192.168.181.240], enter the address as follows.
D Press the [Enter] key (or [Return] key). The following screen will be displayed. This is the camera’s homepage. By selecting functions from this screen, you can use the PC to view images stored in the camera and control the various camera functions. Tips Saving the Camera’s Homepage To view the camera’s homepage, you must input the number. By saving the homepage on the browser, you can open the page easily, simply by selecting the saved page.
Displaying Thumbnail Images This function enables you to view still images, motion pictures, voice memos, etc. recorded with the camera on the PC screen. Viewing Thumbnail Images You can display all the data recorded in the camera (still images, motion pictures, voice memos) in thumbnail form. There are two ways of displaying thumbnail images, normal [THUMBNAIL] and [FILE PROPERTY] which displays more detailed information.
D If you wish to change the storage memory, click on [IN] or [CF CARD]. If you wish to view images in another folder, click on the desired folder from the list of folders on the left of the screen. Select storage memory ([CF] is dimmed when the CF card is not available.) Folder list The title and the following symbols indicating file type are displayed under the data.
Displaying File Properties Perform the following procedure if you wish to check the detailed information relating to the data, for example, the shooting date or photographer. A Click on [FILE PROPERTY]. 2 Viewing Images on a PC The thumbnail will be displayed in the following form. Note • If you have registered a plug-in that is compatible with the voice memos or recorded memos in the browser, you can display and play back files by clicking on the file name of the voice memo on the screen.
Checking the Data This function is for displaying and playing back data such as still images, text files, motion pictures and voice memos in the thumbnail display. ■ Still Images Perform the following procedure if you wish to view a still image in its actual size (1 pixel of the image corresponds to 1 pixel of the screen). A Click on the image you wish to view. Click on the image in the same way for FILE PROPERTY. The image will be displayed in a new window in its actual size.
■ Data Other Than Still Images Perform the following procedure if you wish to display or play back data such as text files, motion pictures or voice memos. Important Note • The QuickTime plug-in software is needed to display and play back data other than normal still images (text, motion pictures, voice memos and non-compressed still images). A Click on the data icon you wish to check. Click on the icon in the same way for FILE PROPERTY.
Saving Data in the PC This function enables you to save data such as images, text files, motion pictures and voice memos as files in the PC hard disk, etc. Note • The [Save] function explained here is not a camera function, but a browser function. For further details, refer to the HELP function or operation manual for your browser. • Instructions for saving the non-compressed still images are given in “Data Other Than Still Images”(P.37).
Note • Still images can be saved in JPEG files. In the case of Windows, however, you can also save images in BMP format. (Change the file format by [File Type] in the dialog box.) ■ Data Other Than Still Images A [For Windows] Move the mouse pointer to the data (symbol) you wish to save and click the right mouse button. [For Macintosh] Move the mouse pointer to the data (symbol) you wish to save and click while pressing the [control] key. The menu will be displayed in the position of the mouse pointer.
Displaying Thumbnail Images with Capture Guide Titles This operation enables you to view images recorded according to an Image Capture Guide List (hereafter referred to as Guide List). Note • Instructions for creating the Guide List or shooting operation from the camera’s homepage, refer to chapter 5 “Using JOB Navi. Image Capture Guide List”. Viewing Thumbnail Images with Guide List You can display the images with Guide List recorded with the camera in thumbnail form.
2 Viewing Images on a PC D If you wish to change the storage memory, click on [IN] or [CF CARD]. If you wish to view images on a different Guide List, click on the desired list from the Guide List on the left of the screen. Select storage memory ([CF] is dimmed when the CF card is not available.) Guide Lists 20 images can be displayed on one page. If there are more than 20 images, you can change the display by clicking on [NEXT 20] or [PRE. 20].
Displaying File Properties If you wish to check detailed information relating to the images, such as the shooting date or photographer, perform the following procedure. A Click on [FILE PROPERTY]. A thumbnail display in the following form will be displayed.
Displaying an Image in its Actual Size If you wish to view an image in its actual size (1 pixel of the image corresponds to 1 pixel of the screen), perform the following procedure. A Click on the image you wish to view. Click on the image in the same way for FILE PROPERTY. 2 B When you have finished viewing, click on the close box. The window will be closed. 41 Viewing Images on a PC The image will be displayed in its actual size in a new window.
Saving Data in the PC This function enables you to save images displayed in thumbnail form as image files on the PC hard disk, etc. Note • The functions explained here are browser functions and not camera functions. For further details, refer to the HELP function or operation manual for your browser. • Instructions for saving non-compressed files are given in “Data Other Than Still Images” (P.37).
Chapter 3 Recording Images with the Camera Shooting Still Images .............. 44 Shooting ....................................... 44 Checking the Image ..................... 47 Saving the Image ......................... 48 Shooting Text Files ................. 49 Shooting ....................................... 49 Saving the Image ......................... 52 Recording Motion Pictures .... 53 Recording ..................................... 53 Saving the Motion Picture ............
Shooting Still Images You can shoot still images by operation from the PC. Shooting This function enables you to control the camera using the Web browser and shoot still images. A Check that the camera is properly connected to the PC, that the camera and the PC are turned on, and that the camera’s mode dial is set to [ ]. B Start the browser on the PC, input the IP address and display the camera’s homepage. See • P.28 “Opening the Camera’s Homepage on the Browser” C Click on [RECORDING].
D Check that [STILL PICTURE] has been selected on the left of the screen. If it has not been selected, click on [STILLPICTURE]. 3 If necessary, set the various items relating to shooting from the screen. For details of each item, refer to Chapter 3 “Shooting” in the ‘Camera’ operation manual. To return the settings to the status prior to shooting, click on [PRE. SETTING]. Note • The procedure for checking or saving a non-compressed still image vary. Refer to page 49 “Shooting Text Files”.
H Click on [START REC.]. Shooting is performed after approximately 10 seconds and the image is displayed in a reduced state with information such as the shooting date, etc. (A short time is required to transmit the image.) If you wish to check the image in its actual size, proceed to the next page. To save the image in the PC (on the hard disk, etc.), proceed to “Saving the Image” (P.48). (At this point, the image is only saved in the camera and not in the PC.
Checking the Image This function is for viewing the image just recorded in actual size (1 pixel of the image corresponds to 1 pixel of the screen). A Click on the reduced image. 3 Recording Images with the Camera The image will be displayed in its actual size in a new window. You can save the image in the PC from this screen. See next page. B When you have finished checking the image, click on the close box. The window will be closed.
Saving the Image This operation is for saving the image displayed on the screen on the PC disk (hard disk, etc.). When saving the non-compressed still images, follow the procedure explained on page 52, ‘Shooting Text Files/Saving the Image’. A If the image is displayed in reduced size, click on the image you want to save and display it in its actual size. B [For Windows] Move the mouse pointer to the image and click the right mouse button.
Shooting Text Files This function enables you to shoot text files by operation from the PC. Shooting You can control the camera using the Web browser and shoot text files. A Check that the camera is properly connected to the PC, that the camera and the PC are turned on, and that the camera’s mode dial is set on [ ]. B Start the browser on the PC, input the IP address and display the camera’s homepage. See • P.
D Click on [TEXT MODE] at the left of the screen. E Set each item. If necessary, set the various items relating to shooting on the screen. For details of each item, refer to Chapter 3 “Shooting” of the ‘Camera’ operation manual. Click on [PRE. SETTING] to return to the settings made on the camera. F Click on [NEXT]. The screen for checking the settings will be displayed.
H Click on [START REC.]. 3 Recording is performed after approximately 10 seconds and the following screen is displayed with information such as the shooting date, etc. Recording Images with the Camera Note • If the plug-in software for displaying TIFF image files has been installed in your browser, you can check the image in its actual size by clicking on the mark. To save the image in the PC (hard disk, etc.), proceed to the next page.
Saving the Image This operation enables you to save the image just recorded on the PC disk (hard disk, etc.). A [For Windows] Move the mouse pointer to the mark and click the right mouse button. [For Macintosh] Move the mouse pointer to the mark and click while pressing the [control] key. The menu will be displayed in the position of the mouse pointer. B Click on [Save Target As...]. If you are using Netscape Communicator, click on [Save Link As...].
Recording Motion Pictures This function enables you to record motion pictures by operation from the PC. Recording You can control the camera using the Web browser and record motion pictures. A Check that the camera is properly connected to the PC, that the camera and the PC are turned on, and that the camera’s mode dial is set on [ ]. B Start the browser on the PC side, input the IP address and display the camera’s homepage. See • P.
D Click on [MOTION PICTURE] at the left of the screen. E Set each item. If necessary, set the various items relating to recording on the screen. For details of each item, refer to Chapter 3 “Shooting” in the ‘Camera’ operation manual. Click on [PRE. SETTING] to return to the settings made on the camera. Note • Changing the [ZOOM] setting during recording is not effective for motion pictures. • Up to 90 seconds of recording can be made. F Click on [NEXT].
H Click on [START REC.]. 3 Recording Images with the Camera Recording will start after approximately 10 seconds and the [NOW RECORDING...] message will be displayed on the screen. When the preset recording time has passed, the following screen will be displayed. Note • When the QuickTime plug-in software is installed in your Web browser, you can play the motion picture by clicking on it. To save a motion picture in the PC (on the hard disk, etc.), proceed to the next page.
Saving the Motion Picture This operation enables you to save the motion picture just recorded on the PC disk (on the hard disk, etc.). A [For Windows] Move the mouse pointer to the image displayed and click the right mouse button. [For Macintosh] Move the mouse pointer to the image displayed and click while pressing the [control] key. The menu will be displayed in the position of the mouse pointer. B Click on [Save Target As...]. If you are using Netscape Communicator, click on [Save Link As...].
Recording a Voice Memo This function enables you to record a voice memo by operation from the PC. Recording You can control the camera using the Web browser and record a voice memo. A Check that the camera is properly connected to the PC, that the camera and the PC are turned on, and that the camera’s mode dial is set to [ ]. B Start the browser by the PC, input the IP address and display the camera’s homepage. See • P.
D Click on [SOUND] at the left of the screen. E Set each item. If necessary, set the various items relating to recording on the screen. For details of each item, refer to Chapter 3 “Shooting” in the ‘Camera’ operation manual. Click on [PRE. SETTING] to return to the settings mode on the camera. Note • Up to 90 seconds of recording can be made. F Click on [NEXT]. The screen for checking the settings will be displayed.
H Click on [START REC.]. 3 Recording Images with the Camera Recording will start after approximately 10 seconds and the [NOW RECORDING...] message will be displayed on the screen. When the preset recording time has elapsed, the following screen will be displayed. Note • If the plug-in software for playing back WAV format voice memo files has been installed in your browser, you can check the recorded sound file by clicking on the microphone mark.
Saving the Voice Memo File This operation enables you to save the voice memo file just recorded in the PC’s disk (hard disk, etc.). A [For Windows] Move the mouse pointer to the area where the microphone symbol is displayed and click the right mouse button. [For Macintosh] Move the mouse pointer to the area where the microphone symbol is displayed and click while pressing the [control] key. The menu will be displayed in the position of the mouse pointer. B Click on [Save Target As...].
Chapter 4 Changing the Camera Settings Address Book Settings ........... 62 Deleting a Dial-Up Account .......... 86 Displaying the Address Book ....... 62 Entering a New Address .............. 63 Editing an Address ....................... 64 Deleting an Address ..................... 65 Saving the Address Book in the PC ................................................ 65 Transferring the Address Book Stored in the PC to the Camera ... 66 Direct Upload Settings ............
Address Book Settings This section explains how to check and edit the Address Book stored in the camera by using a PC. Note • For instructions on how to use the Address Book, refer to the ‘Communication/Internet’ operation manual. Displaying the Address Book This function enables you to display the Address Book stored in the camera (internal memory). Various editing operations can be performed from this screen.
Entering a New Address This function enables you to enter a new address to the Address Book. A Display the Address Book. See • P.62 “Displaying the Address Book” B Click on [NEW ADDRESS]. The screen for setting a new address will be displayed. C Move the mouse pointer to the input item and click on the area. Input the information using the keyboard. 4 The new address will be added. 63 Changing the Camera Settings D When you have finished entering the information, click on [SAVE].
Editing an Address This function enables you to edit the address information (name, e-mail address, telephone number, etc.). A Display the Address Book. See • P.62 “Displaying the Address Book” B Click on the name of the person whose information you wish to edit. The editing screen will be displayed. C Move the mouse pointer to the item to be edited and click on the area. Edit the information using the keyboard. D When you have finished editing, click on [UPDATE]. 64 Editing is now completed.
Deleting an Address This function enables you to delete unwanted addresses from the Address Book. A Display the Address Book. See • P.62 “Displaying the Address Book” B Click on [DELETE] on the address you wish to delete . 4 Saving the Address Book in the PC This function enables you to save the Address Book (all the entries) as a file in the PC (on the hard disk, etc.). Note • This function can be used in the following cases.
B Click on [BACKUP]. The dialog box for specifying the location and file name will be displayed. C Specify the location and file name, and then click on [SAVE]. The Address Book will be saved in the PC. Note • In the case of Windows, the file name extension [.inf] will automatically be added to the end of the file name. Transferring the Address Book Stored in the PC to the Camera This function enables you to download an Address Book file stored on the PC hard disk, etc., and send it to the camera.
C Specify the location of the file to be downloaded, select the file and click on [Open]. The selected file name will be displayed. D Click on [Transfer]. 4 Changing the Camera Settings The selected address book will be sent to the camera.
User Information Settings The owner’s personal information, including name, phone number, and company name, can be registered. The registered information is used both in shooting pictures in signature imprint mode, and in viewing recorded images on the PC screen. A Check that the camera is properly connected to the PC, that the camera and the PC are turned on, and that the camera’s mode dial is set to [ ]. B Start up the browser by the PC, input the IP address and display the camera’s homepage. See • P.
E Set each item using the mouse and keyboard. Note • If you have not yet clicked on [SAVE], you can return to the status prior to setting (the status immediately after this screen was displayed) by clicking on [PRE. SETTING]. 4 F When you have finished making the settings, click on [SAVE]. Changing the Camera Settings Setting of the user information is now completed.
Modem Settings This section explains how to set the modem loaded in the CF card slot of the camera (or connected to the camera). Note • For details of the modem settings, refer to ‘Checking the Modem Settings’ in the ‘Communication/Internet’ operation manual. A Check that the camera is properly connected to the PC, that the camera and the PC are turned on, and that the camera’s mode dial is set to [ ]. B Start up the browser by the PC, input the IP address and display the camera’s homepage. See • P.
E Set each item using the mouse and keyboard. Note • If you have not yet clicked on [UPDATE], you can return to the status prior to setting (the status immediately after this screen was displayed) by clicking on [PRE. SETTING]. F When you have finished making the settings, click on [UPDATE]. 4 Changing the Camera Settings Setting of the modem is now completed.
E-Mail Settings This section explains how to make the settings related to the camera’s e-mail functions on a PC. Note • For details of the e-mail settings, refer to “Setting the E-Mail Function” in the ‘Communication/Internet’ operation manual. A Check that the camera is properly connected to the PC, that the camera and the PC are turned on, and that the camera’s mode dial is set to [ ]. B Start up the browser by the PC, input the IP address and display the camera’s homepage. See • P.
E Click the radio button for the e-mail dial-up account. Important Note • Select [DIAL-UP] to display the list of dial-up account. Make sure to set up the dial-up account. Note • If you have not yet clicked on [UPDATE], you can return to the status prior to setting (the status immediately after this screen was displayed) by clicking on [PRE. SETTING]. F Click on [UPDATE]. G Click on [MAIL]. 4 Changing the Camera Settings H Set each item using the mouse and keyboard.
Preset Memo Settings This section explains how to set the preset memos which are useful for character input such as e-mail etc. Note • For details of how to use the preset memos, refer to “Setting a Preset Memo” in the ‘Communication/Internet’ operation manual. Displaying the Preset Memos This function enables you to display the list of preset memos stored in the camera (internal memory). Operations such as editing, deleting and adding a preset memo start from this screen.
The list of preset memo will be displayed. Creating a New Preset Memo This function enables you to create a new preset memo. A Display the list of preset memos. See 4 • P.74 “Displaying the Preset Memos” Changing the Camera Settings B Click on [CREATE NEW PRESET MEMO]. The screen for creating a new preset memo will be displayed. C Input the preset memo using the keyboard.
D When you have finished entering the preset memo, click on [SAVE]. The new preset memo will be added. Editing a Preset Memo This function enables you to edit a preset memo. A Display the list of preset memos. See • P.74 “Displaying the Preset Memos” B Click on the preset memo you wish to edit. The screen for editing a preset memo will be displayed.
C Edit the preset memo using the keyboard. D When you have finished editing, click on [UPDATE]. 4 The screen will return to the list of preset memos. Changing the Camera Settings Deleting a Preset Memo This function enables you to delete unwanted preset memos. A Display the list of preset memos. See • P.74 “Displaying the Preset Memos” B Click on [DELETE] on the preset memo you wish to delete. The confirmation screen will be displayed. Click on [OK] to erase the preset memo.
Setting Signatures This chapter explains how to set the signatures by using a computer. Note • For details of how to use the signatures, refer to “Shooting with Signature” in the ‘Camera’ operation manual. Displaying the List of the Signatures This function enables you to display the list of the signatures stored in the camera (internal memory). Operations such as editing, deleting and adding a signature start from this screen.
Selecting the Signature to be Used This function enables you to select the signature from the list of the signatures. A Display the list of the signature. See 4 • P.78 “Displaying the List of the Signatures” Note • If you have not yet clicked on [UPDATE], you can return to the status prior to setting (this status immediately after this screen was displayed) by clicking on [PRE. SETTING]. C Click on [UPDATE]. 79 Changing the Camera Settings B Click the radio button for the signature to be used.
Adding New Signatures This fuction enables you to add new signatures. A Display the list of signatures. See • P.78 “Displaying the List of the Signatures” B Click on [CREATE NEW SIGNATURE]. A screen for setting new signature will be displayed. C Input signature from the keyboard. D When you have finished entering the signature, click on [SAVE]. This will add a new signature.
Editing a Signature This function enables you to edit a signature. A Display the list of signatures. See • P.78 “Displaying the List of the Signatures” B Click on signature you wish to edit. 4 The screen for editing a signature will be displayed. Changing the Camera Settings C Modify the signature using the keyboard. D When you have finished editing, click on [UPDATE]. This will revert to the screen of the list of signatures.
Deleting a Signature This function enables you to delete unwanted signatures. A Display the list of signatures. See • P. 78 “Displaying the List of the Signatures” B Click on [DELETE] for the signature you wish to delete. The confirmation screen will appear. If you click on [OK], the signature will be deleted.
Dial-Up Account Settings This section explains how to set the dial-up accounts to be used when sending and receiving e-mail. Note • For details of how to use the dial-up accounts and the various settings to make, refer to “Setting a Dial-Up Account” in the ‘Communication/ Internet’ operation manual. Displaying the Dial-Up Accounts This function enables you to display the dial-up accounts set in the camera. Operations such as editing, deleting and adding a dial-up account start from this screen.
The list of dial-up accounts will be displayed. Entering a New Dial-Up Account This function enables you to enter a new dial-up account. A Display the list of dial-up accounts. See • P.83 “Displaying the Dial-Up Accounts” B Click on [NEW DIAL-UP]. The screen for setting a new dial-up account will be displayed. C Make the settings relating to the dial-up account using the mouse and keyboard.
D When you have finished making the settings, click on [SAVE]. The new dial-up account will be added. Editing a Dial-Up Account This function enables you to edit the settings related to a dial-up account. A Display the list of dial-up accounts. See • P.83 “Displaying the Dial-Up Accounts” B Click on the dial-up account you wish to edit. 4 Changing the Camera Settings The setup screen relating to the dial-up accounts will be displayed. C Edit the settings using the mouse and keyboard.
D When you have finished editing the settings, click on [UPDATE]. Editing of the dial-up account is now completed. Deleting a Dial-Up Account This function enables you to delete unwanted dial-up accounts. A Display the list of dial-up accounts. See • P.83 “Displaying the Dial-Up Accounts” B Click on [DELETE] on the dial-up account you wish to delete. The confirmation screen will be displayed. Click on [OK] to erase the dial-up account.
Direct Upload Settings This section explains how to set the folder and server for the dial-up account and send-to account for direct upload. Note • For details of how to use the direct upload, refer to “Sending an Image Directly to a Computer” in the ‘Communication/Internet’ operation manual. • For details of the settings, refer to “Setting Direct Upload” in the ‘Communication/Internet’ operation manual.
The list of dial-up account for direct upload will be displayed. Selecting a Direct Upload Dial-Up Account This function enables you to select a dial-up account to be used in actual direct upload. Note • The only procedure performed here is selection of the dial-up account to be used from the list. Settings (telephone number, IP address, etc.) related to each dial-up account are made in Dial-Up Account Settings (P.83). A Display the list of dial-up accounts for direct upload. See • P.
Setting the Send-To Folder Name and Server This function enables you to set the folder name and server for direct upload. A Display the list of dial-up accounts for Direct Upload. See • P.87 “Displaying the Direct Upload Dial-Up Accounts” B Click on [DESTI.]. The screen for setting the upload folder name and server will be displayed. C Edit the setting using the mouse and keyboard. 4 prior to setting (the status immediately after this screen was displayed) by clicking on [PRE. SETTING].
Quick Send Settings This section explains how to set the dial-up account and send-to account for Quick Send. Note • For details of how to use the Quick Send, refer to “Sending an Image using Quick Send” in the ‘Communication/Internet’ operation manual. • For details of the various settings, refer to “Setting Quick Send” in the ‘Communication/Internet’ operation manual.
The list of dial-up accounts for Quick Send will be displayed. Selecting a Quick Send Dial-Up Account This function enables you to select a dial-up account to be used for actual Quick Send. Note • The only operation performed here is selection of a dial-up account from the list. Settings related to each dial-up account (telephone number, etc.) are performed in “Dial-Up Account Settings” (P.83). 4 A Display the list of dial-up accounts for Quick Send. Changing the Camera Settings See • P.
Selecting a Quick Send Send-To Account This function enables you to set the send-to account for Quick Send. Note • The only operation performed here is selection of the name from the list. Settings related to each send-to account (name, e-mail address, etc.) are performed in “Address Book Settings” (P.62). A Display the list of dial-up accounts for Quick Send. See • P.87 “Displaying the Direct Upload Dial-Up Accounts” B Click on [SEND TO]. The screen for selecting a recipient will be displayed.
Selecting the Size of the Image to be Sent by Quick Send This function enables you to select the size of the image to be send by Quick Send. A Display the list of dial-up accounts for Quick Send. See • P.87 “Displaying the Direct Upload Dial-Up Accounts” B Click on [IMAGE SIZE]. The screen for selecting the size of the image will be displayed. 4 C Use the mouse to change the setting. prior to setting (the status immediately after this screen was displayed) by clicking on [PRE. SETTING].
Setting FTP Upload This section explains how to set the dial-up account for FTP upload, the FTP server address as the upload destination, the user account name, password, etc. Note • For details of how to use FTP upload, refer to “Uploading an HTML File” in the ‘Communication/Internet’ operation manual. • For details of each setting, refer to “Setting FTP Upload” in the ‘Communication/Internet’ operation manual.
The list of dial-up account for FTP upload will be displayed. Selecting an FTP Upload Dial-Up Account This function enables you to select a dial-up account to be used in actual FTP upload. Note • The only operation performed here is selection of a dial-up account from the list. Settings related to each dial-up account (telephone number, etc.) are performed in “Dial-Up Account Settings” (P.83). A Display the list of dial-up accounts for FTP upload. See 4 • P.
Setting a Server for FTP Upload This function enables you to set the FTP server for FTP upload, the account and password for accessing the server, etc. A Display the list of dial-up accounts for FTP Upload. See • P.94 “Displaying the FTP Upload Dial-Up Accounts” B Click on [SEND TO]. The setup screen relating to the FTP server will be displayed. C Use the mouse and keyboard to edit the setting.
Making a Backup/Restoring the Camera Settings This section explains how to save all the information currently stored in the camera (all information other than recorded images and motion pictures, voice memo data, etc.) in the PC, and how to restore the backup information to the camera. Note • This function can be used in the following cases. • When you wish to save the camera settings in case of accident or misoperation.
D Specify the location and file name and then click on [Save]. The camera settings will be saved in the PC. Note • The file name extension [.bak] will be automatically attached at the end of the file name. Restoring the Backup Settings to the Camera This function enables you to restore the camera settings file saved on the PC disk to the camera. Important Note • If you restore the settings, all the settings currently in effect will be overwritten.
D Specify the location of the file to be restored and select a file, then click on [OPEN]. The selected file will be displayed on the screen. E Click on [RESTORE]. 4 Changing the Camera Settings The selected backup file will be transferred to the camera. F Turn the power off and turn it on again about 10 seconds later. The settings transferred to the camera will be effective.
100
Chapter 5 Using JOB Navi. Func. Image Capture Guide List JOB Navi. Func. Image Capture Guide List ................ 102 Setting the Image Capture Guide List on the Browser ... 114 Role of Guide List ....................... 102 Creating a Guide List ................. 102 Using the Guide List ................... 103 Displaying the Guide Lists .......... 114 Creating a New Guide List ......... 116 Editing the Guide List ................. 118 Deleting a Guide List ..................
JOB Navi. Func. Image Capture Guide List First of all, it is necessary to explain what a JOB Navi. Image Capture Guide List is. Role of Guide List The JOB Navi. Func. Image Capture Guide List (hereafter referred to as Guide List) function enables you to record images while checking the Guide List (a list of images to be recorded) prepared in advance to ensure no images are forgotten. For example, imagine that you have been given the job of “Going to a motor show and taking photos of several cars”.
■ How to Use the Guide List Tool Kit The Guide List Tool Kit installed in Chapter 1 is the software for creating a Guide List using Microsoft Excel and Microsoft Word. However, as the software runs on Windows, it cannot be used on a Macintosh. In the case of Excel, you should specify the range of cells for image names, write it out as a Guide List and save it in the Template folder for the CF card. All that remains then is to insert the card into the camera.
Using the Image Capture Guide List on Excel This section explains the series of operations involved in creating an Image Capture Guide List (hereafter referred to as Guide List) based on an Excel table and transferring it to the camera, recording images according to the list and incorporating the recorded images in a table. Important Note • The Guide List Tool Kit can only be used on PCs running Windows. It cannot be used on a Macintosh.
C Click on [Enable Macros]. The document will be displayed. Check that the following 4 buttons have been added to the toolbar. Additional Buttons (from left) [Create Image Capture Guide File] [Update Image Title] [Paste All Images] [Paste Selected Images] D Click on [Create Image Capture Guide File]. The window for specifying the scope of the image titles will be displayed. E Select the scope of the image titles in the Guide List (C13~C22 in this sample) and click on [OK].
Recording Images Using the Guide List This function enables you to record images according to the Guide List transferred to the camera. Note • You cannot change the storage memory when the image menu is displayed. • For information on the display when you shoot using the Image Capture Guide List, see “Image Capture Guide List Display” (P.128). A Insert the card saving the Guide List to the camera.
I Press the shutter release button to record the image. After recording the image, the screen will return to the image select screen. The number of recordings will be displayed on the right of the image title for images where recording is finished. (Several recordings can be made of one image title.) J Repeat steps H and I until all the images have been recorded. K When all the images have been recorded, press the CANCEL button.
G Select the [xxxrlist] folder. When you record images using the Guide List, a [(no.) rlist] folder is created for each series of recordings (for example, [101rlist], [102rlist]). The folder with the highest number is the newest folder. Select the newest folder. H Select the Guide List and then click on [OK]. The window for specifying the position for pasting the image will be displayed. I Select the first cell in which a camera image will be pasted (E13 in this sample) and click on [OK].
■ Other Functions The [Update image title] and [Paste Selected Images] functions are used as follows. ● Update image title After the Guide List created on Excel has been sent to the camera, if the image list is changed (changing the order of the titles) by camera operation (operating the camera independently), the image list in the PC and the image list in the camera will no longer match.
Using the Image Capture Guide List on Word This section explains the series of operations, using sample templates, for creating an Image Capture Guide List (hereafter referred to as Guide List) based on Word, transferring it to the camera, recording images according to the list and incorporating the recorded images in a document. Important Note • The Guide List Tool Kit can only be used on PCs running Windows. It cannot be used on a Macintosh.
C Click on [Enable Macros]. The document will be displayed. Check that the following 3 buttons have been added to the tool bar. Additional Buttons (from left) [Create Image Capture Guide File] [Paste All Images At Once] [Paste Selected Images] D Click on the [Create Image Capture Guide File] button. The dialog box for specifying the location of the Guide List file, the Guide List title and Guide List file name will be displayed.
Recording Images Using the Guide List This operation is the same as in “Recording Images Using the Guide List” for Excel (P.106). When you have finished recording images, connect the camera and the PC once more. Pasting the Recorded Images into a Document This function enables you to paste images recorded with the camera into a Microsoft Word document. A Insert the card with which you have finished recording. B Start up Microsoft Word and open [Sample1.dot]. C Click on [Enable Macros].
H Select a Guide List and click [OK]. An image is pasted into each layout frame in the document . Note • If several images are recorded for 1 frame, the window for selecting an image will be displayed. Follow the instructions and select an image. ■ Other Functions The [Paste Selected Images] function is for pasting only the specified image in the list from the specified folder in the PC. A Use the mouse to select the layout frame in which you wish to paste an image.
Setting the Image Capture Guide List on the Browser This section explains how to create an Image Capture Guide List (hereafter referred to as Guide List) on the browser, and how to transfer a Guide List saved as a file to the camera. Note • Instructions on how to record images using the Guide List are given in “Recording Images Using the Guide List” (P.106). Displaying the Guide Lists This function enables you to display the JOB Navi. Image Capture Guide Lists in the camera media.
D Check that [GUIDE LIST] on the left of the screen has been selected. If [HTML TEMPLATE] has been selected, click on [GUIDE LIST]. E If you wish to change the storage memory, click on [IN] or [CF CARD]. The Guide Lists recorded in the selected storage memory will be displayed. 5 The [Guide List] for images already recorded can also be displayed in addition to the [Guide List Setup File] in the [TEMPLATE] folder.
Creating a New Guide List This function enables you to create a new Guide List. A Display the Guide Lists and select the storage memory in which you wish to add a new Guide List. The Guide Lists currently stored in that particular storage memory will be displayed. See • P.114 “Displaying the Guide Lists” B Click on [NEW LIST]. The screen for setting images in a new Guide List will be displayed.
D Move the mouse pointer to the [IMAGE TITLE] area, click on the area and add the list of images in the new Guide List using the keyboard. One line is for one image title. If you input characters in the first line of [IMAGE TITLE], that becomes the first image title. If you press the [Enter] key or [return] key to change the line and input different characters, that becomes the title of the second image. This operation enables you to add images as necessary. The image titles must be within 12 characters.
Editing the Guide List This function enables you to edit the images (image titles and number of images) in the Guide List. A Display the Guide List containing the list you wish to edit. See • P.114 “Displaying the Guide Lists” B Click on the title of the list you wish to edit. The titles of the images that have been set in the list will be displayed. The following editing operations can be performed from this screen.
■ Adding an Image A Click on [ADD IMAGE TITLE] on the image title screen. The screen for editing the image titles will be displayed. Use one line for one image title. 119 5 Using JOB Navi. Func. Image Capture Guide List B Move the mouse pointer to the [NEW IMAGE TITLE] area, click on the area and add the image title using the keyboard.
C When you have finished adding image titles, click on [SAVE]. The screen will return to the image title screen. If you then click on [OK], the screen will return to the screen showing the Guide Lists. ■ Editing an Image Title A Click on the image title that you wish to edit on the image title screen. The screen for editing the image titles will be displayed. B Edit the image title displayed using the keyboard.
C When you have finished editing, click on [UPDATE]. The screen will return to the image title screen. If you then click on [CANCEL], the screen will return to the screen showing the Guide Lists. ■ Deleting an Image Title Important Note • DELETE will automatically delete the image recorded under that title as well. The confirmation screen will be displayed. The image title will be displayed when you click on [OK]. 121 Using JOB Navi. Func.
Deleting a Guide List This function enables you to delete a Guide List. A Display the Guide List containing the list you wish to delete. See • P.114 “Displaying the Guide Lists” B Click on [DELETE] for the list you wish to delete. The confirmation screen will be displayed. The list will be delete when you click on [OK].
Saving the Guide List on the PC This function enables you to save the Guide List on the hard disk, etc. of the PC. Note • Use this function in the following cases: • When you want to make a backup file of important Guide Lists. • When you want joint possession of the same Guide List, like the templates (in this case, save the Guide List first, then connect another camera and send the saved Guide List to this camera). A Display the Guide List containing the list you want to save. See • P.
Transferring the Guide List Saved in the PC to the Camera This function enables you to download the Guide List file saved on the PC hard disk, etc., and transfer it to the camera media. A Display the Guide Lists and select the media to which the list is to be sent. The Guide Lists currently in the media are displayed. See • P.114 “Displaying the Guide Lists” B Click on [Browse...]. The dialog box for selecting the Guide List file will be displayed.
D Click on [Transfer]. The selected Guide List will be transferred to the camera media. When the transfer is completed, the Guide Lists including this list will be displayed. 5 Using JOB Navi. Func.
Setting the Image Capture Guide List Independently on the Camera You can rearrange the image order and delete the Image Capture Guide List on the camera. Note • Instructions for recording images using the Guide List are given in “Recording Images Using the Guide List” (P.106). Rearranging the Image List You can rearrange the images of the Guide List stored in the camera storage memory. A Set the mode dial to [ B Press the the Guide List. ].
G Press the FUNCTION button again. Changing the order is complete. Deleting a Guide List A Set the mode dial to [ B Press the the Guide List. ]. button and select the storage memory containing C Press the J button. D Choose the desired Guide List you want to delete and press the buton. E When the confirmation message is displayed, press the shutter release button. 5 Using JOB Navi. Func. Image Capture Guide List Deleting the Guide List will be complete.
Tips Image Capture Guide List Display The following display is used when you shoot using the Image Capture Guide List. Use this Guide List prepared in advance to ensure no images are forgotten. A green mark (䡲) is displayed for the Guide List including more than one image A green rectangle (䡲) for the recorded images 128 Upper number (9 in this case) indicates that of the image to be recorded and lower number (1 in this case) indicates that of the recorded images.
Chapter 6 Using the Extension Functions Using the RDC-i Explorer Plug-In .................................... 130 Using the RDC-i Mounter ...... 133 Making a Backup File of the Camera Settings .................... 136 Making a Backup File ................. 136 Restoring the Backup Settings to the Camera ............................ 138 Using the TWAIN Function ... 140 For Windows .............................. 140 For Macintosh ............................
Using the RDC-i Explorer Plug-In If you have installed the RDC-i Explorer Plug-In on Windows, you can copy the camera data into the PC and make a backup file of the camera settings in the PC. Important Note • The flash lamp (red) blinks during transmission of data to the PC except when the camera is connected to a LAN. Do not disconnect the cable or turn off the camera during transmission as the camera or the PC may be affected.
D Click on [RDC-i Properties...]. The window for setting the camera’s IP address will be displayed. E Input the figures displayed on the camera’s LCD monitor (4 figures separated by “.”). F Click [OK]. The camera is now detected by the PC. When disconnecting the camera wiith a PC or turning off the camera, select [Disconnect] from the [RDC-i] menu.
Note • You can handle the camera’s storage memory in the window displayed by double clicking [My Computer]. Tips Using the Microsoft Power Point Presentation Data If you copy the presentation data created using Microsoft Power Point in the camera, you can do a presentation anytime anywhere. Save the presentation data created on Power Point in [JPEG FileInterchange Format].
Using the RDC-i Mounter By installing the RDC-i Mounter in Macintosh, you can copy data and make a backup file of the camera in a PC. Important Note • The flash lamp (red) blinks during transmission of data to the PC except when the camera is connected to a LAN. Do not disconnect the cable or turn off the camera during transmission as the camera or the PC may be affected. If the cable is disconnected during transmission, turn the camera and the PC off and then turn them on again.
D Select [TCP/IP] from [CONTROL PANEL] in the Apple menu, and set as below depending on the connection method. ● USB Connection • When your Macintosh is set to be connected to the Internet using PPP, select [RICOH RDC-i] for [Connect via]. • When your Macintosh is set to be connected to the Internet via the network, select [Ethernet] for [Connect via]. • When not using the cases above, select [RICOH RDC-i] for [Connect via]. ● LAN Connection Select [Ethernet] for [Connect via].
E In the case of LAN Connection, click on [IP Address] in the RDC-i Mounter control panel, and select [IP Address Setting]. Enter the IP address (dot-separated four numbers) on the LCD monitor of the camera, and click [OK]. F Click on [Mount] for the storage memory you wish to connect. The camera icon will be displayed on the desktop. Note • By designating the directory, you can change the folder mounted on the desktop.
Making a Backup File of the Camera Settings This section explains how to [SAVE SETTING DATA] to make a backup file of all the information currently set in the camera (all information other than recorded images and motion pictures, voice memo data, etc.), and how to [RESAVE SETTING DATA] to restore the backup information to the camera.
Note • In this section, the explanation uses the method of clicking the right button, but the function can also be selected from the Explorer [File] menu. ■ For Macintosh In the case of Macintosh, [Save Configuration File...] and [Restore Configuration File...] are performed using the [SETUP MENU] application. A Connect the camera correctly to the PC and set the camera’s mode dial to [ ]. Then turn the camera and the PC on. B Select [RDC-i Mounter] in [Control Panels] from the Apple menu.
Restoring the Backup Settings to the Camera This function enables you to restore the camera backup settings saved on a PC disk to the camera. Important Note • When this function is executed, all the other current camera settings are erased. ■ For Windows A Connect the camera correctly to the PC and set the camera’s mode dial to [ ]. Then turn the camera and the PC on. B Select [Windows Explorer] under [Programs] in the [Start] menu. Explorer will start up.
■ For Macintosh A Connect the camera correctly to the PC and set the camera’s mode dial to [ ]. Then turn the camera and the PC on. B Select [RDC-i Mounter] from [Control Panels] in the Apple menu. The RDC-i Mounter window will be displayed. C Click on [Set Prefs...]. Note • You can click on [Set Prefs...] if one of the storage memories has been mounted. If the storage memory has not been mounted, mount it first (P.133).
Using the TWAIN Function If you use the TWAIN function, you can download, display and edit images recorded in the camera directly from the application software. However, the TWAIN function can only be used on application software that is compatible with TWAIN. Note • In general, most graphic application software is compatible with TWAIN. • The non-compressed still images are saved in a specific TIFF file format.
Note • If you have connected several items of TWAIN-compatible equipment, it is necessary to select which TWAIN equipment you will use before performing the operation described on the previous page (the camera uses [RDC-i TWAIN]). Use the function titled [Select TWAIN_32 Source...] or similar. In most cases, this item is found next to [TWAIN_32...]. For further details, refer to the operation manual for the application software.
For Macintosh This section explains how to use the TWAIN function on a Macintosh. A Check that the camera is properly connected to the PC, that the camera is turned on and that the camera’s mode dial is set to [ ]. B Mount the storage media of the camera to which you want to download using the RDC-i Mounter. Instructions on how to mount the camera media, see “Using the RDC-i Mounter” (P.131). C Start up the application software compatible with TWAIN on the PC.
• Depending on the connection method and conditions, the screen for inputting the camera’s IP address may be displayed. In this case, input the IP address displayed on the camera’s LCD monitor. The following will be displayed. E Click on [Select Folder...]. The dialog box will be displayed to select a folder. F Click on [DESKTOP], select a camera’s storage memory, select the target folder and click on [Select]. The image list in the selected folder will be displayed.
144
7 Chapter Setting the Receiving PC for Direct Upload Setting the Receiving PC for Direct Upload ......................... 146 For Windows .............................. 146 For Macintosh ............................
Setting the Receiving PC for Direct Upload This section explains the preparations and settings to be made on the PC that will receive direct upload from the camera. Note • For details of how to use the direct upload function, refer to “Uploading Directly to a Computer” and “Using the Direct Upload Function” in the ‘Communication/Internet’ operation manual. For Windows This section gives a broad outline of the preparations to be performed on the receiving PC.
A Select [Control Panel] from the [Start] menu. The control panel window will be opened. B Double click on [Add/Remove Programs]. The [Add/Remove Programs Properties] window will be opened. C Click on the [Windows Setup] tab. The Windows file screen will be displayed. D Select [Communications] and click on [Details...]. The following screen will be displayed. E Tick [Dial-Up Server] and click on [OK]. Installation starts.
■ Preparing the Receiving PC When installation of the software is completed, perform the following operation to put the telephone in standby status. When a direct upload call comes from the camera, the telephone will automatically switch to receiving mode. A Double click on [My Computer] and then double click on [Dial-Up Networking]. B Select [Dial-Up Server...] from the [Connections] menu. The dial-up server setup screen will be displayed. C Select [Allow caller access]. D Click on [Change Password...
G Click on [Server Types]. The screen for setting the type of server will be displayed. H Select [PPP: Internet, Windows NT Server, Windows 98] from [Type of Dial-Up Server]. I Tick the [Enable software compression] and untick the [Require encrypted password]. J Click on [OK] to close the [Server Types] window. K Click on [OK] to close the [Dial-Up Server] window. L Select [Programs] → [RDC-i Direct Upload] from the [Start] menu. The following screen will be displayed.
M Set [Direct Upload root directory] and [Direct Upload Log file name]. Direct Upload root directory : Specify the folder to receive the incoming file. If you wish to specify a folder on the camera side, leave blank. Direct Upload Log file name : If you wish to make a log file (a record of connections and transmissions) for Direct Upload, input the file name here. No log file will be made if there is no entry. Note • Setting of the port number, user name and password is not required. N Click on [Start].
For Macintosh This section gives a broad outline of the preparations to be performed on the receiving Macintosh. For details of actual installation and setting, refer to the Macintosh and software HELP functions and the operation manual. Important Note • If you are using a MacOS version earlier than MacOS9 (e.g. 8.6), you will need to install ARA (Apple Remote Access).
■ File Sharing settings A Open the File Sharing control panel. B Double-click the [Start/Stop] tab. C Check [Owner Name] and [Owner Password]. These settings are used for the PPP account and PPP password in the camera. D Click on the [Users&Group] tab. E Select the same owner name you checked in step C and click [Open]. F Select [Remote Access] from [Show] popup menu and select [Remote Access]. G Check [Allow guests to dial in to this computer] and close the File Sharing control panel.
■ Using the RDC-i Direct Communication software A Start up [RDC-i Direct Upload]. [RDC-i Direct Upload] is installed in the root folder of the startup disk immediately after installation. B If you wish to make a direct upload log file (a record of connections and transmissions), set a folder and file name. The images transferred from the camera will be saved in the folder specified as the destination folder. If you do not need a log file, leave the log file name blank. C Click on [OK].
154
Appendix Camera Settings When Connected to a PC ................ 156 Setting the PC Connection Environment ............................... 156 Setting the Network Environment ............................... 158 Error Messages ..................... 160 Error Messages Displayed on the Web Browser .............................. 160 Other Error Messages ................ 163 Troubleshooting .................... 166 Restoring the Device Which Could not be Used anymore ......
Camera Settings When Connected to a PC When the camera is connected to a PC by a USB cable or by LAN, depending on the PC or network environment, the camera may not function properly unless the settings are changed. This section deals with how to change the camera settings. ■ Character Input Procedures for completing the entry prompt screen for PC connection environment and network environment require character input as explained below.
● IP Address: PC This is the IP address for the PC to which the camera is connected. The setting is in the form of [xxx.xxx.xxx.xxx] (each xxx being a figure from 0 to 255). The factory default setting is [192.168.187.183]. ● IP ADD: RDC-i500 This is the camera’s own IP address. The factory default setting is [192.168.187.184]. A Set the mode dial to [SET]. The Setup menu will be displayed. B Select [COMMUNICATION SETTINGS] button.
Setting the Network Environment If you have connected the camera to a network using a LAN connection CF card, set the host name and various other addresses in order to send and receive data between the camera and other LAN equipment or a network. The camera’s factory default settings are relatively common, so normally there is no need to change the settings. If transmission between the camera and the PC does not go smoothly, or if you wish to fix the camera’s IP address, change the settings.
A Set the mode dial to [SET]. The Setup menu will be displayed. B Select [COMMUNICATION SETTINGS] button. and press the The screen for setting the communication function will be displayed. C Select [NETWORK] and press the button. The screen for setting the PC connection will be displayed. D Set the various items. Appendix E When you have finished making the settings, press the ENTER button. Setting is completed and the screen returns to the Setup menu.
Error Messages In the case of misoperation or of failure due to some problem or other, an error message will be displayed. This section deals with the causes and remedies of problems. Note • This section explains the error messages displayed on the PC screen. For details of the error messages displayed on the camera monitor, refer to the ‘Camera’ operation manual and ‘Communication/Internet’ operation manual.
Error Message Card Error Memory full Recording file Error Cause and Remedy Specified card cannot be used as recording destination. Click on [Back] button. Storage memory (internal memory or CF card) is full and no further recording is possible. Click on [Back] button. Error has occurred in recorded image. Click on [Back] button, check connection and perform operation again. ■ Error Messages Displayed on JOB Navi.
■ Error Messages Displayed on Setup Screen Cause and Remedy [Transfer] button was clicked without specifying file name for [Browse...] . Invalid file selected for [Browse...]. Select file from File read Error address book. Upper limit of number of addresses in address book Cannot add Address has been reached. Delete unwanted addresses. anymore Cannot add preset memo Upper limit of number of templates has been reached. Delete unwanted templates.
■ Error Messages Displayed on Setting Backup/Restoring Screen Error Message Backup failed Input file parameter File read Error File restore Failed File saving Error Cause and Remedy Failed to create backup file due to lack of memory, etc. Close other applications and try again. Attempted to restore settings without specifying file name. Select file. Invalid file selected. Select correct backup file. Failed to restore backup file due to lack of memory, etc. Close other applications and try again.
Error Message This drive cannot be formatted. This drive is read-only. Illegal file name. No space in the drive. Already contents same file name. Too deep folder tree. Failed to delete. This file / folder cannot be transferred. This file name is used by Camera. Cannot move folder to Camera. Cause and Remedy Specified drive cannot be formatted. Restart camera and try again. Specified drive is write-prohibited. Cancel write protection. Incorrect file name specified when copying/moving. Specify correct file.
Error Message Failed to receive Socket Data. Failed to send Socket Data. Failed to create Socket. Cannot find necessary DLL. Cannot connect to Camera Cannot communicate with Camera Cannot read the file Set up Camera property No selected file. Select a Signature file. Fail to transfer Signature file. Reconfirm connection and retransfer. Cause and Remedy Camera not correctly connected or set. Check camera connection and settings. Camera not correctly connected or set. Check camera connection and settings.
Troubleshooting When setting of the USB driver can not be correctly recognized, please make the following operations. Restoring the Device Which Could not be Used anymore This section explains the remedy when your camera is recognized as an unknown device by a PC because you remove ad replace the USB cable before installing the USB driver or canceling the USB driver installation on the way. A Connect the camera to the PC using the USB cable and turn the camera on. B Start the device manager.
Selecting “Never dial a connection” When you are trying to access the camera’s homepage with the dial-up connection configuration on a PC, the screen for selecting [Work offline] or [Retry] may be displayed. Select [Retry] to view the camera’s homepage. However, your PC will begin dial-up procedure automatically when “Always dial my default connection” is selected on the Internet Properties dialog window of the Internet Explorer. To prevent this, turn the automatic dialing off with the following procedure.
Checking the Proxy Server When you can not connect to the camera by controlling the browser, please make the following procedures to check the proxy server settings. For Internet Explorer (Version 5.x) A Right-click on the [Internet Explorer] icon on the desktop and then click on [Properties]. B Click on the [Connections] tab. C Click on the [LAN Settings...]. D Click on the checkbox for [Use a proxy server] under [Proxy Server] if it is checked.
Installing the Dial-Up Adapter When the dial-up adapter has not been displayed in the Network Component dialog, install the dial-up adapter in the following procedure. A Right-click on the [Network Neighborhood] icon on the desktop and then click on [Properties]. B Click on the [Confguration] tab and then click [ADD]. The [Select Network Component Type] window will be displayed. C Select [Adapter] and click on [Add...].
Checking the Dial-Up Settings When the dial-up server does not work despite appropriate settings of receiving end for Direct Upload, check the following setting. For Internet Explorer (Version 5.x) A Right-click on the [Internet Explorer] icon on the desktop and then click on [Properties]. B Click on the [Connections] tab. C Click on the radio button for [Never dial a connection] under [Dialup settings].
MEMO Appendix 171
Index Functional Index SET Mode (Setup) ◆ CAMERA SETTINGS ... KEEP SETTINGS ....... ... LCD CONFIRM. ......... ... AUTO POWER OFF ... ... BEEP SOUND ............ ... POWER SAVE ........... Camera .................................. P.108 Camera .................................. P.109 Camera .................................. P.110 Camera .................................. P.111 Camera .................................. P.112 ... DATE SETTINGS ....... ... LANGUAGE ............... ... VIDEO OUT MODE .... .
... FTP UPLOAD ............. ... QUICK SEND ............. ... NETWORK ................. ... PC CONNECTION ..... ... MODEM SETTING ..... Communication/Internet ......... P.51 Communication/Internet ......... P.44 Connecting to a Psersonal Computer ..... P.158 Connecting to a Psersonal Computer ..... P.156 Communication/Internet ......... P.60 ◆ FORMAT ................................................... Camera .................................. P.35 Recording Mode ◆ MENU Button ... CONT. MODE ............
Play Mode ( ) ◆ MENU Button ... SEND ......................... ... QUICK SEND ............. ... COPY ......................... ... PROTECT .................. ... AUTO PLAYBACK ..... Communication/Internet ...... P.70, 73 Communication/Internet ...... P.68 Camera ............................... P.88 Camera ............................... P.92 Camera ............................... P.95 ... DPOF SETTING ......... Camera ............................... P.96 ... VOICE MEMO ............ Camera ..............
PC Mode ( ) Connecting to a Personal Computer Communication Mode ( ) ... E-MAIL ....................... Communication/Internet ........... P.83 ... DIRECT UPLOAD ...... Communication/Internet ........... P.
Alphabetical Index A Address Book Sending to a PC ............................ Address book Deleting ......................................... Displaying ..................................... Editing ........................................... Saving ........................................... Application software Installing For Macintosh .......................... For Windows ............................ E 66 65 62 64 65 17 15 B Backup file Address Book ................................
N Network environment ........................ 158 O Owner Information Setting ........................................... 68 U USB cable connection For Windows .................................. USB driver ..................................... 13, Installation for Macintosh .............. Installtion for Windows .................. 20 14 14 13 P PC connection environment .............. 156 Q Quick Send Displaying the dial-up account ..... 90 Selecting a dial-up account ..........
MEMO 178
Introduction Ricoh Service Offices Thank you for purchasing a Ricoh RDC-i500. This manual explains the correct handling procedures and precautions for your camera. To ensure the best performance, please read the manual thoroughly before using the camera. Keep the manual handy for quick future reference. Ricoh Co., Ltd. 3-2-3, Shin-yokohama Kohoku-ku, Yokohama-shi 222-8530, Japan http://www.ricoh.co.
Connecting to a Personal Computer Operation Manual RICOH CO., LTD. 3-2-3, Shin-yokohama Kohoku-ku, Yokohama-shi 222-8530, Japan L2172553 Connecting to a Personal Computer Operation Manual To ensure correct use of your camera, read this manual carefully before use. Keep the manual handy for future use.