
Installation guide


Sending a Scanned File to a Registered Shared Folder
147
6
Selecting a Shared Folder
You can select a single shared folder
as a destination to which you send a
scanned file. Follow the steps below
to select a shared folder.
A
AA
A
Press the {
{{
{1}
}}
} key.
Note
❒ You can skip this step when the
E-mail/Send File standby
screen is displayed.
❒ Enter your User Name and
password, if asked.
The E-mail/Send File standby
screen is displayed.
B
BB
B
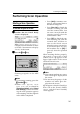
Press [SMB/FTP].
Note
❒ If “On” is selected for [Auto Up-
date Destination List] in [2.Send
Scan Settings] under the Scanner
Features menu on this machine,
the destination list is automati-
cally updated when you press
[Dest.]. See p.66 “Auto Update
Destination List” for details.
C
CC
C
Press the {
{{
{1
11
1}
}}
} or {
{{
{0
00
0}
}}
} key to high-
light [SMB], and then press [List].
The list of the shared folders that
are registered to this machine ap-
pears.
D
DD
D
Use [↓
↓↓
↓Next] and [↑
↑↑
↑Prev.] to scroll
through the pages, and display
the shared folder name you want
to select.
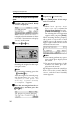
E
EE
E
Use the {
{{
{1
11
1 }
}}
} and {
{{
{0
00
0}
}}
} keys to
highlight the shared folder name
you want to select, and then press
[Select].
This selects the check box next to
the shared folder name.
Note
❒ Because you can select only one
shared folder, selecting another
folder automatically deselects
the folder currently selected (so
the check mark next to the fold-
er name is cleared).
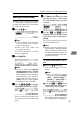
To recall shared folders using a
title
A Press the {
{{
{./*}
}}
} (Title) key.
List of titles appears on the
screen.
Note
❒ Titles are displayed accord-
ing to the settings in [Configu-
ration] → [Basic Settings] →
[Scanner] → [Select Title] on
the Web Status Monitor.
B Use the {
{{
{1
11
1}
}}
} or {
{{
{0
00
0}
}}
} key to
highlight the title you want to
select, and then press [OK].
The shared folders assigned to
the selected title are displayed.