
Specifications

START-UP Photomicrography with
Carl Zeiss Photo reticles 35 mm SLR cameras
2-4 B 40-046 e 03/99
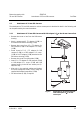
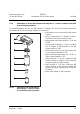
2.2.2 Insertion of MC 2.5
× Photo Reticles in the Eyepiece
A focusing eyepiece with photo reticle must be
used if focusing is not to be performed through
the viewfinder of the SLR camera.
The MC 2.5
× photo reticles are inserted into the
eyepieces 10
× foc. of the relevant microscope.
The photo reticles (2-2/1) from Carl Zeiss have
been adhered to screw-in mounts (2-2/2) to allow
easy replacement.
To insert the photo reticles, just unscrew the
empty reticle mount and replace it with a new
mount (2-2/2) containing the required photo
reticle (2-2/1).
The slight image shift caused by the additional
path through the glass is taken into account on
the diopter scale by the fact that the zero point
position is indicated not by the white dot W (2-
2/W) but by the red dot (2-2/R).
For focusing eyepieces without photo reticle ⇒ set diopter zero position to the white dot (2-2/W), and
for focusing eyepieces with photo reticle ⇒ set diopter zero position to the red dot (2-2/R).
☞
If photo reticles are inserted into the unscrewed mount by the customer, attention must be
paid to the labeling being visible the right way up after insertion.
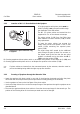
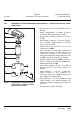
2.2.3 Focusing of Eyepieces through the Binocular Tube
• Insert the eyepiece with photo reticle in one side of the binocular phototube and align the photo
reticle with the microscope camera (microscope camera normally pointing to the observer).
• Use the eyepiece to focus on the line figure of the photo reticle.
• Use the focusing drive to focus on the microscope image of the specimen through the eyepiece set as
described above.
• Then use the eyepiece without photo reticle to focus the microscope image for the second eye. The
position of the focusing drive on the microscope stand must not be changed.
0
Fig. 2-2 Attachment of photo reticle MC 2.5
×
in eyepiece