OPERATOR’S MANUAL 18 VOLT/24 VOLT MaxSelect™ 6-1/2 in. CIRCULAR SAW R885 0 50 5 NEW LITHIUM-ION BATTERY PACKS MUST BE CHARGED BEFORE FIRST USE BATTERIES AND CHARGERS SOLD SEPARATELY Your circular saw has been engineered and manufactured to our high standards for dependability, ease of operation, and operator safety. When properly cared for, it will give you years of rugged, trouble-free performance.
TABLE OF CONTENTS Introduction .......................................................................................................................................................................2 General Safety Rules ..................................................................................................................................................... 3-4 Specific Safety Rules .............................................................................................................
GENERAL SAFETY RULES Use safety equipment. Always wear eye protection. Safety equipment such as dust mask, non-skid safety shoes, hard hat, or hearing protection used for appropriate conditions will reduce personal injuries. Avoid accidental starting. Ensure the switch is in the off-position before plugging in. Carrying power tools with your finger on the switch or plugging in power tools that have the switch on invites accidents. Remove any adjusting key or wrench before turning the power tool on.
GENERAL SAFETY RULES Use the power tool, accessories and tool bits etc., in accordance with these instructions and in the manner intended for the particular type of power tool, taking into account the working conditions and the work to be performed. Use of the power tool for operations different from those intended could result in a hazardous situation. connection from one terminal to another. Shorting the battery terminals together may cause burns or a fire.
SPECIFIC SAFETY RULES � When blade is binding, or when interrupting a cut for any reason, release the trigger and hold the saw motionless in the material until the blade comes to a complete stop. Never attempt to remove the saw from the work or pull the saw backward while the blade is in motion, or kickback may occur. Investigate and take corrective actions to eliminate the cause of blade binding.
SAFETY RULES FOR CHARGER Do not let gasoline, oils, petroleum-based products, etc. come in contact with plastic parts. They contain chemicals that can damage, weaken, or destroy plastic. An extension cord should not be used unless absolutely necessary. Use of improper extension cord could result in a risk of fire and electric shock. If extension cord must be used, make sure: a. That pins on plug of extension cord are the same number, size and shape as those of plug on charger. b.
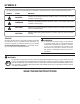
SYMBOLS Some of the following symbols may be used on this tool. Please study them and learn their meaning. Proper interpretation of these symbols will allow you to operate the tool better and safer.
SYMBOLS The following signal words and meanings are intended to explain the levels of risk associated with this product. SYMBOL SIGNAL MEANING DANGER: Indicates an imminently hazardous situation, which, if not avoided, will result in death or serious injury. WARNING: Indicates a potentially hazardous situation, which, if not avoided, could result in death or serious injury. CAUTION Indicates a potentially hazardous situation, which, if not avoided, may result in minor or moderate injury.
FEATURES 24V LITHIUM-ION BATTERY PACK No Load Speed ..................................... 3,900 r/min. (RPM) Motor .................................................................. 24 Volt DC 18V NICKEL-CADMIUM BATTERY PACK No Load Speed ..................................... 3,200 r/min. (RPM) Motor .................................................................. 18 Volt DC PRODUCT SPECIFICATIONS Blade Diameter .......................................................6-1/2 in. Blade Arbor ................
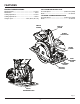
FEATURES KNOW YOUR CIRCULAR SAW 50° ADJUSTMENT BUTTON See Figure 1. The safe use of this product requires an understanding of the information on the tool and in this operator’s manual as well as a knowledge of the project you are attempting. Before use of this product, familiarize yourself with all operating features and safety rules. The 50° adjustment button provides more flexibility while cutting by allowing an extra 5° to the bevel adjustment lever.
ASSEMBLY ATTACHING THE BLADE See Figure 2. SPINDLE LOCK BUTTON INNER BLADE WASHER WARNING: A 6-1/2 in. blade is the maximum blade capacity of the saw. Never use a blade that is too thick to allow outer blade washer to engage with the flats on the spindle. Larger blades will come in contact with the blade guard, while thicker blades will prevent blade screw from securing blade on spindle. Either of these situations could result in a serious accident. 0 50 5 Remove the battery pack from the saw.
OPERATION THE FOLLOWING INSTRUCTIONS ARE FOR RIDGID 24V LITHIUM-ION BATTERY PACKS AND THE 24V RIDGID LITHIUM-ION CHARGER. WARNING: Do not allow familiarity with tools to make you careless. Remember that a careless fraction of a second is sufficient to inflict severe injury. CHARGING THE BATTERY PACK NOTE: New 24 Volt lithium-ion battery packs will not work without first being charged. Before first time use, charge the battery pack to activate it.
OPERATION FULL CAPACITY TO CHARGE A fully discharged battery pack with a temperature between 32°F (0°C) and 150°F (65°C) will charge in about an hour. Charge the 24 Volt lithium-ion battery pack only with the charger provided. � Connect the charger to a power supply. NOTE: If needed, the charger can operate with most generators and inverters rated at 300 Watts or higher.
OPERATION LED FUNCTION OF RIDGID 24V LITHIUM-ION CHARGER See Figure 6. LED INDICATOR BATTERY PACK RED LED GREEN LED ACTION Charging Fast charging ON OFF Charges in 1 hour Charging Deeply Discharged ON OFF Charger pre-charges battery until normal voltage is reached, then begins fast charge mode. May take longer than 1 hour to fully charge.
OPERATION LED FUNCTION OF RIDGID NICKEL-CADMIUM CHARGERS See Figure 7. LED INDICATOR BATTERY PACK RED LED GREEN LED ACTION Power Without battery pack ON OFF Ready to charge battery pack Evaluate Hot battery pack Flashing OFF When battery pack reaches cooled temperature, charger begins fast charge mode. Evaluate Cold battery pack Flashing OFF When battery pack reaches warmed temperature, charger begins fast charge mode.
OPERATION TO INSTALL BATTERY PACK 24V LITHIUM-ION BATTERY PACK See Figure 8. Place the battery pack in the saw. Align the raised rib inside the saw with the groove on the battery pack. TO INSTALL TO REMOVE Make sure the latches on each side of the battery pack snap in place and the battery pack is secured in the saw before beginning operation. CAUTION: When placing battery pack in the tool, be sure raised rib on battery pack aligns with the groove inside the tool and latches into place properly.
OPERATION KICKBACK - BLADE SET TOO DEEP KICKBACK See Figures 10 - 13. Kickback occurs when the blade stalls rapidly and the saw is driven back towards you. Blade stalling is caused by any action which pinches the blade in the wood. WARNING: To avoid kickback, release switch trigger immediately if blade binds or saw stalls. Kickback could cause you to lose control of the saw. Loss of control can lead to serious injury. Fig.
OPERATION LOCK-OFF BUTTON LOCK-OFF BUTTON See Figure 14 The lock-off button reduces the possibility of accidental starting. The lock-off button is located on the handle above the switch trigger. The lock-off button must be depressed before you pull the switch trigger. NOTE: You can depress the lock-off button from either the left or right side. STARTING/STOPPING THE SAW See Figure 14 To start the saw: Depress the lock-off button. Depress the switch trigger.
OPERATION OPERATING THE SAW See Figures 17 - 18. It is important to understand the correct method for operating the saw. Refer to the figures in this section to learn the correct and incorrect ways for handling the saw. DANGER: 0 50 5 When lifting the saw from the workpiece, the blade is exposed on the underside of the saw until the lower blade guard closes. Make sure the lower blade guard is closed before setting the saw down.
OPERATION CROSS CUTTING/RIP CUTTING TOP VIEW OF SAW See Figures 19 - 20. When making a cross cut or rip cut, align your line of cut with the outer blade guide notch on the saw base. FRONT OF SAW Since blade thicknesses vary, always make a trial cut in scrap material along a guideline to determine how much, if any, the guideline must be offset to produce an accurate cut. NOTE: The distance from the line of cut to the guideline is the amount you should offset the guide. Secure the workpiece.
OPERATION WIDTH OF CUT SCALE See Figure 22. A width of cut scale has been provided on the base of the saw. When making straight cross cuts or rip cuts, the scale can be used to measure up to five inches to the left side of the blade. It can be used to measure up to one inch to the right side of the blade. BASE ASSEMBLY 50° ADJUSTMENT BUTTON WIDTH OF CUT SCALE 0 BEVEL CUTTING 50 5 See Figures 23 - 24. The angle of cut of the saw may be adjusted to any desired setting between zero and 50°.
OPERATION HEX KEY WARNING: BLADE Attempting bevel cut without lever securely tightened can result in serious injury. ADJUSTMENT SCREW 0° BEVEL STOP See Figure 25. The saw has a 0° bevel stop that has been factory adjusted to assure 0° angle of the saw blade when making 90° cuts. To check: Remove the battery pack from the saw. CARPENTER’S SQUARE 0 Place the saw in an upside down position on a workbench.
MAINTENANCE GENERAL MAINTENANCE WARNING: Avoid using solvents when cleaning plastic parts. Most plastics are susceptible to damage from various types of commercial solvents and may be damaged by their use. Use clean cloths to remove dirt, dust, oil, grease, etc. When servicing use only identical RIDGID replacement parts. Use of any other parts may create a hazard or cause product damage. WARNING: WARNING: Do not at any time let brake fluids, gasoline, petroleum-based products, penetrating oils, etc.
ACCESSORIES Look for these accessories where you purchased this product: WARNING: �� Edge Guide*.....................................Part no. 631697001 Current attachments and accessories available for use with this tool are listed above. Do not use any attachments or accessories not recommended by the manufacturer of this tool. The use of attachments or accessories not recommended can result in serious personal injury. �* Available through customer service only. Call 1-866-539-1710 to order.
WARRANTY RIDGID® HAND HELD AND STATIONARY POWER TOOL 3 YEAR LIMITED SERVICE WARRANTY WHAT IS NOT COVERED Proof of purchase must be presented when requesting warranty service. This warranty applies only to the original purchaser at retail and may not be transferred.
OPERATOR’S MANUAL 18 VOLT/24 VOLT MaxSelect™ 6-1/2 in. CIRCULAR SAW R885 Customer Service Information: For parts or service, contact your nearest RIDGID authorized service center. Be sure to provide all relevant information when you call or visit. For the location of the authorized service center nearest you, please call 1-866-539-1710 or visit us online at www.ridgid.com. The model number of this tool is found on a plate attached to the motor housing.