
Technical data

--- 25 ---
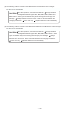
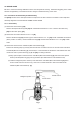
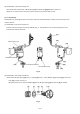
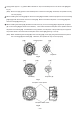
(b) Screw the Nut [5] in the Front Case [10] (see Fig. 4).
Align the mark (i) on the Nut [5] with the mark on the Front Case [10] then screw it in. Rotate the Nut [5]
about a turn clockwise to align the mark (i) on the Nut [5] with the mark on the Front Case [10].
At this time, check that the "Y" surface of the Nut [5] is almost flush with the "Z" surface of the Front Case
[10]. After above step, tighten the Nut [5] so that the Nut [5] pushes the Stopper [8] into the Front Case
[10].
Fig. 4
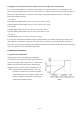
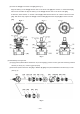
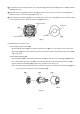
(3) Reassembly of the gear unit
(a) Apply grease (Hitachi Motor Grease No. 29) to the engaging portions of each gear and contacting surfaces
with the pin set (6 pcs.) of the ring gear properly.
(b) Mount the parts from the Pin Set [12] to Washer (B) [27] to the part assembled in the above (2) in order
(see Fig. 5).
Fig. 5
[14] [15]
[16]
[17]
[18]
[20] [21]
[27]
[10]
[13]
[12]
[25]
[26]
[24]
[22] [23]