
Warranty


9 — English
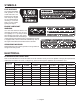
ELECTRICAL
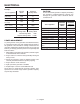
Example:
Tool or Appliance
Running
Watts*
Additional
Starting Watts*
Quartz Work Light
(1000 Watt)
1000 0
Reciprocating Saw
960 960
Drill (1/2 inch,
5.4 amps)
600 900
Circular Saw (Heavy
Duty, 7-1/4 in.)
1400 2300
Demolition hammer
600 1200
4560 Total
Running Watts
2300 Highest
Starting Watts
Total Running Watts 4560
Highest Starting Watts + 2300
Total Starting Watts Needed 6860
POWER MANAGEMENT
To prolong the life of the generator and attached devices,
it is important to take care when adding electrical loads to
the generator. There should be nothing connected to the
generator outlets before starting its engine. The correct and
safe way to manage generator power is to sequentially add
loads as follows:
1. With nothing connected to the generator, start the engine
as described later in this manual.
2. Plug in and turn on the first load, preferably the largest
load you have.
3. Permit the generator output to stabilize (engine runs
smoothly and attached device operates properly).
4. Plug in and turn on the next load.
5. Again, permit the generator to stabilize.
6. Repeat steps 4 and 5 for each additional load.
Never add more loads than the generator capacity. Take
special care to consider surge loads in generator capacity
as previously described.
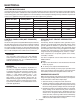
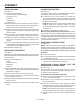
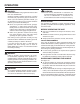
Tool or Appliance
Estimated*
Running
Watts
Estimated*
Additional
Starting Watts
DIY/Job Site
Quartz Halogen Work Light 1000 0
Airless Sprayer − 1/3 HP 600 +1200
Reciprocating Saw 960 +960
Electric Drill − 1/2 HP 600 +900
Circular Saw − 7-1/4 in. 1400 +2300
Miter Saw − 10 in. 1800 +1800
Planer/Jointer − 6 in. 1800 +1800
Table Saw/Radial Arm Saw −
10 in.
2000 +2000
Air Compressor − 1 HP 1600 +4500
*Wattages listed are approximate. Check tool or equipment for actual wattage.
CAUTION:
Do not overload the generator’s capacity. Exceeding
the generator’s wattage/amperage capacity can
damage the generator and/or electrical devices
connected to it.