
Specifications


35
Auxiliary Fence
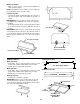
Making the base:
• Start with a piece of 3/8 inch plywood at least 5-1/2
inches wide or wider and 30 inches long or longer.
• Cut the piece to shape and size shown:
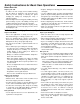
Making the side:
• Start with a piece of 3/4 inch plywood at least 2-3/8
inches wide or wider and 27 inches long or longer.
• Cut the piece to shape and size shown:
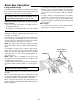
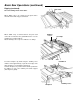
Putting it together:
• Put the pieces together, as shown:
IMPORTANT: Make sure the screw heads do not stick
out from the bottom of the base, they must be flush or
recessed. The bottom must be flat and smooth enough to
rest on the saw table without rocking.
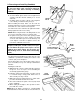
Cutting Out the Base
Cutting Out the Side
Finished Auxiliary Fence
3/8" Thick Plywood Base
30"
2-5/8"
5-1/2"
3-1/2"
3/4" Thick Plywood Side
27"
3/4" Plywood
3/8"
4-3/4"
This Face and
This Edge Must
Be Parallel
1-1/4"
Plywood
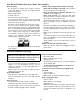
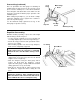
Making the handle:
• Miter crosscut a piece of 3/4 inch thick plywood to
shape and size shown:
NOTE: The mitered corners can be any size that looks
like the drawing (about 1-1/2" by 1-1/2").
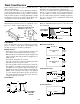
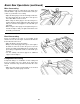
Putting it Together
• Using good quality woodworking glue, glue the 3/8" x
3/8" x 2-1/2" piece strip saved earlier to the base as
shown.
IMPORTANT: Do not use nails or screws. This is to pre-
vent dulling of the sawblade in the event you cut into the
push block.
• Position the handle at the center of the plywood base
as shown. Fasten them together with glue and wood
screws.
IMPORTANT: Make sure the screw heads do not stick
out from the bottom of the base, they must be flush or
recessed. The bottom must be flat and smooth enough to
slide along the auxiliary fence you are now ready to
make.
Glue Only
Screw Head Must Be
Flush Or Recessed
3/8" Plywood Base
3/4" Plywood Handle
Finished Push Block