SP6480-5ES 8/24/06 10:28 AM Page 1 OWNERS MANUAL WD0625/WD0945 6 U.S. GALLONS/ 22.5 LITRES OR 9 U.S. GALLONS/ 34.0 LITRES WET/DRY VAC For Your Safety: Read all instructions carefully Save this manual for future reference FOR QUESTIONS OR INFORMATION CONTACT US AT 1-800-4-RIDGID (1-800-474-3443) OR www.ridgidvacs.com MAXIMIZE VACUUM MAXIMIZE VACUUM PERFORMANCE PERFORMANCE WITH A WITH A NEW NEW FILTER FILTER $500rd Gift Ca es Sweepstak Part No. SP6480 Logon to . . . www.ridgidvacs.
SP6480-5ES 8/24/06 10:28 AM Page 2 Table of Contents Section Page Section Page Cord Maintenance . . . . . . . . . . . . . . . 9 Moving the Wet/Dry Vac . . . . . . . . . . . 9 Blowing Feature . . . . . . . . . . . . . . . . . 9 Maintenance . . . . . . . . . . . . . . . . . . . . . 9 Filter . . . . . . . . . . . . . . . . . . . . . . . . . . 9 Filter Cleaning . . . . . . . . . . . . . . . . . . 9 Filter Removal . . . . . . . . . . . . . . . . . 10 Cleaning a Dry Filter . . . . . . . . . . . .
SP6480-5ES 8/24/06 10:28 AM Page 3 • To reduce the risk of health hazards from vapors or dust, do not vacuum toxic materials. • Do not use or store near hazardous materials. • To reduce the risk of electric shock, do not expose to rain. Store indoors. • Do not allow to be used as a toy. Close attention is necessary when used by or near children. • Do not use with a torn filter or without the filter installed except when vacuuming liquids as described in the operation section of this manual.
SP6480-5ES 8/24/06 10:28 AM Page 4 Observe the following warnings that appear on the motor housing of your Vac: WARNING: For your own safety, read and understand owner’s manual. Do not run unattended. Do not pick up hot ashes, coals, toxic, flammable or other hazardous materials. Do not use around explosive liquids or vapors. DOUBLE INSULATED GROUNDING NOT REQUIRED. WHEN SERVICING USE ONLY IDENTICAL REPLACEMENT PARTS.
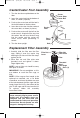
SP6480-5ES 8/24/06 10:28 AM Page 5 Caster/Caster Foot Assembly 1. Turn the dust drum upside down on the floor. Caster Caster Stem Caster Ball 2. Insert the caster feet into the bottom of drum, as shown (4 places). Pin 3. Push on the caster foot until the foot is flush with bottom of the dust drum. 4. Insert the caster stem into the socket of the caster foot, as shown (4 places). Caster Foot 5. Push on the caster until the ball on the caster stem is inserted all the way into the socket.
SP6480-5ES 8/24/06 10:28 AM Page 6 Replacement Filter Assembly (continued) 1. Place the float over the opening in the center of the lid with the words "This Side Towards Lid" laying face down over the hole. Filter Cage Tabs (3) WARNING: To avoid personal injury or damage to vac be sure to keep hands, fingers, or any other foreign objects out of the center opening when assembling the float . Float Solid End Filter Cage Tabs (3) Slots (3) Power Assembly THIS SIDE TOWARD LID 2.
SP6480-5ES 8/24/06 10:28 AM Page 7 NOTE: The swivel end of the hose is removable if more hoses need to be attached for more length from the vac. To remove the swivel portion of the hose, grasp the hose swivel and firmly pull it out of the flexible hose. Connect the soft end of a second hose (accessory #VT-2507) into the swivel end of the original hose by forcing the sections together until they fit tightly. You can also connect two hoses together by purchasing VT2511 (Hose to Hose connector).
SP6480-5ES 8/24/06 10:28 AM Page 8 Operation (continued) does not fit fully in the outlet, reverse the plug. If it still does not fit, contact a qualified electrician to install the proper outlet. Do not change the plug in any way. NOTE: A dry filter is necessary to pick up dry material. If you use your vac to pick up material when the filter is wet, the filter will clog quickly and be very difficult to clean.
SP6480-5ES 8/24/06 10:28 AM Page 9 3. Lay top assembly upside down on a clean area while emptying drum or changing filter. WARNING: To reduce the risk of injury to bystanders, keep them clear of blowing debris. 4. Dump the drum contents into the proper waste disposal container. WARNING: Wear a dust mask if blowing creates dust which might be inhaled. WARNING: To reduce the risk of back injury or falls, do not lift a vac heavy with liquid or debris.
SP6480-5ES 8/24/06 10:28 AM Page 10 Maintenance (continued) Be sure to dry the filter before storing or picking up dry debris. IMPORTANT: After cleaning, check the filter for tears or small holes. Do not use a filter with holes or tears in it. Even a small hole can cause a lot of dust to come out of your vac. Replace it immediately. Filter Removal To remove the filter for cleaning or replacement, unscrew the filter nut from the filter cage and lift off filter and filter plate.
SP6480-5ES 8/24/06 10:29 AM Page 11 Wet Nozzle (9-Gallon, WD09450 Only) To pick up liquids off a smooth surface, use the 2-1/2 inch wet nozzle accessory supplied with your wet/dry vac. To use this nozzle, simply attach the nozzle to the end of an extension wand. Connect a second extension wand to the first, and connect the 2-1/2 inch x 7 foot hose to the extension wand. Liquids may be picked up by dragging the nozzle across the surface. The squeegee will dry the surface as you vacuum.
SP6480-5ES 8/24/06 10:29 AM Page 12 Repair Parts 6 or 9 U.S. Gallons Wet/Dry Vac Model Number WD06250 or WD09450 RIDGID parts are available on-line at www.ridgidparts.com Always order by Part Number - Not by Key Number WARNING SERVICING OF DOUBLE-INSULATED WET/DRY VAC In a double-insulated Wet/Dry Vac, two systems of insulation are provided instead of grounding. No grounding means is provided on a double-insulated appliance, nor should a means for grounding be added.
SP6480-5ES 8/24/06 10:29 AM Page 13 6 or 9 U.S. Gallons Wet/Dry Vac Model Number WD06250 or WD09450 RIDGID parts are available on-line at www.ridgidparts.
SP6480-5ES 8/24/06 10:29 AM Page 14 What is covered RIDGID® tools are warranted to be free of defects in workmanship and material. How long coverage lasts This warranty lasts for the lifetime of the RIDGID® tool. Warranty coverage ends when the product becomes unusable for reasons other than defects in workmanship or material.
SP6480-5ES 8/24/06 10:29 AM Page 15 MANUAL DEL USUARIO WD0625/WD0945 ASPIRADORA PARA MOJADO/SECO DE 6 GALONES EE.UU./ 22.5 LITROS Ó 9 GALONES EE.UU./ 34.0 LITROS Para su seguridad: Lea detenidamente todas las instrucciones. Guarde este manual para referencia futura. SI TIENE PREGUNTAS O DESEA INFORMACIÓN, CONTÁCTENOS LLAMANDO AL 1-800-4-RIDGID (1-800-474-3443) O CONECTÁNDOSE A www.ridgidvacs.
SP6480-5ES 8/24/06 10:29 AM Page 16 Indice Sección Página Sección Página Vaciado del tambor . . . . . . . . . . . . . . . . . . . . . . 22 Mantenimiento del cordón . . . . . . . . . . . . . . . . 23 Transporte de la aspiradora para mojado/seco . 23 Dispositivo de soplado . . . . . . . . . . . . . . . . . . . 23 Mantenimiento . . . . . . . . . . . . . . . . . . . . . . . . . . . 23 Filtro . . . . . . . . . . . . . . . . . . . . . . . . . . . . . . . . . 23 Limpieza del filtro . . . . . . . . . . . .
SP6480-5ES • • • • • • • • • • • • • 8/24/06 10:29 AM Page 17 “Funcionamiento” de este manual. Los residuos secos absorbidos por el impulsor podrían dañar el motor o ser expulsados de vuelta al aire. No abandone la aspiradora cuando esté enchufada. Desenchúfela del tomacorriente cuando no la esté utilizando y antes de realizar servicio de revisión. Apague la aspiradora antes de desenchufarla.
SP6480-5ES 8/24/06 10:29 AM Page 18 Siga las siguientes advertencias que aparecen en la caja del motor de la aspiradora. ADVERTENCIA: Para su propia seguridad, lea y entienda el manual del usuario. No tenga en marcha la aspiradora desatendida. No recoja cenizas calientes, carbón caliente, materiales tóxicos ni inflamables ni otros materiales peligrosos. No use la aspiradora alrededor de líquidos o vapores explosivos AISLAMIENTO DOBLE. NO SE REQUIERE CONEXION A TIERRA.
SP6480-5ES 8/24/06 10:29 AM Page 19 Ensamblaje de las ruedecillas/patas para ruedecilla 1. Ponga el tambor para polvo en posición invertida sobre el piso. 2. Introduzca las patas para ruedecilla en la parte inferior del tambor, tal como se muestra (4 lugares). 3. Ejerza presión sobre la pata para ruedecilla hasta que la pata esté al ras con la parte inferior del tambor para polvo. 4. Introduzca el vástago de la ruedecilla en el receptáculo de la pata para ruedecilla, tal como se muestra (4 lugares). 5.
SP6480-5ES 8/24/06 10:29 AM Page 20 Ensamblaje del filtro de repuesto (continuación) 1. Coloque el flotador sobre la abertura que está en el centro de la tapa con las palabras “This Side Towards Lid” – Este lado hacia la tapa – orientadas hacia abajo sobre el agujero.
SP6480-5ES 8/24/06 10:29 AM Page 21 NOTA: El extremo giratorio de la manguera es extraíble por si fuera necesario conectar más mangueras para disponer de más longitud desde la aspiradora. Para quitar la parte giratoria de la manguera, agarre dicha parte giratoria y tire firmemente de ella hacia fuera de la manguera flexible. Conecte el extremo blando de una segunda manguera (accesorio No.
SP6480-5ES 8/24/06 10:29 AM Page 22 Funcionamiento (continuación) póngase en contacto con un electricista competente para instalar el tomacorriente adecuado. No haga ningún tipo de cambio en el enchufe. Después de enchufar el cordón de energía en el tomacorriente, encienda la unidad empujando el interruptor de la posición “O” a la posición “|”. Los símbolos utilizados en el accionador del interruptor son los símbolos internacionales de “encendido y apagado”.
SP6480-5ES 8/24/06 10:29 AM Page 23 4. Vierta el contenido del tambor en el recipiente adecuado de eliminación de residuos. ADVERTENCIA: Use una máscara antipolvo si el soplado genera polvo que podría ser inhalado. ADVERTENCIA: Para reducir el riesgo de que se produzcan lesiones en la espalda o caídas, no levante la aspiradora si pesa demasiado debido a que contiene líquido o residuos.
SP6480-5ES 8/24/06 10:29 AM Page 24 Mantenimiento (continuación) IMPORTANTE: Después de limpiar el filtro, compruebe si éste tiene desgarraduras o agujeros pequeños. No use un filtro que tenga agujeros o desgarraduras. Incluso un agujero pequeño puede hacer que se salga mucho polvo de la aspiradora. Cámbielo inmediatamente. Instalación Consulte la página 19, “Ensamblaje del filtro de repuesto”. Deje que el filtro se seque antes de volver a instalarlo y de guardar la aspiradora.
SP6480-5ES 8/24/06 10:29 AM Page 25 Boquilla para mojado (modelo de 9 galones WD09450 solamente) 2. Utilizando las dos manos, baje el cuerpo de la boquilla sobre el accesorio de inserción y la barredora de goma con la abertura redonda de la boquilla lo más cerca posible de usted.
SP6480-5ES 8/24/06 10:29 AM Page 26 Piezas de repuesto Aspiradora para mojado/seco de 6 ó 9 galones EE.UU. Números de modelo WD06250 y WD09450 Las piezas RIDGID se encuentran disponibles en línea conectándose a www.ridgidparts.
SP6480-5ES 8/24/06 10:29 AM Page 27 Aspiradora para mojado/seco de 6 ó 9 galones EE.UU. Números de modelo WD06250 y WD09450 Las piezas RIDGID se encuentran disponibles en línea conectándose a www.ridgidparts.
SP6480-5ES 8/24/06 10:29 AM Page 28 Qué está cubierto Se garantiza que las herramientas RIDGID® están libres de defectos de fabricación y de materiales. Cuánto dura la cobertura Esta garantía dura toda la vida de la herramienta RIDGID®. La cobertura de garantía termina cuando el producto se vuelva inutilizable por motivos que no sean defectos de fabricación o de materiales.