
User`s manual


INSTALLATION AND USE
This chapter describes the operations to be carried out to prepare the UPS.
WARNING: the instructions below should be followed scrupulously for your personal safety and that of the
product.
BEFORE CARRYING OUT THE FOLLOWING SEQUENCE OF
OPERATIONS, MAKE SURE THAT THE UPS IS COMPLETELY SWITCHED
OFF AND IS NOT CONNECTED TO THE MAINS OR TO ANY LOAD.
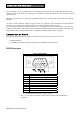
CONNECTIONS AND SWITCHING ON FOR THE FIRST TIME
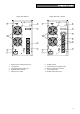
1) Connect the power cable supplied with the UPS to the IEC input socket.
2) Connect the UPS power cable to mains power supply.
3) After a few seconds the UPS starts up, a beep sounds and the “Fault/Stand-by” indicator lights up. The
UPS is in stand-by mode on minimum power. The microprocessor is powered and will supervise
operations and run diagnostics. The batteries are being charged, the sockets are disconnected and
everything is ready to go.
4) Connect the load/s to be powered to the sockets on the rear of the UPS using the IEC-IEC cables supplied
or a cable with maximum length of 10 meters.
N.B.: do not connect any loads that absorb more than 10A to the 10A IEC sockets. These loads should
be connected exclusively to the 16A IEC socket when this is available.
Connection to the Net/Tel protection device
A telephone/modem or network cable can be connected to the modular RJ-45/RJ11 connectors located on
the rear of the UPS that protect against overvoltages. A telephone extension cable is required for this type of
connection.
N.B.: The connection is optional. The Net/Tel protection is active even when the UPS is turned off or
disconnected from mains power.
Warning: The device that protects against overvoltage on the telephone line may not work if it is not
installed correctly. Ensure that the telephone wall cable is inserted in the connector marked “IN” and
that the cable of the unit to be protected (telephone, modem, network card, etc.) is inserted in the
connector marked “OUT”.
Warning: The overvoltage protection device is only for indoor use. Do not connect telephone wires
during a storm.
N.B.: The protection device limits the effects of an overvoltage but does not guarantee overall protection.
SWITCHING ON FROM MAINS POWER
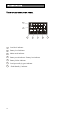
1) Press the ON button for at least one second (until a beep sounds). Once it is released, all the LEDs come
on for 1 second and a beep sounds. The UPS then runs a short test on the battery voltage and mains power
status. In normal conditions, after this test, only the “mains” LED, load level and battery level indicators
stay lit (if different lights or audio signals appear/occur, consult the table in the “Alarms and Indicator”
Chapter for further details).
2) Switch on the loads connected to the UPS.
Only for the first time you switch on: after about 30 sec., check that the UPS is working correctly by:
1. Simulating a black-out by removing the mains power cable
2. The load must continue to receive power, the “battery mode” indicator should light up and the
UPS should beep every 4 seconds.
3. Reconnect the power cable. Normal mains power operation should be restored.